Angler RLB18LED User manual

INSTRUCTIONS
Bi-Color Ringlight (18 in.)
RLB18LED

2
Thank you for choosing Angler.
Angler’s 18-inch bi-color Ringlight is ideal for photographers and
videographers who need a warm, diuse and near-shadowless light with
a wide beam spread to illuminate their subjects. The 18-inch Ringlight
is also perfect for personal and professional makeup and cosmetics
applications, and for lighting selfies and vlogs. It runs on AC power or
two NP-F batteries, so it can light your projects at home or on location.
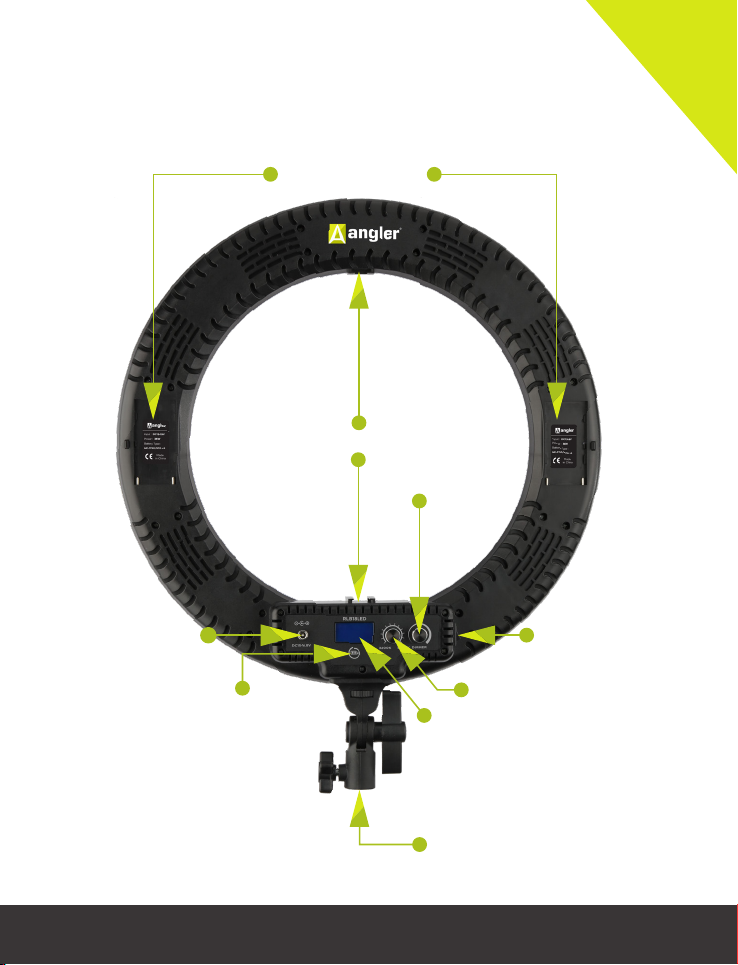
To match the lighting of any environment, the variable color
temperature adjusts from the warmth of a tungsten bulb at 3200 K,
to bright daylight at 5600 K, and everything in between. The dimmer
adjusts from 0% to 100% to dial in the perfect brightness. And the
Ringlight furnishes a spectacular catchlight that will make subjects’ eyes
appear alive and bright.
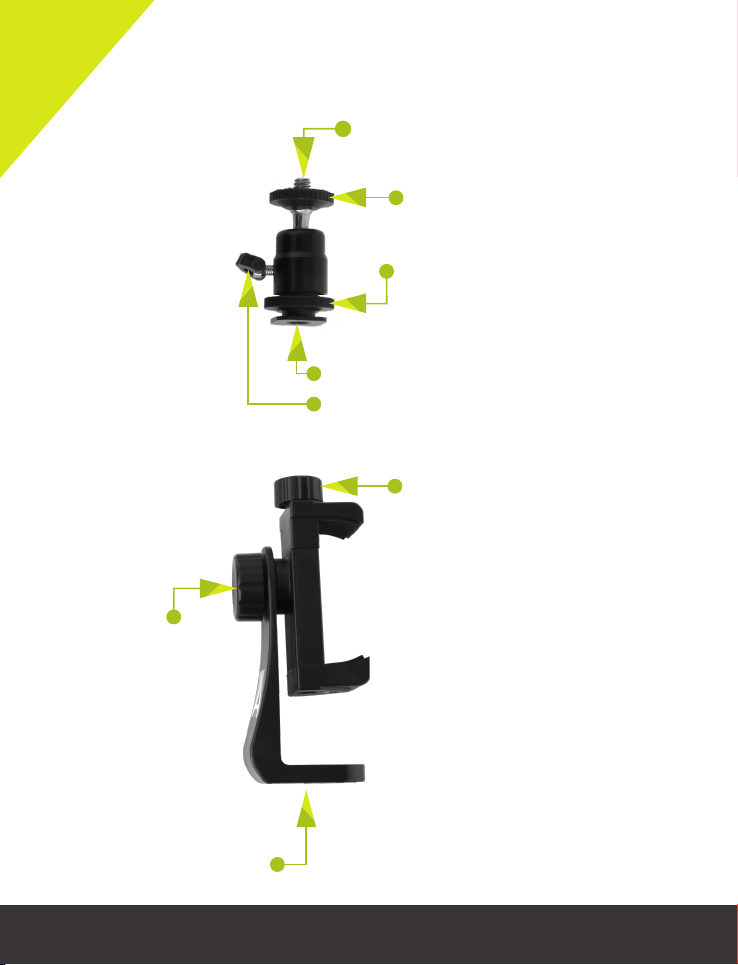
A mirror attachment is included for personal and professional cosmetics
and to check makeup when in front of the light while shooting a selfie.
It sits in the center of the ring, so you’re illuminated in beautiful
wraparound light. A mini ballhead and smartphone bracket are included
to attach a camera or smartphone to the center of the ring.

3
Precautions
Please read and follow these instructions, and keep this manual in a
safe place.
Keep this unit away from water and any flammable gases or liquids.
Do not leave the device in a closed vehicle under the sun or in other
areas subject to very high temperatures.
Do not attempt to disassemble or repair the equipment. There are
high-voltage components inside the unit. Failure to observe this
precaution could result in electric shock or product malfunction.
This will void the warranty, and Angler will not be responsible for
any damage.
Use only the correct, recommended voltage.
Make sure the unit is powered o when plugging it into a power
source.
Disconnect the power cord when not in use.
Do not stare directly at the lights when they are powered on.
Use only parts provided by the manufacturer.
Handle the unit with care.
Clean the unit with a soft, dry cloth.
Keep this unit away from children.
Make sure the item is intact and that there are no missing parts.
All images are for illustrative purposes only.

4
Overview
Mounting Handle
LED array
under
diuser
1/4-20 screw
Tilt lock
Locking wheel
Locking knob
1/4-20 socket

5
NP-F battery slots
Power input Power switch
Shoe mounts
Dimmer
Battery check
button
5/8 in. receiver
LCD screen
Color temperature knob

6
Shoe mount
Ball tension screw
Locking wheel
Shoe lock
1/4-20 mounting bolt
Mini Ballhead
Smartphone Bracket
1/4-20 socket
Tilt
lock
Adjustment
clamp

7
Mirror
Also Included:
AC power cord
AC power adapter and cord
Travel case
Shoe mount
Locking
wheel

8
1
1
Mounting the Ringlight
Light Stand
1. To mount the Ringlight on a light
stand, loosen the mounting handle’s
locking knob, and place the receiver
over the light stand’s 5/8-inch pin.
2. Make sure the receiver fits complete-
ly around the pin before you tighten
the locking knob. If it doesn’t, contin-
ue to loosen the locking knob until the
fixture drops down around the pin.
3. Tighten the locking knob until the
Ringlight is secure.
Tripod
The Ringlight is compatible with tripods
that have a 1/4-20 threaded mounting
bolt. To mount the Ringlight directly onto
a tripod:
1. Remove the mounting handle by
loosening the locking wheel until the
handle comes o.
2. Screw the Ringlight onto the tripod’s
1/4-20 mounting bolt until snug.

9
Powering On the Light
AC Power
When operating on AC power, first remove the batteries.
1.
Plug the power adapter into the light, and plug the power cord into
an available outlet.
2. Move the power switch to ON.
Battery Power
When operating on battery power, unplug the power adapter from the
AC outlet and from the light.
1.
Place an NP-F battery into each of the
battery plates, and slide them toward
the contacts until they lock in place.
2. Move the power switch to ON.
Press and hold the battery check button to
see the remaining charge in your batteries.
Pro tip: For uninterrupted operation, pack
a few extra batteries in your gear bag.
1

10
Adjusting the Color Temperature and Brightness
Color Temperature
Turn the color temperature knob to adjust the
color temperature from 3200 K (tungsten
balance) to 5600 K (daylight balance).
Brightness
Turn the dimmer knob to adjust the output level
from 0% to 100% in 1% increments.

11
Using the Ringlight with a Camera
Attaching a camera in the center of
the Ringlight is an ideal way to shoot
cosmetics and fashion.
To mount a camera to the Ringlight,
follow these steps:
1. Loosen the mini ballhead’s locking
wheel by turning it counterclockwise.
2. Screw the mini ballhead into the
threaded mounting socket on the
camera, and tighten the locking wheel
by turning it clockwise until snug.
3. Loosen the shoe lock by turning it
counterclockwise.
4. Slide the shoe mount and camera into
either of the Ringlight’s mounting
shoes. Then turn the shoe lock
clockwise until the mini ballhead is
held firmly in place.
5. Adjust the camera angle by loosening
the ball tension screw and aiming the camera.
Important! Always support the camera with one hand when
loosening the ball tension screw.
4
2

12
6
7
2
Using the Ringlight with a Smartphone
1. Loosen the mini ballhead’s locking wheel
by turning it counterclockwise .
2. Screw the mini ballhead into the
threaded mounting socket on the
smartphone bracket, and tighten the
locking wheel by turning it clockwise
until snug.
3. Adjust the clamp to the width of your
smartphone.
4. Slide the smartphone into the clamp,
and tighten it until the phone is secure.
5. Loosen the shoe lock by turning it
counterclockwise.
6. Slide the shoe mount and smartphone
bracket into either of the Ringlight’s
mounting shoes. Then turn the shoe
lock clockwise until the mini ballhead is
held firmly in place.
7. Loosen the tilt lock to adjust the
orientation of the smartphone, and
tighten it until secure.

13
3
Using the Mirror
Use the mirror to let your subject check
their hair and makeup in front of the light.
To attach the mirror to the Ringlight,
follow these steps:
1.
Loosen the locking wheel by turning it
counterclockwise.
2. Slide the mirror into either one of the
Ringlight’s shoe mounts.
3. Tighten the locking wheel until secure.
Use one side of the mirror for normal view.
Use the other side for a magnified view.

14
Specifications
LIGHT FIXTURE
LED Chip Type SMD LED
Beam Angle 120°
Color Temperature 3200 to 5600 K
Color Accuracy
Standard
CRI 96.6 (5600 K) / 96.7 (4400 K) / 98.5 (3200 K)
TLCI 95.2 (5600 K) / 97.7 (4400 K) / 98.6 (3200 K)
Cooling System Passive
Dimming Yes, 0% to 100% in 1% increments
Display LED
Housing Material ABS PLASTIC
Light Intensity @
3 ft.
2609 lx (3200 K)
2854 lx (4400 K)
2766 lx (5600 K)
Number of LEDs 240
Expected Lamp Life 50,000 HR.
Circular Panel Size 18 in. (45.7 cm) diameter
Weight 2.5 lb. (1.13 kg) light only
CONNECTORS
Battery Plate NP-F (×2)
Power INPUT
CONNECTOR bARREL

15
Mounting
Fixture Mount 5/8 in. receiver
Mount
1/4-20 threaded socket
Cold-shoe mount (×2)
Smartphone bracket with 1/4-20
threaded socket
POWER
AC Input Power 100 to 240 V AC, 50/60 Hz
DC Input Power 15 to 16.8 V DC
Power Adapter 15 V, 4.0 A DC
Power Source AC adapter, NP-F battery (×2)
Battery Run Time 2.5 HR. with 2x Watson NP-F975 Batteries
Max Power
Consumption 48 W
Smartphone Bracket
Maximum Width 4.0 in.
Minimum Width 2.0 in.

One-Year Limited Warranty
This Angler product is warranted to the original purchaser to be free from defects in
materials and workmanship under normal consumer use for a period of one (1) year from
the original purchase date or thirty (30) days after replacement, whichever occurs later.
The warranty provider’s responsibility with respect to this limited warranty shall be limited
solely to repair or replacement, at the provider’s discretion, of any product that fails
during normal use of this product in its intended manner and in its intended environment.
Inoperability of the product or part(s) shall be determined by the warranty provider. If the
product has been discontinued, the warranty provider reserves the right to replace it with
a model of equivalent quality and function.
This warranty does not cover damage or defect caused by misuse, neglect, accident,
alteration, abuse, improper installation or maintenance. EXCEPT AS PROVIDED
HEREIN, THE WARRANTY PROVIDER MAKES NEITHER ANY EXPRESS
WARRANTIES NOR ANY IMPLIED WARRANTIES, INCLUDING BUT NOT
LIMITED TO ANY IMPLIED WARRANTY OF MERCHANTABILITY OR FITNESS
FOR A PARTICULAR PURPOSE. This warranty provides you with specific legal rights,
and you may also have additional rights that vary from state to state.
To obtain warranty coverage, contact the Angler Customer Service Department to obtain
a return merchandise authorization (“RMA”) number, and return the defective product
to Angler along with the RMA number and proof of purchase. Shipment of the defective
product is at the purchaser’s own risk and expense.
For more information or to arrange service, visit www.anglerlights.com or call Customer
Service at 212-594-2353.
Product warranty provided by the Gradus Group.
www.gradusgroup.com
Angler is a registered trademark of the Gradus Group.
© 2019 Gradus Group LLC. All Rights Reserved.
ANGLER
A Gradus Group
Brand
GG1
Table of contents
Other Angler Lighting Equipment manuals

Angler
Angler COL-1212 User manual

Angler
Angler BI-45W-RL User manual

Angler
Angler Sparta Series User manual

Angler
Angler QO-DP26 User manual

Angler
Angler Circo CI-LR21 User manual

Angler
Angler FastBox Series User manual

Angler
Angler CL-24 User manual

Angler
Angler CatchLight User manual

Angler
Angler CI-LR20 User manual

Angler
Angler Quick-Open Deep Parabolic Softbox V2 User manual
Popular Lighting Equipment manuals by other brands

MENU
MENU Torso manual

WE-EF
WE-EF DOC220 Installation and maintenance instructions

Chroma
Chroma Color Charge user manual

LED World
LED World HH-S2835P-60-24-5M-PINK Important instructions

Home Accents Holiday
Home Accents Holiday 1002 494 377 Assembly instructions

Avlite
Avlite AV-OL-MI Installation & service manual