Thank you for choosing Angler.
Angler’s Quick-Open Deep Parabolic softboxes open in seconds and fold up just
as quickly. The Quick-Open series of softboxes feature integrated locking rods
that lift and lock in place and make setting up fast and eortless. The release
levers for each rod let you fold down the softbox so you’ll be ready to move to
the next setup or location in seconds.
Quick-Open softboxes are 16-sided light shapers that provide a soft yet focused
beam for portrait, product, and fashion photography in the studio or on location.
The deep parabolic shape delivers directional control and reduces light spill.
Precautions
• Please read and follow these instructions, and keep this manual in a safe place.
• When setting up the QO-DP60-V2, use a heavy-duty light stand and a
weight bag on the stand’s legs.
• Not for use with tungsten, halogen, or other high-heat light sources.
• Keep this unit away from water and any flammable gas or liquid.
• Handle this unit with care.
• Keep this unit away from children.
• Use parts provided by the manufacturer only.
• Make sure this item is intact and that no parts are missing before use.
• All photos in this manual are for illustrative purposes only.
Setting Up the Softbox
1.
Set the softbox facedown on a flat and
stable surface.
2.
Open the softbox vents so you can securely
grip each rod.
3. QO-DP26-V2, QO-DP36-V2, and
QO-DP-48-V2: Locking opposing rods
will keep even pressure on the fabric.
Use both hands to lift opposing support
rods until they click in place.
QO-DP60-V2: Locking four opposing
rods will make it easier to lift and lock
the remaining rods. Use one hand to
grip a rod, and your other hand to brace
the mount. Lift four opposing rods
until they click in place. Then lock the
remaining rods.
4.
Once all the rods are locked in place,
insert the Bowens speed ring into the
Bowens mount of your monolight, and
rotate until it locks.
5.
Rotate the softbox to the preferred
orientation. Lock it in place by tightening
the thumbscrew.
6. Close the vents to prevent light leaks.
3
4
2
5
Using the Diusers
The inner and outer diusers soften and spread the beam for an even and flattering
wraparound light.
Note: Each diuser will reduce the light output by approx. 1 stop.
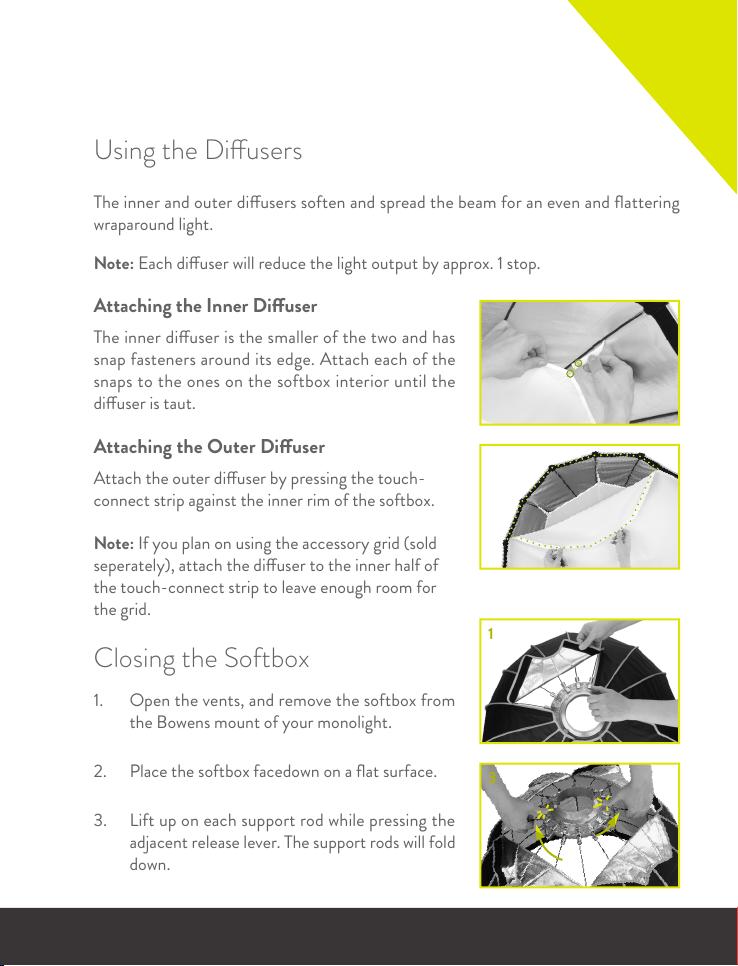
Attaching the Inner Diuser
The inner diuser is the smaller of the two and has
snap fasteners around its edge. Attach each of the
snaps to the ones on the softbox interior until the
diuser is taut.
Attaching the Outer Diuser
Attach the outer diuser by pressing the touch-
connect strip against the inner rim of the softbox.
Note: If you plan on using the accessory grid (sold
seperately), attach the diuser to the inner half of
the touch-connect strip to leave enough room for
the grid.
Closing the Softbox
1.
Open the vents, and remove the softbox from
the Bowens mount of your monolight.
2. Place the softbox facedown on a flat surface.
3.
Lift up on each support rod while pressing the
adjacent release lever. The support rods will fold
down.
3
1
FOLD
FOLD
FOLD
FOLD