Aqua-Marina Motion User manual

INFLATABLE
LEISURE & FISHING BOATS
User’s Guide
Motion BT-88820/88821
WildRiver BT-88822/88823
www.aquamarina.com

Thank You For Choosing Aqua Marina
leisure and fishing boats
You’ll love our inflatable leisure and fishing boats. Every Aqua Marina®inflated boat is easy to
inflate and deflate, without the storage and care concerns of other boats. Choose from a wide
selection of inflatable rafting and fishing boats, each combining rugged, reliable construction with
the comfort and convenience that is synonymous with the Aqua Marina reputation for premium
quality.
This manual has been compiled to help you achieve long term safe use and pleasure from your
Aqua Marina®boats.
GENERAL INFORMATION
SAFETY
In a manual of this type it is impossible to give adequate space to the topic of water safety.
Check in your local area for information and/or training as needed. Inform yourself about local
regulations and dangers related to boating and/or other water activities. It is your responsibility to
be aware of and comply with all relevant safety regulations. For all water recreation or sport you
should have a reasonable swimming ability. Just as swimmers have a cardinal rule about not
swimming alone. It is strongly advised that you should never go boating alone.
PLEASE KEEP THIS MANUAL IN A SECURE PLACE, AND HAND IT OVER TO THE NEW
OWNER WHEN YOU SELL THE CRAFT. RECORD THE "HULL IDENTIFICATION NUMBER"
(HIN) WHICH IS PRINTED ON THE BOAT'S HULL IN THE FOLLOWING BOX:
MANUFACTURER’S CERTIFICATION
Our boats comply with ISO 6185 standard
established by the International Organization
for Standardization.
MANUFACTURER’S RECOMMENDATION
The total number of persons, motor power
andtotal weight shall not exceed the limits
labeled (Fig.1) on the boat.
CN-ORP
Fig.1
2
EN ISO 6185 PART1 TYPE
Ⅱ
DESIGN CATEGORY D
STANDARD EN ISO 6185-1:2018
D
TYPE
Ⅱ
= 2
= 185kg (408lbs)+ +
= 0
BT-88821
BOAT TYPE
DESIGN CATEGORY
BOAT MODEL
CN-ORP
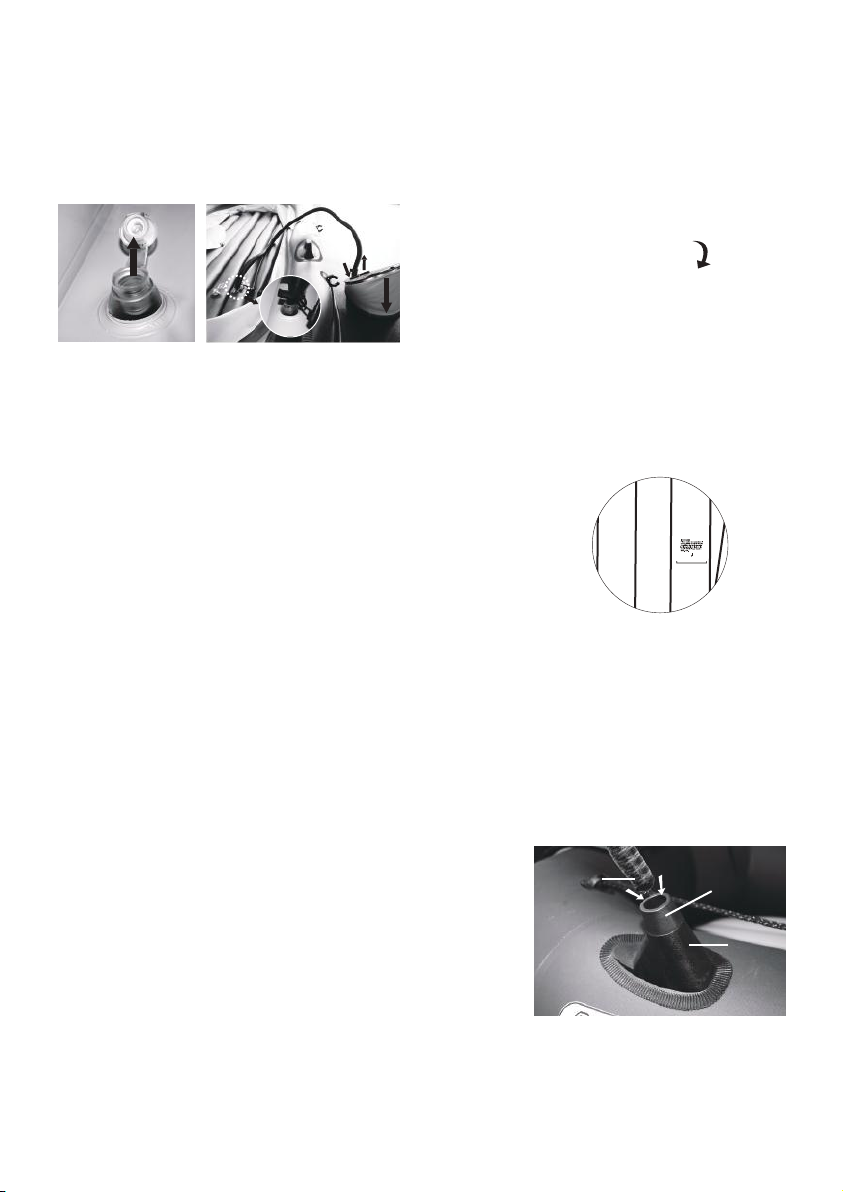
Do not over inflate or use high pressure air compressor to inflate.
Adults should inflate the chambers in numbered sequence.
Use the enclosed ruler to check while inflating.
Ensure even distribution of persons or loads in the boat.
Fill with cold air only.
WARNING:
This is not a life-saving device.
Use only under competent supervision.
Always use an approved life preserver.
Do not use in high wind, rapid currents, open water or dangerous tides.
Be familiar with the area where you intended to use the boat.
Never allow diving into or from this boat.
Never leave in or near the water when not in use.
Follow these rules to avoid drowning, paralysis or other serious injuries.
- Not for use by children without adult supervision.
- Do not overload.
- Not for whitewater use.
- The leakage of battery acid is dangerous.
- Know and follow local water safety rules and boat regulations.
- The weight shall be evenly distributed in the boat.
MADE IN CHINA
= 0.04bar (0.58psi)
= 500W
ORIENTAL RECREATIONAL PRODUCTS
(SHANGHAI) CO.,LTD
NO. 1699 DAYE ROAD, WUQIAO,
FENGXIAN, SHANGHAI, 201402, CHINA
DATE

3
1. As per Directive 2013/53/EU boat design category
Design Category D “SHELTERED WATERS”
Designed for voyages on sheltered coastal waters, small bays, small lakes, rivers and canals
when conditions up to, and including, wind force 4 and significant wave heights up to, and
including, 0,3 m may be experienced, with occasional waves of 0,5 m maximum height, for
example from passing vessels.
2. Country of origin
3. Maximum person’s capacity
4. Manufacturer’s recommended maximum load capacity
5. Manufacturer’s recommended working pressure
6. Hull identification number (HIN)
7. CE mark, manufacturer’s name and address
8. Maximum motor power
SAFETY CHECK LIST & SAFETY WARNING
• Not a life saving device.
• Not for use by children without adult supervision.
• Always wear an approved Personal Flotation Device (Life Preserver).
• Do not overload.
• Never tow from another boat or vehicle.
• Use only in water away from debris and obstructions.
• Do not use in high wind, strong currents, open water or dangerous tides.
• Be familiar with the area you intend to use the boat.
• Never allow diving into or from these boats.
• Never leave in or near water when not in use.
• Know and follow local water safety rules and boating regulations.
• Use only in protected waters.
• Do not use this product under the influence of alcohol or drugs.
• Do not over inflate.
INFLATABLE BOAT SPECS & FEATURES
SPECIFICATIONS
STANDARD EQUIPMENT
Model
BT-88820
BT-88821
BT-88822
BT-88823
Storage bag
1 pc
1 pc
1 pc
1 pc
Aluminum oar
set
1 pair
1 pair
1 pair
1 pair
8” Foot pump
1 pc
1 pc
1 pc
1 pc
Repair patch
1 set
1 set
1 set
1 set
Inflatable Seat
1 pc
1 pc
2 pcs
2 pcs
Electric Motor
T-18
1 pc
1 pc
Boat
Model Category Size Air
pressure
No. of air
chamber
Max
passenger
Max
payload
Max power
allowed
Net weight
(boat)
D2.55x1.25m
(8’6”x4’1”)
0.04bar
(0.58psi) 2+1 2 (or 1+2) 185kg (408lbs) 500W 7.3kg (16.1lbs)
12kg (26.4lbs)
9.5kg (20.9lbs)
12.5kg (27.5lbs)
D2.83x1.52m
(9’3”x4’2”)
0.04bar
(0.58psi) 2+2 2+1 225kg (496lbs) 500W
BT-88820
/88821
BT-88822
/88823

4
DESCRIPTION
NOTE: Drawings for illustration purpose only. Actual product may vary. Not to scale.
SET UP INSTRUCTION
UNFOLD THE BOAT
Choose a smooth and clean surface to spread the boat out
so that the inflatable chambers can fill easily.
BOSTON SCREW VALVE OPERATION
Follow the instructions below for valve operation and correct inflation and deflation procedures.
1. Double valve cap (valve lets air in, not out). (Fig.1)
2. Quick deflation cap. (Fig.2)
3. Unscrew double valve cap. (Fig.3)
4. Insert output end of air pump into valve and fill. (Fig.4)
5. To deflate, unscrew quick-deflation cap. (Fig.5)
CAUTION: Double valve does not operate when this cap is off. Do not unscrew this cap while
boat is in water.
1
4
7
10
2
5
8
11
3
6
9
12
Bow carry handle
Inflatable I-beam floor
Aluminum oar
Boston screw valve
All round grab line
Oar lock
Inflation valve
Fishing rod holder
(for WildRiver only)
Inflatable cushion seat
Oar holder
Electric motor connector
Gear pouch or accessory
bag (for Wildriver only)
Fig.1/2 Fig.3 Fig.4 Fig.5
1
2
1
1
22
3
3
4
4
10
10
88
6
6
12
11
5
5
7
7
99

5
INFLATION VALVE OPERATION
1. Open external cap and pull firmly to extend out. (Fig.1)
2. Attach suitable adapter nozzle to inflation end of pump. Insert pump and start pumping. (Fig.2)
3. When fully inflated, gently twist adapter sleeve to right while backing pump out of valve.(Fig.3)
4. Fully remove adapter and close external stopper. Valve should appear depressed into
itself. (Fig.4)
INFLATION STEPS
1. Inflate the chambers following the numerical sequence marked on the valves. It is very
important to follow the numerical sequence; failure to do so will result in an improper inflated
boat.
2. Inflate the floor until it is stiff to the touch but NOT hard.
3. Inflate the hull. Fill each chamber until it is stiff to the touch but NOT hard.
NOTES:
Air temperature and weather condition do affect the internal air pressure of inflatable products.
In cold weather the product will lose some pressure due to the fact that the air will contract. If
this occurs, you may want to add a little air to the product. However, in hot weather, the air will
expand. You must let some air out to prevent the product from failing due to overpressure.
• Only use Aqua Marina® approved inflation pumps.
• Never use motor-driven high-pressure air pumps as this may result in over-inflation. Fill with
cold air only.
• Under and over-inflation will result in safety hazards.
• Never stand on or rest objects on the boat during inflation.
• Never open the cap of air valve while the boat is in use.
• Be sure the valve is tightly closed before using the boat.
FISHING ROD HOLDER USE
• Slide the end cap over the end of the fishing rod.
• Insert the fishing pole into the holder.
Electric motor T-18 installation (for BT-88821/88823 only)
• Release the small adjustable tension collar from electric motor
• Put stainless steel pipe into the upper and the lower buckle of the boat stern.
• Adjust to make sure the motor fits boat in place and firmly
• Fix the tension collar and tighten it.
Fig.1 Fig.2 Fig.3 Fig.4
Inflate Deflate
Fishing
Rod
Fishing
Rod
Holder
End Cap
IMPORTANT!
Please use the transparent scale (come with the repair kits bag) to
check if the air floor is properly inflated. The black line on the floor
should NOT be longer than the MAX. scale.

6
OAR ASSEMBLY
1. Insert the “shaft A” through the oar-lock first
2. Insert “shaft A” with the pin end into the “shaft B” with the blade towards outboard (water).
3. Double check and make sure the retainer ring onto the other end of the “shaft A”, from inside
of the boat.
4. When the oars are not in use secure the oars onto the oar holders located on each side of the
boat.
PRODUCT CARE AND STORAGE
The boat is made of the highest quality materials and complies with ISO 6185 standards.
Altering the construction of the boat will endanger your own safety, safety of the occupants and
void the limited warranty!
There is very little that you have to do to keep your boat in good condition for many years.
• When landing on the shore, carry the boat. Do not tow it on the sand or ground as damage
may occur.
• If you use the tow rings to tow the boat, go slowly to avoid over-towing as damage may occur.
• Clean your boat after a trip to prevent damage from sand, salt water or sun exposure. Most dirt
can be removed with a garden hose, a sponge and mild soap. Make sure the boat is
completely dry before storing. Use as few cleaning agents as possible, do not discharge waste
agents into water, and clean your boat preferably on land.
• Be sure your product is completely dry before storing.
• The products may be stored inflated, but do not place any heavy or sharp objects on it.
Hanging the boat is not recommended.
• Open all air valves and deflate boat completely. Remove all the accessories from the boat;
seats and oars.
• Fold the bow end twice to the middle of the boat tightly while forcing out any remaining air;
repeat this procedure for the stern. The boat storage bag is designed to allow you to get your
boat into the bag as easily as possible with minimal folds. Follow the diagram below for the
best folding procedures:
A
B
Shaft A
Shaft B
Pin
Retainer ring

7
• Storage is best in a dry room. Ensure protection against rodents and other vermin, as they
feed on the fabric of the canoe.
• Store the product and accessories in a dry, temperature controlled, between 32 degrees
Fahrenheit (0 degrees Celsius) and 104 degrees Fahrenheit (40 degrees Celsius) storage
location.
LEAK DETECTION AND REPAIR
AIR LEAK DETECTION
If your boat appears a bit soft, it might not be because of a leak. If the boat was inflated late in
the day with 32°C (90°F) air, that air might cool down to 25°C (77°F) overnight. The cooler air
exerts less pressure on the hull, so it could appear soft the next morning. If there has been no
temperature variation, you need to start looking for a leak:
• Take a good look at your boat from just a few feet away. Flip it over and closely check over the
outside. Any large leaks should be clearly visible.
• If you have an idea where your leak is, use a mix of dishwashing liquid and water in a spray
bottle, and spray over the suspicious areas. Any leak will produce bubbles that will pinpoint the
location of the leak.
• Check valves for leak, if necessary, spray soapy water around the valve and the valve base.
SMALL REPAIRS
Inadvertent punctures can be repaired using included vinyl repair patch. You can purchase
additional PVC or silicon based glue for repairing camping mats, tents or shoes from your local
market to patch your boat. Please refer to the instruction of the glue for patching.
1. Thoroughly clean and dry the damaged area. Completely deflate the product.
2. Cut a portion of the patch to cover the puncture and allow an additional 1/4” on all sides.
Always cut a round patch, never leave square corners.
3. Be sure the repair area is completely dry.
4. Apply generous coat glue to the vinyl repair patch and to the product.
5. Allow the glue to dry for 2 to 3 minutes, or until the glue becomes tacky.
1
23

8
6. Apply the patch to the product, using your thumb or finger; apply even pressure across the
entire surface of the patch. Make sure the edges of the patch are pressed down along the
entire diameter.
7. Allow the product to dry for at least 12 hours before inflating and using.
If there are large tears/cracks, please bring the water craft or any essential equipment part
into a professional repair shop for appropriate repair or replacement.
WARRANTY
AM warrants this product to be free from major defects in material or workmanship to the
original purchaser for a period of SIX (6) Months from the date of purchase. This warranty
is subject to the following limitations:
1. The warranty is valid only when this product is used for normal recreational activities and
does not cover products used in rental or school operations
2. AM will make the final warranty determination, which may require inspection and/or photos of
the equipment, which clearly show the defect(s). If necessary, this information must be sent
to the AM distributor in your country with prepaid postage. Product can be returned only if a
return authorization number is given in advance by the AM distributor. The return
authorization number must be clearly labeled on the outside of the package, or it will be
refused
3. If a product is deemed to be defective by AM, the warranty covers the repair or replacement
of the defective product only. AM will not be responsible for any costs, losses, or damages
incurred as a result of loss or use of this product
4. This warranty does not cover damage caused by misuse, abuse, neglect, normal wear and
tear including, but not limited to, punctures, damage due to excessive heat exposure,
damage caused by improper handling and storage, damage caused by use in waves or
shore break, board breakage caused by filling or crashing in surf conditions, or damage
caused by anything other than defects in material and workmanship
5. This product must not be modified and/or fitted with a motor
6. This product must not be used in excess of the manufacturers recommended maximum load
capacity
7. This warranty is void if any unauthorized repair, change or modification has been made to
any part of the equipment
8. The warranty for any repaired or replacement equipment is good from the date of the original
purchase only
9. The original purchase receipt must accompany all warranty claims. The name of the retailer
and date of purchase must be clear and legible
10. There are no warranties that extend beyond the warranty specified here in
WARNING
This product is designed in accordance with standards for a specific
use. Any modifications or transformations higher than that indicated by
the manufacturer could result in serious risks for the user and will void
the warranty.
This manual suits for next models
5
Table of contents
Other Aqua-Marina Boat manuals

Aqua-Marina
Aqua-Marina CASCADE BT-21CAP User manual

Aqua-Marina
Aqua-Marina BT-UD250 User manual

Aqua-Marina
Aqua-Marina BT-88810 User manual

Aqua-Marina
Aqua-Marina BT-88890 User manual

Aqua-Marina
Aqua-Marina CALIBER CA-398 User manual

Aqua-Marina
Aqua-Marina BETTA BE-312 User manual

Aqua-Marina
Aqua-Marina BT-88890 User manual

Aqua-Marina
Aqua-Marina BT-AC285 User manual

Aqua-Marina
Aqua-Marina LAXO User manual

Aqua-Marina
Aqua-Marina TOMAHAWK User manual