AQUA SZUT JUNIOR N User manual

1
PL
I N S T R U K C J A O B S Ł U G I
GB
INSTRUCTION MANUAL
D
BEDIENUNGSANLEITUNG
PL
Dane techniczne / Technical data / Technische Daten
D
GB
BUDOWA FILTRA:
1.Pokrywa korpusu silnika 2.Silnik 3.Ruszt pojemnika 4.Nadstawka pojemnika (opcja: PLUS-1szt, BIO-2szt)
5.Króćce ssawne 6.Wkład ltrujący 7.Pojemnik ltra 8.Nasadka napowietrzająca 9.Końcówka wylotu wody
10.Wieszak na akwarium 11.Suwak 12.Wieszak z przyssawkami 13.Przyssawki 14.Wirnik 15.Regulator prze-
pływu 16.Pokrywa wirnika 17.Regulator napowietrzania 18.Wężyk do napowietrzania ø4 19.Wkład ltrujący BIO
- gąbka 20.Wkład ltrujący BIO - Ceramika 21.Pokrywa zasysająca A, B - wloty powietrza do natleniania wody
FILTER CONSTRUCTION:
1.Motor body cover 2.Motor 3.Container grate 4.Container top (option: PLUS - 1 pc., BIO - 2 pcs.) 5.Suction stub
pipes 6.Filtration cartridge - BIO - sponge 7.Filter container 8.Aeration cap 9.Water inlet terminal 10.Suspension
for aquarium 11.Slide 12.Suspension with suction cups 13.Suction cups 14.Rotor 15.Flow regulator 16.Rotor co-
ver 17.Aeration regulator 18.Aeration hose dia. ø4 19.BIO ltration cartridge - sponge 20.BIO ltration - ceramics
21.Suck-in cover A, B - air inlets for water aeration
FILTERAUFBAU:
1.Deckel des Motorkörpers 2.Motor 3.Behälterrost 4.Behälterauage (Option: PLUS 1St., BIO 2 St.) 5.Saugstüt-
zen 6.Filtereinlage - BIO-Schwamm 7.Filterbehälter 8.Belüftungsaufsatz 9.Wasserauslaufstück 10.Aufhänger
11.Schieber 12.Aufhänger mit Saugnäpfen 13.Saugnäpfe 14.Läufer 15.Durchußregler 16.Läuferdeckel 17.Be-
lüftungsregler 18.Belüftungsschlauch Ø4 19.Filtereinlage BIO-Schwamm 20.Filtereinlage BIO-Keramik 21.Saug-
deckel A, B Lufteinlauf zur Sauerstoffanreicherung des Wassers
JUNIOR N
JUNIOR N JUNIOR N PLUS JUNIOR N BIO
Do akwariów o pojemności
Capacity of the aquarium
Bis zu Aquariumsgröße
60-120 l 80-150 l 100-200 l
Napięcie / częstotliwość
Voltage / Frequency
Spannung / Frequenz
230 V~ / 50 Hz
Pobór mocy
Power consumption
Leistungsaufnahme
5 W
Max. wydajność ltra
Max. lter productivity
Max. Filterleistung
500l/h
Max. głębokość napowietrzania
Max. aeration depth
Max. Belüftungstiefe
10 cm
Szczelność
Leak tightness
Dichtigkeit
IPX 8
rys.2 / pic.2 / abb.2
rys.1 / pic.1 / abb.1
2

PL
4
3
PL GB
WARUNKI GWARANCJI.
AQUA-SZUT Sp. z o.o. z siedzibą przy ul. Opolskiej 11/19 we Wrocławiu (52-010) gwarantuje nabywcy poprawne działanie urządzenia, na
które została wystawiona niniejsza karta gwarancyjna, pod warunkiem użytkowania go zgodnie z przeznaczeniem oraz zasadami określonymi
w instrukcji obsługi doręczonej Nabywcy wraz z tym towarem. Urządzenie objęte jest 24-miesięczną gwarancją (licząc od daty zakupu) i obejmuje
towary zakupione na terenie całej Europy. Gwarancją nie są objęte uszkodzenia powstałe w wyniku nieprawidłowej eksploatacji. Gwarancja
ogranicza się tylko do urządzenia, obejmuje wady materiałowe i błędy wykonania, nie obejmuje szkód następczych. Gwarancja jest realizowana
przez naprawę urządzenia lub jego wymianę. W przypadku stwierdzenia nieprawidłowej pracy lub wad wykonania prosimy o kontakt telefoniczny
pod numerem (+48 71) 34 35 773. W celu dokonania naprawy gwarancyjnej należy dostarczyć urządzenie wraz z kartą gwarancyjną do punktu
sprzedaży. Naprawa gwarancyjna zostanie dokonana w ciągu 14 dni od dostarczenia urządzenia i zgłoszenia reklamacji. Gwarancja na sprzedany
towar konsumpcyjny, nie wyłącza, nie ogranicza ani nie zawiesza uprawnień kupującego wynikających z niezgodności towaru z umową.
właściwościach.
Przegląd kontrolny i konserwacja:
Dla zachowania wysokiej sprawności ltra zaleca się przeprowadzanie regularnego czyszczenia wkładu ltrującego, wirnika
i jego komory. Do tych celów nigdy nie należy stosować detergentów (mydła, płynów do mycia naczyń itp.) oraz rozpusz-
czalników; resztki tych środków pozostałych w ltrze mogą powodować choroby i śnięcie ryb.
Uwaga ! - Przed przeprowadzeniem jakichkolwiek prac w akwarium, lub przy ltrze, należy koniecznie wyłączyć ltr przez
wyciągnięcie wtyczki sieciowej z gniazdka.
Czyszczenie wkładu ltrującego:
1. Wyłącz urządzenie przez wyjęcie wtyczki sieciowej z gniazdka!
2. Wyjmij ltr z wody.
3. Zdejmij pojemnik ltra z korpusu silnika.
4. Wyjmij wkład ltrujący i starannie wypłucz pod bieżącą letnią wodą.
5. Zmontuj ltr w odwrotnej kolejności
UWAGA! Wkłady czyść na zmianę przez co zachowana zostanie ora bakteryjna niezbędna do prawidłowej ltracji
W przypadku zakłóceń pracy silnika (ciężko pracujący silnik) należy oczyścić wirnik i jego komorę.
Czyszczenie wirnika i jego komory:
1. Wyłącz urządzenie przez wyjęcie wtyczki sieciowej z gniazdka!
2. Wyjmij ltr z wody.
3. Zdejmij pojemnik ltra z korpusu silnika.
4. Przekręć w prawo regulator przepływu wody i wyjmij go z silnika.
5. Wyjmij wirnik z komory i starannie wypłucz pod bieżącą wodą, usuń osad z wirnika i komory wirnika.
6. Zmontuj ltr w odwrotnej kolejności.
Demontaż i kasacja:
„Producent odpadów” - tj. użytkownik ltra, w chwili likwidacji wyrobu czy też wymiany zużytych części, powinien podjąć
następujące działania:
- części nadające się do dalszego wykorzystania poddać regeneracji bądź przechować,
- elementy z tworzyw sztucznych, gumy itp. Przekazać do punktów prowadzących recykling,
lub postępować zgodnie z miejscowymi przepisami o postępowaniu z odpadami metalicznymi, nieorganicznymi, organicz-
nymi i mieszanymi.
Nieprzestrzeganie niniejszych instrukcji wyklucza możliwość uznania roszczeń gwarancyjnych.
UWAGA: Producent, czyli rma AQUA-SZUT Sp. z o.o. z siedzibą we Wrocławiu, zastrzega sobie prawo do zmiany
parametrów technicznych urządzenia.
JUNIOR - FILTR WEWNĘTRZNY
Zanurzenie robocze:
- minimalne: górna krawędź korpusu silnika poniżej lustra wody
-maksymalne: cały regulator przepływu powietrza wystaje ponad lustro wody
Wskazówki dotyczące użytkowania:
- Filtr wewnętrzny służy do oczyszczania wody w akwariach i umożliwia dodatkowe napowietrzanie wody.
- Przed instalacją i uruchomieniem należy bezwarunkowo dokładnie przeczytać poniższą instrukcję obsługi i montażu!
- Należy przestrzegać wskazówek dotyczących użytkowania, montażu
i bezpieczeństwa!
Warunki bezpieczeństwa pracy:
- Przy uruchamianiu i konserwacji ltra oraz przy innych pracach w zbiorniku wodnym wyłączyć wszelkie urządzenia elek-
tryczne znajdujące się w akwarium wyciągając wtyczki z gniazda
- Filtr przeznaczony tylko do akwariów i wyłącznie w pomieszczeniach!
- Urządzenie może pracować tylko do temperatury wody nie przekraczającej 35°C!
- Przed każdym uruchomieniem sprawdzić ltr oraz przewód zasilania sieciowego!
- Zabrania się dokonywania napraw lub wymiany przewodu zasilania sieciowego!
- Zabrania się używania ltra bez wody.
- Urządzenie montować zgodnie z instrukcją.
Niniejszy sprzęt nie jest przeznaczony do użytkowania przez osoby (w tym dzieci) o ograniczonej zdolności zycznej, czu-
ciowej lub psychicznej, lub osoby nie mające doświadczenia lub znajomości sprzętu, chyba że odbywa się to pod nadzorem
lub zgodnie z instrukcją użytkowania sprzętu, przekazanej przez osoby odpowiadające za ich bezpieczeństwo.
Należy zwracać uwagę na dzieci , aby nie bawiły się sprzętem.
W przypadku uszkodzenia przewodu zasilania sieciowego urządzenie podlega złomowaniu! Niebezpieczeństwo zagrożenia
życia!
Charakterystyka ltra:
- nieskomplikowana obsługa, prosta konserwacja
- małe rozmiary, niski poziom hałasu
- mechaniczne i biologiczne oczyszczanie wody
- wykonanie zgodnie z normami bezpieczeństwa RP i UE
- wysoka sprawność ltrowania dzięki zastosowaniu wkładu BIO (w nadstawkach)
- doskonałe wzbogacanie wody w tlen - konstrukcja pompy zapewnia intensywny ruch na powierzchni wody, co ułatwia
dostęp tlenu atmosferycznego i wydalanie dwutlenku węgla rozpuszczonego w wodzie oraz zapewnia zasysanie powietrza
do komory wirnika, gdzie tlen rozbity na drobne cząsteczki wnika do wody.
- płynna regulacja natężenia przepływu wody za pomocą regulatora bez konieczności wyjmowania pompy z akwarium
- przewód zasilający o długości 1,5m.
Montaż:
1. Nałóż wężyk doprowadzający powietrze na wlot powietrza lub na nasadkę napowietrzającą (patrz rys. 1)
2. Włóż ltr do akwarium tak aby znalazł się poniżej poziomu wody w akwarium
3. Zamocuj wieszak ltra do szyby akwarium, za pomocą przyssawek i nasuń ltr na prowadnicę. Filtr posiada dwa sposo-
by mocowania (rys.2).
4. Włącz ltr (włóż wtyczkę przewodu przyłączeniowego do gniazdka sieciowego)
5. Przekręcając regulator dostosuj przepływ wody przez ltr odpowiednio do potrzeb swojego akwarium (ilości ryb, wielkości
zbiornika).
Niedozwolona jest praca ltra na sucho (bez wody)!!! Filtr w trakcie pracy musi być całkowicie zanurzony w wodzie, a
regulator napowietrzania w całości powinien wystawać ponad lustro wody.
Uwaga na skutek parowania poziom wody w akwarium obniża się!
Wkłady ltracyjne w zależności od rodzaju ltra
1. Wkład ltrujący podstawowy, (podwójna duża gąbka) który zapewnia bardzo dużą powierzchnię ltracyjną. Działa jako
pierwsze medium ltracyjne (podstawowe) i wstępnie wychwytuje wszystkie większe cząstki stałe.
2. Wkład ltrujący BIO gąbka, wykorzystując zjawisko osiedlania się bakterii, które biorą udział w BIO-ltracji (zjawisko
naturalne występujące w strumieniach, zbiornikach wodnych itp.) jednocześnie przez drobną strukturę por gąbki, wspomaga
ltrację mechaniczną.
3. Wkład BIO ceramika (opcja: BIO-kulki), typowa dla wkładów biologicznych ltracja oparta na dużej powierzchni poro-
watej bazy do osiedlania bakterii. W miejscu BIO-ceramiki jest możliwość zastosowania także BIO-kulek o podobnych
JUNIOR - INTERNAL FILTER
Working immersion:
- minimum: the upper edge of the motor body is below the water mirror.
- maximum: the whole air ow regulator protrudes above the water mirror.
Indications related to the usage:
- The internal lter is used for cleaning the water in the aquarium and allows a supplementary aeration of water.
- Before the installation and putting into operation, it is a prerequisite to read through the service and installation instructions
below!

PL
6
5
GB
- Directions for use, installation and safety shall be observed!
Operation safety requirements:
- When starting and maintaining the lter as well as during another work in the water reservoir, switch off all electrical
appliances located inside the aquarium by removing the plug from the socket.
- The lter is designed for aquariums only and for use in rooms only!
- The unit may operate at the water temperature not exceeding 35°C!
- Before each putting into operation, check the lter and the power supply cord!.
- It is forbidden to make any repairs or replacements of the power supply cord!
- The use of the lter without water is not allowed.
- Install the unit following the instruction.
In case of a damage to the power supply cord, the unit should be scrapped!
Danger of a risk to life!
Filter characteristics:
- Non-complicated service, easy maintenance
- Small dimensions, low noise level
- Mechanical and biological water cleaning
- Made to RP and UE safety standards
- High ltration efciency owing to the use of the BIO cartridge (in tops)
- Excellent water enrichment in oxygen the design of the pump ensures an intensive movement towards the water surface,
which permits the access of atmospheric oxygen and the purge of carbon dioxide diluted in water as well as ensures the
suction of air into the rotor chamber where oxygen broken down into tiny particles penetrates into water.
- Smooth adjustment of water ow without a need to remove the pump from the aquarium.
- 1.5 m long power supply cord.
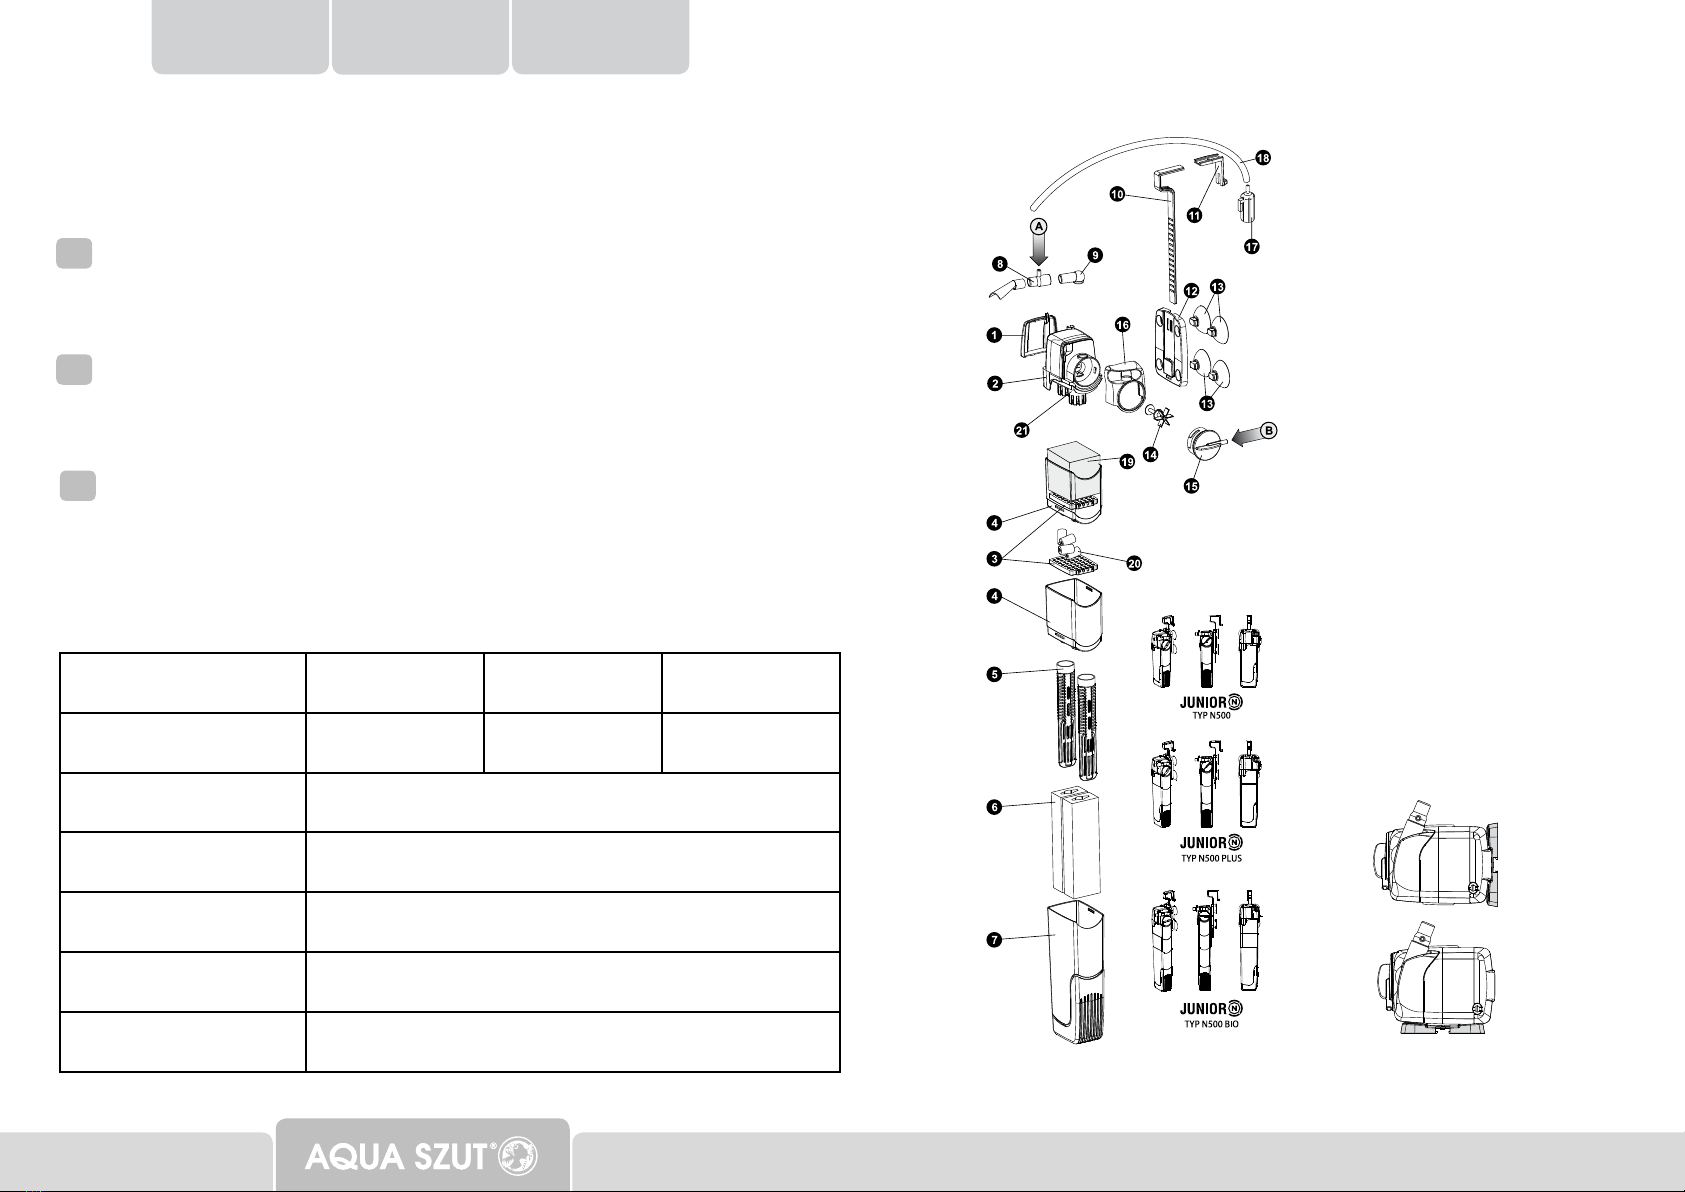
Installation:
1. Insert the air supply hose onto the air inow or the aeration cap (see Fig. 1).
2. Place the lter into the aquarium so that it is located below the water level in the aquarium.
3. Fasten the lter suspension to the aquarium pane using suction cups and slide the lter over the guide. The lter has two
xing methods (Fig.3).
4. Switch on the lter (put the plug of the connection cord into the mains socket).
5. By rotating the regulator, adapt the water ow through the lter correspondingly to the needs of your aquarium (the
amount of sh, aquarium size).
The dry operation (without water) of the lter is not allowed!!! During operation, the lter should be fully immersed in water
while the aeration regulator should fully protrude above the water mirror.
Note Due to evaporation, the water level in the aquarium sinks!
Filtration cartridges that depend on the lter type
1. Basic ltration cartridge (double large sponge) that ensures a very large ltration surface. It acts as a ltration medium
(basic) and preliminarily captures all larger solids.
2. BIO ltration cartridge a sponge, which uses the phenomenon of the settlement of bacteria that take part in the BIO
ltration (a natural phenomenon appearing in streams, water reservoirs, etc.) through the ne structure of the sponge pores
simultaneously, assists the mechanical ltration.
3. BIO cartridge ceramics (option: BIO beads), typical of biological cartridges, the ltration is based on a large porous
surface a basis for the settlement of bacteria. In the place of the BIO ceramics there also is an option to use BIO beads of
similar properties.
Inspection survey and maintenance:
To maintain the high efciency of the lter, it is recommended to perform, on a regular basis, the cleaning of the lter, the
rotor and its chamber. To this aim, never use detergents (soap, dish washing liquids, etc.) and solvents; the residue of
these means left in the lter may result in diseases and sh mortality.
Note Before performing any work in the aquarium or on the lter, switch off without fail the lter by removing the mains plug
from the socket.
Cleaning the ltering cartridge:
1.Switch off the unit by removing the mains plug from the socket!
2. Remove the lter from the water.
3. Remove the lter container from the motor body.
4. Remove the ltering cartridge and thoroughly rinse it under running lukewarm water.
D
GUARANTEE TERMS AND CONDITIONS.
AQUA-SZUT Sp. z o.o. with permanent establishment ul. Opolska 11/19 in Wrocław (52-010) is offering to the buyer a guarantee of correct
operation of the device, for which this guarantee card has been issued, under the condition that it is used according to the intended use and the
rules specied in the User’s Manual delivered to the Buyer together with this item. The unit is covered by 24-month guarantee (from the date
of purchase). and it includes the products bought in any part of Europe. The guarantee excludes defects resulting from improper operation. It
is conned to the unit itself, covers material and workmanship defects, but excludes any consequential damages. The guarantee is effected by
repair or replacing the defective unit. To effect guarantee repair, please deliver the unit with its guarantee card to the retail outlet. The repair will
be completed within 14 days of delivering the unit and raising the claim. The guarantee for the sold consumer goods does not exclude, limit or
suspend the rights of the buyer following from goods contrary to the agreement.
JUNIOR - INNENFILTER
Betriebstiefe:
- minimal: Oberkante des Motorkörpers unterhalb des Wasserspiegels
- maximal: der gesamte Luftregler oberhalb des Wasserspiegels
Benutzungshinweise:
- Der Innenlter dient zur Wassereinigung in Aquarien und gibt zusätzlich die Möglichkeit, Wasser mit Sauerstoff anzure-
ichern.
- Vor der Installation und Inbetriebnahme die Bedienungs- und Montageanleitung gründlich durchlesen!
- Die Nutzungs-, Montage und Sicherheitshinweise unbedingt beachten!
Arbeitssicherheitsbedingungen:
- Bei der Inbetriebnahme und Wartung des Filter sowie bei anderen Arbeiten an dem Wasserbehälter alle elektrischen
Geräte durch das Herausziehen des Netzsteckers von der Steckdose vom Netz trennen.
- Der Filter ist ausschließlich für Aquarien und nur in Innenräumen vorgesehen!
- Das Gerät ist ausschließlich für Wassertemperaturen unter 35 °C!
- Vor jeder Inbetriebnahme den Filter und das Netzkabel überprüfen!
- Es ist verboten, jegliche Reparaturen an den Gerät bzw. an dem Netzkabel vorzunehmen!
- Es ist verboten, den Filter trocken (außerhalb von Wasser) zu betreiben.
- Das Gerät gemäß der Anleitung installieren.
Bei einer Beschädigung des Netzkabels ist das Gerät zu entsorgen! Lebensgefahr!
Filtermerkmale:
- einfache Bedingung und Wartung
5. Install the lter in the reverse order.
NOTE! The cartridges are to be cleaned by turns, which will preserve the bacterial ora necessary for the correct ltration.
In case of any disturbances in the motor operation (heavily working motor), the rotor and its chamber should be cleaned.
Cleaning the rotor and its chamber:
1. Switch off the unit by removing the mains plug from the socket!
2. Remove the lter from the water.
3. Remove the lter container from the motor body.
4. Turn clockwise the water ow regulator and remove it from the motor.
5. Remove the rotor from the chamber and rinse it thoroughly under running water, remove deposits from the rotor and the
rotor chamber.
6. Install the lter in the reverse order.
Disassembly and withdrawal from use:
„The producer of waste” - that is the user of the lter, at the moment of liquidating the product or replacing the worn-out
parts, shall take the following actions:
- parts that are good for further use shall be subjected to reclaiming or stored,
- rubber, plastic elements, etc. shall be delivered to the recycling centers, or handled according to the local prescriptions on
treating metallic, inorganic, organic or mixed waste.
The non-observance of these instructions excludes the potentiality of recognizing warranty claims.
NOTE: The manufacturer, that is the company AQUA-SZUT Sp. z o.o. having its ofces in Wroclaw, reserves the right to
modify the engineering parameters of the unit.

PL
7
D
GARANTIEBEDINGUNGEN.
AQUA-SZUT Sp. z o.o. mit dem Sitz in ul. Opolska 11/19 in Wrocław (52-010) garantiert dem Käufer eine korrekte Arbeit der Einrichtung, worauf
diese Garantiekarte ausgestellt worden ist, unter der Bedingung das sie bestimmungsgemäß und gemäß der in der an den Käufer gelieferten
Gebrauchsanweisung und der Ware bestimmten Regeln gebraucht wird. Die Gewährleistungsfrist beträgt 24 Monate (von Einkaufsdatum). und
umfasst die in ganzem Europa eingekauften Waren. Ausgenommen von der Garantie sind Shaden, die infolge einer unsachgemäßen Bedinung
enstanden sind. Die Gewährleistung beschränkt sich auf das Gerät es wird für die Mängel gewährt, die auf Material und Fertigungsfehler zurück-
zuführen sind. Die Folgefehler sind von der Garantie ausgenommen. Die Garantieleistungen fassen Reparatur oder wechsel des Gerätes um.
Zur Garantiereparatur schicken Sie das Gerät und die Garantiekarte an die Stelle, wo Sie Ihr Gerät eingekauft haben. Garantiereparatur folgt
innerrhalb von 14 Tagen von der Gerätslieferung und der Beanstandung. Die Garantie auf die verkauften Verbrauchsgüter schließt die Rechte des
Käufers aus der Nichtübereinstimmung der Ware mit dem Vertrag nicht aus, beschränkt sie nicht und beendet sie nicht.
GWARANCJA / GUARANTEE / GEWÄHRLEISTUNG
nazwa urządzenia / name of product / der Name
8
data / date / Datum
pieczęć punktu sprzedaży / stamp of the place of purchasing /
Stempel der Verkaufsstelle
AQUA-SZUT Sp. z o.o. POLAND, 52-010 Wrocław ul. Opolska 11/19
phone (+48) 71 34 35 769, (+48) 71 34 35 773, fax (+48) 71 34 24 564
e-mail: [email protected], www.aquaszut.pl
- kompakt, niedriger Lärmpegel
- mechanische und biologische Wasserreinigung
- entspricht den RP- und EU-Sicherheitsnormen
- hohe Filterleistung durch den Einsatz der BIO-Einlagen (in Auagen)
- hervorragende Sauerstoffanreicherung des Wassers die Bauweise der Pumpe garantiert eine intensive Wasserum-
wälzung auf der Oberäche, was den Zugang der Luftsauerstoffes und das Ausscheiden des in Wasser aufgelösten
Kohlendioxids ermöglicht. Zusätzlich wird die Luft in die Läuferkammer eingesaugt, wo der in kleinste Partikel „zerstäubte“
Sauerstoff in Wasser leichter eindringen kann.
- stufenlose Regelung des Wasserdurchusses mit Hilfe des Reglers , ohne dass die Pumpe aus dem Aquarium herausge-
nommen werden muß
- Stromversorgungskabel mit einer Länge von 1,5m
Montage:
1. Den Luftversorgungsschlauch auf den Lufteinlauf bzw. auf den Belüftungsaufsatz aufsetzen (siehe Abb. 1).
2. Den Filter im Aquarium platzieren, so dass er sich unterhalb des Wasserspiegels bendet.
3. Den Filteraufhänger an der Glasscheibe des Aquariums mit Hilfe der Saugnäpfe anbringen und den Filter in die Führung
schieben. Der Filter kann auf zwei unterschiedliche Weisen montiert werden (Abb. 2)
4. Den Filter einschalten (den Stecker des Netzkabels in eine Steckdose stecken)
5. Durch Drehen des Reglers den Wasserdurchuß entsprechend den individuellen Anforderungen (Aquariumvolumen,
Zahl der Fische) einstellen).
Der Filter darf trocken (ohne Wasser) nicht betrieben werden!!! Während des Betriebs muß er völlig im Wasser eingetaucht
sein, und der Belüftungsregler muß komplett oberhalb des Wasserspiegels liegen.
Achtung durch das Verdampfen des Wasser sinkt der Wasserspiegel kontinuierlich!
Filtereinlagen je nach Art des Filters
Der Filter ist mit 3 Arten Filtereinlagen ausgerüstet:
1. Die Grundltereinlage (doppelter Großschwamm), die eine sehr große Filteräche bietet. Sie dient als das erste Filter-
medium (Grundmedium) und fängt alle grobe Verunreinigungen auf.
2. Filtereinlage BIO-Schwamm, die die Entwicklung von Bakterienkulturen nutzt, welche sich an der BIO-Filterung beteili-
gen (eine natürliche Erscheinung, kommt in Bächen, Wasserbecken usw. vor). Gleichzeitig unterstützt sie durch ihre feinen
Poren die mechanische Filterung.
3. Filtereinlage BIO-Keramik (Option: BIO-Kugeln), typisch für Bioltereinlagen. Die Filterung basiert auf einer großen,
porösen Filteräche. die als Boden für Bakterienkulturen dient. An Stelle von BIO-Kermik können auch BIO-Kugel mit
ähnlichen Eigenschaften eingesetzt werden.
Kontrollrevisionen und Wartung:
Um eine hohe Filterleistung auf die Dauer zu erhalten, empehl es sich, die Filtereinlage, den Läufer und die Läuferkam-
mer regelmäßig zu reinigen. Zu diesem Zweck keine Reinigungsmittel (Seife, Geschirrspülmittel usw.) oder Lösungsmittel
nutzen; Reste dieser Mittel im Filter können Krankheiten oder selbst das Sterben der Fische verursachen.
Achtung Vor dem Beginn jeglicher Arbeiten an dem Wasserbehälter alle elektrischen Geräte durch das Herausziehen des
Netzsteckers von der Steckdose vom Netz.
Reinigung der Filtereinlage:
1. Das Gerät durch das Herausziehen des Netzsteckers von der Steckdose vom Netz!
2. Den Filter aus dem Wasser nehmen.
3. Den Filterbehälter vom Motorkörper abnehmen.
4. Die Filtereinlage herausnehmen und gründlich unter lauwarmen laufendem Wasser spülen.
5. Den Filter in umgekehrter Reihenfolge zusammenbauen
ACHTUNG! Die Filtereinlagen abwechselnd reinigen, wodurch die für den korrekten Filterverfahren unerläßliche bakterielle
Flora erhalten werden kann.
Bei Störungen im Filterbetrieb (Schwerläugkeit des Motors) den Läufer und die dazugehörige Kammer reinigen.
Reinigen des Filters und der Filterkammer:
1. Das Gerät durch das Herausziehen des Netzsteckers von der Steckdose vom Netz!
2. Den Filter aus dem Wasser nehmen.
3. Den Filterbehälter vom Motorkörper abnehmen.
4. Den Durchußregler nach rechts drehen und aus dem Motor herausnehmen.
5. Den Läufer aus der Kammer herausnehmen und gründlich unter laufendem Wasser spülen, alle Beläge vom Läufer und
der Läuferkammer entfernen.
6. Den Filter in umgekehrter Reihenfolge zusammenbauen.
Demontage und Entsorgung:
Der „Abfallproduzent”, d.h. der Filterbenutzer soll bei der Entsorgung des Filters bzw. beim Austausch von verschlissenen
Teilen folgende Maßnahmen ergreifen:
- Teile, die wiederverwendet werden können, regenerieren lassen bzw. aufbewahren.
- Teile aus Kunststoffen, Gummi usw. zu Recyclingpunkten bringen, bzw. gemäß den lokalen Vorschriften über das die
Behandlung von metallischen, anorganischen, organischen und gemischten Abfällen vorgehen.
Das Nichteinhalten dieser Anleitung schließt jegliche Garantieansprüche des Benutzers aus.
ACHTUNG: der Produzent, die Firma AQUA-SZUT Sp. Z o.o. mit sitz in Wroclaw, behält sich das Recht auf Änderungen
der technischen Daten des Gerätes vor.
This manual suits for next models
3
Table of contents
Languages:
Other AQUA SZUT Water Filtration System manuals
Popular Water Filtration System manuals by other brands

Monarch Water
Monarch Water WELLBEING CAPRICORN install guide

Ispring
Ispring WF1024 Installation instructions & user manual

Aqua Optima
Aqua Optima AWD001 instructions

AirBench
AirBench Vertex VP Operation and maintenance

Mellerware
Mellerware PURIFY manual

Omnifilter
Omnifilter RO2000 Series installation instructions

Sterling
Sterling QCRO-50 installation manual

APEC
APEC ESSENCE ROES-UV75 Change instructions

CASHIDO
CASHIDO 10 Second Purifier OH8100-XN2 Series user manual

Oase
Oase Vitronic 24 W operating instructions

AquaCare
AquaCare 310-001us instruction manual

EasyPro
EasyPro Eco-Clear EC2600 Instructions for Operation, Safety, Warranty