Aquadistri Wifi MaxLED 85 User manual

WiFi MaxLED 85/160
Instruction Manual
Gebrauchsanweisung
Mode d’Emploi
Gebruiksaanwijzing

2
1. LED unit
2. Flexible bracket (4 pcs)
3. Bracket support (4 pcs)
4. Bracket mounting bolts
(4 x 6 mm plastic screws)
5. Bracket fixation screws
(4 x stainless steal screws)
6. Power cord
7. Ballast
8. Tank mounting screws
(4 x 15 mm nylon screws)
1. Eclairage
2. Pied de fixation (4 p)
3. Support de fixation (4 p)
4. vis du support de fixation
(Vis plastique 4x6 mm)
5. Vis fixation supports alu
sur rampe (4x Vis Inox)
6. câble d’alimentation
7. ballast
8. Vis de fixation sur l’aquarium
(Vis nylon 4 x15 mm)
1. LED-Einheit
2. Flexible Halterung (4 Stk.)
3. Klemmhalterung (4 Stk.)
4. Befestigungsschrauben
(4 x 6 mm Kunststoffschrauben)
5. Madenschrauben
(4x Edelstahlschrauben.)
6. Stromkabel
7. Vorschaltgerät
8. Becken-Montageschrauben
(4 x 15 mm Nylonschrauben)
1. LED unit
2. Flexibele houder (4 st.)
3. Houder ondersteuning
(4 x 6 mm plastic schroeven)
4. Schroeven tbv houder
(4 x roestvrijstalen schroeven)
5. Flexibele houder schroeven (4st.)
6. Stroomkabel
7. Trafo
8. Schroeven tbv bevestiging
aan het aquarium. (4 x nylon schroeven)
NL
F
D
GB
1
3
2
4
5
3
45
8
Optional
61 2 7
Parts/Teile/composants/onderdelen

2 3
Safety
1. Read manual carefully before usage, in all languages
2. Only suitable for indoor use.
3. Ensure voltage shown on the label match to the mains supply voltage.
4. Never look directly at the LEDs! UV and Infrared (IR) emitted from this light may cause permanent eye and/or
skin damage, always minimize exposure to eyes and skin, the supplier is never responsible for any wrong
usage of this light.
5. A drip loop must be used with all electrical aquarium devices to prevent water leakage into the
power socket (see image).
6. Although the LED lamp is splash waterproof it should not be submerged in water and there should be at least
15 mm between water level and lamp. Attach the lamp firmly.
7. Only plug light into mains after the LED lamp is firmly mounted above the aquarium.
8. Always dry your hands before doing any jobs on the LED lamp or operating the lamp switch.
9. Always disconnect electrical supply before you perform any maintenance on aquarium and LED lighting.
10. The LED unit can get warm, allow adequate time to cool down attempting any maintenance.
11. Make sure cable and light are undamaged before usage, If damaged the supply cord cannot be replaced,
the whole unit needs to be recycled. Never shorten or lengthen the electrical leads.
12. If overpowered, the adapter can be replaced, buy a replacement adapter from your dealer.
13. In the unlucky event that the LED unit falls into the water, first unplug it and then retrieve it by using the
cable to lift the unit out of the water.
14. Warranty is not valid when the unit is damaged due to submersing.
15. This appliance can be used by children aged from 8 years and above and persons with reduced physical,
sensory or mental capabilities or lack of experience and knowledge if they have been given supervision
or instructions concerning the use of the appliance in a safe way and understand the hazards involved.
Children may not play with the appliance. Cleaning and user maintenance shall not be done by children
without supervision.
Installation;
Required tools, small flathead Screwdriver included.
Step 1: Attach the flexible bracket to the bracket support, using the 4 short bracket bolts and tighten
these down with the screwdriver.
Step 2: Attach flexible bracket to LED unit by pushing the legs into the unit.
Step 3: Place bracket support on the aquarium tank, adjust legs, with supplied screws of different
length, depending on the glass thickness choose the correct screw and tighten the bracket onto
the glass tank.
Step 4: Connect the power cable, tighten the connection to make it waterproof, connect
ballast and powerplug.
Step 5: Optional hanging bracket installation, a hanging bracket is available as an accessory at your
Blue Marine dealer.
Protection function:
The smart fan will start when the temperature of the light is above 40°C and stop to work below 40°C. The light
will automatically turn off when its temperature is around 70°C.
Maintenance:
• Regular cleaning with a moist cloth will improve life time and light output.
• The LED lamps cannot be replaced, once the LED lamps stop burning the whole unit needs to be replaced.
Drip
loop
GB

4
WiFi connection
Connecting in AP-modus
Resetting the WiFi controller
Hold the WiFi controller for 10 seconds as shown. As soon as the
lamp flashes, the reset has been successfully completed.
Go to the WiFi settings on your
mobile device. Select MaxLED
Enter the password: 00000000
(8 x zero) and choose “join”.
Once connected, the indicator
on the control box will turn
blue. Now open the Horizon
aqua App.
When a connection is made via “AP mode” a direct connection
is created via WiFi between your mobile device and the Horizon
aqua product. Your connection to the Internet will then not work. In
addition, only one connection / device can be active in AP mode.
We therefore advise you to set up a connection via a router (STA
mode). In this case you do not have to connect to the device, but the
devices are accessed via the (standard) connection to your router.
To set up a connection in STA mode, a connection must first be set
up in AP mode at the first installation, after which you can enter
the router in WiFi which router you want to connect to. See above:
“Connect to router in STA mode ”.
Download the Horizon APP
GB

4 5
Making connection
After connecting with the
MaxLED the LED button is
active
Choose: The paperclip
Go to “Settings”, choose WiFI on your mobile device and connect to
your router. The indicator on the MaxLED control box will flash blue
quickly.
Choose: “+” to search for the
MaxLED
Choose: WIFI
After the MaxLED is found
press search to activate the
MaxLED
Choose: The router
Select the device and you will
go to the setting screen.
Enter the password and choose
“OK”. Wait a moment and then
return to the home screen of
the app.
GB
Connect to router in STA mode

6
Setting date and time
Unlock by clicking on the lock:
Sunrise
Choose start time and end time
Click on “OK” to confirm
Select time settings by clicking
on the time display:
Daylight
New time settings have een set Dawn
Set the correct date and time
here. Press “OK” to confirm
Sunset
5 time blocks can be
programmed.
• Dawn
• Sunrise
• Daylight
• Sunset
• Moonlight
Duration: First unlock. Click on
the time display to adjust it
Moonlight
GB

6 7
Set the light output
Lightning mode Cloudy mode
Lighting on / off
Channel Slider unlock
Move the button over the slider
to adjust light intensity and color
Select ‘Lightning’ to enter the
settings.
Select ‘Cloudy’ to enter the
settings.
Select “Save” to save the
settings
Select the desired duration (1-99
minutes). Select the lightning
frequency (1-8). Select Ok to
confirm the settings.
Select the desired duration (1-99
minutes). Select the frequency
(1-12). Select Ok to confirm the
settings.
Lighting on / off
Button = yellow
Lighting is switched on
Button = yellow
Lightning is switched on
Button = yellow
Cloudy is switched on
Button = Gray
Lightning is switched off
Button = Gray
Cloudy is switched off
Lighting on / off
Button = Gray
Lighting is switched off
GB

8
Generate a QR code of your settings such as time blocks, light intensity and color
Load settings with a QR code
Load settings from a QR code from your photo album on your mobile phone.
Choose ‘OR’
Choose ‘OR’
Choose ‘OR’
Generate a QR code of your settings such as time blocks, light
intensity and color.
Zoom in Flash Zoom out
Save your QR code. You can
now restore your settings
by scanning the QR code or
sharing it with friends.
After the QR code is loaded, a
preview appears. Swipe left or
right to view the settings for the
different time blocks.
Select the photo button to go to
the photo album on your mobile
phone.
Select the QR code in your
photo album.
GB

8 9
Restore factory settings
Choose Reset:
Select “OK” to return to the
factory settings. The device
must be connected in AP mode
to reconfigure.
GB
Problem Checking Solution
• Check whether the lamp is
correctly connected to the power
supply.
• Check that the brightness
is not set to 0
• Check whether the lamp is
switched on or that a time block
is active in which the lamp
should illuminate
• Check whether the total set time
does not exceed 24 hours.
• Check if the time is set correctly.
• Connect the lamp correctly to
the power supply.
• Set the brightness to a value
higher than zero.
• Switch the lamp on, adjust the
time block settings, check
whether the correct time is set
correctly.
• Adjust the settings.
• Set the time correctly.
The light does not work
Lighting stays on while
it should be switched off.
Troubleshooting

10
Sicherheit
1. Lesen Sie vor Gebrauch die Gebrauchsanweisung sorgfältig durch.
2. Ausschließlich zur Verwendung im Haus geeignet.
3. Überprüfen Sie, ob die Stromspannung auf dem Aufkleber mit der Spannung des Stromnetzes
übereinstimmt.
4. Schauen Sie niemals direkt in die LEDs! UV- und Infrarotstrahlung dieser Lampen kann dauerhafte Schäden
an Augen und Haut verursachen! Der Hersteller ist nicht verantwortlich für falsche Handhabung.
5. Stellen Sie sicher, dass kein Wasser in die Steckdose gelangen kann (Siehe Abbildung).
6. Obwohl die LED Lampe wasserdicht ist, darf sie nicht ins Wasser eingetaucht werden. Es muss ein minimaler
bstand von 15 mm zwischen Lampe und Wasseroberfläche eingehalten werden. Die Beleuchtung sollte gut
befestigt sein.
7. Den Stecker erst nach der Installation in die Steckdose stecken
8. Vor der Wartung der Beleuchtung oder Bedienung des Schalters unbedingt die Hände trocknen.
9. ACHTUNG: Vor der Durchführung von Wartungsarbeiten alle Geräte im Aquarium ausschalten und
Netzstecker ziehen.
10. ACHTUNG: Die Lampe wird warm, zuerst abkühlen lassen, bevor man sie wechselt.
11. Stellen Sie vor der Nutzung sicher, dass Kabel und Beleuchtung unbeschädigt sind. Ein beschädigtes Kabel
kann nicht ersetzt werden. Das ganze Gerät muss entsorgt werden. Die Kabel dürfen nie gekürzt oder
verlängert werden.
12. Wird das Vorschaltgerät überlastet, muss es ausgetauscht werden. Ein neues Vorschaltgerät können
Sie bei Ihrem Händler kaufen.
13. Fällt die Beleuchtung unglücklicherweise ins Wasser, ziehen Sie vor dem Herausnehmen den Netzstecker
und nehmen die Beleuchtung vorsichtig am Kabel aus dem Aquarium.
14. Keine Garantie bei Schäden, die durch Eintauchen ins Wasser verursacht werden.
15. Dieses Gerät kann von Kindern ab 8 Jahren sowie von Personen mit reduzierten physischen, sensorischen
oder mentalen Fähigkeiten oder Mangel an Erfahrung und/oder Wissen benutzt werden, wenn sie
beaufsichtigt oder bezüglich des sicheren Gebrauchs des Gerätes unterwiesen wurden und die daraus
resultierenden Gefahren verstanden haben. Kinder dürfen nicht mit dem Gerät spielen. Reinigung und
Benutzerwartung darf nicht durch Kinder ohne Beaufsichtigung durchgeführt werden.
Installation
Benötigte Werkzeuge, ein kleiner Schraubenzieher und ein Inbusschlüssel, liegen bei.
• Befestigen Sie die Metallbügel mit den 4 Kunststoffschrauben an der Halterung.
• Schieben Sie die Metallbügel in die LED-Einheit und drehen Sie die Edelstahlschrauben mit dem
Inbusschlüssel an, die Schrauben nicht ganz festziehen.
• Platzieren Sie die LED-Einheit auf dem Aquarium, stellen Sie die Breite der Halterungen auf die Breite des
Aquariums ein und fixieren Sie jetzt die Edelstahlschrauben.
• Fixieren Sie die Halterungen mit den Nylonschrauben.
• Schließen Sie die Fernbedienung zwischen dem Vorschaltgerät und der LED-Einheit an, drehen Sie die
Verbindung fest, so dass sie wasserdicht ist.
• Optional kann die LED-Beleuchtung über dem Aquarium aufgehängt werden, ein Kabelsatz ist als Zubehör
bei Ihrem Blue Marine-Händler erhältlich.
Sicherheitsfunktion
Der intelligente Ventilator startet, wenn die Temperatur der Beleuchtung 40°C übersteigt und schaltet sich
bei einer Temperatur unter 40°C wieder ab. Ab einer Temperatur von ca. 70°C schaltet sich die Beleuchtung
automatisch aus.
Maintenance:
• Zur Verbesserung der Lebensdauer und der Lichtleistung Lampe regelmäßig mit einem Staubtuch reinigen.
• Die LEDs sind nicht ersetzbar; einmal defekt, muss die gesamte Einheit ersetzt werden.
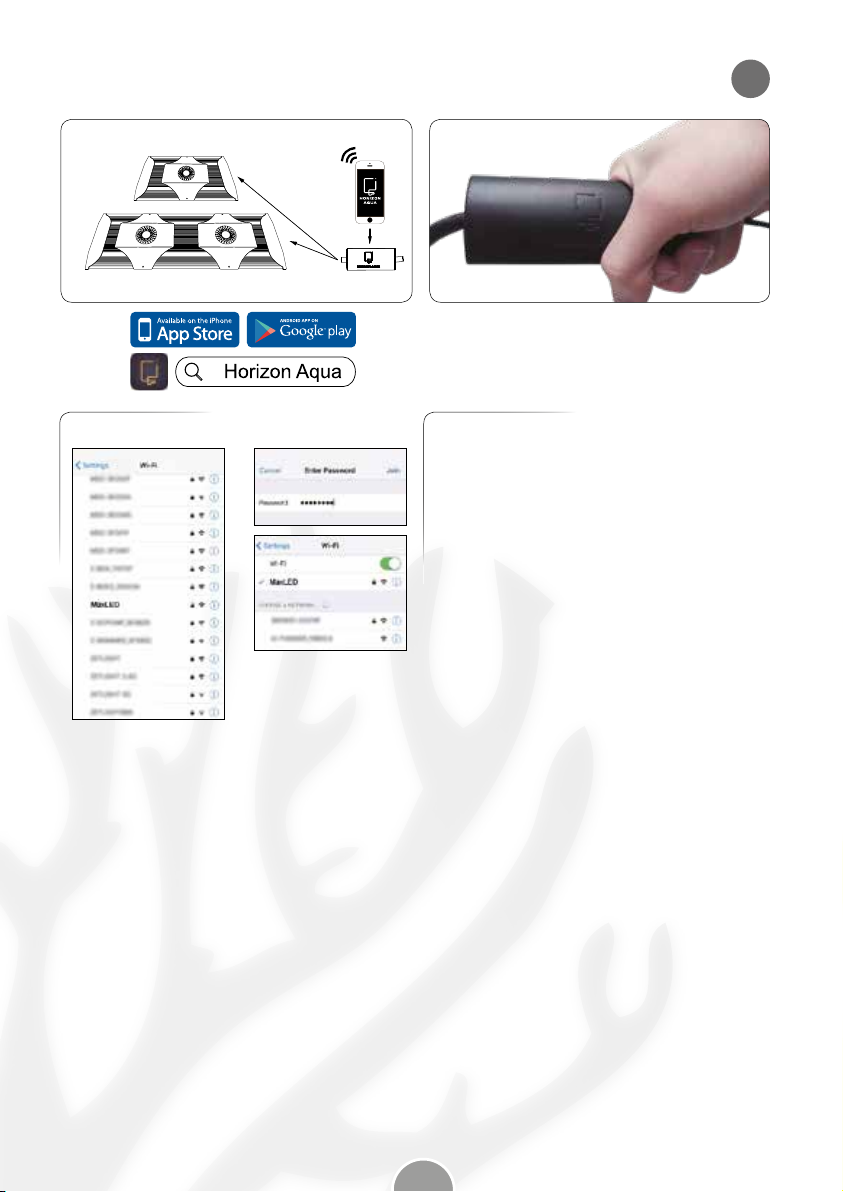
Drip
loop
D

10 11
Verbindung
Verbinden im AP-Modus
Controller zurücksetzen
Halten Sie den WiFi-Controller für 10 Sekunden, wie im Bild
unten gezeigt. Sobald das Licht blinkt, ist der Reset erfolgreich
abgeschlossen.
Wechseln Sie auf Ihrem
Smartphone oder Tablet zu
Einstellungen > WLAN.
Wähle Sie den MaxLED
Geben Sie das Passwort ein:
0000 0000 (acht Nullen).
Bestätigen Sie mit OK. Sobald
die Verbindung hergestellt ist
(die Anzeige bleibt blau), starten
Sie die Horizon Aqua App.
Bei einer Installation im “AP-Modus” wird eine direkte Verbindung
über WLAN zwischen dem Mobilgerät und dem Horizon Aqua-
Produkt erstellt. Die WLAN-Verbindung zwischen Mobilgerät
und Internet wird dafür unterbrochen. Im AP-Modus ist nur eine
Verbindung / Gerät aktiv.
Wir empfehlen, eine Verbindung über Ihren WLAN-Router
herzustellen (STA-Modus). In diesem Fall sind die angeschlossenen
Geräte über eine permanente Verbindung mit Ihrem Router
verbunden, ebenso Ihr Mobilgerät.
Um eine Verbindung im STA-Modus einzurichten, muss das Horizon
Aqua-Gerät zunächst für die Ersteinrichtung im AP-Modus mit Ihren
Smartphone oder Tablet verbunden werden. Wenn die AP-Verbindung
hergestellt ist, können Sie in der App unter „WiFi-Einstellungen“
zum STA-Modus wechseln, indem Sie dort eine Verbindung zu
Ihrem Router einrichten. Siehe hierzu „Verbindung im STA-Modus
herstellen“ in diesem Handbuch.
Download der Horizon APP
D

12
Verbindung
Nach dem Verbinden mit der
MaxLED ist die LED-Taste aktiv
Auswahl: Paperclip
Wechseln Sie auf Ihrem Mobilgerät zu Einstellungen > WLAN
und wählen Sie Ihren WLAN-Router aus. Die Kontrollleuchten am
Controller blinken jetzt blau.
Wählen Sie: “+”, um nach der
MaxLED zu suchen
Auswahl: WIFI
Nachdem der MaxLED
gefunden wurde, drücken Sie
Suche, um die MaxLED zu
aktivieren
Auswahl: Wählen Sie Ihren
Router
Wählen Sie das Gerät aus
und Sie gelangen zum
Einstellungsbildschirm.
Geben Sie das Passwort ein
und drücken Sie OK.
Warten Sie einen Moment und
kehren Sie zum Startbildschirm
der Horizon Aqua App zurück.
D
Stellen Sie eine Verbindung zu Ihrem Router im STA-Modus her

12 13
Datum und Zeit einstellen
Wählen Sie “Sperre”, um das
Bedienfeld zu entsperren oder
zu sperren.
Sonnenaufgang
Einstellung der Start- und
Endzeit Klicken Sie “OK” zur
Bestätigung
Auswahl Controller-Zeit
Tageslicht
Neue Zeiteinstellung gesichert Morgendämmerung
Stellen Sie hier Datum und
Uhrzeit (aktuell) ein. Klicken Sie
“OK” zur Bestätigung
Sonnenuntergang
5 Beleuchtungszeiten können
eingestellt wirden:
- Morgendämmerung
- Sonnenaufgang
- Tageslicht
- Sonnenuntergang
- Mondlicht
Zeiteinstellung: Entsperren Sie
durch Klicken auf das Schloss
Anschließend “Zeiteinstellung”
klicken
Mondlicht
D

14
Lichtausbeute einstellen
Blitzmodus (Gewitter) Bewölkungssimulation (Cloudy)
Beleuchtung ein- und ausschalten
Kanal Schieber entsperren
Bewegen Sie den Schieber
jedes Kanals, um die Helligkeit
und die Farbe zu ändern.
Klicken Sie auf “Lightning” zur
Anpassung der Einstellungen
Klicken Sie auf “Cloudy” zur
Anpassung der Einstellungen
Klicken Sie auf “Speichern”,
um die Einstellungen zu
übernehmen
Geben Sie die Dauer zwischen
1-99 Minuten ein. Geben Sie
die Frequenz zwischen 1-8 ein.
Wählen Sie OK zur Bestätigung.
Geben Sie die Dauer zwischen
1-99 Minuten ein. Geben Sie die
Frequenz zwischen 1-12 ein.
Wählen Sie OK zur Bestätigung.
Beleuchtung An/Aus
Taste = gelb
Beleuchtung ist
eingeschaltet
Taste = gelb
Eingeschaltet
Taste = gelb
Eingeschaltet
Taste = grau
Ausgeschaltet
Taste = grau
Ausgeschaltet
Beleuchtung An/Aus
Taste = grau
Beleuchtung ist
ausgeschaltet
D

14 15
Lichteinstellungen per QR-Code speichern/teilen
Einstellungen mittels QR-Code laden
Einstellungen mittels QR-Code aus dem Fotoalbum laden
Auswahl ‘QR’
Auswahl ‘QR’
Auswahl ‘QR’
Generieren Sie einen QR-Code Ihrer Einstellungen wie
Beleuchtungszeiten, Lichtstärke und Farbe.
Zoom rein Blitzlicht Zoom rous
Speichern Sie den QR-Code.
Damit können Sie Ihre
Einstellungen jederzeit
wiederherstellen oder diese mit
anderen teilen.
Nachdem der QR-Code
geladen wurde, wird eine
Vorschau angezeigt. Mit
dem Schieber (rechts/links)
können Sie die verschiedenen
Beleuchtungszeiten
kontrollieren.
Wählen Sie “Photo”, um das
Fotoalbum Ihres Mobilgeräts
zu öffnen.
Foto öffnen
D

16
Standardeinstellungen wiederherzustellen
Auswahl Reset:
Wählen Sie “OK”, um die
Standardeinstellungen
wiederherzustellen. Für eine
Neukonfiguration muss das
Gerät wieder im AP-Modus mit
Ihrem Mobilgerät verbunden
werden.
D
Problem Überprüfen Losung
• Überprüfen Sie, ob die Lampe
richtig an die Stromversorgung
angeschlossen ist.
• Überprüfen Sie das die Helligkeit
nicht auf 0 ist Eingestellt.
• Überprüfen Sie, ob kein Zeitraum
aktiv ist wo die Lampe nicht aktiv
ist.
• Prüfen Sie, ob die eingestellte
Gesamtzeit die 24 Stunden nicht
überschreiten.
• Überprüfen Sie, ob die Uhrzeit
richtig eingestellt ist.
• Schließen Sie die Lampe richtig
an die Stromversorgung.
• Stellen Sie die Helligkeit auf
einen Wert ein höher als null.
• Lampe einschalten, Zeitraum
Einstellungen prüfen.
• Passen Sie die Einstellungen an.
• Stellen Sie die Uhrzeit richtig ein.
Das Licht funktioniert nicht
Die Beleuchtung bleibt
eingeschaltet weil
ausgeschaltet sein sollte.
Fehlerbehebung

16 17
Sécurité
1. Lisez attentivement le manuel avant utilisation.
2. Utilisation intérieure uniquement.
3. Vérifiez si la tension d’utilisation mentionnée sur l’autocollant du produit correspond bien à la tension de
votre réseau électrique.
4. Ne jamais regarder directement les LEDS. Les UV et Infrarouge (IR) émis par la lampe peuvent causer des
lésions permanentes aux yeux et à la peau. Vous devez minimiser au maximum l’exposition des yeux et de
la peau. Le fournisseur ne peut être tenu responsable en cas de mauvais usage de l’éclairage.
5. Assurez-vous d’aucune possibilité de projection d’eau sur la prise électrique (voir l’image).
6. Bien que la lampe LED soit étanche aux éclaboussures, elle ne doit pas être immergée dans l’eau et il doit
y avoir au moins 15 mm entre le niveau de l’eau et de la lampe. Fixez solidement l’éclairage.
7. Ne branchez l’éclairage qu’après vous être assuré qu’elle est fermement fixée à l’aquarium.
8. Toujours sécher vos mains avant de faire des manipulations sur la lampe ou d’actionner l’interrupteur.
9. Débrancher ou éteindre tous les appareils dans l’aquarium avant de procéder à l’entretien.
10. La lampe LED peut chauffer, veuillez attendre que la température baisse avant toute manipulation.
11. Assurez-vous que le câble et la lampe ne sont pas endommagés avant de les utiliser. Si le câble est
endommagé, il ne peut pas être remplacé et l’unité complète doit être recyclée. Ne jamais raccourcir ou
allonger les fils électriques.
12. Si l’adaptateur a subi une surtension, il peut être remplacé. Achetez un adaptateur de remplacement chez
votre revendeur.
13. Si l’éclairage tombe dans l’aquarium, retirez d’abord la fiche de la prise et alors seulement retirez
l’éclairage de l’eau.
14. La garantie n’est plus valide lorsque l’éclairage LED est endommagée par submersion.
15. Cet appareil peut être utilisé par des enfants âgés de 8 ans et plus et des personnes ayant des capacités
ou un manque d’expérience et de connaissances physiques, sensorielles ou mentales réduites si elles ont
été formées et encadrées d’instructions concernant l’utilisation de l’appareil en toute sécurité et de
comprendre le risques encourus. Les enfants ne peuvent pas jouer avec l’appareil. Le nettoyage et
l’entretien de ne doivent pas être effectués par des enfants sans surveillance.
Installation
Outil nécessaire: Petit tournevis plat.
• Fixez les supports métalliques aux attaches supports, à l ‘aide des 4 vis (plastiques).
• Faites glisser les supports métalliques dans l’unité à LED et serrez les vis (Inox) avec la clé Allen dans les
supports, ne serrez pas les vis.
• Placez l’unité LED sur l’aquarium, réglez la largeur des supports à la largeur de l’aquarium et fixez
maintenant les vis (Inox).
• Fixez les attaches support avec les vis de fixation nylon.
• Raccorder la télécommande entre le ballast et l’unité LED, serrer la connexion pour l’imperméabiliser.
• En option, l’éclairage LED peut être suspendu au-dessus de l’aquarium, un ensemble de câbles est
disponible comme accessoire chez votre revendeur Blue Marine.
Protection
Le ventilateur démarre quand la température est supérieure à 40°C
ENTRETIEN:
• Un nettoyage régulier avec un chiffon humide assure une plus longue durée de vie et une meilleure
luminosité.
• Les LED ne peuvent pas être remplacées individuellement, l’ensemble de l’éclairage doit être remplacé
lorsque les LED ne fonctionnent plus.
Drip
loop
F

18
WiFi connexion
Connecting in AP-modus
Réinitialisation du contrôleur
Maintenez le récepteur WIFI pendant 10 secondes comme
montré sur la photo. Dès que la lumière flashe, la réinitialisation
a été effectuée.
Accédez à Paramètres> WiFi
sur votre smartphone ou votre
tablette. Choisissez MaxLED
Entrez le mot de passe: 000
00000 (huit zéros) et cliquez
sur OK. Une fois que vous êtes
connecté (l’indicateur reste
vert), démarrez l’application
Horizon Aqua.
Lorsqu’une connexion est établie en “mode AP”, une connexion
directe par WiFi entre l’appareil mobile et le produit Horizon-aqua est
créée. Votre connexion à Internet sera interrompue. En mode AP, une
seule connexion / un seul appareil sera actif.
Nous recommandons d’établir une connexion via un routeur (mode
STA). Dans ce cas, il n’est pas nécessaire d’établir une connexion
avec l’appareil, les appareils connectés sont connectés via une
connexion permanente via le routeur.
Pour établir une connexion en mode STA, l’appareil doit d’abord
être connecté en mode AP pour la configuration initiale. Lorsque la
connexion AP est établie, vous pouvez configurer une connexion via
un routeur dans l’application sous les paramètres WiFi. Voir établir la
connexion en mode STA dans ce manuel.
Téléchargez l’application Horizon
F

18 19
Faire une connexion
Après avoir connecté avec
MaxLED le bouton LED est actif
Cliquez sur Paperclip
Accédez à Paramètres> WiFi sur votre appareil mobile et
sélectionnez votre routeur WiFi. Sur votre contrôleur, l’indicateur
clignote rapidement en bleu.
Choisissez: “+” pour
rechercher le MaxLED
Cliquez sur “WIFI”
Après avoir trouvé le MaxLED,
appuyez sur search pour
activer le MaxLED.
Sélectionnez votre routeur
Sélectionnez l’appareil et vous
irez à l’écran de réglage.
Entrez le mot de passe et
sélectionnez OK. Attendez un
court instant et revenez à l’écran
d’accueil de l’APP.
F
Connectez en mode STA

20
Réglage de l’heure et la date
Cliquez sur la serrure
Lever de soleil
Faites glisser les chiffres vers
le haut ou le bas pour régler
l’heure de début. Faites glisser
les chiffres vers le haut ou le
bas pour régler l’heure de fin
Sélectionnez « OK » pour
confirmer
Sélectionnez Setting controller
time
Lumière du jour
Le nouveau réglage est défini Aube
Faites glisser les chiffres vers
le haut ou le bas pour régler
l’année, le mois et le jour.
Faites glisser les chiffres vers
le haut ou le bas pour régler
les heures et les minutes.
Sélectionnez “OK” pour
confirmer.
Coucher de soleil
Réglage des 5 périodes
d’éclairage
- Aube
- Lever de soleil
- Lumière du jour
- Coucher de soleil
- Clair de lune
Cliquez sur la serrure. Cliquez
sur l’horodatage pour l’ajuster
Clair de lune
F
This manual suits for next models
1
Table of contents
Languages:
Other Aquadistri Other manuals

Aquadistri
Aquadistri SuperFish Aqua 20 Installation guide

Aquadistri
Aquadistri BlueMarine Reef 200 User manual

Aquadistri
Aquadistri SuperFish Eco-Flow 120 Installation guide

Aquadistri
Aquadistri Superfish JellyFish User manual

Aquadistri
Aquadistri BlueMarine A.T.O. User manual

Aquadistri
Aquadistri IQ40 Reef Installation guide

Aquadistri
Aquadistri Superfish FISH FEEDER User manual

Aquadistri
Aquadistri BlueMarine Dosing pump User manual

Aquadistri
Aquadistri SuperFish Heater and Ice Guard User manual

Aquadistri
Aquadistri SUPERFISH AQUA-QUBE User manual