ARCHEON EOlifeX User manual

INSTRUCTIONS FOR USE
INSTRUCTION D’UTILISATION


Instructions for use . . . . . . . . . . . . . . . . . . . . . . . . . . . . . . . . . . . . . . . . . . . . . . . . . 4
Instruction d’utilisation . . . . . . . . . . . . . . . . . . . . . . . . . . . . . . . . . . . . . . . . . . . . . 24
[EN]
[FR]

4
EN
The EOlife X equipment is manufactured by ARCHEON,
2 Chemin des Aiguillettes, 25000 Besançon, France.
I. Symbols used on product labelling . . . . . . . . . . . . . . . . . . . . . . . . . . . . . . . . . . . . . . . 5
II. Acronyms. . . . . . . . . . . . . . . . . . . . . . . . . . . . . . . . . . . . . . . . . . . . . . . . . . . . . . . 5
III. Conditions of use . . . . . . . . . . . . . . . . . . . . . . . . . . . . . . . . . . . . . . . . . . . . . . . . . 6
1. Indications for use . . . . . . . . . . . . . . . . . . . . . . . . . . . . . . . . . . . . . . . . . . . . . . . 6
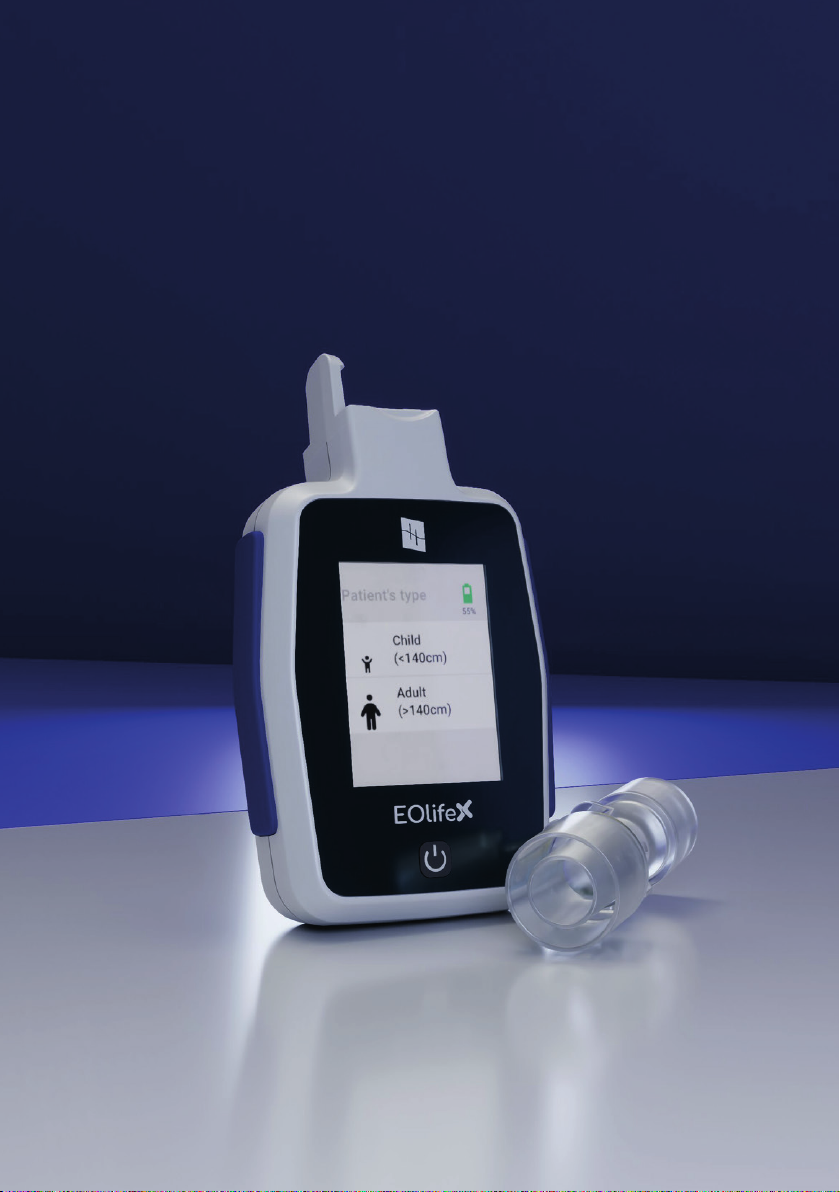
2. Patients . . . . . . . . . . . . . . . . . . . . . . . . . . . . . . . . . . . . . . . . . . . . . . . . . . . . . . 6
3. Environment of use . . . . . . . . . . . . . . . . . . . . . . . . . . . . . . . . . . . . . . . . . . . . . . 6
4. Users . . . . . . . . . . . . . . . . . . . . . . . . . . . . . . . . . . . . . . . . . . . . . . . . . . . . . . . . 6
5. Contraindications . . . . . . . . . . . . . . . . . . . . . . . . . . . . . . . . . . . . . . . . . . . . . . . . 6
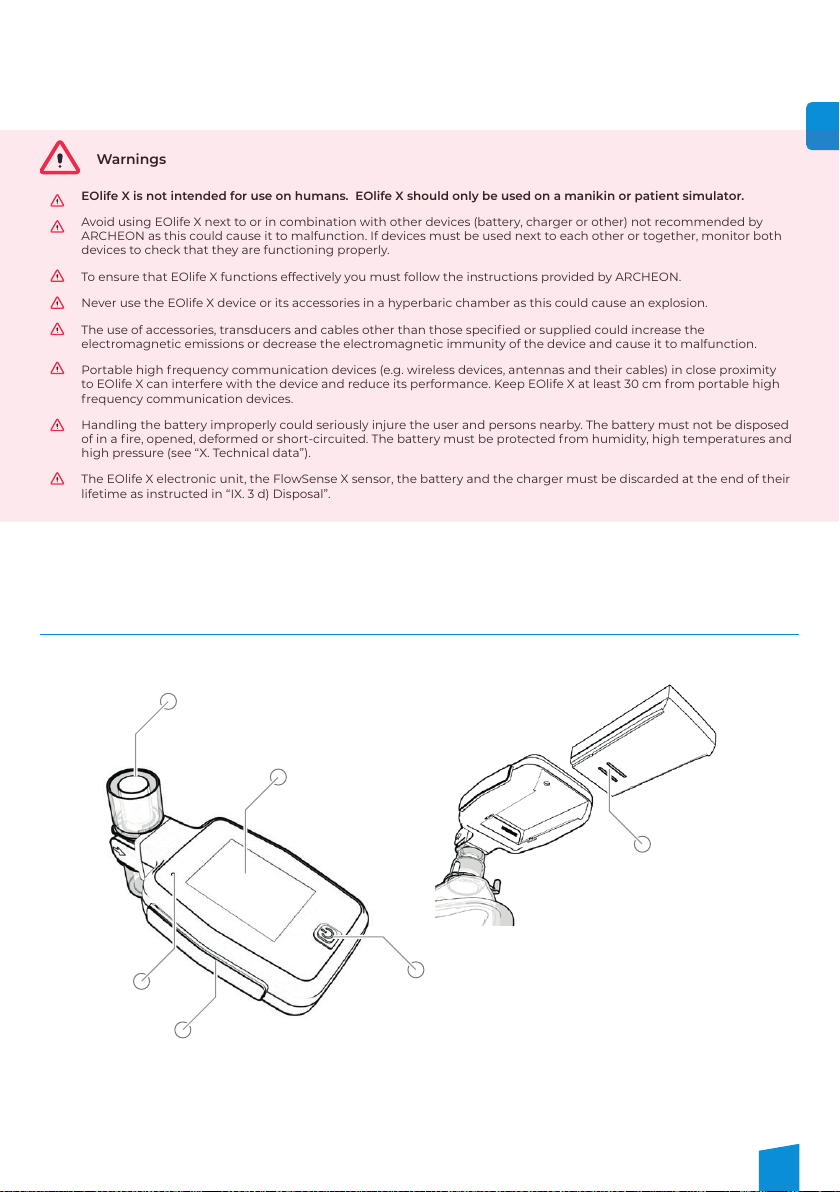
IV. Safety. . . . . . . . . . . . . . . . . . . . . . . . . . . . . . . . . . . . . . . . . . . . . . . . . . . . . . . . . 6
V. Product description . . . . . . . . . . . . . . . . . . . . . . . . . . . . . . . . . . . . . . . . . . . . . . . . 7
VI. Equipment and accessories. . . . . . . . . . . . . . . . . . . . . . . . . . . . . . . . . . . . . . . . . . . 8
VII. Quick start guide of the device . . . . . . . . . . . . . . . . . . . . . . . . . . . . . . . . . . . . . . . . 9
VIII. Detailed product description and operating instructions . . . . . . . . . . . . . . . . . . . . . . . 11
1. Using the device. . . . . . . . . . . . . . . . . . . . . . . . . . . . . . . . . . . . . . . . . . . . . . . . .11
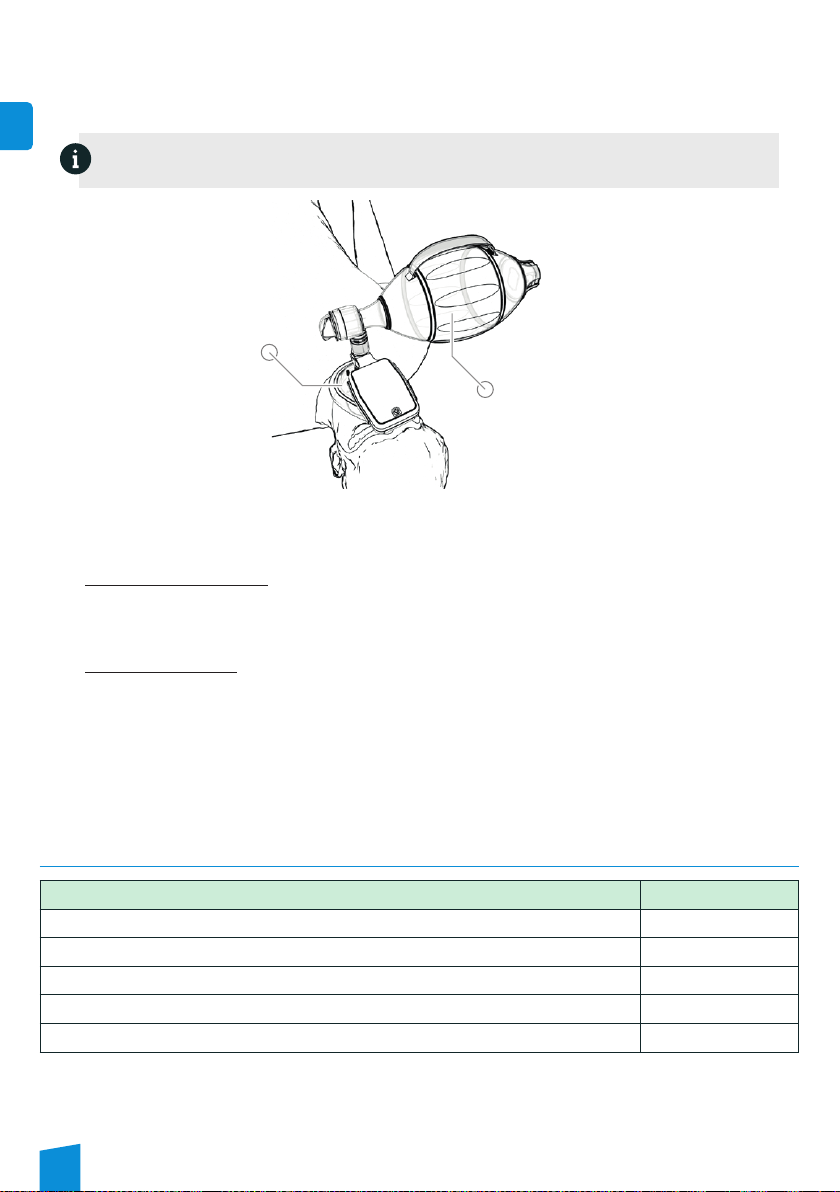
a) Assembly/disassembly . . . . . . . . . . . . . . . . . . . . . . . . . . . . . . . . . . . . . . . . . . . . . . 11
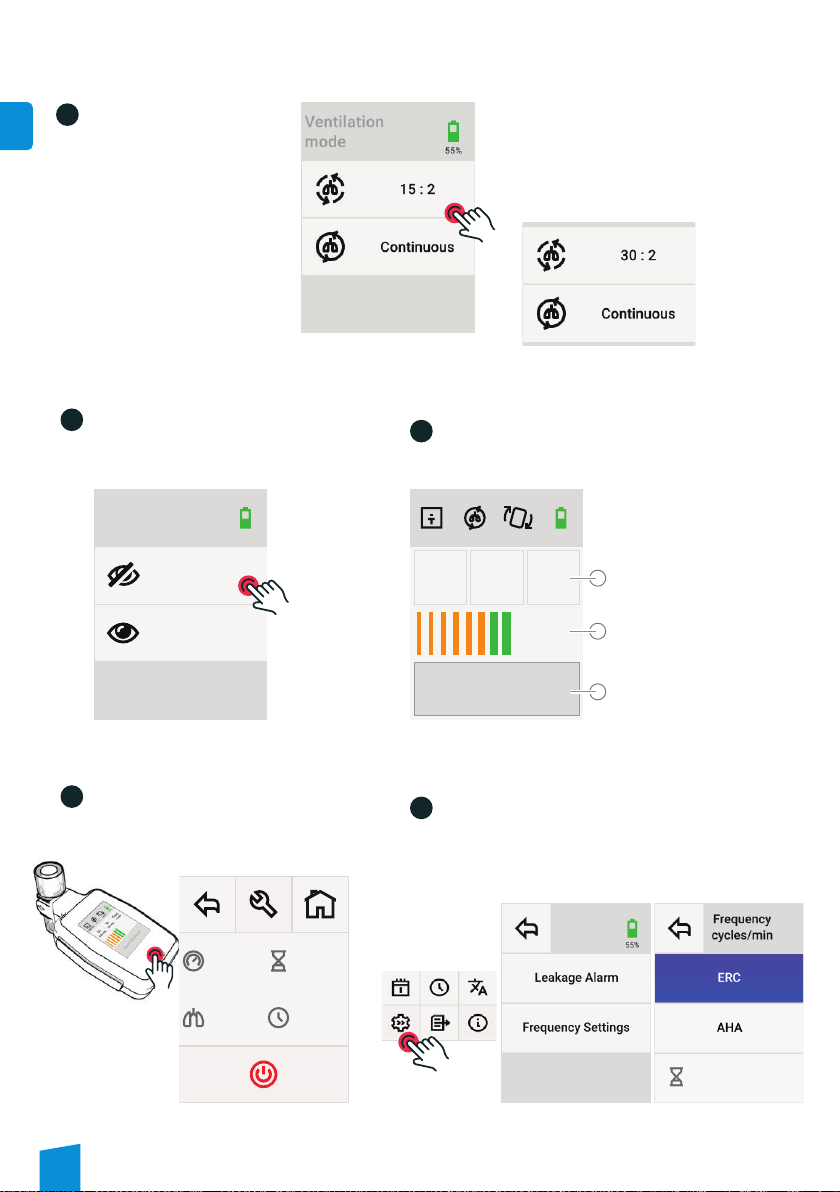
b) EOlife X blind ventilation training mode . . . . . . . . . . . . . . . . . . . . . . . . . . . . . . . . . . 12
c) EOlife X monitored ventilation training mode . . . . . . . . . . . . . . . . . . . . . . . . . . . . . . 12
d) Visual signals conditions . . . . . . . . . . . . . . . . . . . . . . . . . . . . . . . . . . . . . . . . . . . . 15
e) Visual signals priorisation . . . . . . . . . . . . . . . . . . . . . . . . . . . . . . . . . . . . . . . . . . . . 17
f) Automatic shutdown . . . . . . . . . . . . . . . . . . . . . . . . . . . . . . . . . . . . . . . . . . . . . . . 18
2. EOlife X device set-up screen . . . . . . . . . . . . . . . . . . . . . . . . . . . . . . . . . . . . . . . .18
a) Set-up screen display. . . . . . . . . . . . . . . . . . . . . . . . . . . . . . . . . . . . . . . . . . . . . . .18
b) Device settings. . . . . . . . . . . . . . . . . . . . . . . . . . . . . . . . . . . . . . . . . . . . . . . . . . .19
c) Data transfer . . . . . . . . . . . . . . . . . . . . . . . . . . . . . . . . . . . . . . . . . . . . . . . . . . . . 19
d) Update . . . . . . . . . . . . . . . . . . . . . . . . . . . . . . . . . . . . . . . . . . . . . . . . . . . . . . . .20
e) Information . . . . . . . . . . . . . . . . . . . . . . . . . . . . . . . . . . . . . . . . . . . . . . . . . . . . . 21
3. Maintenance. . . . . . . . . . . . . . . . . . . . . . . . . . . . . . . . . . . . . . . . . . . . . . . . . . .21
a) Charging the battery . . . . . . . . . . . . . . . . . . . . . . . . . . . . . . . . . . . . . . . . . . . . . . . 21
b) Disposal . . . . . . . . . . . . . . . . . . . . . . . . . . . . . . . . . . . . . . . . . . . . . . . . . . . . . . .22
IX. Technical data . . . . . . . . . . . . . . . . . . . . . . . . . . . . . . . . . . . . . . . . . . . . . . . . . . .23
1. Technical data related to the device . . . . . . . . . . . . . . . . . . . . . . . . . . . . . . . . . . . .23
2. Technical data relating to the power supply . . . . . . . . . . . . . . . . . . . . . . . . . . . . . . 24
3. Technical data relating to the FlowSense X . . . . . . . . . . . . . . . . . . . . . . . . . . . . . . . . . . .25
X. What to do in the event of an incident . . . . . . . . . . . . . . . . . . . . . . . . . . . . . . . . . . . .25
XI. Warranty and limits of liability . . . . . . . . . . . . . . . . . . . . . . . . . . . . . . . . . . . . . . . . .25
XII. Certifications . . . . . . . . . . . . . . . . . . . . . . . . . . . . . . . . . . . . . . . . . . . . . . . . . . 26
TABLE OF CONTENTS

5
EN
I. Symbols used on product labelling
II. Acronyms
AHA
CPR
ERC
LED
WEEE
American Heart Association
Cardiopulmonary resuscitation
European Resuscitation Council
Light-Emitting Diode
Waste Electrical and Electronic Equipment
Symbol Definition
Manufacturer’s lot number
Part number
Serial number
Quantity
CE marking
Warning
Manufacturer
Use by date
IP44
Ingress protection against :
• Intrusion of solid objects larger than 1 mm
• Water splashing from any direction
Temperature limitation
Humidity limitation
Do not dispose of with general waste
UKCA UK Conformity Assessed

6
EN
III. Conditions of use
IV. Safety
oBefore using the product, read these instructions carefully. Failure to follow the instructions can lead to improper use
and expose the user or persons nearby to risks.
oThe use of defective devices may put the user at risk.
oThe EOlife X device, its battery, its charger and the FlowSense X sensor must be stored and used as described in the
instructions for use (see “X. Technical data”).
oThe device can be safely used outdoors, as it is rainproof, splashproof and cannot be penetrated by solid objects larger
than 1mm (IP44 rating). However, it should be handled with care and kept away from powerful water jets and dust.
oAlways check the battery level before using EOlife X. We advise recharging the battery after each use. Change the battery
if the charge is below 20%. We also advise having a spare operational battery in case this is needed.
oUsing a battery with a low charge at temperatures below 0°C greatly reduces the run time and can cause EOlife X to stop
functioning after a short time. If the device is used at low temperatures, the battery should be fully charged.
oDo not remove the battery when EOlife X is switched on.
• Use the device as intended (see “III. Conditions of use”).
• Comply with the contraindications (see “III Conditions of use”).
• Carefully read the safety instructions in these instructions for use.
• Comply with all the sections in these instructions.
Precautions
• Only use the EOlife X device and its accessories if they do not show any visible damage.
1. Indications for use
EOlife X is a radio equipment intended to the training of users on a mannikin to the manual ventilation during
cardiopulmonary resuscitation (CPR).
2. Patients
EOlife X is indicated to be used on:
- adult simulated patient between 4’7” (140 cm) and 6’7” (200 cm)
- pediatric simulated patient between 1 year (above 2’5” = 75 cm) and 12 years (below 4’7” = 140 cm)
3. Environment of use
EOlife X is intended to be used in training session.
4. Users
EOlife X is intended to be used by healthcare professionals and rescuers.
5. Contraindications
EOlife X is not approved for the following uses:
- In a hyperbaric chamber
- Near magnetic resonance imaging machines

7
EN
EOlife X is not intended for use on humans. EOlife X should only be used on a manikin or patient simulator.
Avoid using EOlife X next to or in combination with other devices (battery, charger or other) not recommended by
ARCHEON as this could cause it to malfunction. If devices must be used next to each other or together, monitor both
devices to check that they are functioning properly.
To ensure that EOlife X functions effectively you must follow the instructions provided by ARCHEON.
Never use the EOlife X device or its accessories in a hyperbaric chamber as this could cause an explosion.
Portable high frequency communication devices (e.g. wireless devices, antennas and their cables) in close proximity
to EOlife X can interfere with the device and reduce its performance. Keep EOlife X at least 30 cm from portable high
frequency communication devices.
The EOlife X electronic unit, the FlowSense X sensor, the battery and the charger must be discarded at the end of their
lifetime as instructed in “IX. 3 d) Disposal”.
Handling the battery improperly could seriously injure the user and persons nearby. The battery must not be disposed
of in a fire, opened, deformed or short-circuited. The battery must be protected from humidity, high temperatures and
high pressure (see “X. Technical data”).
The use of accessories, transducers and cables other than those specified or supplied could increase the
electromagnetic emissions or decrease the electromagnetic immunity of the device and cause it to malfunction.
Warnings
FlowSense X sensor
Removable battery
Touch screen
Red
LED
Bumpers
Physical
ON/OFF button
V. Product description
oThe device is a portable machine that includes the EOlife X electronic unit, its removable and rechargeable battery, its
charger and the FlowSense X sensor.

8
EN
oEOlife X is used with the FlowSense X sensor which is positioned between a non-invasive ventilation interface (mask),
invasive ventilation interface (endotracheal tube), or any type of supraglottic airway device, and a standard self-inflating
bag to manually ventilate a manikin.
oEOlife X allows the user to choose the patient type (adult or child), the ventilation mode (continuous ventilation, CPR
with a 30:2 ventilation ratio or CPR with a 15:2 ventilation ratio), the patient’s height or the patient’s age and the training
mode (blind ventilation or monitored ventilation).
oEOlife X records the ventilation data, which can be exported to another device for research and analysis. EOlife X includes
a Bluetooth low energy wireless module to communicate with such devices.
• Monitored ventilation training:
Based on the inspiratory and expiratory flow rates measured during ventilation, EOlife X calculates and records the
main ventilation parameters (insufflation volumes, tidal volumes, ventilation frequency and leakage) and gives real-
time feedback on the ventilation performed. EOlife X also shows the target ventilation values (in accordance with the
guidelines issued by the AHA and ERC international scientific committees) to guarantee adequate ventilation.
• Blind ventilation training:
Based on the inspiratory and expiratory flow rates measured during ventilation, EOlife X calculates and records the
main ventilation parameters (insufflation volumes, tidal volumes, ventilation frequency and leakage) but does not give
the user real-time feedback on the ventilation performed and does not show target ventilation values.
Self-inflating bag
Mask
VI. Equipment and accessories
Equipment Part number
EOlife X A0000089
EOlife X battery A0000110
Charger and 4 adapters A0000029
FlowSense X (x1) A0000093
FlowSense X (x10) A0000095
The equipment and accessories can be ordered from approved distributors.
Note
The ventilation interface and the self-inflating bag are accessories not supplied by ARCHEON.

9
EN
VII. Quick start guide of the device
This section gives a short step-by-step description of how to use the EOlife X device. There is a more detailed description in
the next section, “VIII. Detailed product description and operating instructions”.
Assembly with the bag
EOlife X assembly with
the FlowSense® sensor
See “VIII 1 a) Assembly”
Assemble EOlife X, attaching the FlowSense® single use sensor and other devices to ventilate the patient (ventilation
interface and bag)
Start up EOlife X by pressing the
physical ON/OFF button Press on the type of the patient :
▶Child : the patient is a child
under 140 cm (4’7’’) tall.
▶Adult : the patient is an adult
above 140 cm (4’7’’) tall.
According the patient type (child or adult), press on :
▶Age of the
child patient
- purple : 1-2 years
- Yellow : 2-3 years
- White : 3-4 years
- Blue : 5-6 years
- Orange : 7-9 years
- Green : 10-11 years
1
45
6
Assembly with the
ventilation interface
23
▶The height of the adult
patient :
- small : the patient’s height
is between 140 cm (4’7’’) and
160 cm (5’2’’)
- medium: the patient’s
height is between 160 cm
(5’3’’) and 180 cm (5’10’’)
- tall : the patient’s height is
between 180 cm (5’11’’) and
200 cm (6’7’’)

10
EN
55%
Training mode
Blind
ventilation
Monitored
ventilation
Medium Continuous Rotate 55%
Vi Vt Freq.
420 mL 390 mL 11/min
Good Ventilation
Main screen
(advanced interface)
Bar graph
(real-time Vi)
Visual signal
display area
Information area (advanced
interface)
• Vi = insufflated volume
• Vt = tidal volume
• Freq. = ventilation frequency
According to the patient type
(child or adult), choose the type of
ventilation performed :
Child :
- 15:2 mode : alternating between
15 chest compressions and 2
ventilations
- Continuous mode : continuous
ventilations at a frequency
recommended by AHA and ERC
guidelines
7
Choose the type of training :
- Blind ventilation
- Monitored ventilation
8
78 %
387 mL
12 / min
35 min
Ventilation screen
See VIII 1 b) EOlife X ventilation method
See VIII 1 d) Visual signals
9
Display the summary screen by
pressing the physical ON/OFF
button
10 Select the date, time and language and
choose to deactivate the leakage alarm and
the followed guideline
11
Adult :
- 30:2 mode : alternating between
30 chest compressions and 2
ventilation
- Continuous mode : ventilation
at a frequency of 10 cycles per
minute

11
EN
Switch off EOlife X by pressing the ON/OFF button for 3
seconds or by quick pressing the ON/OFF icon on the touch
screen
Disconnect the ventilation bag and interface
(mask or endotracheal tuve) and unclip
the FlowSense X sensor by pulling the tab
outwards, as shown by the arrow
Disconnecting EOlife XSwitching off using
the summary screen
12 13
click
Notch
Ridge
Tab
VIII. Detailed product description and operating instructions
EOlife X is controlled via the touch screen and the physical ON/OFF button.
Avoid using any object that could scratch the screen.
Caution
a) Assembly/disassembly
Assembly
FlowSense X is factory calibrated. Once removed from its packaging FlowSense X is ready to be used.
Remove the FlowSense X sensor from its packaging by using the notch to tear the antistatic bag to avoid damaging
the sensor.
Connect the FlowSense X sensor to the EOlife X unit, taking care not to expose the printed circuit board to dust or
splash it with water.
First insert the part of the FlowSense X with a notch into the connector ridge, and then press firmly on the sensor so
that it comes into contact with the connector pins. You will hear a click when the connector tab holds the FlowSense
X sensor in place.
Check that the FlowSense X sensor is held properly in place before starting up the EOlife X unit.
1. Using the device

12
EN
Connect the ventilation interface (mask or
endotracheal tube) to the compatible end of the
FlowSense X sensor. The sensor ends are shaped
differently to ensure that the interface cannot be
connected to the wrong end.
Connect the bag to the other end of the FlowSense
X sensor. The device must be assembled as shown
here:
Disassembly
To remove the accessories from the product, take the FlowSense X sensor out of the ventilation interface (mask or
endotracheal tube) by gently pulling vertically on the FlowSense X sensor. Then remove the ventilation bag at the other
end in the same way.
When ventilating with a mask, ensure it is correctly held on the manikin's face during insufflation and for the entire
duration of expiration so that EOlife X can measure the volume expired.
Warning
b) EOlife X blind ventilation training mode
c) EOlife X monitored ventilation training mode
In blind ventilation mode, EOlife X calculates the volumes insufflated and expired, the ventilation frequency and
leakage, estimates the tidal volumes, and records the data. After recording the ventilation session, EOlife X provides a
statistical report on the quality of the ventilation performed.
In monitored ventilation mode, EOlife X gives the user real-time feedback on the quality of the ventilation performed
based on a cyclic analysis of inspiratory and expiratory flow rates. It must therefore be positioned proximally to be able
to measure both the inspiratory and expiratory flow rates, calculate the volumes insufflated and expired, the ventilation
frequency and leakage, estimate the tidal volumes, and generate user information signals and visual signals if the
ventilation parameters are unacceptable.
EOlife X also uses algorithms to filter out small airflows generated by chest compressions so as not to display
anomalous volume and ventilation frequency values and to avoid measurement artefacts. During ventilation, be sure to
generate enough flow to be detected by the device.
REC
STOP
Recording session
Medium Continuous Rotate 55%
Blind ventilation
training screen
Recording indicator
Click on stop to
stop recording

13
EN
Main screen
5
7
8
9
41
1. Displays the patient’s height or the patient’s age selected and quick access key to change the patient’s height or
the patient’s age
2. Displays the chosen ventilation mode and quick access key to change the ventilation mode.
3. Rotation icon and key to rotate the screen 180° to adjust the direction of the screen to the user’s position during
ventilation.
The user can perform ventilation and change the patient’s height, the patient’s age or the ventilation mode.
The screen returns to its normal position if the user:
• Presses again on the rotation icon
• Presses the physical ON/OFF button to show the summary screen
• Presses the physical ON/OFF button for 3 seconds to switch the device off
4. Displays the battery level (between 0% and 100%).
oSee “VIII. 3 a) Charging the battery”.
5. Displays the actual volume insufflated (Vi) for each ventilation cycle (value in mL).
2 3
6
Note
The tidal volume is the estimated volume of air/oxygen actually reaching the patient’s lungs based on both
the measurement of the volume of air expired and the leak calculated during the insufflation/
expiration phases. The ERC and AHA recommend that adult and child patient in cardiopulmonary arrest
should be ventilated with a tidal volume of 6 to 8 mL/kg of Ideal body weight.
6. Displays the actual tidal volume (Vt) (for each of ventilation cycle (value in mL).
Note
7. Displays the trend value of the ventilation frequency (Freq.) (value in cycles/minute) taking into account the
frequency of the last ventilation cycles performed :
For the 30:2 and the 15:2 mode : value displayed from the third ventilation cycle.
For the continuous mode : value displayed from the fourth ventilation cycle.
Note
Check that the manikin’s airways are completely sealed so that all of the air insufflated via the mouth is fully
expired. If this is not the case, you have to deactivate the leakage alarm in the EOlife X settings (seeVIII 2 b)).
EOlife X will be able to analyse the ventilation ncycles or calculate the ventilation parameters correctly by
simulating the expiration.
The main screen guides the user by displaying the ventilation parameters and visual guide showing the ideal air/
oxygen volume to administer and when to administer it. The main screen also uses visual signals to warn the user if
the manikin is not ventilated correctly.
Medium Continuous Rotate 55%
Vi Vt Freq.
420 mL 390 mL 11/min
Good Ventilation
Adult (ERC and AHA) 10 ventilations per min
Child from 1 to 6y (ERC) 20 ventilations per min
Child from 7 to 11y (ERC) 15 ventilations per min
Child from 1 to 11y (AHA) 25 ventilations per min

14
EN
• When the user ventilates, the bar graph shows in real time the quantity of air/oxygen that must be insufflated
based on ERC and AHA guidelines.
▶Display in continuous mode:
oDisplay in 30:2 and 15:2 mode:
• In continuous resuscitation mode, EOlife X generates a visual countdown to show the user when to ventilate
to deliver the ‘target frequency’ breaths per minute. When the green lung is displayed, the user must
ventilate.
In 30:2 mode, the countdown function is disabled as the person ventilating must wait for 30 chest
compressions before delivering 2 ventilations.
In 15:2 mode, the countdown function is disabled as the person ventilating must wait for 15 chest
compressions before delivering 2 ventilations.
In this mode the ventilation frequency depends on the person (or machine) performing the chest
compressions.
The green lung is shown permanently to indicate that the device is waiting to detect a ventilation to display
the bar graph.
Orange:
Volume < Ideal volume. Green:
Ideal volume.
Red:
Volume > Ideal volume.
8. Real-time indication of how to ventilate:
▶A bar graph shows whether the volume insufflated/exhaled is adequate:

15
EN
9. Visual signal display area :
• “Good ventilation” all the ventilation parameters calculated are within the appropriate range of
values as defined in the international guidelines.
• “Insufficient volume” the volume of air insufflated to the patient is significantly lower than the
values given in the international guidelines.
• “Excessive volume” the volume of air insufflated to the patient is significantly higher than the
values given in the international guidelines.
• “Low frequency” the ventilation frequency is much significantly than the values given in the
international guidelines.
• “High frequency” the ventilation frequency is significantly higher than the values given in the
international guidelines.
• “Important leakage” the difference calculated between the volume of air/oxygen insufflated
and the volume exhaled is too great. This may be because the mask is not
positioned correctly, due to improper intubation (oesophageal intubation) or
because the ventilation circuit is not properly sealed.
Note
See details of visual signals in “VIII. 1 c) Visual signals”.
d) Visual signals conditions
Visual messages related to ventilation parameters
Visual messages may appear during ventilation when the ventilation parameters exceed the threshold values and are
persistently outside the ranges given below.
The screen shows the visual messages in the visual signal display area (lower part of the screen) as a message.
The visual messages concern:
• The tidal volume (Vt):
Visual signal
conditions
Cause
Solution
Patient height Tidal volume value
Insufficient volume
Small < 225mL
Insufflate a volume of air within the
appropriate range as defined in the
international guidelines
Medium < 285mL
Tall < 350mL
1-2 years < 45 mL
2-3 years < 55 mL
3-4 years < 70 mL
5-6 years < 90 mL
7-9 years < 115 mL
10-11 years < 140 mL

16
EN
• The ventilation frequency (Freq.):
Visual signal
conditions Cause Ventilation frequency value Solution
Low frequency
(continuous mode)
Adult No insufflation during 9s
Ventilate at an appropriate
frequency, as recommended in
the international guidelines
Child: 1-4y (ERC) and
AHA No insufflation during 6s
Child: 5-11y (ERC) No insufflation during 6.5s
Low frequency
(30:2 mode) Adult No inspiration for 24
seconds
Low frequency
(15:2 mode)
Child: 1-4y (ERC) and
AHA No insufflation during 14s
Child: 5-11y (ERC) No insufflation during 14.5s
High frequency
Adult > 15 bpm
Child: 1-4y (ERC) and
AHA > 30 bpm
Child: 5-11y (ERC) > 25 bpm
Visual signal
conditions
Cause
Solution
Patient height Tidal volume value
Excessive volume
Small > 430 mL
Insufflate a volume of air within the
appropriate range as defined in the
international guidelines
Medium > 565 mL
Tall > 710 mL
1-2 years > 100 mL
2-3 years > 120 mL
3-4 years > 150 mL
5-6 years > 190 mL
7-9 years > 240 mL
10-11 years > 300 mL
Note
• In continuous ventilation mode the visual signal condition is calculated based on the trend value of
the volumes. If the trend value and the current value of the tidal volume are as described in the table
above, the tidal volume visual signal is triggered.
• In 30:2 and 15:2 CPR mode the visual signal condition is calculated based on the mean value of the
tidal volumes during two consecutive ventilation cycles.
Note
• In continuous ventilation mode the frequency is calculated based on the trend value of the ventilation
frequency. If the trend value and the current value of the frequency are as described in the table above,
the ventilation frequency visual signal is triggered.
• In 30:2 and 15:2 CPR mode the visual signal condition is calculated based on the actual value of the pause
time.

17
EN
• Leakage:
Visual signal
conditions Leakage value Solution
Important leakage for
adult patient > 40%
Depending on the cause of the leakage, several solutions are
possible (non-exhaustive list):
oReposition the tracheal tube if the manikin is improperly
intubated (selective intubation, tube not deep enough inside
the trachea) or inflate the bag more if the ventilation circuit is
not properly sealed
oReposition the mask properly on the manikin's face to ensure
that the ventilation circuit is properly sealed
oCompletely free the manikin's airways
Important leakage for
child patient > 50%
Note
• In continuous ventilation mode leakage is calculated based on the trend value of the leakages. If
the trend value and the current leakage value are as described in the table above, the leakage visual signal
is triggered.
• In 30:2 and 15:2 CPR mode the visual signal condition is calculated based on the mean value of the
leakages during two consecutive ventilation cycles.
All visual signal messages appear in the same display area, therefore a system is necessary to prioritize the visual
signals. Visual signals prioritization also enables the user to focus first on correcting the most critical problem in
terms of patient safety, and avoids the additional stress of multiple simultaneous visual signals.
The visual signals were prioritized with clinical experts based on the risk level:
High and low
frequency
Excessive
volume
Important
leakage
Insufficient
volume
>>>
Visual signal message linked to the FlowSense X® sensor
During ventilation, if the FlowSense X sensor is defective or not properly connected or if a foreign object on the
connector interferes with the signal transmission, an alarm screen is displayed:
You must reconnect a functional FlowSense X sensor as described above to clear the
“FlowSense X failure” screen.
FlowSense X failure
FlowSense X failure screen
Note
The “FlowSense X failure” alarm screen can only be displayed from the main screen.
e) Visual signals priorisation

18
EN
EOlife X device failure
If there is a device failure, EOlife X will be unusable: the screen switches off (or no longer comes on) and the red LED in
the top right corner of the screen comes on.
See “XI. Troubleshooting”.
f) Automatic shutdown
a) Set-up screen display
1. Start up EOlife X by pressing the physical ON/OFF button.
2. Press normally on the physical ON/OFF button to show the summary screen.
2. EOlife X device set-up screen
Summary screen
Summary screen
3. Next, select the [wrench ] to display the EOlife X set-up screen.
Set-up screen
To set
the time
Data transfer
To set
the date
Device
settings
Language
selection
Access to main
information
If there is no user action (a press of the physical ON/OFF button, a touch of the screen when the device is running
or the detection of the inspiration phase when a ventilation sequence is running.) for 1 hour, the device turns itself
off completely.
To turn the device on again, simply press the physical ON/OFF button.

19
EN
b) Device settings
c) Data transfer
o Leakage alarm settings
When the manikin’s airways are not completely sealed and the air insufflated
via the mouth is not fully expired, you have to deactivate the leakage alarm in
the device settings because EOlife X will not correctly works. By deactivating
the leakage alarm, EOlife X will simulate an expiration and will be able
to analyse the ventilation cycles or calculate the ventilation parameters
correctly.
o Frequency settings
For a child patient, AHA and ERC guidelines do not have the same
recommandations about the ventilation frequency. EOlife X offers the
possibility to choose between following AHA or ERC guidelines.
• AHA guideline for children between 1 year and 11 years : 25 cycles per minutes
• ERC guideline for children between 1 year and 6 years : 20 cycles per minutes
• ERC guideline for children between 7 years and 11 years : 15 cycles per minutes
EOlife X records the ventilation parameters in each ventilation cycle. It can record for an estimated period of 10 hours.
This data can then be transferred via Bluetooth to a compatible device using the EOlife Connect© app to extract and
analyse the data. To avoid losing the data recorded, it is advisable to transfer the data recorded by EOlife X after each
use.
Note
Transferring data requires the use of a device compatible with EOlife Connect©, not included with the
equipment sold with EOlife X. This device can be either a tablet or a smartphone running on one of these
operating systems: Android or IOS.
The EOlife Connect© app must be downloaded from the App Store or Google Play Store and installed on your
device to be able to use the EOlife X data transfer feature.
Please contact an approved distributor or the manufacturer for more information.
Download the data recorded by EOlife® from the set-up screen by selecting [the icon]. The EOlife® Bluetooth
connection is automatically turned on and a message appears.
Note
When data is being transferred from the device, the EOlife X screen is frozen and the red LED at the top left of
the screen may come on. Once the transfer is complete, the LED will turn off and the device will be operational
again.
Bluetooth activation screen

20
EN
Download the data recorded by EOlife X from EOlife Connect©:
1. Start up EOlife Connect©.
2. Press on [the icon] on the home screen. The EOlife Connect© Bluetooth is enabled and the device searches for
nearby EOlife X devices.
3. On the connection screen, select the serial number of the EOlife X device you want to connect with to perform
the data transfer.
4. A circular progress bar shows the progress of the data transfer. A confirmation message appears once the data
transfer is complete.
5. Press on one of the two options to view either the last downloaded ventilation or all downloaded ventilations.
d) Update
EOlife X has software that can be updated via Bluetooth using the EOlife Connect© app.
Your approved distributor or the manufacturer will notify you when an update is available.
Note
This update requires the use of a device compatible with EOlife Connect©, not included with the equipment
sold with EOlife X. This device can be either a tablet or a smartphone running on one of the following
operating systems: Android or IOS.
The EOlife Connect© app must be downloaded from the App Store or Google Play Store and installed on your
device to be able to use the EOlife X software update feature.
Please contact an approved distributor or the manufacturer for more information.
Note
During the device update, the EOlife X screen is off and the red LED at the top left of the screen is on. Once
the update is complete, the LED will turn off and the device will start up again.
Turn on the EOlife X’s Bluetooth from the set-up screen by selecting [the icon]. It turns on automatically and a
message appears.
Bluetooth activation screen
Update the EOlife X software from EOlife Connect©:
1. Start up EOlife Connect©.
2. Press on [the icon] on the home screen. The EOlife Connect© Bluetooth is enabled and the device searches for
nearby EOlife X devices.
3. On the update screen, select the serial number of the EOlife X device you want to connect with to perform the
update.
4. A progress bar shows the progress of the update. A confirmation message appears once the update is complete.
Other manuals for EOlifeX
1
Table of contents
Languages:
Other ARCHEON Medical Equipment manuals
Popular Medical Equipment manuals by other brands

Smith & Nephew
Smith & Nephew LEGION Cones SURGICAL TECHNIQUE

Care Fusion
Care Fusion Alaris 8210 Series Technical & service manual

4healthcare
4healthcare 4H440 User instruction manual

Care Fusion
Care Fusion 50-7500B Procedure

Hillrom
Hillrom The Vest P205 user manual

Breas Medical
Breas Medical Z1 Auto Clinician User Guide