manuals.online logo
Brands
  1. Home
  2. •
  3. Brands
  4. •
  5. Architectural Mailboxes
  6. •
  7. Postal Equipment
  8. •
  9. Architectural Mailboxes 6200 Series User manual

Architectural Mailboxes 6200 Series User manual

Post Mount Mailbox | 6200 Series
MOUNTING INSTRUCTIONS
R
Before You Begin
Outgoing Flag
Your new mailbox comes fully assembled
with the exception of the included
outgoing flag. The outgoing flag should
be attached before proceeding to mount
the mailbox to it’s post.
Outgoing Mail
To leave mail for your carrier to pick up, place
it under the outgoing mail clip inside of the
hopper door and raise the outgoing flag. Upon
your carrier's next delivery, they will retrieve
your outgoing mail and lower the flag.
Keys
Your new mailbox comes with two keys. The keys allow access to the storage compartment. To retrieve
incoming deliveries, simply open the access door at the bottom of the box. IT IS IMPORTANT TO
NOTE THAT IT IS NOT THE RESPONSIBILITY OF MAIL CARRIERS TO OPEN MAILBOXES
THAT ARE LOCKED, ACCEPT KEYS FOR THIS PURPOSE, OR LOCK MAILBOXES AFTER
DELIVERY OF THE MAIL.
Parts
x 2, nuts
x 2, washers
x1, outgoing flag
Then, place the washers
over the rods and secure the
flag with the nuts. Tighten
the nuts with a wrench.
To attach the flag, slide it over
the threaded rods on the right
side of the mailbox, ensuring
proper orientation.
Outgoing
Mail Clip
Post Mount Mailbox | 6200 Series
MOUNTING INSTRUCTIONS
R
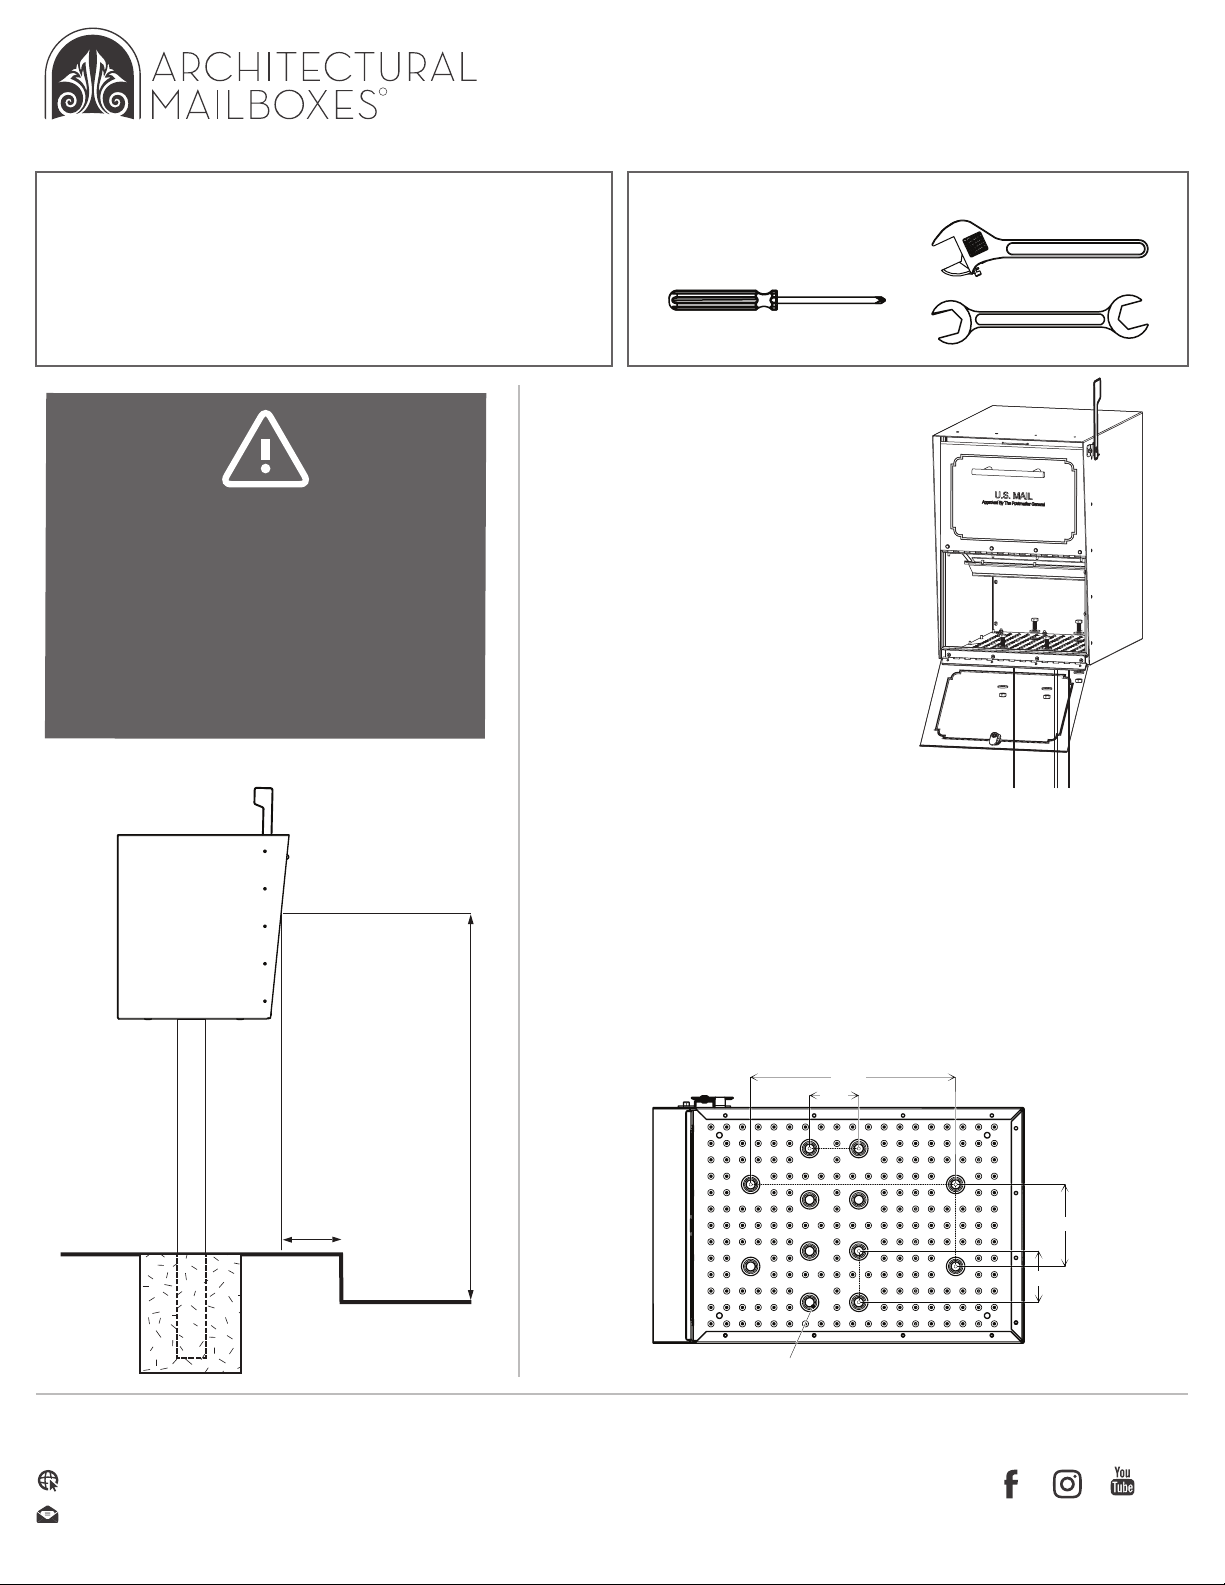
CUSTOMERS ARE REQUIRED TO CONTACT THE LOCAL
POST OFFICE BEFORE INSTALLING THE MAILBOX TO
ENSURE ITS CORRECT PLACEMENT AND HEIGHT AT
THE STREET. GENERALLY, MAILBOXES ARE INSTALLED
AT A HEIGHT OF 41–45 INCHES FROM THE ROAD
SURFACE TO EITHER THE INSIDE SURFACE OF THE
MAILBOX THAT THE MAIL IS PLACED ON BY THE
CARRIER OR TO THE LOWEST EDGE OF MAIL ENTRY
(FOR LOCKED MAIL SLOT DESIGNS) AND ARE SET
BACK 6–8 INCHES FROM THE FRONT FACE OF CURB
OR ROAD EDGE TO THE MAILBOX DOOR.
Tools (not included)
One Phillips Screwdriver
One Wrench
- or -
Hardware
Mailbox mounting hardware is included with all new Architectural
Mailboxes posts and 4x4 wood-post adapters. If you are using an
existing post, not made by Architectural Mailboxes, please reference
the mounting hole diameter and pattern in Option 2 to determine
the hardware you will need for installation.
© 2020, Architectural MailboxesRev. E
Questions, Comments, Concerns?
[email protected]
www.architecturalmailboxes.com
Find us on social media!
@archmailboxes
Option 2
Identify if your existing post or mounting surface has a matching
hole pattern with the mailbox. If there are no matching hole
patterns, you will need an adapter plate or piece of wood to drill
the mounting holes into. Architectural Mailboxes does not
recommend drilling new holes in the mailbox, as that will expose
untreated metal and void the product warranty. Use the drawing
below for suggested bolt sizes to use with your mailbox.
For use with non-Architectural Mailboxes posts...
Option 1
Align the mailbox mounting holes
with the holes in the mounting plate.
Attach the mailbox to the mounting
plate using the hardware included
with the Architectural Mailboxes
post or adapter.
For use with compatible
Architectural Mailboxes
posts and adapters...
ROAD SURFACE
41” to 45”
6” to 8”
MAIL ENTRY
CURB
Need keys? Visit us at...
www.architecturalmailboxes.com/keys
Fits 5/16" Bolts
2.5”
2.4”
4.0”
10.0”

Other Architectural Mailboxes Postal Equipment manuals

Architectural Mailboxes 7511 User manual

Architectural Mailboxes

Architectural Mailboxes 7511 User manual

Architectural Mailboxes Oasis User manual

Architectural Mailboxes

Architectural Mailboxes Oasis User manual

Architectural Mailboxes DVK Series User manual

Architectural Mailboxes

Architectural Mailboxes DVK Series User manual

Architectural Mailboxes MB981 Series User manual

Architectural Mailboxes

Architectural Mailboxes MB981 Series User manual

Popular Postal Equipment manuals by other brands

Opex Omation 206 Operator's guide

Opex

Opex Omation 206 Operator's guide

Neopost ij25 user guide

Neopost

Neopost ij25 user guide

Gentry 876 installation instructions

Gentry

Gentry 876 installation instructions

Ricoh mSorter OCR user manual

Ricoh

Ricoh mSorter OCR user manual

Neopost Automailer 5 installation guide

Neopost

Neopost Automailer 5 installation guide

PAKETSAFE Paketsafe Plus Loxone Installation

PAKETSAFE

PAKETSAFE Paketsafe Plus Loxone Installation

Thiele Streamfeeder EFS Pro manual

Thiele

Thiele Streamfeeder EFS Pro manual

Pitney Bowes DM50 Series Update instructions

Pitney Bowes

Pitney Bowes DM50 Series Update instructions

Burg Wächter RONDO manual

Burg Wächter

Burg Wächter RONDO manual

Pitney Bowes DL400 Operator's guide

Pitney Bowes

Pitney Bowes DL400 Operator's guide

FP PostBase installation guide

FP

FP PostBase installation guide

Neopost IS-240 user guide

Neopost

Neopost IS-240 user guide

Neopost IJ45 manual

Neopost

Neopost IJ45 manual

SSS Siedle CLASSIC Product information

SSS Siedle

SSS Siedle CLASSIC Product information

FP optimail 30 installation guide

FP

FP optimail 30 installation guide

Neopost AutoStamp Getting started

Neopost

Neopost AutoStamp Getting started

Salsbury Industries 4325D installation instructions

Salsbury Industries

Salsbury Industries 4325D installation instructions

Pitney Bowes DL400 Operator's guide

Pitney Bowes

Pitney Bowes DL400 Operator's guide

manuals.online logo
manuals.online logoBrands
  • About & Mission
  • Contact us
  • Privacy Policy
  • Terms and Conditions

Copyright 2025 Manuals.Online. All Rights Reserved.