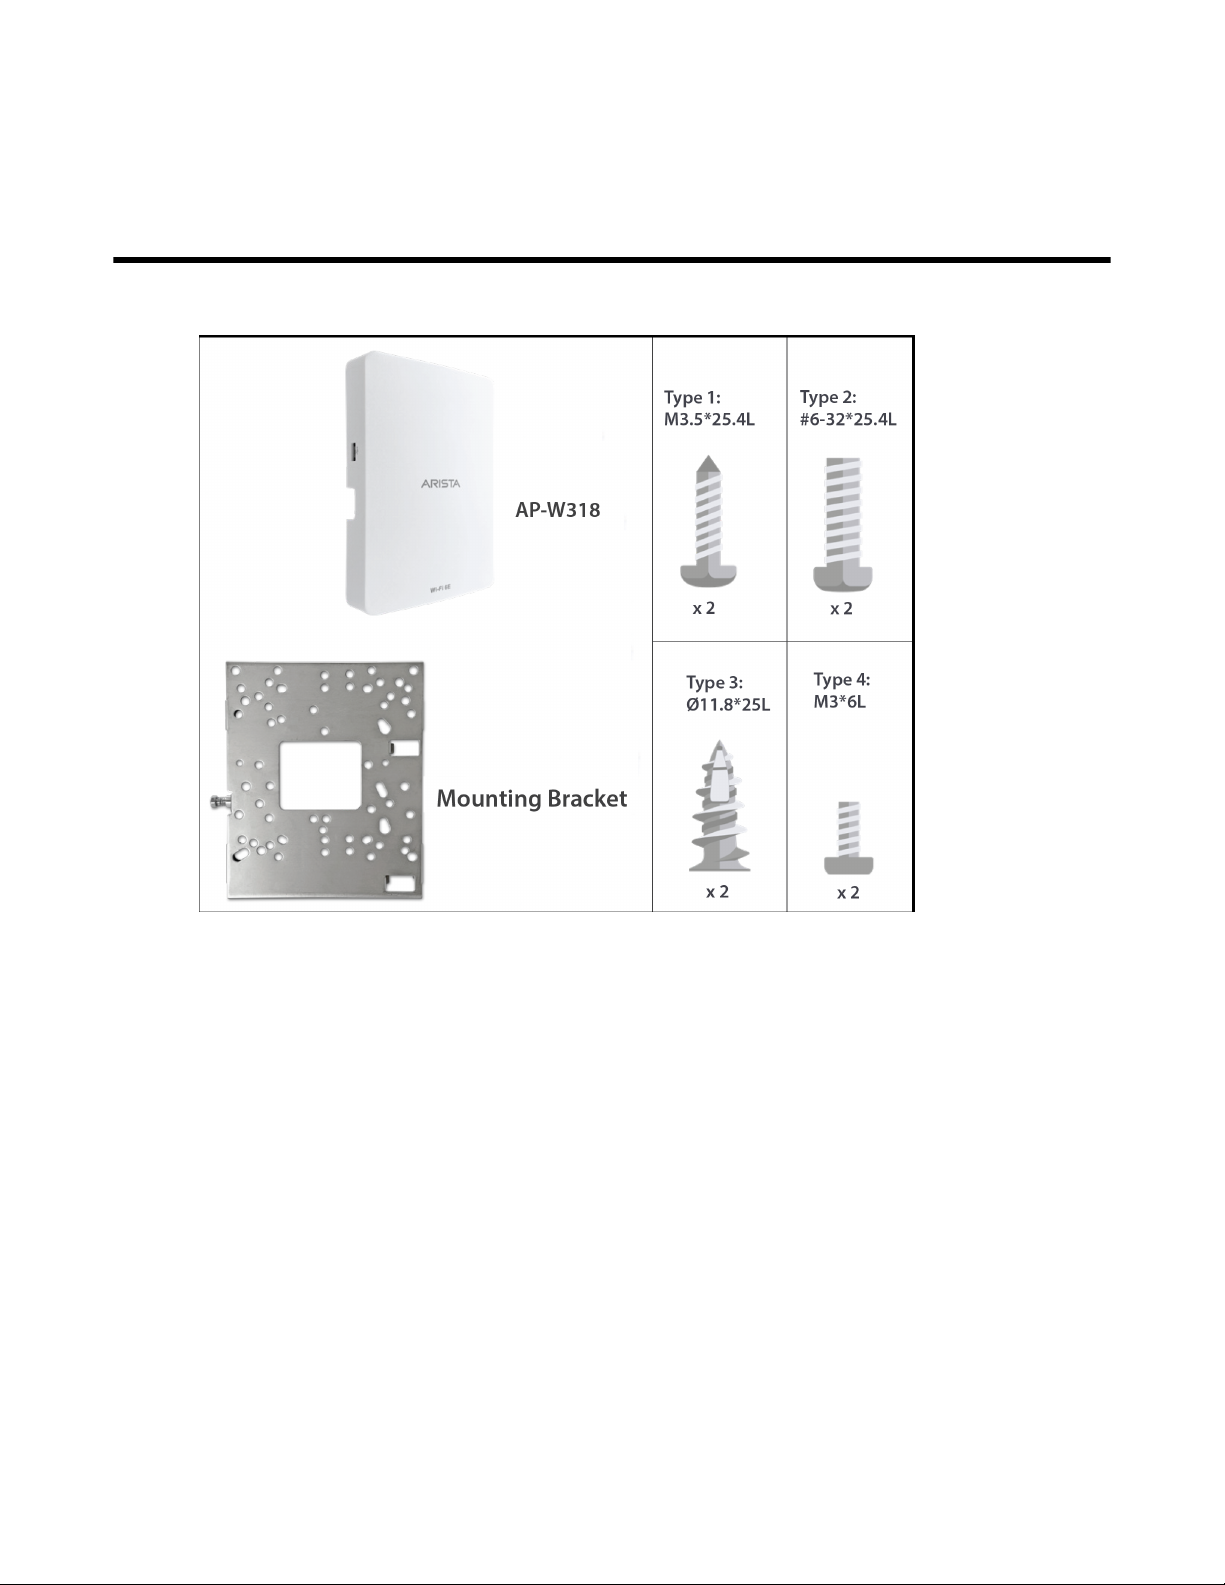
Arista W-318 User manual

Quick Start Guide
W-318/W-318 RW Access Point
Arista Networks
www.arista.com
DOC-0
58
4
7
-01

ii Quick Start Guide: Access Point
© Copyright 2023 Arista Networks, Inc. The information contained herein is subject to change without notice. Arista Networks
and the Arista logo are trademarks of Arista Networks, Inc in the United States and other countries. Other product or service
names may be trademarks or service marks of others.
Headquarters
5453 Great America Parkway
Santa Clara, CA 95054
USA
408 547-5500
www.arista.com
Support
408547-5502
866 476-0000
support-wifi@arista.com
Sales
408 547-5501
866 497-0000

Contents
Contents
Chapter 1: About This Guide.................................................................1
Chapter 2: Package Content.................................................................. 3
Chapter 3: Overview of the Access Point.............................................5
3.1 Right Panel of the Access Point............................................................................................ 5
3.2 Rear Panel of the Access Point.............................................................................................7
3.3 Bottom Panel of the Access Point......................................................................................... 9
Chapter 4: Install the Access Point.....................................................11
4.1 Mount the Access Point....................................................................................................... 11
4.2 Connect the Access Point to the Network........................................................................... 14
4.2.1 Connect the Access Point Using PoE....................................................................14
4.3 Power On the Access Point.................................................................................................15
4.3.1 Using the Access Point with Power Adapter..........................................................15
4.4 Table Mount the Access Point.............................................................................................15
Chapter 5: Access Point Troubleshooting......................................... 17
Chapter 6: Appendix A: AP-Server Mutual Authentication...............19
Chapter 7: Appendix B: Product Compliance....................................21
Chapter 8: Appendix C: Regulatory Model Numbers........................ 23
iii

iv

Chapter 1
About This Guide
This installation guide explains how to deploy the W-318/W-318 RW access point (AP).
Important: Please read the EULA before installing W-318/W-318 RW. You can download and
read the EULA from https://www.arista.com/en/support/product-documentation.
Installing the AP constitutes your acceptance of the terms and conditions of the EULA
mentioned above in this document.
Intended Audience
This guide can be referred by anyone who wants to install and configure the W-318/W-318 RW access
point.
Document Overview
This guide contains the following chapters:
•Package Content
•Overview of the Access Point
•Install the Access Point
•Troubleshooting
Note: All instances of the term 'server' in this document refer to the Wireless Manager, unless
the server name or type is explicitly stated.
Product and Documentation Updates
To receive important news on product updates, please visit our website at https://www.arista.com/
en/support/product-documentation. We continuously enhance our product documentation based on
customer feedback.
1

2

Chapter 2
Package Content
The W-318 package must contain the components shown in the following figure.
Figure 1: W-318 package content
The package content of W-318 RW access point includes an additional table mount stand, a power
adaptor, and ethernet cables as shown in the following image:
3

Figure 2: W-318 RW package content with table mount stand
Important: The MAC address of the access point (AP) is printed on a label at the bottom of the
product and the packaging box. Note the MAC address before mounting the AP on the wall or
at a location that is difficult to access.
If the package is not complete, please contact the Arista Networks Technical Support Team at support-
[email protected], or return the package to the vendor or dealer where you purchased the product.
4

Chapter 3
Overview of the Access Point
The W-318/W-318 RW access point (AP) is a 2x2:4 MU-MIMO, tri-band with multifunction radio,
802.11a/b/g/n/ac/ax access point.
This chapter provides an overview of the AP and describes the following:
•Right Panel of the AP
•Rear Panel of the AP
•Bottom Panel of the AP
3.1 Right Panel of the Access Point
The right panel of the access point has 6 LEDs that indicate the functioning state of the device, one
console port, and one passthrough port.
5

Figure 3: W-318/W-318 RW Right Panel
The following table describes the ports available on the right panel of the AP:
Table 1: Right Panel Ports and Description
Port Description Connector Type Speed/Protocol
Console Port to establish a
‘config shell’ terminal
session via serial
connection.
RJ-45 • RS 232 Serial
(115200 bits per
second)
• Data bits:8; Stop
bits: 1
• Parity: None
• Flow Control: None
6

Overview of the Access Point
Port Description Connector Type Speed/Protocol
Passthrough A wired port that
facilitates extension
of the wired network
after the AP is mounted
on the wall or stand.
You can plug-in
another device to the
passthrough port of the
AP. The traffic on the
passthrough port does
not interfere with the
AP traffic. You cannot
apply any policies on
the passthrough port
traffic.
Device connected
through the Uplink
port (Ethernet port) at
10/100/1000 Mbps
NA
6 GHz Blinking Green Wireless activity on 6
GHz radio
The following table indicates the device states based on the LEDs.
Table 2: AP LED Status Description
LED Status Description
Solid Green Power ONPower
OFF Power OFF
Solid Green Device connected through the
Uplink port (Ethernet port) at
10/100/1000 Mbps
Uplink
Blinking Green Activity on the Uplink port
LAN1/2/3 Solid Green Device connected to LAN port
1/2/3 on the bottom of the
device at 10/100/1000 Mbps
Solid Green No activity on 2.4 GHz radio2.4 GHz
Blinking Green Wireless activity on 2.4 GHz
radio
Solid Green No activity on 5 GHz radio5 GHz
Blinking Green Wireless activity on 5 GHz radio
Solid Green No activity on 6 GHz radio6 GHz
Blinking Green Wireless activity on 6 GHz radio
3.2 Rear Panel of the Access Point
The rear panel of the access point (AP) has an Ethernet port labeled Uplink that enables you to
connect the AP to a wired LAN through a switch or a hub. The Uplink port powers the AP using the
802.3bt standard.
7

Figure 4: W-318/W-318 RW Rear Panel
Table 3: W-318/W-318 RW Rear Panel
Port Description Connector Type Speed/Protocol
Passthrough A wired port that
facilitates extension
of the wired network
after the AP is mounted
on the wall or stand.
Another device can be
plugged-in to the pass-
through port of the AP.
The traffic on the pass-
through port does not
interfere with the AP
traffic. No policies can
be applied on the pass-
through port traffic.
RJ45 -
8

Overview of the Access Point
Port Description Connector Type Speed/Protocol
Uplink Enables you to connect
the AP to a wired LAN
through a switch or a
hub. The AP can then
communicate with the
server. This port also
provides the power for
the device using the
802.3bt standard
RJ45 10/100/1000 Mbps
Power over Ethernet
3.3 Bottom Panel of the Access Point
The bottom panel of the access point and its corresponding ports are described below.
Figure 5: W-318/W-318 RW Bottom Panel
Table 4: W-318/W-318 RW Bottom Panel
Port Description Connector Type Speed/Protocol
DC In Enables you to connect
to and power on the
access point using 12
V DC power with 2
Ampere.
5.5mm overall
diameter/2.1mm center
pin/hole
NA
Ethernet (LAN3/PSE) Gigabit Ethernet port
that can be used for
wired extension for
an SSID. This Power
Sourcing Equipment
(PSE) port also
provides the power to
the connected device
using the 802.3af
standard.
RJ45 10/100/1000 Mbps
Gigabit Ethernet
Ethernet (LAN2) Gigabit Ethernet port
that can be used for
wired extension for an
SSID.
RJ45 10/100/1000 Mbps
Gigabit Ethernet
9

Port Description Connector Type Speed/Protocol
Ethernet (LAN1) Gigabit Ethernet port
that can be used for
wired extension for an
SSID.
RJ45 10/100/1000 Mbps
Gigabit Ethernet
Reset Resets the access point
to factory defaults.
To reset the access
point, press and hold
the Reset Pin Hole
until all LEDs go off,
which indicates that
the access point has
rebooted. Pressing the
Reset Pin Hole while
the access point is
booting up will not have
any effect. Perform this
operation only when the
access point is running.
Pin hole push button Hold down and power
cycle the access point
to reset
10

Chapter 4
Install the Access Point
This chapter explains the procedure to install the access point (AP).
Zero-Configuration of the Access Point
Zero-configuration is supported under the following conditions:
• The device is in the AP mode with background scanning ON and no SSID configured.
• The DNS entry, wifi-security-server, is configured on all the DNS servers. This entry must point to
the IP address of the server. By default, the AP looks for the wifi-security-server DNS entry.
• The AP is on a subnet that is DHCP enabled.
Important: If the AP is on a network segment that is separated from the server by a firewall,
you must first open the port 3851 for bidirectional User Datagram Protocol (UDP) and Transport
Control Protocol (TCP) traffic on that firewall. This port number is assigned to Arista Networks.
Zero-configuration cannot work if multiple APs are set up to connect to multiple servers. In this
case, the APs must be configured manually. For details on how to configure an AP manually,
see the Access Point Configuration Guide on our website at https://www.arista.com/en/support/
product-documentation .
Take a configured AP; that is, ensure that a static IP is assigned to the AP or the settings have been
changed for DHCP. Note the MAC address and the IP address of the AP in a safe place before it is
installed in a hard-to-reach location. The MAC address of the AP is printed on a label at the bottom of
the product.
The steps to install the AP with no configuration (zero-configuration) are as follows:
1. Mount the AP
2. Connect the AP to the network
3. Power ON the AP
4.1 Mount the Access Point
Use the following steps to mount the access point:
1. Attach the mounting bracket to the wall by using the mounting hardware kit.
11

Figure 6: Attach bracket to the wall
2. Affix the mounting bracket on to the wall using the appropriate screws from the mounting
accessories included in the package.
Figure 7: Different screws provided in the package
3. Connect the cables to the appropriate ports in the rear-side of the access point.
12

Install the Access Point
Figure 8: Connect the cables to the rear ports
4. Mount the AP on the bracket by aligning the two notches on the bracket with the two grooves on
the rear panel of the AP. Slide the AP and tighten it onto the bracket with the screw provided in the
package.
Figure 9: Tighten the screw to secure the AP
Note: To prevent disconnection or tampering by unauthorized personnel, it is extremely
important to install the device such that it is difficult to unplug the device from the network or
from the power outlet.
As a best practice, label the access points using MAC addresses or at least your own convention so
that you can identify them easily. For example, use serial numbers to label the access points.
13

4.2 Connect the Access Point to the Network
To connect the access point (AP) to the network, perform the following steps:
1. Ensure that a DHCP server is available on the network to enable network configuration of the AP.
2. Add the DNS entry wifi-security-server on all DNS servers. This entry should point to the IP
address of the server.
3. Ensure that DHCP is running on the subnet to which the AP will be connected.
4. Check the status LEDs on the AP. If all LEDs glow green, then the AP is operational and connected
to the server.
5. Log on to the server using ssh and run the get sensor list command.
You will see a list of all Arista devices that are recognized by the server. Single Sign-On users can
go to the MONITOR > WiFi > Access Points tab in CloudVision Cognitive Unified Edge and check
whether the AP is visible under the Access Points tab.
The AP is connected and operational.
Note: If the zero configuration is not successful, you must configure the AP manually.
Important: If DHCP is not enabled on a subnet, the AP cannot connect to that subnet with
zero-configuration. If the DNS entry is not present on the DNS servers or if you do not have the
DHCP server running on the subnet, you must manually configure the device. See the Access
Point Configuration guide at https://www.arista.com/en/support/product-documentation .
4.2.1 Connect the Access Point Using PoE
If you are using a PoE injector, make sure one of the connectors is plugged into the Uplink port of the
AP and the other end is plugged into a suitable switch port with proper network connectivity.
Figure 10: Back panel of the AP showing the network ports
14

Install the Access Point
4.3 Power On the Access Point
You can power-on the access point (AP) by plugging one end of the Ethernet cable into the PoE
(802.3af) switch or injector, and the other end into the Ethernet/PoE port on the AP. Ensure the PoE
source you are using is turned ON.
As an alternative to PoE, you can insert a compatible power adapter plug into an AC power outlet and
the other end into the power input port on the AP.
Note: If you are not using PoE, ensure that you use only an AC power adapter supported by
the AP.
4.3.1 Using the Access Point with Power Adapter
To power-on the access point (AP) with a power adapter, perform the following steps:
1. Plug the power cable into the DC power receptacle at the rear of the AP.
2. Plug the other end of the power cable into an 110V~240V 50/60 Hz AC power source.
3. Wait until the LED lights on the AP are lit. Refer to the LED details table.
4.4 Table Mount the Access Point
Use the following steps to table mount the access point:
1. Plug the network cable (Ethernet cable) into the WAN port (PoE++) located at the back of the AP
as shown below. If the network is not PoE enabled, plug the Power Adaptor at the DC Input port, as
shown.
Figure 11: Attach cables to AP
2. Flip the stand on the AP as shown, aligning the hooks on the stand to the grooves on the AP. Slide
the hooks into the grooves to attach the AP to the stand.
15

Figure 12: Attach stand to AP
3. The spring-loaded pin will automatically lock into the locking hole of the AP. If the pin is not aligned,
pull the pin and align it to the locking hole. Note: To remove the AP from the stand, pull the pin and
then remove the AP.
Figure 13: Image showing the spring-loaded pin
Use LAN 1, LAN 2, and LAN 3 ports at the bottom of the AP to connect to local devices.
16
This manual suits for next models
1
Table of contents
Other Arista Wireless Access Point manuals

Arista
Arista C-130E User manual

Arista
Arista O-105 User manual

Arista
Arista C-330E User manual

Arista
Arista C-200 User manual

Arista
Arista O-235 User manual

Arista
Arista O-105E User manual

Arista
Arista C-230 User manual

Arista
Arista C-360 User manual

Arista
Arista AP-O235 User manual

Arista
Arista O-105E User manual

Arista
Arista C-230E User manual

Arista
Arista C-120 User manual

Arista
Arista AP-C230 User manual

Arista
Arista AP-C250 User manual

Arista
Arista C-330 User manual

Arista
Arista O-235E User manual

Arista
Arista OEM-AP-O105 User manual

Arista
Arista O-105 User manual

Arista
Arista C-130 User manual

Arista
Arista C-250 User manual