ARJO HUNTLEIGH Maxi Twin User manual

Maxi Twin
...with people in mind
04.KT.00_16GB • 10/2017
Instructions for Use

WARNING
To avoid injury, always read this Instructions for Use and accompanied documents
before using the product.
Mandatory to read the Instructions for Use
Design Policy and Copyright
® and ™ are trademarks belonging to the ArjoHuntleigh group of companies.
© ArjoHuntleigh 2013.
As our policy is one of continuous improvement, we reserve the right to modify designs
without prior notice. The content of this publication may not be copied either whole or in
part without the consent of ArjoHuntleigh.

3
Foreword ...................................................................................4
Intended Use .............................................................................5
Safety Instructions ....................................................................6
Preparations ..............................................................................7
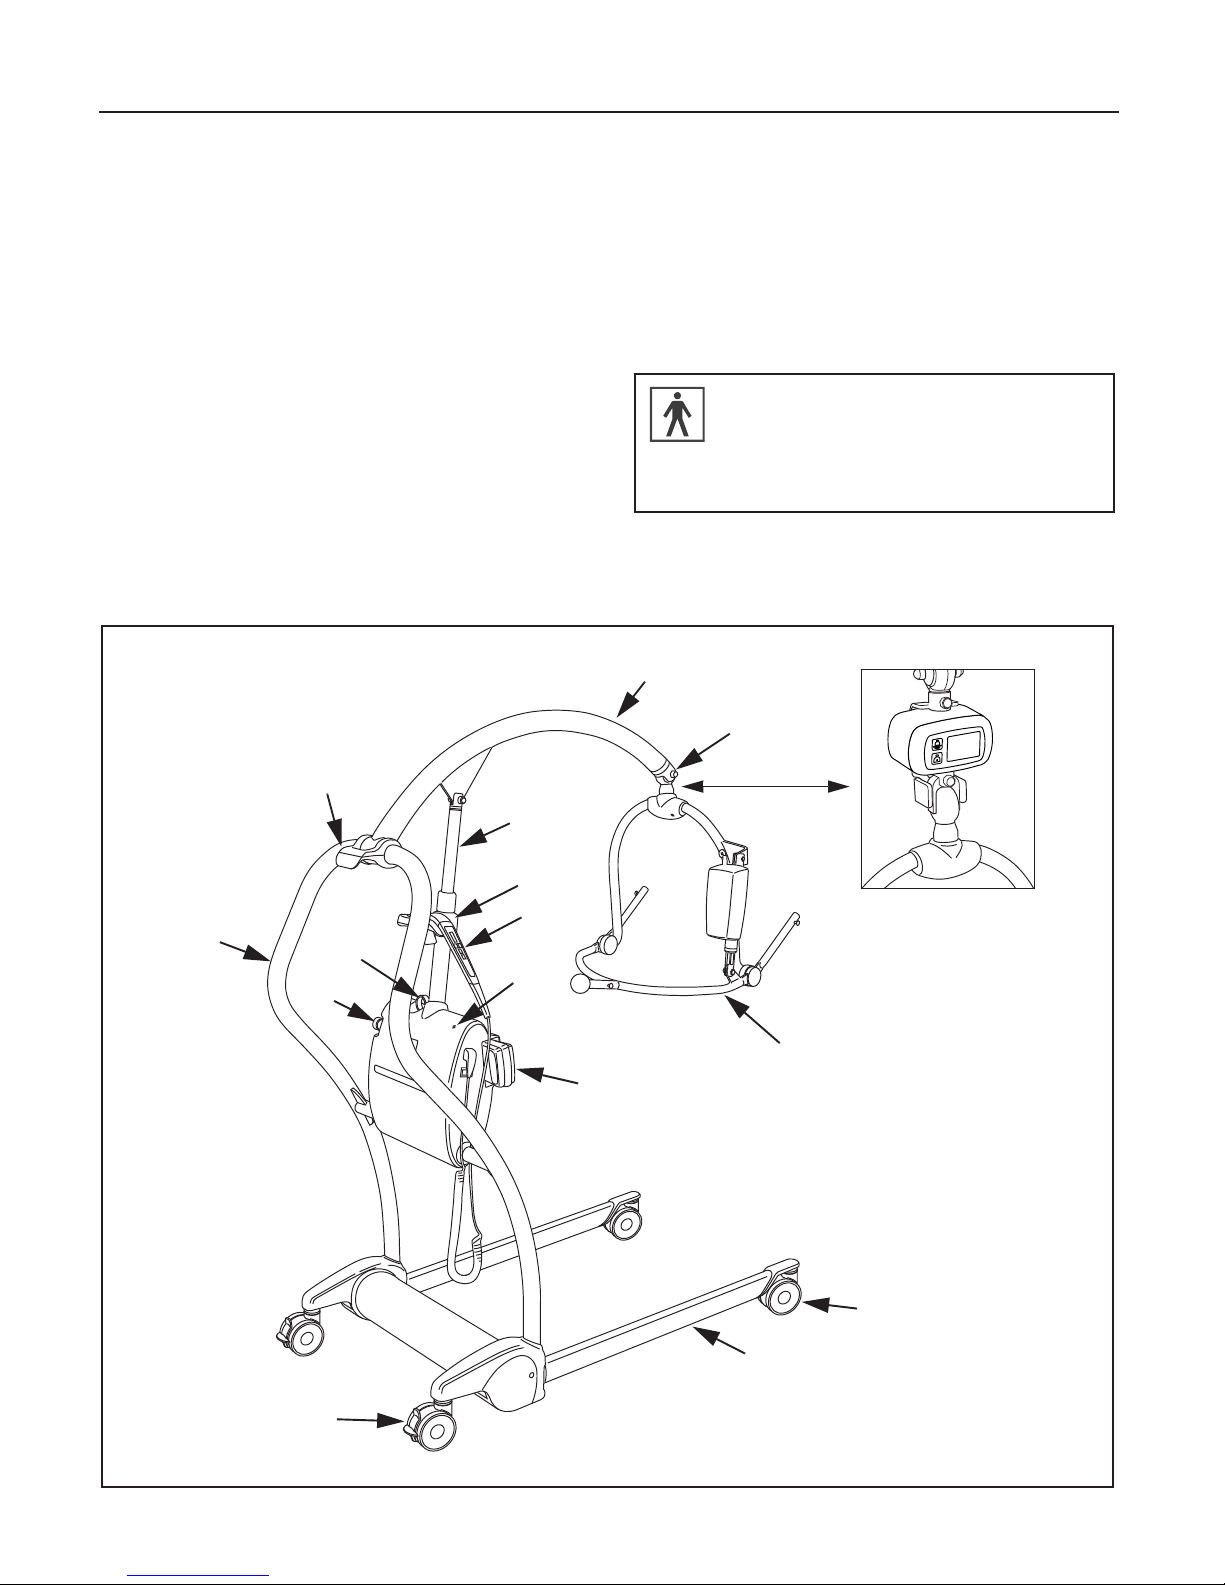
Parts Designation ......................................................................8
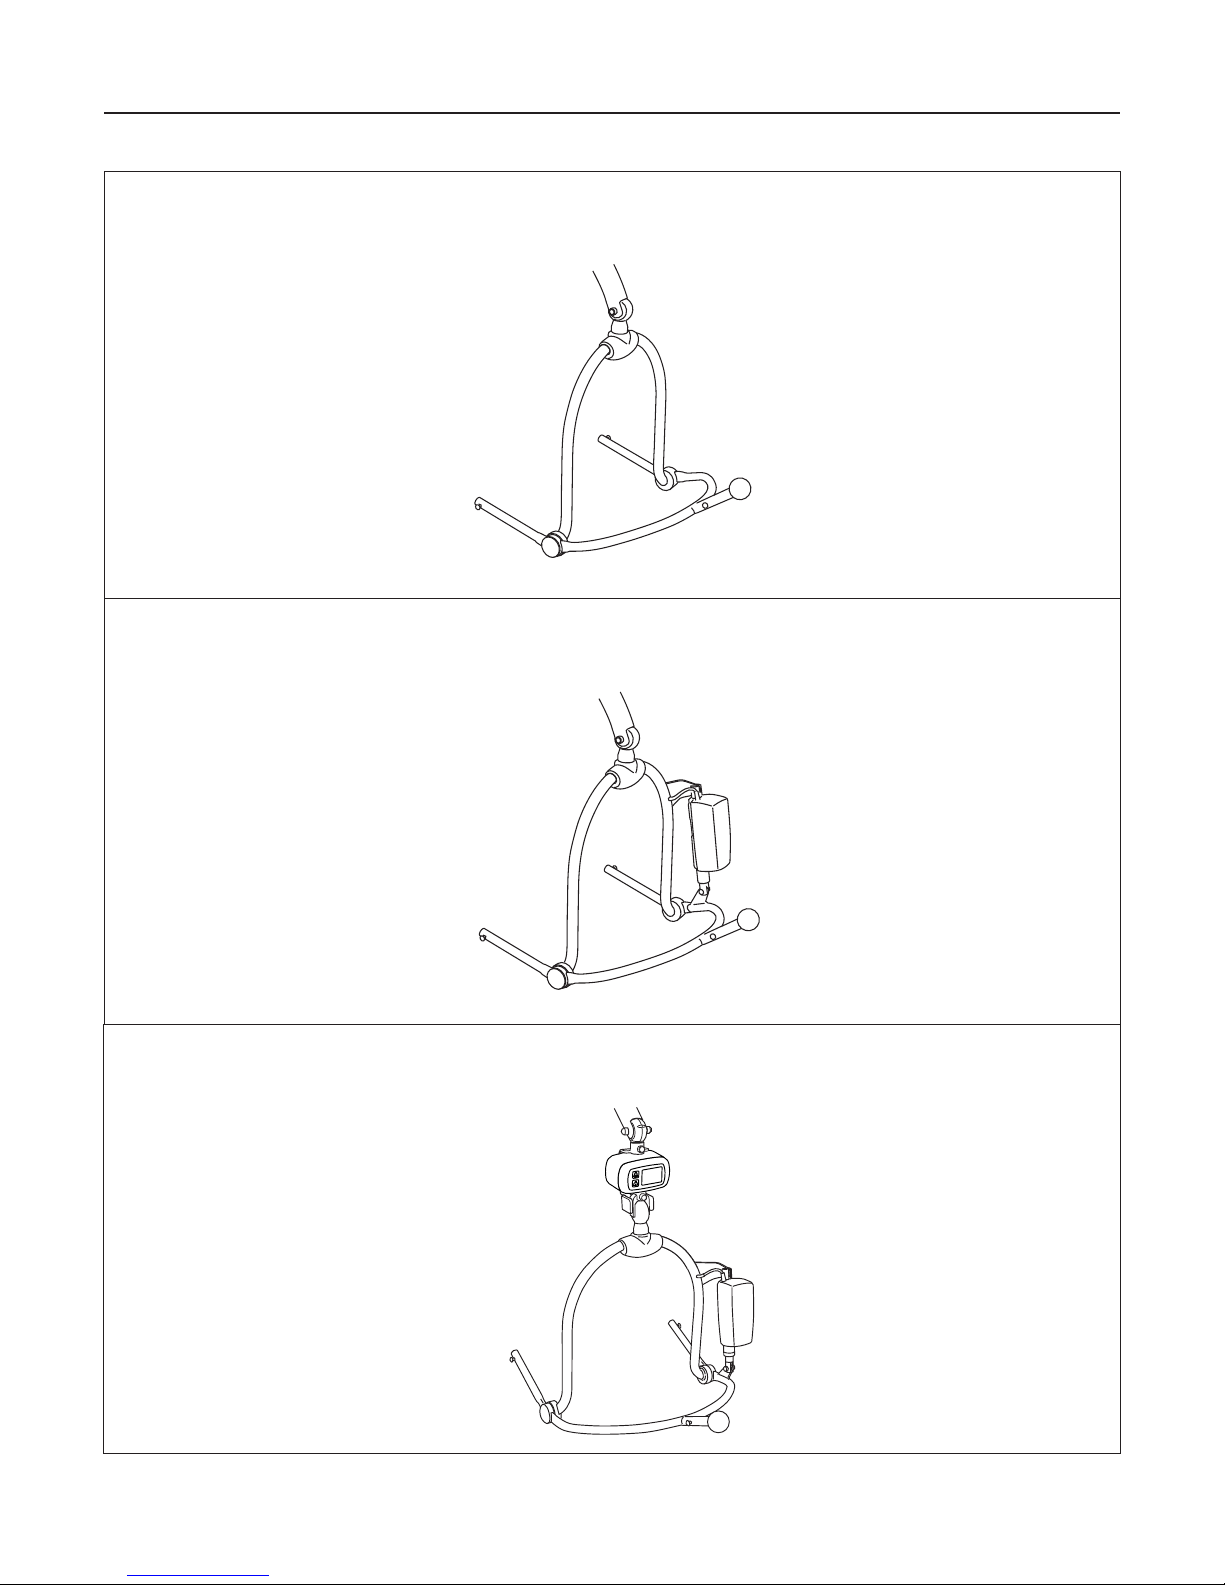
DPS Spreader Bars ..................................................................9
Loop Bars 1 ...............................................................................0
Slings 1 .....................................................................................2
Product Description/Function ..................................................14
Hand Control ...................................................................... 14
Lifting 14...................................................................................
Adjustable Width of Chassis Legs .......................................14
Castor Brakes ......................................................................15
Driving/Positioning Handles ................................................15
Scale on the Powered Spreader Bar ...................................15
Emergency Stop Button ......................................................16
Emergency Lowering “Ring” ................................................16
Powered Spreader Bar ........................................................17
Automatic Safety Stop .........................................................17
Battery .................................................................................17
Battery Indicator Light .........................................................17
Battery Charger ...................................................................17
Powered Spreader Bar ...........................................................18
Using your Maxi Twin ..............................................................19
Attachment of Clip/Loop (Passive Sling) .................................20
Detachment of Clip/Loop (Passive Sling) ...............................21
Attach the Leg Clips/Loops (Passive Sling) ............................22
Transferring Resident - DPS Spreader Bar ............................24
To Lift from a Chair ..............................................................24
To Lift from a Bed ................................................................26
To Lift from the Floor ...........................................................28
Transferring the Resident - Loop Spreader Bar ......................30
To Lift from a Chair ..............................................................30
To Lift from a Bed ................................................................31
To Lift from the Floor ...........................................................32
To Lift with a Large Loop Bar ..............................................32
Home Care Use ......................................................................34
Battery Instructions .................................................................36
Cleaning and Disinfecting Instructions ....................................38
Care and Preventative Maintenance .......................................40
Troubleshooting ......................................................................44
Technical Specifications .........................................................46
Dimensions .............................................................................48
Labels on the Maxi Twin .........................................................50
Electromagnetic Compatibility .................................................52
List of Standards and Certificates ...........................................52
Parts and Accessories ............................................................54
Contents

4
Foreword
Thank you for purchasing ArjoHuntleigh
equipment.
Your Maxi Twin™mobile passive lift is part of a series
of quality products designed especially for hospitals,
nursing homes and other health care use.
Please contact us if you have any questions about the
operation or maintenance of your ArjoHuntleigh
equipment.
Please Read this Instructions for Use
thoroughly!
Please read this Instructions for Use (IFU) in its entirety
before using your Maxi Twin lift. Information in the
IFU is crucial to the proper operation and maintenance
of the equipment and will help protect your product and
make sure that the equipment performs to your
satisfaction. Some of the information in this IFU is
important for your safety and must be read and
understood to help prevent possible injury.
Unauthorized modifications on any ArjoHuntleigh
equipment may affect its safety. ArjoHuntleigh will not
be held responsible for any accidents, incidents or lack
of performance that occur as a result of any
unauthorized modification to its products.
Report Unexpected Operations or
Events
Contact your local ArjoHuntleigh representative if any
unexpected operations or events occur. The contact
information appear on the last page of this IFU.
Service and Support
A service routine must be performed on your Maxi
Twin lift every year by ArjoHuntleigh authorized
service personnel to make sure the safety and daily
operation of your product.
If you require further information, please contact your
local ArjoHuntleigh representative who can offer
comprehensive support and service programs to
maximize the long-term safety, reliability and value of
the product. Contact your local ArjoHuntleigh
representative for replacement parts.
Your service representative stocks the parts you will
need.
The contact information appears on the last page of this
IFU.
Definitions in this IFU
Means: Safety warning. Failure to understand and obey
this warning may result in injury to you or to others.
•
Means: Failure to follow these instructions may cause
damage to all or parts of the system.
•
Means: This is important information for the correct use
of this system or equipment.
Means: The name and address of the manufacturer.
WARNING
CAUTION
NOTE

5
Intended Use
This equipment must be used in accordance
with these safety instructions. Anyone using
the equipment must also have read and
understood the instructions in this
Instructions for Use (IFU).
If there is anything you are not sure about,
contact your ArjoHuntleigh representative.
Maxi Twin is a floor based mobile sling lift.
The lift is intended to be used for lifting and transfers in
hospitals, nursing homes or other health care facilities,
in private homes and similar home care facilities. The
equipment is intended for indoor use.
Maxi Twin is only intended to be used with
ArjoHuntleigh-supplied slings and stretchers that are
designed to be used with Maxi Twin.
The products may only be used by appropriately trained
caregivers with adequate knowledge of the care
environment and its common practices and procedures;
Maxi Twin allows the handling of residents up to 182 kg
(400 lbs).
Maxi Twin is intended to be used for residents who:
• sits in a wheelchair
• has no capacity to support himself/herself
• cannot stand unsupported and is not able to bear
weight, not even partially
• is dependent on the caregiver in most situations
Or, for a resident who:
• is passive
• is almost completely bedridden
• is often stiff or have contracted joints
• is totally dependent on the caregiver
The product should not be used for residents who suffer
from uncontrollable head movements.
If the resident does not meet these criteria an alternative
equipment/system shall be used.
The transfer with Maxi Twin takes place indoors in the
resident room, common areas or in a bathroom, it’s not
intended to be used in the shower or outdoors.
The Maxi Twin should only be used for the purpose
specified in this Instructions for Use (IFU). Any other
use is prohibited.
Lifetime of the Equipment
The equipment most only be used for the purposes
stated above.
The lifetime of this equipment is ten (10) years but
depending on the storage of the battery, the use
frequency and the charging intervals, the service life of
the battery is 2-5 years.
The lifetime and service life are stated providing that the
preventive maintenance are being carried out in
accordance with the instructions for care and
maintenance in the Instructions for use (IFU).
Depending on level of wear some equipment parts such
as castors and hand control may need to be replaced
during the equipment lifetime according to information
in the Instructions for use (IFU).

6
Safety Instructions
WARNING
To avoid injury, make sure there is a safe
distance between the resident and the
device. Pay particular attention to resident
with uncontrollable movements.
WARNING
To avoid falling, make sure that the user
weight is lower than the safe working load
for all products or accessories being used.
WARNING
To avoid injury, only use ArjoHuntleigh
slings specified in these Instructions for
Use. To select correct sling size follow the
specific sling Instructions for Use.
WARNING
To avoid entrapment, make sure to keep
the residents hair, arms and feet close to
the body and use designated grab
supports during any movement.
WARNING
To avoid the resident from falling or
caregiver from being injured, only detach
the sling clips when the resident’s body
weight is fully supported by the bed or
chair.
WARNING
To avoid the device from tipping and the
resident from falling, do not use the
equipment on floor with recessed drains,
holes or slopes exceeding a ratio of 1:50
(1.15°).
WARNING
To avoid explosion or fire, never use the
equipment in oxygen rich environment, in
presence of heat source or flammable
anaesthetic gases.
To Avoid the Possibility of Injury
Always Make Sure That:
• the resident never spends long periods of time in
the Maxi Twin lift, it can affect the blood flow in
his/her legs.
•lower the Maxi Twin lift during transfer to a safe
height, little higher than a normal chair height.
• the resident’s feet are clear of the floor during
transfer.
•theMaxi Twin lift is kept with the chassis legs in
parallel (closed) position during transfer.
WARNING
To avoid injury, make sure that the resident
is not left unattended at any time.
WARNING
To avoid falling during transfer, always
make sure that the brakes are applied on all
equipment being used.
CAUTION
Do not leave/use Maxi Twin and
accessories for extended periods in humid,
wet areas or in the shower.

7
Preparations
Actions Before the First Use (8 Steps)
1 Visually check the package for damage. If the
product looks damaged make a complaint to the
transport agency.
2 The packaging should be recycled according to
local regulations.
3 Check that all parts of the product are supplied.
Comparewiththe productdescription in thisIFU.
If any part is missing or damaged - do NOT use
the product!
4 Unpack the battery charger. Select and attach the
adapter correctly suited to your power outlet.
See, Battery Charger IFU.
5 Charge each battery for approximately 8 hours
(Japan 3.5 hours).
6 Disinfect the product according to Cleaning and
Disinfecting Instructions on page 38.
7 Prepare an area that is dry, with good ventilation
and out of direct sunlight for storage of the Maxi
Twin lift.
8 Choose a designated area, where the Instructions
for Use (IFU) should be kept and is easily
accessible at all times for the users.
NOTE
If you have any questions, please contact your
local ArjoHuntleigh representative for support
and service. The contact information
(ArjoHuntleigh addresses) is listed on the last
page of this IFU.
Actions Before Every Use (4 Steps)
1 Check that all parts of the lift are in place.
Compare to Parts Designation on page 8.
2 Pre-inspect the sling prior to use. If any part is
missing or damaged - do NOT use the product!
4 Aresident pronetokickingmusthave theleg clips
of the sling crossed. This prevents the resident
from falling as a result of clip detachment due to
kicking. See section, Attach the Leg Clips/Loops
(Passive Sling) on page 22.
5 Behind the actuator covers are moving parts.
Should the covers become damaged, do not use
the lift. Contact an ArjoHuntleigh Service
technician.
Maxi Twin directions
The direction of driving during transfer is according to
the illustration below.
The directions left or right on the Maxi Twin lift are
given as shown in the illustration.
3WARNING
To prevent cross-contamination, always
follow the disinfection instructions in
this Instructions for Use.
Right
Left

8
1 Mast/Lift manoeuvring handle
2Jib
3 Adjustable chassis legs
4 Braked castors (rear)
5 Non-braked castors (front)
6 Powered DPS spreader bar
7 Hand control
8 Hand control hang point
9 Lift battery pack
10 Main lift actuator
11 Emergency stop button
12 Emergency lowering “ring”
13 Pivot bolt
14 Hand control holder
15 Battery indicator light
16 Scale (optional)
Entire Product:
Type BF
Applied part: protection against
electrical shock in accordance with
EN 60601-1.
Parts Designation
3
4
5
6
2
17
9
8
11
10
12
13
14
15
16

9
DPS Spreader Bars
Manual DPS (Dynamic Positioning System) Spreader Bar
Powered DPS Spreader Bar
Powered DPS Spreader Bar with Scale

10
Loop Bars
2-point Loop Bar (Small and Medium)
4-point Loop Bar (Large)

11
Intentionally left blank

12
A sling range label is located on the side of the spreader/loop bar
for quick colour to size reference (see “Labels on the lift” section).
Refer to the Passive Clip Sling IFU when the size of sling should
be chosen and sling instructions.
WARNING
To avoid falling, make sure that the user weight is
lower than the safe working load for all products or
accessories being used.
WARNING
To avoid the resident from falling or caregiver from
being injured, only detach the sling clips when the
resident’s body weight is fully supported by the bed
or chair.
WARNING
To avoid injury, only use ArjoHuntleigh slings
specified in these Instructions for Use. To select
correct sling size follow the specific sling
Instructions for Use.
WARNING
To avoid entrapment, make sure to keep the
residents hair, arms and feet close to the body and
use designated grab supports during any
movement.
NOTE
If ArjoHuntleigh Slings and Flites (disposable slings) are
used with the Maxi Twin, then always refer to their
instructions before use.
Slings

13
ArjoHuntleigh standard sling profiles that can be used with the Maxi Twin lift
Unpadded clip
sling
Padded clip sling Unpadded mesh
clip sling
Double amputee clip sling
Toilet clip sling
with head support
Toilet loop
sling
with head
support
General
purpose loop
slingwithhead
support
Examples of Loop slings for
Loop spreader bars
Examples of Passive Clip slings
for DPS spreader bars

14
Hand Control
The hand control has an integrated hook which makes it easy to
attach. When not in use, hook it over the hand control hang point
at the top of the mast (B) or the hand control holder located on the
main lift actuator (A). (See Fig. 1)
Unhook the hand control and hold it in your hand:
• Press (A) button in order to raise the jib. (See Fig. 2)
• Press (B) button in order to lower the jib. (See Fig. 2)
• Press (C) button for reclined position (only for powered
spreader bar). (See Fig. 2)
• Press (D) button for sitting position (only for powered
spreader bar). (See Fig. 2)
• Press (E) button to close chassis legs.
(See Fig. 2)
• Press (F) button to open chassis legs.
(See Fig. 2)
Lifting
The lifting/lowering movement is performed by an actuator driven
by an electric motor.
Adjustable Width of Chassis Legs
The chassis legs can be opened to variable widths.
Select the “Open chassis legs” button on the hand control and
keep pressing it until the required width is achieved.
To close, press the “Close chassis legs” button. When pressure is
released from the button, movement will stop and the chassis legs
will remain securely in position.
(See Fig. 3)
CAUTION
Do not drop the hand control into water.
NOTE
When opening or closing the legs of the powered
chassis, make sure that no one stands in the way of the
moving chassis legs.
AB
Fig. 1
A
B
CD
E
F
Fig. 2
Fig. 3
Product Description/Function

15
Castor Brakes
The chassis rear castors have brakes which can be foot operated to
keep the Maxi Twin lift in position. Brake (A) and release the
brake (B) as shown on the illustration. The brakes on both castors
have to be applied to get full effect. (See Fig. 1)
Driving/Positioning Handles
Use the driving handles when pushing and positioning the Maxi
Twin lift. (See Fig. 2)
Scale on the Powered Spreader Bar
The Maxi Twin lift powered spreader bar comes with or without a
scale. Refer to the Scale IFU.
(See Fig. 3)
Fig. 1 A
B
Fig. 2
Fig. 3

16
Emergency Stop Button
In case of an emergency, where you immediately have to stop any
powered movement, (other than by releasing pressure on the hand
control button), press the “emergency stop button”(A), located on
the side of the main lift actuator cover (see illustration).
(See Fig. 1)
Once the emergency stop button has been operated, it will have to
be reset before any powered movement can be utilised.
To reset the emergency stop function, turn the red emergency
button 1/8 of a turn clockwise until it pops up.
Emergency Lowering “Ring”
The emergency lowering function will only work when there is a
load in the Maxi Twin lift exceeding 2 kg (4.4 lbs). It can be used
in the event of a main control failure.
The emergency lowering “Ring” (B) is on the top of the main lift
actuator housing, a green and white identification label is
positioned near the emergency lowering ring for quick and easy
recognition. Pull the emergency lowering ring up to operate,
release the control during use and lowering will stop. (See Fig. 1)
WARNING
To avoid injury, only use the emergency lowering
when normal lowering is impossible. Use extreme
care during lowering.
NOTE
Due to internal friction, the speed of lowering will vary
depending on the weight of the resident. You may have
to assist the downwards movement by pulling down the
jib
NOTE
The emergency lowering overrides important safety
functions and should only be used when the hand
control is not working.
B
A
Fig. 1

17
Powered Spreader Bar
Four sling attachment lugs (A) enable the sling clips to be
attached.
The rotational positioning handle (B) allows you to position the
resident sideways.
The powered spreader bar (C) is operated from the hand control.
The resident can be positioned in a reclined or sitting position.
(See Fig. 1)
Automatic Safety Stop
This is not operator controlled but a function built into the
electronics of the lift.
Battery
The battery is situated on the side of the lift actuator housing.
(See Fig. 1)
Battery Indicator Light
A beeping sound and a low battery indicator (A) light will flash
when the battery needs charging. The caregiver should complete
the current lift movement. (See Fig. 1)
Battery Charger
Type no:
NEA 8000
(See Fig. 2)
Function I:
If the lift is moving up /down and it moves against
something, the movement will be stopped by an
automatic safety stop. Release the up /down button on
the hand control.
Function II:
If the lift is mistakenly overloaded with a resident
heavier than permitted, an automatic safety stop will
automatically be activated. If this occurs, stop pressing
the up button on the hand control. Lower the resident by
pressing the down button and then remove the resident
from the lift.
NOTE
The battery shape only fits correctly into the lift with its
raised edge upwards.
Fig. 1
A
B
AC
A
Fig. 1
Fig. 2

18
Powered Spreader Bar (if fitted) (2 Steps)
If your lift comes with a powered spreader bar, the same
instructions apply as the non-powered spreader bar.
1 The difference is that the powered spreader bar has the
added advantage of positioning the resident with minimal
physical effort by the caregiver. The rotation of the powered
spreader bar is manual which is the same as the manual
spreader bar. (See Fig. 1)
The powered spreader bar is waterproof and is classified
labelled by ArjoHuntleigh as a wet environment unit. This
water level mark signifies that the lower end of the spreader
bar and sling may be immersed in bath water or used for
showering.
2 In orderto position theresident, move thepowered spreader
bar by a push of a button on the hand control. The
movementwill stopwiththe releasedpressure ofthe button.
The spreader bar will remain firmly in position, once
powered movement has stopped. (See Fig. 2)
WARNING
To avoid falling, make sure that the user weight is
lower than the safe working load for all products or
accessories being used.
CAUTION
The electrical actuator, as part of the powered
spreader bar, will not withstand water and should
not be sprayed with water or be submerged under
water. The maximum water level is indicated on the
water level mark on the side of the spreader bar.
WARNING
To avoid entrapment, make sure the path of the
movement is free from obstacles.
Sling
attachment
lugs
Rotational
positioning
handle
Powered DPS
actuator.
Fig. 1
DPS = Dynamic Positioning System
Fig. 2
Lower Raise
Recline Sit up
Chassis leg close
Chassis leg open
Powered Spreader Bar

19
Before the resident is transferred to a Maxi Twin,
make sure that:
• the battery pack is fully charged before use. Remove it from
the charger unit and the arched top of the battery should face
upwards when inserted into the battery opening. Electrical
connection will be made automatically.
• aselectionof slingtypesand sizesare easily availablefor all
types of lifting procedures when using the Maxi Twin lift.
• when possible, approach the resident from the front.
• if necessary, open the chassis legs to go around a chair or
wheelchair.
Powered Chassis Legs
Select the appropriate button on the hand control and keep it
pressed down until the required leg width is achieved. To close,
press the close chassis leg button. The opening/closing of the
chassis legs will stop if pressure is released from the button.
When to Use the Brakes
When lifting or lowering a resident who is supported by a sling it
is not necessary to use the brakes. This allows the lift to move to
the correct position relative to the centre of gravity of the resident.
It’s recommended to apply the brakes however, when lifting a
resident from the floor. This may prevent any unwanted or
accidental movement of the Maxi Twin lift that may cause harm or
injury.
WARNING
To avoid entrapment, make sure to keep the
residents hair, arms and feet close to the body and
use designated grab supports during any
movement.
WARNING
To avoid entrapment, make sure to keep the
residents hair, arms and feet close to the body and
use designated grab supports during any
movement.
Using your Maxi Twin

20
Clip Sling (3 Steps)
For more information, refer to respective sling IFU.
1 Place the clip on the spreader bar lug. (See Fig. 1)
2 Pull the strap down. (See Fig. 2)
3 Make sure all lugs are locked at the top end of the clips and
no straps are not squeezed in between the clip and the
spreader bar. (See Fig. 3)
Loop Sling (3 Steps)
The illustration is an example of a hook with latch. The spreader
bars or stretcher frames might be of a different design.
1 Place the loop over the spring loaded latch.
2 Pull the loop down to force the latch to open.
3 Make sure that the spring loaded latch closes completely
with the loop inside the hook. (See Fig. 4)
Fig. 1
Fig. 2
Fig. 3
Fig. 4 Latch
Hook
Attachment of Clip/Loop (Passive Sling)
Other manuals for Maxi Twin
3
Table of contents
Other ARJO HUNTLEIGH Lifting System manuals

ARJO HUNTLEIGH
ARJO HUNTLEIGH maxi sky 440 User manual

ARJO HUNTLEIGH
ARJO HUNTLEIGH Sara Plus User manual

ARJO HUNTLEIGH
ARJO HUNTLEIGH EASYTRACK FS User manual

ARJO HUNTLEIGH
ARJO HUNTLEIGH Alenti User manual

ARJO HUNTLEIGH
ARJO HUNTLEIGH Maxi Sky 1000 User manual

ARJO HUNTLEIGH
ARJO HUNTLEIGH MAXI MOVE User manual

ARJO HUNTLEIGH
ARJO HUNTLEIGH Voyager Portable User manual

ARJO HUNTLEIGH
ARJO HUNTLEIGH Malibu Sovereign Operating instructions

ARJO HUNTLEIGH
ARJO HUNTLEIGH Maxi Sky 2 User manual

ARJO HUNTLEIGH
ARJO HUNTLEIGH Maxi Sky 2 User manual