Arjo Joerns Voyager User manual

DO NOT DESTROY
KEEP ENCOSED KEY AND MANUAL
WITH THE LIFT AT ALL TIMES.
001.08075.04 Rev 13 • 08/2019
INSTRUCTIONS FOR USE
Voyager

Design Policy and Copyright
® and ™ are trademarks belonging to the Arjo group of companies.
© Arjo 2019.
As our policy is one of continuous improvement, we reserve the right to modify designs without prior
notice.
The content of this publication may not be copied either whole or in part without the consent of Arjo.

3
Table of Contents
001.08075.04 rev13
General Information................................................................................................................................. 4
Foreword .......................................................................................................................................... 4
Suitability ....................................................................................................................................... 4
Service and Support ...................................................................................................................... 4
Manufacturer Information............................................................................................................... 5
Distributor Information ................................................................................................................... 5
Definitions Used in this Manual ..................................................................................................... 5
Intended Use ................................................................................................................................. 5
Operational Life ............................................................................................................................. 5
Product Identification ..................................................................................................................... 5
How to Use this Manual................................................................................................................. 5
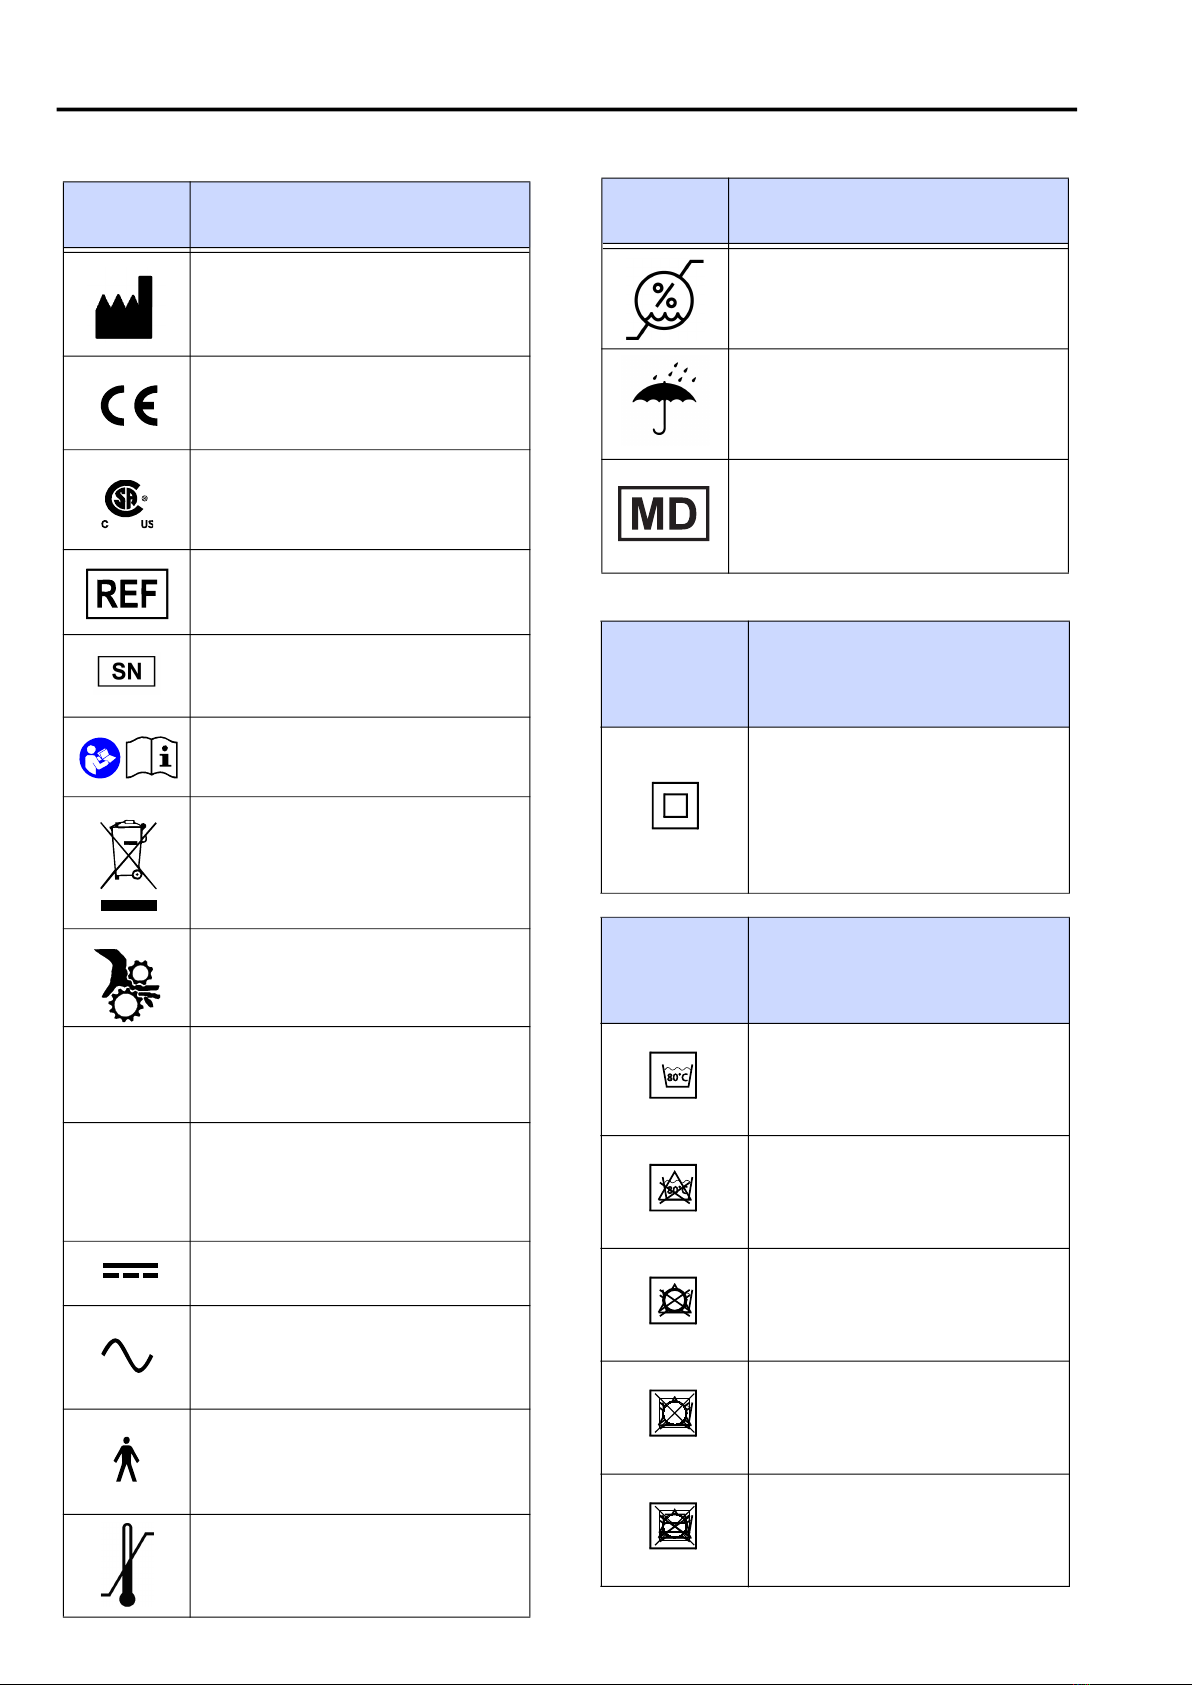
Symbols Used................................................................................................................................ 6
Safety Instructions................................................................................................................................... 7
General Instructions ......................................................................................................................... 7
Safe Working Load ........................................................................................................................ 7
Important Safety Directions .............................................................................................................. 8
Shock Prevention........................................................................................................................... 8
Fire and Explosion Prevention....................................................................................................... 8
Human and Environmental Safety Practices ................................................................................. 9
Battery and Battery Charger Safety Practices ............................................................................... 9
Homecare Environment Considerations ........................................................................................ 9
Parts Designation .................................................................................................................................. 10
Voyager Lift and Charging Station.................................................................................................. 10
Hand Control .................................................................................................................................. 11
How to Use the Voyager........................................................................................................................ 12
Before Approaching the Patient................................................................................................... 12
Transferring the Patient ............................................................................................................... 13
Emergency Lowering ................................................................................................................... 14
Emergency Brake ........................................................................................................................ 14
Battery Information ...................................................................................................................... 14
Charging the Battery.................................................................................................................... 15
Care and Maintenance........................................................................................................................... 16
Preventive Maintenance Schedule .............................................................................................. 16
User Inspections............................................................................................................................. 16
Inspections by an Authorized Service Technician .......................................................................... 17
Cleaning the Lift.............................................................................................................................. 18
Daily Checklist ................................................................................................................................ 19
Strap Inspection........................................................................................................................... 19
Handling and Storage .................................................................................................................. 19
Battery Replacement ................................................................................................................... 19
Verification of the Charger’s Power Source................................................................................. 20
Sling Inspection and Care .............................................................................................................. 20
Annual Inspection ........................................................................................................................... 20
UK Regulation.............................................................................................................................. 20
Troubleshooting..................................................................................................................................... 21
Labels on the Lift ................................................................................................................................... 23
Technical Specifications....................................................................................................................... 24
Lift Dimensions ............................................................................................................................... 25
Electromagnetic Compatibility ............................................................................................................. 26
Electromagnetic Compliance ....................................................................................................... 26
Electromagnetic Emissions.......................................................................................................... 26
Electromagnetic Immunity ........................................................................................................... 27
Table of Contents

4
General Information
001.08075.04 rev.13
Foreword
Please read this manual in its entirety. It contains crucial
information for the proper use and maintenance of the Voyager. It
will help protect your product as well as ensure that it performs to
your satisfaction.
Lifting and transferring a person always present a potential risk.
Informations in this manual are safety related and must be read
and understood to help prevent injuries.
If a serious incident occurs in relation to this medical device,
affecting the user, or the patient then the user or patient should
report the serious incident to the medical device manufacturer or
the distributor. In the European Union, the user should also report
the serious incident to the Competent Authority in the member
state where they are located.
Tested as per standards by:
Suitability
The Voyager range of lifts are suitable for the following
categories of lift within the working parameters of the lifts
specified in the technical specifications:-
Category A - Wheelchair
Category B - Bed
Category C - Bath
Category D - Toilet/ shower chair
Category E - Floor
Category F - 90 degree rotation
The Voyager series are suitable for patients in the sitting, sitting/
recumbent and recumbent positions.
Service and Support
A service routine must be done on your Voyager by Joerns /
Healthcare trained service staff. This will ensure the product
remains safe and functional. See “Care and Maintenance”
section.
Please contact your local Joerns / Healthcare agent for any of the
following:
• more information,
• report an unexpected event or lack of performance,
WARNING: Injuries can be attributed to the use of
inadequate parts. Use only parts designated by Joerns
Healthcare on your Voyager.
WARNING: Unauthorized changes on any Joerns
Healthcare product may affect its safety. Joerns Healthcare
will not be held responsible for any accidents, incidents or
deficiencies of performance that occur as a result of any
unauthorized changes to its products.
General Information
Thank you for choosing the
Voyager lift from Joerns /
Healthcare.
Your Voyager is part of a
series of quality products
designed specially for home
care, nursing homes and
other health care uses.
We are dedicated to serving
your needs and providing the
best products available along
with training that will bring
your staff maximum benefit
from every Joerns /
Healthcare product.
Please read this manual
thoroughly. Contact us if you
have any questions about the
operation or maintenance of
your Joerns / Healthcare
product.

General Information
5
001.08075.04 rev.13
• help in setting up, using or maintaining your
Voyager,
• replacement parts.
The agent can offer support and service
programs to maximize the long-term safety,
reliability and value of the product.
Additional copies of this manual can be
purchased from your local Joerns / Healthcare
agent. When ordering, include the Instructions for
Use product number (001.08075.04 rev. 13).
Manufacturer Information
This product has been manufactured by:
ArjoHuntleigh AB
Hans Michelsensgatan 10
211 20 Malmö,
SWEDEN
: +46 (0) 10-335 45 00
: +46 (0) 413-138 76
: www.arjo.com
Distributor Information
UK Information
Joerns Healthcare Ltd,
Drakes Broughton Business Park,
Worcester Road,
Drakes Broughton, Pershore,
Worcestershire, WR10 2AG
United Kingdom
Customer Care : +44(0)844 811 1158
: www.joerns.co.uk.
US Information
Joerns Healthcare Ltd,
2100 Design Road, Suite 100
Arlington, TX 76014
USA
: 800-826-0270
: 800-457-8827
: www.joerns.com
Definitions Used in this Manual
Means: Failure to understand and follow these
instructions may result in injury to yourself and
others.
Means: Failure to follow these instructions may
cause damage to the product.
Means: This is important information regarding
the correct use of the product.
Intended Use
The Voyager is designed for lifting patients in a
homecare setting, at nursing homes and other
assisted living centres. Patient transfer must be
done under the supervision of trained caregivers
as per the instructions therein.
The product must only be used for the purposes
stated above. It must be installed by Joerns /
Healthcare authorized personnel as per local
codes.
Operational Life
The equipment is designed and tested to support
at minimum, a useful life of seven (7) years or
10,000 transfers, whichever comes first. It is
subject to preventive maintenance as specified in
the "Care and Maintenance" section in this
manual.
The expected life for consumable products such
as batteries, fuses, straps and cords is dependent
upon the care and usage of the product
concerned. Consumables must be maintained in
accordance with published Instructions for Use
and the "Preventive Maintenance Schedule".
Product Identification
The lift’s identification number (specification,
model, serial number) appears on a silver
nameplate affixed on the back of the casing.
How to Use this Manual
Keep this manual with the lift and refer to it as
needed. Make sure that all operators are regularly
trained in the use of the product as per the
information found therein.
WARNING:
CAUTION:
NOTE:
WARNING: Do not attempt to use this
product without fully understanding the
information contained in this manual.
A misuse of this unit may lead to a patient
fall and to injuries.

General Information
6
001.08075.04 rev.13
General
Symbols Key to Symbols
Points out the date of
manufacture and the address
of the manufacturer
CE marking indicating conformity
with European Community
harmonised legislation.
Approved by the Canadian
Standards Association.
Manufacturer's catalogue
number.
Manufacturer's serial number.
Refers to the
Instructions for Use.
Waste Electrical and Electronic
Equipment (WEEE) - do not
dispose of this product in general
household or commercial waste.
Risk of pinching.
SWL SWL represents the maximum
load the lifter is rated for safe
operation.
IPN1N2
Degree of protection provided by
enclosure.
N1: Ingress of particles,
N2: Ingress of water.
Direct current.
Alternating current.
Type BF applied part.
Operating Temperature Range.
Operating Humidity Range.
Keep dry.
Indicates the product is a Medical Device
according to EU Medical Device
Regulation 2017/745
Charger
Related
Symbol
Key to Symbol
Class II electrical equipment:
term referring to electrical
equipment in which protection
against electric shock does
not rely on basic insulation
only.
Sling
Related
Symbols
Key to Symbols
Maximum washing
temperature: 80 °C (176 °F),
permanent cycle.
Do not use bleach.
Do not dry clean.
Tumble dry low temperature.
Do not iron.
General
Symbols Key to Symbols
Symbols Used

Safety Instructions
7
001.08075.04 rev.13
General Instructions
Keep these safety instructions with the Voyager lift at
all times.
Safe Working Load
The Voyager has been designed with a lifting
capacity of 200 kg (440 lb).
CAUTION: The Voyager is for transferring
patients only. Do not use the lift for any other
purpose.
WARNING: Always place the sling around the
patient as per the instructions enclosed.
Failure to do so may result in injuries to you or
to others.
CAUTION: Do not drop the lift, since it may
cause internal damage that is not easily seen.
If you suspect any damages to the lift, contact
your local Joerns / Healthcare agent for
servicing.
NOTE: Joerns Healthcare lifts are designed for
Arjo/Easytrack rail systems, Joerns Healthcare
slings and accessories.
WARNING: The Voyager is intended to be used
for patients whose weight is within a specified
safe working load. Do not attempt to lift more
than the lowest weight limit indicated on the
following:
• the rail system;
• the “maximum load” label on the lift;
• on the accessories;
• on the sling.
Surcharge of any of these elements may lead
to a patient fall and to injuries.
The product must be put in
service and used as per these
safety instructions.
Anyone using the product must
also have read and understood
this manual.
If there is anything you are not
sure about, contact your local
Joerns / Healthcare agent.
Safety Instructions

Safety Instructions
8
001.08075.04 rev.13
Important Safety Directions
Always ensure that:
• The lift is installed by an authorized Joerns /
Healthcare contractor or installer.
• The product is used by trained caregivers.
• Special consideration is taken when
transferring a patient who is connected to
electrodes, catheters or other medical devices.
• Violent impact during transfers is avoided.
• The sling is not damaged, torn or frayed and
the straps are in good condition and properly
fastened.
• The lifting steps found in this manual are
followed.
• All controls and safety features are used only
as per the rules specified in this manual. Never
attempt to force a control or button on the lift.
• The charger is not stored in a shower, bath or
other areas with high humidity.
• Any precautionary or instruction labels are
read and those that cannot be easily read are
replaced.
• The daily maintenance is carried out before
using the lift.
Shock Prevention
• Do not touch or use a lift with bare conductors
or a damaged power cord. Electrically live
equipment can result in serious injuries. If the
lift or charger has any exposed or damaged
wires, contact your local Joerns / Healthcare
agent immediately.
• Do not splash or expose the device to water or
moisture.
• Check nameplate for input voltage and
frequency requirements. These ones differ by
country. Do not attempt to use the lift in an area
that has a different voltage and frequency
requirement.
• Read battery and charger instructions
thoroughly before using or storing them.
Fire and Explosion Prevention
• Do not place or store the battery under direct
sunlight or near a heat source.
• Do not expose the batteries to flames.
They might open, causing a chemical leak.
• Do not use the charger in the presence of
flammable anaesthetic gases. The charger
might generate a spark, which could cause an
implosion.
• Do not short circuit the battery terminals.
WARNING: Before attempting a transfer, a
clinical assessment of the patient’s
suitability for transfer should be carried out
by a qualified health professional. A transfer
conducted when it should not can degrade
the patient’s health condition.
WARNING: Joerns Healthcare warns of
possible strangulation risks related to the
lifting strap and hand control cable, and
advises to take necessary precautions to
prevent these.
WARNING: This product contains small
parts (such as caps, see Fig. 6) that might
present a severe danger to children if
swallowed or inhaled.
CAUTION: Keep all components of the lift
clean and dry.
CAUTION: Excessive exposure of the hand
control to water (or other liquid) could cause
malfunction of the device.

Safety Instructions
9
001.08075.04 rev.13
Human and Environmental Safety
Practices
• Should the battery casing crack and cause
contents to come in contact with skin or
clothing, rinse immediately with plenty of
water.
• If contents come in contact with the eyes, rinse
immediately with plenty of water and seek
medical attention.
• Inhalation of the contents can cause
respiratory irritation. Provide fresh air and
medical attention.
• For recycling and disposal of the batteries, the
rules as per the WEEE directive (Waste of
Electronic and Electrical Equipment) as well as
local laws and regulations must be followed. If
not they may explode, leak and cause
personal injury. When returning batteries,
insulate their terminals with adhesive tape.
Otherwise, the residual electricity in used
batteries may cause fire or explosion.
Battery and Battery Charger Safety
Practices
Only use batteries designed for use with the
device. If unsure, do not use the battery. Make
sure it belongs to the device by comparing the
battery label with the technical specifications in
the Instructions for Use. If battery type cannot be
confirmed, call your Joerns Healthcare agent.
• Do not expose the battery or chargers to
flames.
• To avoid bodily injury, do not crush, puncture,
open, dismantle or otherwise mechanically
interfere with the battery.
• Stop using the battery if any damage or
deformation is noted.
• Be careful not to drop the battery.
• Only use the charger that has been supplied
with the product.
• Do not charge the battery in an unventilated
area.
• The charger must not be covered or exposed
to dust.
• The charger is designed for dry areas only and
for normal air humidity conditions.
Homecare Environment
Considerations
WARNING: Following the instructions is
important for the safe use of the battery.
WARNING: Following the instructions is
important for the safe use of the battery.
WARNING: The Voyager is not intended to
be operated by children. Serious injuries
could occur.
NOTE: Rigorous cleaning actions should be
done when the Voyager is exposed to an
animal. Pet hair trapped inside the device
(through the strap opening) can reduce the
product performance.

Parts Designation
10
001.08075.04 rev.13
Parts Designation
Voyager Lift and Charging Station
Fig. 1
Legend
1) Emergency lowering key 5) Support 9) Battery
2) Strap 6) UP button 10)Emergency stop / Battery eject button
3) Carabiner 7) DOWN button 11) Charger
4) Hand Control unit 8) Charging Station

12
How to Use the Voyager
001.08075.04 rev.13
Before Approaching the Patient
Attendants should always tell the patient what
they are about to do. Make sure to have on hand
a sling that is of the correct model and of
adequate size for transfer with the Voyager.
Before performing the transfer, it is important to
evaluate the patient’s general condition. For
example, an agitated patient will require a more
specific type of sling.
Attachment Methods
Once the loop sling has been fitted around the
patient, it can be configured in three ways. With
each of the three methods described below, it is
necessary to first connect each shoulder loop of
the sling to both sides of the spreader bar.
Attachments Points
Method 1 - Cross-through
(Legs closed with crossing straps)
This method is recommended for most general
transfer.
Fig. 4
Method 2 - Hammock
(Bridge, legs closed)
This method can provide a comfortable cradle for
amputee patient.
It is also a useful method for patients with
contractures, making it difficult to bring a sling
strap between the legs.
Fig. 5
Method 3 - Abduction
(Legs opened with non-crossing straps)
In this method, legs are held in abduction which is
convenient for toileting and hygiene care.
WARNING: All rails must be closed with end
stoppers or connected to other closed rail
components. Before use, make sure all end
stoppers are in place. A wrong installation of
these items might lead to a patient fall and to
injuries.
WARNING: The lift must never be operated
by the patient. In the unlikely case of a
failure, the patient might get stuck in the unit.
The attachment point
designation shown here are
only for the purpose of the
explanations below.
Fig. 3
WARNING: Method 2 might not be suitable
for confused, combative or erratic patients
as they can fall forward and get injured.
WARNING: Method 3 might not be suitable
for patients with no upper body control as
they can slide down and almost out of the
sling.
How to Use the Voyager

How to Use the Voyager
13
001.08075.04 rev.13
Transferring the Patient
1) Install the sling around the patient.
2) Take the battery out of the charger and insert it
into the lift. Make sure the silver contact points
go inside the lift.
3) Once the patient sling is installed, unwind the
strap.
There are two ways to unwind the strap:
First, you can press the down
button while holding tension on
the strap with the other hand
(there must be tension on the
strap for the lift to function).
The other way is to use the
“quick-release”. (1) Push the
knob sideways and (2) pull the
strap out of the lift.
4) Attach the carabiner to the trolley in the rail.
Fig. 6
5) Move the lift over to the patient.
6) Lower the lift to approximately below the
patient’s chin level before beginning to attach
the sling straps (this is to avoid the unit from
making contact with the patient’s face due to
the movement of the lift).
For a patient in a lying position, lower the lift near
the thorax, and then install the straps.
7) Attach the straps of the sling as described in
the sling’s documentation.
8) Lift the patient slightly by pressing the UP
control button.
11) Use the handles on the back of the sling to
position the patient when transferring into a
chair. Hold the handles firmly as the sling
lowers and the sling will tilt back to position the
patient.
12)Once the patient is properly seated and the
straps are loose, remove the sling from the lift.
CAUTION: Push the knob completely over to
ensure that the quick-release will work
properly.
The quick-release will not work if there is
tension on the strap. Make sure the strap
has some slack in it before attempting to
slide the knob over.
DO NOT force the knob. It should slide
easily.
Note: To help you reach the trolley, use the
arm extension as follows:
Insert the round hook into the loop of the
arm extension #A8300 (1), then hook it to the
trolley in the track (2).
(1) (2)
WARNING: Hold the lift with one hand at all
times when near a patient. The proximity of
the lift near the patient’s face may cause the
patient some discomfort.
WARNING: Before lifting the patient:
1) Make sure that all straps are attached to
the lift’s supports.
2) Make sure the patient's arms are safely
out of the way.
3) Make sure the sling is not caught on any
obstructions (wheelchair brake or arm of
chair, etc.).
If any of the above occurs, lower the patient
immediately and correct the problem.
9) Lift until the patient's buttock
clears all obstacles in the
transfer path, chair arm
supports for example, before
moving the patient. Guide the
legs past any obstacle.
10)When the patient is located
above the desired point of
transfer and ready to be
lowered, press the down
button.
WARNING: A patient should never be left
unattended during a transfer. In the unlikely
event of a failure of the device, the caregiver
must be ready to react.

How to Use the Voyager
14
001.08075.04 rev.13
13)Slide the lift away from the patient.
15)Remove the sling from around the patient.
Emergency Lowering
The Voyager has a safety feature that allows the lift
to be lowered even if the electrical system does not
operate.
Located on the right side of the lift (near the sling
support), the emergency lowering device is
activated by the insertion of the special key
included with this manual.
To lower safely a patient, follow these steps, as
illustrated in Fig. 7:
1) Find the rubber stopper and label on the side of
the lift and pull it out. Do not discard it.
2) Move the patient over a bed or chair.
3) Insert the 4 mm Allen key into the opening then
turn it clockwise to lower the patient. The key
rotation turns the motor directly, so that for each
key turn, the patient will lower slightly.
Fig. 7
4) Once the patient is lowered safely on a bed or
into a wheelchair, remove the key from the lift
and call a qualified technician to service your
Voyager.
Emergency Brake
The emergency brake is an additional safety
feature that automatically prevents the patient from
falling in the unlikely event of a transmission or
motor failure.
Battery Information
For safe handling and to extend the battery
lifetime, please follow and remember these
instructions.
Only use batteries designed and labelled for use
with the device. When not sure, do not use the
battery. Make sure the battery belongs to the
device by comparing the battery label with the
technical specifications in this manuel. If battery
type cannot be confirmed, call your Joerns /
Healthcare agent.
Battery life depends on many factors: frequency of
use, frequency of charging, temperature of
operation, storage and storage time.
Make sure to have a replacement battery ready
when needed. Have the facility department keep
one in stock.
The battery included in the Voyager is 24 VDC, 2.0
Ah and rechargeable. It provides 10 to 30 transfers
per battery charge.
14)Unhook the lift from the trolley
in the rail and use the “quick
release” to wind up the strap.
To do so, (1) push the knob
sideways and (2) hold the
strap while it winds itself into
the lift.
CAUTION: When using the “quick-release”,
hold the strap in your hand and release the
knob only when the strap is not in motion.
This will prevent wear of the internal
components.
CAUTION: The emergency lowering feature
is to be used only in case of emergency.
WARNING: After an incident has occurred
and the brake was deployed, never attempt
to unlock the brake or press the UP button.
This may disengage the brake and make the
patient fall. The emergency lowering device
cannot be used.
WARNING: Never use a lift with the
emergency brake deployed. Use other
product to lower the patient.
The emergency brake is intended for a
single activation and therefore can only be
used once. Call your Joerns / Healthcare
agent Service Department to arrange for the
unit to be replaced.
CAUTION: Not following these instructions
can cause short battery life.

How to Use the Voyager
15
001.08075.04 rev.13
Charging the Battery
The steps for recharging the battery are as
follows:
1) Eject the battery from the lift unit by pressing
on the battery eject button.
2) Check to make sure that the green light on the
charger is illuminated. Insert the battery into
the charger, ensuring that the metal contact
points on the battery touch the charger’s
contacts.
The charging indicator light (yellow) will flash
while the battery is charging. When the battery is
fully charged, the charging indicator light will
become solid.
If the battery is low, it will take approximately two
hours for a full charge.
If the battery is fully drained it could take up to 6
hours to recharge.
Fig. 8
When the lift is needed again, pull the battery out
of the charger and gently slide it back into the
Voyager lift. The metal contacts should be inside
the lift.
The charger’s power cord can remain plugged
into the wall indefinitely, convenient for overnight
recharging.
The battery can be left in the charger for an
extended period of time without damaging either
the charger or the battery.
If the green light does not go on when the charger
is plugged into an electrical outlet, see the
“Troubleshooting” section.
NOTE: To prolong battery life, place the
battery in the charger whenever the lift is not
in use. If the low battery indicator beeps, be
sure to recharge the battery as soon as
possible. Charge the battery until the
charging indicator light is a solid yellow
before using the lift again. This will extend
the life of the battery.
NOTE: Joerns / Healthcare uses sealed lead-
acid batteries. These batteries are not
affected by any memory effect. Therefore,
batteries should not be completely drained
before recharging.
WARNING: Do not operate the charger with
a damaged cord or if the unit has been
dropped or damaged.
Do not bend the power cord by force, or
place a heavy object on it. This will damage
the cord and may cause fire or electrical
shock.
CAUTION: Only use chargers that are
specified by Joerns / Healthcare to recharge
the batteries.
NOTE: To avoid dropping the battery, keep
your hand near the battery opening when
pressing on the battery eject button.
NOTE: Whenever possible, leave the battery
in the charger when the lift is not in use.
At a minimum, charge the battery until the
charging light turns solid yellow before
using again. This will extend the life of the
battery.
CAUTION: Do not attempt to use a battery
not authorized by the manufacturer. The
Voyager and its charging system use
specially designed batteries. Using
unauthorized batteries may seriously
damage the lift or the charger.
CAUTION: The lift should not remain stored
for long period of time without charging the
battery. Batteries should be recharged at
least every two weeks to maximize their life-
span.

16
Care and Maintenance
001.08075.04 rev.13
Care and Maintenance
Preventive Maintenance Schedule
The product is subjected to wear and tear, and the following maintenance instructions must be acted upon
when specified to ensure that it remains within its original manufacturing specifications. Care and
maintenance must be carried out as per the preventive maintenance schedule below.
Customer obligations must be carried out by qualified personnel as per the instructions in this manual.
User Inspections
WARNING: The maintenance described in the following checklist is the minimum that the
manufacturer recommends. In some cases more frequent inspections should be carried out.
Continuing to use this product without conducting regular inspections or when a fault is found
will seriously compromise the safety of the user and of the patient. Local regulations and
standards may be higher than those of the manufacturer. A load test is recommended. Service
and preventive maintenance can be arranged with the manufacturer. Preventive maintenance
specified in this manual can prevent accidents and reduce repair costs.
WARNING: Safety related maintenance and authorized service must be carried out by qualified
personnel, fully trained in servicing procedures by Joerns / Healthcare, and equipped with
correct tools and proper documentation, including Parts List and Service Manual. Failure to meet
these requirements could result in personal injuries and/or unsafe product.
WARNING: Never proceed to maintenance or service while lift is in use with a patient.
Action/Check INITIALLY BEFORE
EVERY USE
EVERY 2
MONTHS
EVERY 4
MONTHS
EVERY
YEAR
EVERY 2
YEARS
Lift device
INSPECT FOR MISSING HARDWARE OR
BROKEN ENCLOSURE.X X X
INSPECT STRAP FOR WEAR. X X
RECHARGING BATTERY. X
INSPECT THE SLING SUPPORTS ON THE
LIFT FOR DAMAGE OR CRACKS.X
INSPECT WHEELS IN RAIL FOR
DAMAGE, RUST OR CRACKS. REPLACE
IF DAMAGED.
X
CLEAN THE RAIL. X
OVERALL INSPECTION BY AUTHORIZED
PERSONNEL.X
INSPECT CARABINER FOR DAMAGE OR
CRACKS X
VERIFY EMERGENCY STOP BUTTON. X
VERIFY EMERGENCY LOWERING
DEVICE.X

17
Care and Maintenance
001.08075.04 rev13
Inspections by an Authorized Service Technician
Action/Check INITIALLY BEFORE
EVERY USE
EVERY 2
MONTHS
EVERY 4
MONTHS
EVERY
YEAR
EVERY 2
YEARS
Sling and hardware
CHECK ALL SLING ATTACHMENTS FOR
SIGN OF WEAR.X
INSPECT SLING MATERIAL FOR WEAR
OR DETERIORATION.X
INSPECT SLING STRAPS FOR WEAR. X
INSPECT FOR ANY DEFECTS OR LOOSE
THREADS IN THE “STITCHED AREAS”. X
CLEANING SLING AS INDICATED ON
THE TAG.WHEN NECESSARY
Action/Check INITIALLY BEFORE
EVERY USE
EVERY 2
MONTHS
EVERY 4
MONTHS
EVERY
YEAR
EVERY 2
YEARS
Authorized Service
Replace strap. X
Inspect the welding aspect on the
frame to detect cracks. X
Inspect transmission. X
Inspect connecting joints for proper
attachment. X
Verify that the emergency brake on
the drum is turning freely. X
Verify emergency devices for good
functioning. X
Load test with SWL (maximum
working capacity). X
NOTE: If the product does not work as intended, immediately contact your local Joerns /
Healthcare agent for support.
WARNING: Always reinstall the rail end stoppers (if removed) after servicing.
WARNING: Make sure the trolley is compatible with the stoppers and rail system.

Care and Maintenance
18
001.08075.04 rev.13
Cleaning the Lift
Removing visible residues:
1) Use a cloth soaked with water.
2) Remove visible residues from the lift and its
accessories (sling, handset, strap) from top to
bottom.
Cleaning:
1) Use a damp cloth with warm water mixed with
a mild detergent.
2) Scrub the equipment from top to bottom,
removing all visible residues.
3) Rinse with clean water any remaining residual
detergent. Then wipe clean with a dry cloth.
Voyager’s Special Areas to Clean
Fig. 9
To ensure a better rolling surface for the trolley
wheels, clean the inside of the rail every
4 months. To do so, insert a damp cloth in the
opening and slide it from one end of the rail to the
other.
NOTE: It is recommended to clean the lift
and its accessories between each patient
use.
NOTE: Pay special attention to areas
pointed in. These are most likely to enclose
germs. Use a smaller brush and/or cotton
swab to reach them.
CAUTION: Do not drench the product, as
this could damage electrical components
and cause internal corrosion.
If a hot air dryer is used to dry the lift, the
temperature must not exceed 80°C (176 °F).
Do not use petroleum-based solvents, as
this may damage plastic parts.
Emergency stop/
battery eject button
Up/Down button
membrane
Hand control
edge
Hand control
back and handle

Care and Maintenance
19
001.08075.04 rev.13
Daily Checklist
The following procedures must be followed before
each use:
• Charge the battery.
• Inspect the lift for any damage. If the lift casing
does not look properly aligned, or there are
any cracks or other damage on the lift, or there
are parts missing, do not use it. Contact your
Joerns / Healthcare agent to have the lift
serviced.
• Inspect the strap for any visible signs of wear,
frays, loose threads or other damage (see
Fig. 10). If there is any evidence of damage, do
not use it. Contact your local Joerns /
Healthcare agent to have the lift serviced.
• Inspect the sling for tears, frayed straps or
loose stitching. If the sling has any of the
above damage, do not use it. Contact your
local Joerns / Healthcare agent to have the
sling replaced or repaired.
• Inspect the carabiner at the top of the strap to
ensure that it is properly attached.
Strap Inspection
If the strap is damaged or shows signs of wear or
discolouration, the acceptable load on the strap
before rupture can drop rapidly and present a
danger for the patient or caregiver. Joerns /
Healthcare recommends a thorough inspection of
the straps every two months as follows:
1) Completely unwind the strap.
2) Look for any signs of wear or discolouration
(see Fig. 10).
Fig. 10
Handling and Storage
Avoid violent impacts while transporting the lift.
The lift should not remain stored for long periods
of time without recharging the battery.
If you store or ship the Voyager, ensure that the
power is turned off (push the battery eject button)
beforehand.
Battery Replacement
Replace the battery when there is a noticeable
reduction in the number of transfers that can be
performed between charges. If you hear the
Voyager lift beeping, see the instructions in the
“Troubleshooting” section of this manual to
determine if there is a problem with the battery.
For battery replacement, contact your local
Joerns / Healthcare agent.
WARNING: Before each use, make sure all end
stoppers on the rail are in place.
NOTE: The lift cassette and the sling should
be cleaned between use of different patients.
WARNING: Do not splash, drench or
immerse the unit in water.
WARNING: The strap must be changed if it
shows any sign of wear as indicated above
or any other visual defects.
The manufacturer recommends changing
the strap at least every 2 years or every 2850
cycles—which ever comes first.
By continuing to use the lift without
changing a damaged strap, the safety of the
caregiver or patient is greatly compromised.
NOTE: Even if the lift is not used, Joerns /
Healthcare recommends charging the
battery at least every two weeks. This will
prevent premature aging of battery.
CAUTION: Do not attempt to use a battery that
was not supplied by Joerns / Healthcare. The
battery has been specially designed for Joerns
/ Healthcare charging systems. Attempting to
use an unauthorized battery may seriously
damage the lift and/or the charger.
Loose threads in stitched
areas
Noticeable discolouration
Edge wear (fraying)
Middle wear
(strap or stitches are lighter
than original color)

Care and Maintenance
20
001.08075.04 rev.13
Verification of the Charger’s Power
Source
If the light does not illuminate when the battery is
correctly installed in the Voyager charger, try the
following:
1) Make sure that the charger is correctly
plugged into the AC outlet, and that the green
light is on.
2) Make sure that the battery is properly inserted
in the charger.
3) Check the power of the AC outlet on the wall.
4) If the charger’s yellow or green light does not
light up, contact your local Joerns / Healthcare
agent for assistance.
Sling Inspection and Care
Refer to documentation included with slings.
Annual Inspection
The Voyager and its accessories must be
inspected annually by a qualified technician.
UK Regulation
WARNING: The slings should be checked
before and after use and, if necessary,
washed as per instructions on the sling.
This is especially important when using the
same equipment for another patient. This
minimizes the risk of cross infection.
WARNING: The Voyager and accessories
must be serviced every 12 months as a
minimum requirement. Do not attempt to do
the inspection unless you are qualified to do
so. Not servicing the product may lead to
patient fall, causing injuries.
Note: In the UK the Voyager must be
inspected and maintained in compliance
with 1998 no 2307 health & safety: lifting
operations and lifting equipment regulations
1998. Your dealer will provide you with more
information.
Table of contents
Other Arjo Lifting System manuals