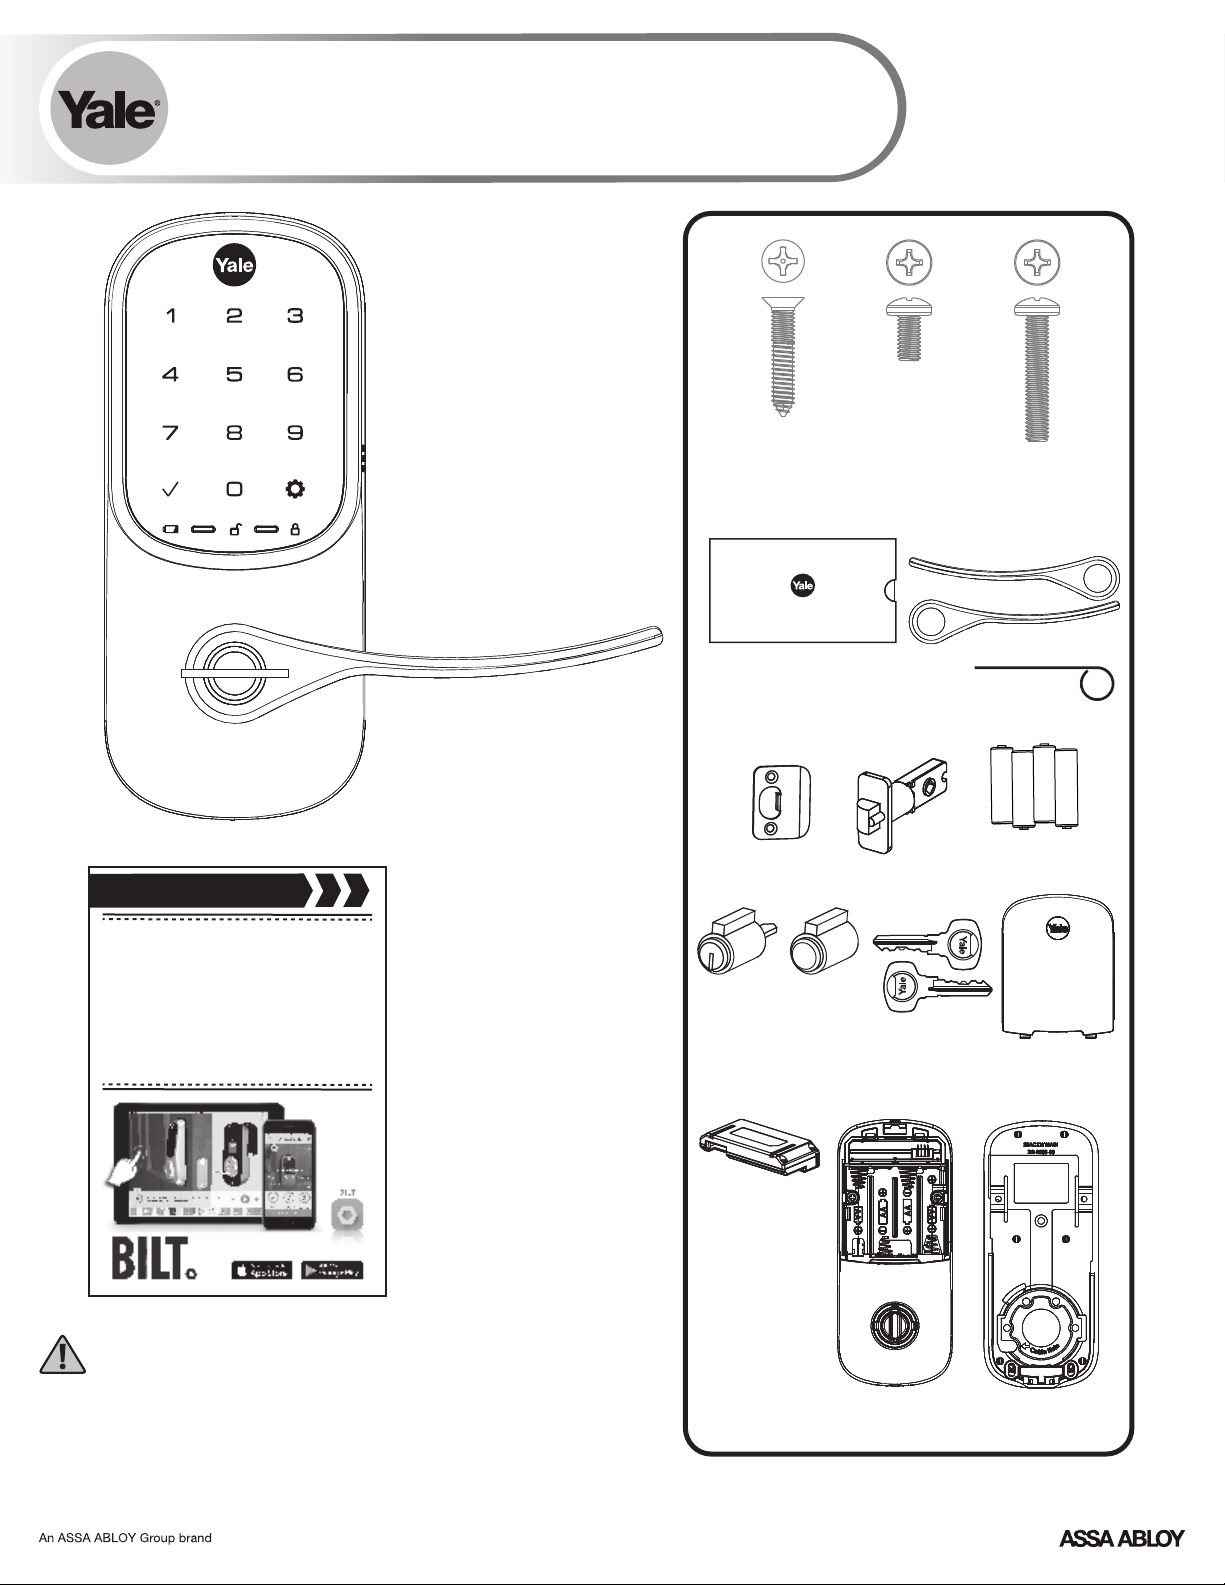
Assa Abloy Yale Assure Lever YRL226 Technical specifications

P/N YRL-TS-MNL-0018 Rev A
1
®
Yale Assure Lever
Touchscreen (YRL226) and Key-Free Touchscreen (YRL256)
Installation and Programming Instructions
FAILURE TO FOLLOW THESE INSTRUCTIONS COULD RESULT IN DAMAGE TO THE PRODUCT AND VOID THE FACTORY WARRANTY
Before you begin
for step-by-step installation
instructions & to register
your product
DOWNLOAD
THE BILT APP
WARNING
This product can expose you to lead which is known to the state of
California to cause cancer and birth defects or other reproductive harm.
For more information go to www.P65warnings.ca.gov.
Battery Cover
Key
AA Alkaline
BatteriesLatchStrike Plate
Interior Mounting Plate
Interior Lock
Battery Cover
Levers
Cylinder
(YRL226)
Optional
Smart Module*
Keys (YRL226)
Installation Guide Envelope
(Includes this manual and
door checker with template)
Let's Get Started
*Yale Smart Module
is not included with
NR models.
Key-Free
Cylinder
(YRL256)
OR
#7 wood & #8-32
machine x 20mm
Combination screws
x4
M4 x 22mm
Pan head machine
screws
x2
#8-32 x 5/16"
Machine screws
x2

P/N YRL-TS-MNL-0018 Rev A
2
Preparing to Install
Tools Needed
Standard
Phillips Head
Screwdriver
Utility Knife
Drill
Wood Mortise
Chisel
Pencil Tape
Measure
Level
Tools necessary only for new doors or
adjusting existing prep.

P/N YRL-TS-MNL-0018 Rev A
3
Check Door Measurements and
Make Adjustments If Needed
New Door Marking Template
Door Checker
Use door checker from installation guide envelope to verify your door
measurements and make any needed adjustments.
With door checker, use template from installation guide envelope to
prep a new door that has not been predrilled for hardware.
Let's Get Started
New Door
Marking
Template
Let's Get Started
Check
Your Door
Guide

P/N YRL-TS-MNL-0018 Rev A
4
?Determining Door Handing
Left Hand Right Hand
Face a door swinging open
away from you.
If it swings open to the right,
it is a right hand door. If it
swings open to the left, it is a
left hand door.
Exterior
Inswinging Door
Interior Left Hand
Reverse
Right Hand
Reverse
Face a door swinging open
toward you.
If it swings open to the right, it
is a right hand reverse door. If it
swings opens to the left, it is a
left hand reverse door.
Exterior
Outswinging Door
Interior
Curve of latchbolt must contact strike plate first.
Frame
Door
Latchbolt Curve
Strike
Plate
Exterior
Interior
Outside of Right Hand Door
YRL226 Cylinder and Key Shown
YRL256 = Key-Free Cylinder and No Key

P/N YRL-TS-MNL-0018 Rev A
5
Preparing Door & Frame
Necessary for new doors or adjusting existing prep.
1" (25mm)
Deep
!
Drill holes 1/2 way
through door then
complete from other side
to prevent splitting.
2-1/8"
(54mm)
Dia.
2-3/8" (60mm)
or
2-3/4" (70mm)
Backset
1"
(25mm)
Dia.
See
Door Prep
Template
Inside
of Door
Frame
Frame

P/N YRL-TS-MNL-0018 Rev A
6
x4
1Installing Latch & Strike Plate
Right Hand Installation Shown
2-3/8" through bolt posts
2-3/4" through bolt posts
Note: Adjustment based on backset
O
optional
default
PULL
Outside
of Door
Frame
*Backset
*2-3/8" (60mm)
or
2-3/4" (70mm)

P/N YRL-TS-MNL-0018 Rev A
7
2
Outside of
Right Hand Door
Inside of
Right Hand Door
Installing Touchscreen
Right Hand Installation Shown
!
!
“TOP” mark must be
on top surface and tailpiece
in vertical position.
Incorrect orientation will
cause lock to fail.

P/N YRL-TS-MNL-0018 Rev A
8
x2
3Installing Interior Mounting Plate
Right Hand Installation Shown
Inside of
Right Hand Door
Inside of
Right Hand Door

9
4
P/N YRL-TS-MNL-0018 Rev A
Attaching the Cable Assembly
Right Hand Installation Shown
Inside of
Right Hand Door
Ensure cable is securely
fastened into adapter.
!
Use cable
hooks for
proper cable
routing.
!

P/N YRL-TS-MNL-0018 Rev A
10
5
X2
Installing Interior Lock
Right Hand Installation Shown
X
Inside of
Right Hand
Door
“Click”

P/N YRL-TS-MNL-0018 Rev A
11
6Installing Exterior Cylinder (YRL226)
or Key-Free Cylinder (YRL256)
Outside of
Right Hand Door
!
Cylinder must be installed
with bar away from latch.
Latch
Bar
Bar
Tailpiece
Cylinder
(YRL226)
Key-Free Cylinder
(YRL256)
OR
YRL226 Cylinder YRL256 Key-Free Cylinder
Remove key from cylinder.
OR
There is no key.
Cylinder
Tailpiece
(YRL226) must
slide into
vertical slot

P/N YRL-TS-MNL-0018 Rev A
12
7
8
Installing Exterior Lever
Installing Interior Lever
Inside of
Right Hand Door
!
Press pin while installing
lever so lock is not damaged.
Outside of
Right Hand Door
YRL226 Cylinder
Shown
!
Press pin while installing
lever so lock is not damaged.

P/N YRL-TS-MNL-0018 Rev A
13
Testing Thumbturn Operation
Outside of
Right Hand
Door
Outside of
Right Hand
Door
!Test with door open.
!
Test thumbturn and both levers in locked and unlocked positions. If operation fails,
check installation beginning with Step 2 and refer to Hardware Troubleshooting.

P/N YRL-TS-MNL-0018 Rev A
14
Testing Key Operation (YRL226)
Outside of
Right Hand
Door
Outside of
Right Hand
Door
!Test with door open.
!If key operation test fails, check installation beginning with Step 6.

P/N YRL-TS-MNL-0018 Rev A
15
9
NOTE: If a Smart module was included with your lock, it
is in a separate box with additional module installation
instructions.
Inside of
Right Hand Door
Installing Smart Module
(if included)
!
Batteries must not be
installed prior to inserting
and/or removing module.

P/N YRL-TS-MNL-0018 Rev A
16
10
Inside of
Right Hand Door
Installing Batteries & Cover
®
Congratulations, you've installed the Yale Assure Lever
Touchscreen YRL226 ( ) or Key-Free Touchscreen (YRL256)!
Using Your Lock instructions will help
you customize your lock.
"Welcome to
Yale Real Living."

P/N YRL-TS-MNL-0018 Rev A
17
Testing Touchscreen Operation
!Test with door open.
A Master Entry Code must be created upon installation or after resetting the lock to factory default.
Programming and use of lock is not possible until this step has been successfully completed. See of
Using Your Lock instructions below. 1
Enter Entry Code
Press
!If touchscreen operation test fails, check installation beginning with Step 2.
Enter Entry Code
Press
OR

18
P/N YRL-TS-MNL-0018 Rev A
Resetting Lock to Factory Default
When resetting the lock, all user codes, including the Master Entry Code*,
are deleted. All programming features are reset to original default
settings. See “Setting Definitions”.
1. Remove the battery cover and batteries.
2. Remove the interior lock to access the reset button.
3. The reset button (see image above) is marked.
4. Re-insert 3 batteries and hold the reset button for 3 seconds.
5. While still holding the reset button, insert the 4th battery, and hold the
reset button for an additional 3 seconds.
6. Release the reset button.
7. Re-install the interior lock onto the door.
*Upon reset, Master Entry Code creation is the only option available and
must be performed prior to any other programming of the lock.
Reset Button
Interior Lock

P/N - Rev AYRL TS-MNL-0018
19
Changing Lock: Replacing Cylinder (YRL226)
1.To Remove Cylinder:
See installation Steps 6 and 7. Reverse appropriate actions to remove the exterior lever handle and cylinder.
2.To Install New Cylinder:
A. Follow appropriate actions of installation Steps 6 and 7 to replace the cylinder and exterior lever handle.
B. Test operation of new cylinder and key by following "Testing Operation".
Hardware Troubleshooting
Cycle lock in both the locked and unlocked positions. If problems are found:
Tailpiece and spindle will not mate and fit into the interior escutcheon
a. Ensure that your door is between 1-3/8" and 1-3/4" thick
b. Ensure that the square shaped spindle has “Top” writing and arrow facing upwards
c. Place the tailpiece in the vertical position
d. Verify that the thumbturn is in the horizontal (unlocked) position
Thumbturn does not rotate electronically or physically
a. Verify that inside of the lock is properly seated on the mounting bracket
b. Ensure that the square shaped spindle has “Top” writing and arrow facing upwards
c. Place the tailpiece in the vertical position
d. Verify that the thumbturn is in the horizontal (unlocked) position
I'm getting an alert when I try to lock or unlock the door electronically
a. Do not turn or depress the lever during operation, this could cause a jam alarm
b. Check that thumbturn does not have anything preventing it from physically rotating
c. Verify that you can rotate thumbturn freely
My lock is not making any sound when I touch numbers or icons on the touchscreen
a. Use the programming tree in the manual to verify that Audio is enabled
b. If Audio is enabled, ensure that the white cable that connects the touchscreen to
the interior of the lock is not pinched or broken
When rotating the thumbturn I hear noise
a. A little bit of noise is normal when operating the thumbturn
b. If cranking, grinding or clicking occurs please verify your installation
The locking pins will not retract when I try to install the levers
a. If the thumbturn is in vertical (locked) position, rotate the thumbturn to the horizontal
(unlocked) position and it will retract

P/N - Rev AYRL TS-MNL-0018
20
Setting Definitions
*The Master Entry Code must be created prior to any other programming of the lock.
Creation
required*
Settings Default Setting
Master Entry Code
Definition
The Master Entry Code is used for programming
and for feature settings. It must be created prior to
programming the lock. The Master Code will also
operate (unlock/lock) the lock.
Auto Re-lock Disabled
After a successful code entry or manual unlock
with the key (YRL226), the lock will automatically
re-lock after each unlock in an effort to keep your
home secure. This feature is optional, and can be
turned off. In the ON mode, the lock will
automatically re-lock after thirty (30) seconds.
Inside Indicator Light Disabled (Off)
Located on the interior lock. Shows active status
(Locked) of lock and can be enabled or disabled in
the Advanced Lock Settings (Main Menu selection
#3).
One Touch Locking Enabled
When the latch is retracted, activating the
touchscreen will extend the latch (during Auto Re-
lock duration or when Auto Re-lock is disabled).
When One-Touch Re-lock is not in use (disabled),
any valid Entry Code will re-lock the lock.
Volume Enabled (Low) The volume setting for Entry Code verification is set
to Low (2) by default; otherwise it can be set to
High (1) or Silent (3) for quiet areas.
Language English Choosing English (1), Spanish (2) or French (3)
becomes the (default) setting for the lock voice
prompts.
All Code Lockout Mode Disabled
This feature is enabled by the Master Entry Code.
When enabled, it restricts all Entry Code access
except Master. When attempting to enter a
code while the lock is in All Code Lockout mode,
the RED locked padlock will appear on the screen.
Wrong Code Entry Limit 5 Times
After five (5) unsuccessful attempts at entering a
valid Entry Code, the lock will shut down and not
allow operation for sixty (60) seconds.
Shutdown Time 60 Seconds
The lock will shutdown (flashing RED) for sixty
(60) seconds and not allow operation after the
Wrong Code Entry limit (5 attempts) has been met.
Other manuals for Yale Assure Lever YRL226
1
This manual suits for next models
1
Table of contents
Popular Touchscreen manuals by other brands

Elo TouchSystems
Elo TouchSystems E534869 user manual

Universal Remote Control
Universal Remote Control TOTAL CONTROL TKP-7500 owner's manual

Ferrari Costruzioni Meccaniche
Ferrari Costruzioni Meccaniche FPC user manual

Elo TouchSystems
Elo TouchSystems 1000 Series Quick installation guide

InTouch
InTouch INOF215 user manual

Setra Systems
Setra Systems MRMS user guide