manuals.online logo
Brands
  1. Home
  2. •
  3. Brands
  4. •
  5. Atlantis
  6. •
  7. Bathroom Fixture
  8. •
  9. Atlantis 1930 User manual

Atlantis 1930 User manual

1930 & 2030 FRAMELESS SCREENS - FITTING INSTRUCTIONS
Angle Front –HA
Included in this package:
Other equipment required
1 x
Bag 102

Flat Screw Driver
1 x
Set ‘E’ Handles

Pozi Drive Screw Driver
2 x
135 ◦ Hinges

Adhesive Application Gun
1 x
Clear Silicon

Level
1 x
Blue Masking Tape

Pencil
1 x
Door Fitting Instructions

Drill
The following instructions show installation when using Acrylic Liner.
When this system is having Tiled Walls the Wall Channels are to be
installed Directly onto the Waterproofing Membrane.
Once Wall Channels have been installed walls are to be tiled. Glass Screens are to be installed as per
following instructions.
If a protective cover is adhered to base it should be left in place until frameless screen installation is
complete.
2 Wall –HA
1. Choose door direction
Right Hand
Left Hand
R22 R22
R45 R45
2. Position wall channel over base channel. Mark wall to
indicate where wall channel is plumb.
The machine recess in the wall glazing channel must firmly
locate over the base glazing channel.
3. Mask two sides of wall channel before applying white
silicon. Apply a continuous 8mm bead of Sika NG Artic
White silicon to full length of wall channels in groove as
indicated.
Hex screw must face
inside shower
Silicon
here
4. Locate framing timber. Use 4mm drill bit to drill holes
through wall channels. Fix four screws into each channel
(use wall plugs if required).
5. Apply a 10mm continuous bead of Sika Artic White silicon,
to the full length of each wall channel. Silicon seal the join
where the wall and base channel will intersect. Screw the
wall channels to the wall (ensuring they are plumb).
Acrylic Liner (Fig.1) - apply an additional bead of silicon to
the outside of the acrylic liner.
Tiled Walls (Fig.2) –apply an additional bead of silicon to
the inside of the waterproofing
Fig.1 -Acrylic Liner
–Silicon seal outside wall channel
Fig.2 - Tiled Walls
–Silicon seal inside wall channel
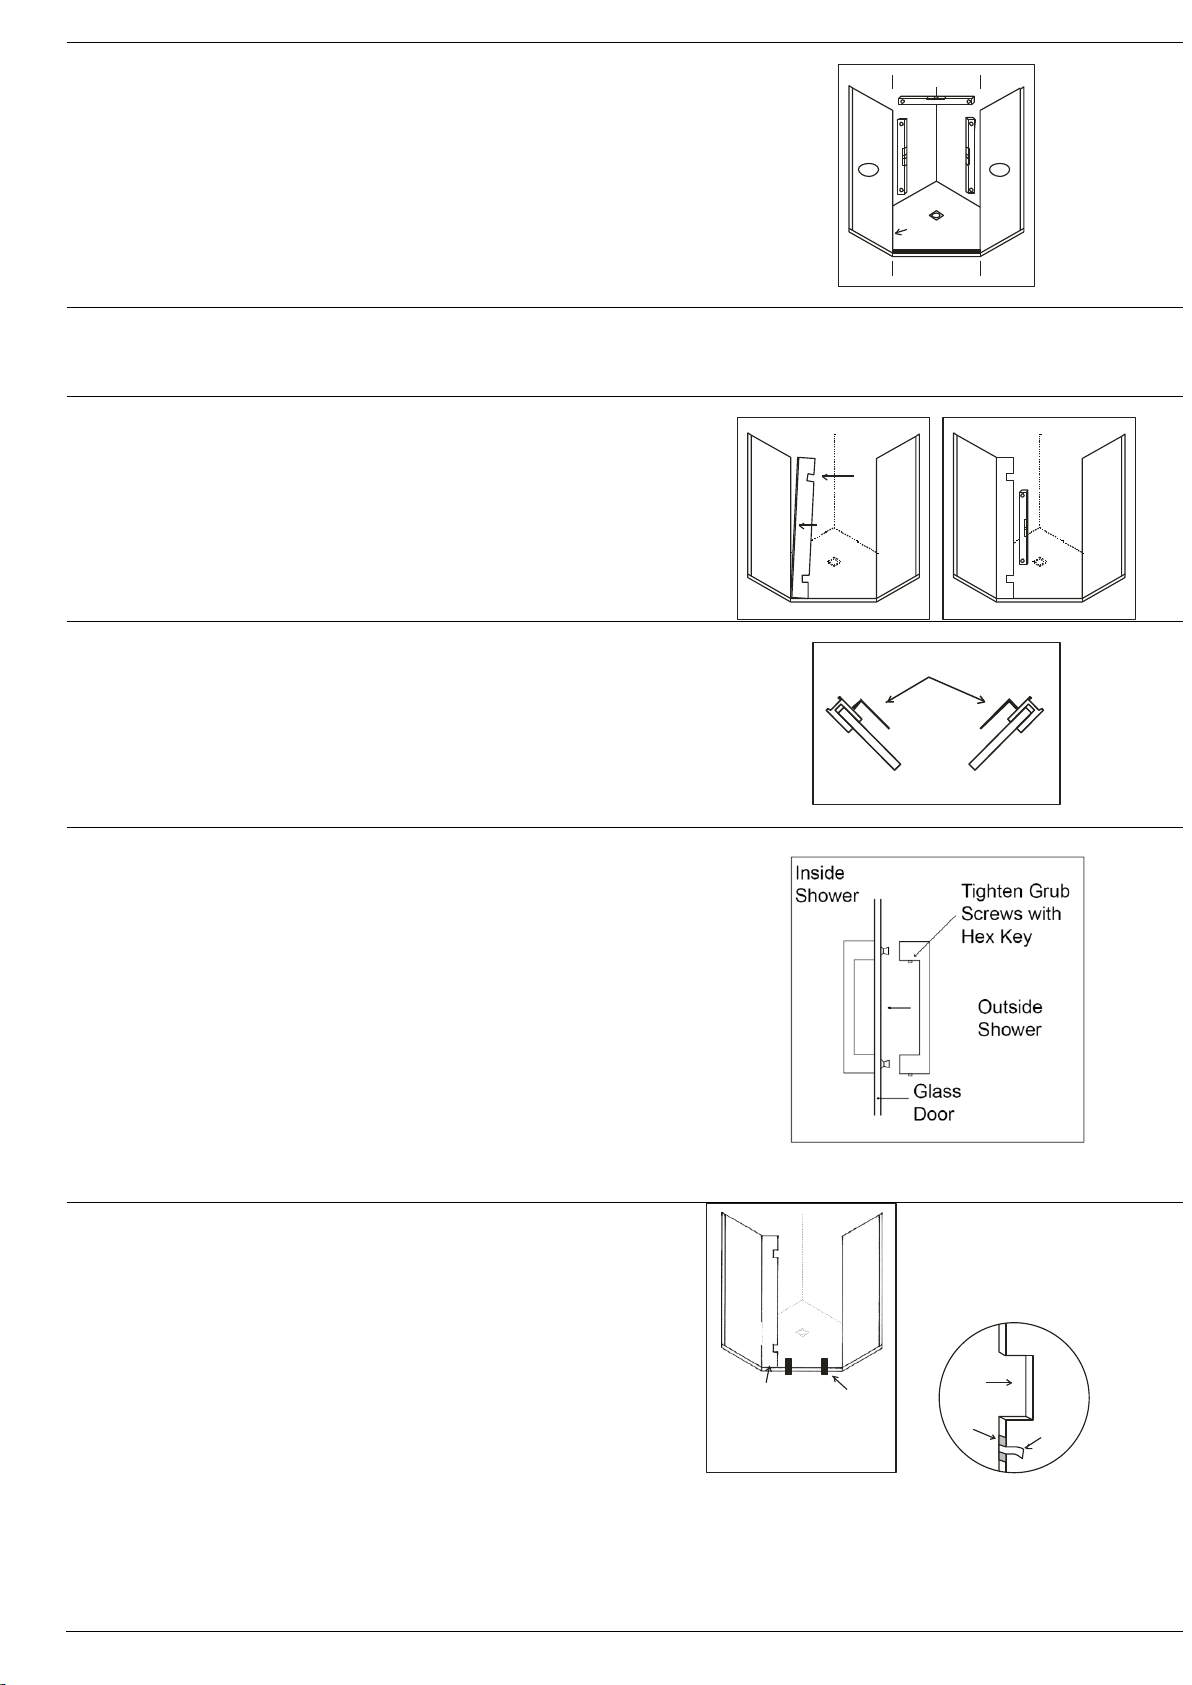
6. Fix liner cover to wall channel covering exposed liner edge
as shown.
This step only applies if acrylic wall liner has been
supplied.
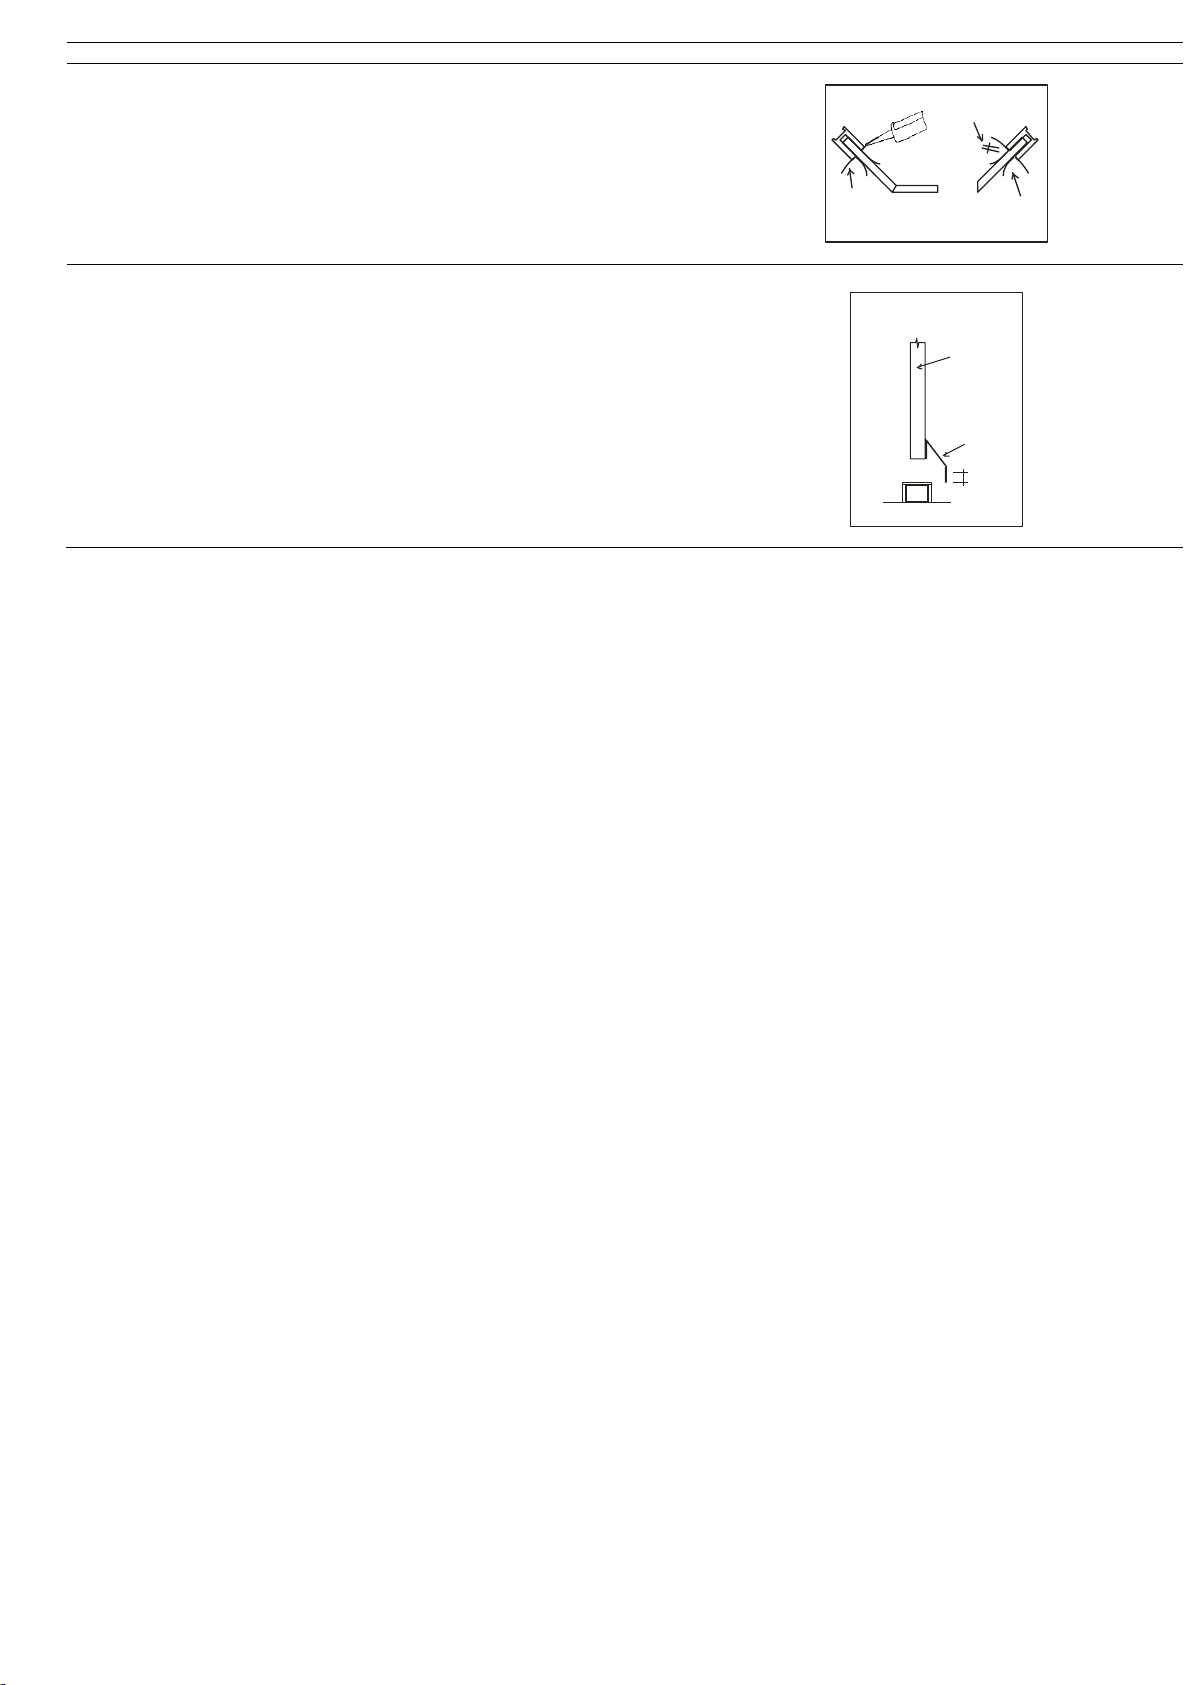
7. Keep glass standing upright.
Once package containing glass is opened, check glass is
facing same direction up as label, do not sit glass directly
on floor, always sit glass on polystyrene packaging or
similar padded surface. Keep glass level with floor to avoid
hitting corners on hard surfaces.
No responsibility will be taken by Atlantis for any glass breakages through installers actions causing breakage.
8. The sill infill will be taped into the base glazing channel.
Slide this sill infill firmly to panel R45 side of bottom
channel. Tape in position.
R22 R45
Protect all channels from adhesive and grouts by covering with masking tape.
9. Start by placing 6mm packers into bottom channels in
locations as shown. Add or remove other packers if
required.
R22 R45
10. Critical Seal. Remove the dust and dirt first. Seal the
connection between the glass receiver channel and the
base glazing channel with clear silicon, prior to final glass
placement. Ensure junction between wall channel and
base channel is full of silicon before final glass placement.
The following steps for installing glass must be followed to ensure a professional result.
11. Locate panel R45 into channels firmly against sill infill.
Adjust height of panel if necessary by adding or removing
packers in bottom channel. Ensure panels are flush to top
of channel and plumb.
R45
12. Locate panel R22 into channels and slide firmly to sill infill.
Adjust this panel ensuring it is level and plumb to panel
R45 by adding or removing packers in bottom channels.
Equal Gap
R22 R45
Level
22 Bevel On
Edge Of Glass
o
INSTRUCTIONS FOR HA DOOR OPTION VARY FROM THESE INSTRUCTIONS.
THERE IS NO SMALL RETURN PANEL FOT THE GLASS DOOR TO BE MOUNTED ON. DOOR WILL HINGE DIRECTLY
FROM RETURN PANEL
13. Preparation Method. Dampen cloth with methylated
spirits and wipe the edge of the glass clean. Use a clean
cloth and wipe dry (repeat).
Remove release film off double sided tape and press the
two glass panels firmly together.
Tape
Level
14. Fixing of glass panels into wall channels
Fix glass into channels by tightening hex screws firmly with
hex keys supplied. Ensure glass return panels line up with
each other when viewed in the directions as shown by
arrows.
Outside
Inside
Hex Key
15. Assemble handles as shown. Fit handles to glass door prior
to installing door in position. Fix ferrule screws through
glass. Do not over tighten.
Locate second handle over ferrules. Tighten two grub
screws with small hex key supplied.
16. Place 6mm MDF packers over sill before installation of
glass door to allow correct clearance for door.
Apply 1mm plastic packer to edge of glass with masking
tape as shown. Position one next to each hinge cut out
(this will ensure correct door clearance and prevent glass
damage).
6mmMDF
Packers
Use timber wedge
on this panel for
satisfactory door
alignment if necessary
Tape 1mm packers
onto fixed panel.
ThinPlastic
Packer
Hinge
Cut Out
MaskingTape
17. Install hinges. Fit correct side of hinge as shown onto
panel R22. Ensure hinges are centred in cutouts.
Fixed Glass
Apply this side
of hinge to
panel R22
first
Loosen
bolts
and
slide
hinge over
glass. Tighten
very firmly Viewed from
inside shower
Opening Door
18. Insert timber wedge between door and panel R45 for
correct door clearances.
TOP VIEW
Timber
Wedge
Top Brace
19. Stand inside shower door. Slide glass door into hinges.
Centre door between side panels and tighten hinge bolts
firmly with large hex key.
View from inside shower
Use
handles
to assist
in lifting
glass door
20. Door clearances
Minimum 3mm gap under door
21. This is the general layout of the complete door.
Outside
Glass Door
Hex Key Inside
1.5mm
Gap 1.5mm
Gap
22. Drill and screw the loose top block onto the top brace, as
per the positioning guide. Place the brace onto the
screens and tighten the top brace block grub screws to
secure the brace. Do not over tighten grub screws onto
the glass.
Fit the loose top brace block to the top
brace, to suit your screen direction.
23. Mask channels and glass in position as shown. Apply clear
silicon to inside and outside of glass panels. Use spatula to
remove excess.
Masking
Tape
3mm gap between
masking tape
This tape
to edge
of channel
24. Sill Infill –Apply a continuous bead of clear silicon to each
inside face of the base channel. Ensure the ends of the
infill are sealed and place into the base channel as shown.
Installation of bottom door seal. Trim to length if
necessary. Clip onto the bottom of the door. Ensure the
sloping face is inside the shower.
Glass
Door
Inside
Shower
BottomSeal
Outside
Shower
2mm
interference
withsill

This manual suits for next models

1

Other Atlantis Bathroom Fixture manuals

Atlantis FX-NTRB User manual

Atlantis

Atlantis FX-NTRB User manual

Atlantis Linea Quattro Series User manual

Atlantis

Atlantis Linea Quattro Series User manual

Atlantis EASYTILE II User manual

Atlantis

Atlantis EASYTILE II User manual

Atlantis Quub User manual

Atlantis

Atlantis Quub User manual

Popular Bathroom Fixture manuals by other brands

Aquavista 15-B42WP-CH-A Assembly

Aquavista

Aquavista 15-B42WP-CH-A Assembly

AmazonBasics B07RS44KQN Welcome guide

AmazonBasics

AmazonBasics B07RS44KQN Welcome guide

Noro FROST C-C 150 instruction manual

Noro

Noro FROST C-C 150 instruction manual

Kohler K-6525 installation guide

Kohler

Kohler K-6525 installation guide

Heatstore HSTRL500WTN Installation and operating instructions

Heatstore

Heatstore HSTRL500WTN Installation and operating instructions

Glacier bay 35603HBHD Use and care guide

Glacier bay

Glacier bay 35603HBHD Use and care guide

Valore VS 2002 Plus Installation and user guide

Valore

Valore VS 2002 Plus Installation and user guide

IKEA VOXNAN 403.724.23 manual

IKEA

IKEA VOXNAN 403.724.23 manual

Laufen SIMIBOX HF574038000000 quick start guide

Laufen

Laufen SIMIBOX HF574038000000 quick start guide

AM.PM W83T-315-090W manual

AM.PM

AM.PM W83T-315-090W manual

Gessi VENTI2O 65101 manual

Gessi

Gessi VENTI2O 65101 manual

Nadoli DS653648BK manual

Nadoli

Nadoli DS653648BK manual

Hewi 802.50.015 installation instructions

Hewi

Hewi 802.50.015 installation instructions

Relax Smart 0801-A Assembly instructions

Relax

Relax Smart 0801-A Assembly instructions

Wedi Fundo Assembly instruction

Wedi

Wedi Fundo Assembly instruction

Toto Soiree Installation and owner's manual

Toto

Toto Soiree Installation and owner's manual

BELLOSTA microfono 6913/5/1 Installation instruction

BELLOSTA

BELLOSTA microfono 6913/5/1 Installation instruction

noken Radiador 500x1000 Installation and Maintenance

noken

noken Radiador 500x1000 Installation and Maintenance

manuals.online logo
manuals.online logoBrands
  • About & Mission
  • Contact us
  • Privacy Policy
  • Terms and Conditions

Copyright 2025 Manuals.Online. All Rights Reserved.