AU Tool BT60 User manual
www.autooltech.com
Battery Capacity Monitor
User Manual
AUTOOL BT60

Precautions (Mandatory Compliance)
To avoid harm to people and property, please must comply
with the following rules.
Dangers:
● No children are allowed to touch.
● Do not use damaged leads or connectors.
● No cutting or extending of leads and no exchanging of
connectors.
● Do not use corroded cable connectors.
● Make sure the power cable is properly connected to the
car battery cable connector.
● Not available except for 12v car batteries.
Warnings:
● Follow the right order for installation.
● Make sure the main unit is fixed with double-sided tape.
● Do not wipe with a dry cloth.
● It can not be disassembled and modified.
●If there is a peculiar smell or deformation, please do not
use it again.
● When installing the main unit with double-sided tape, the
vent hole of the battery must not be blocked.
Precautions:
● No water drops or other liquids on the surface.
● Wipe the liquid on the surface with a damp cloth.
Before use:
Since it is divided into two stages to determine the voltage
fluctuation during engine starting, the characteristics of the
new battery need to be stored as a reference and compared to
determine the pros and cons, which allows more accurate
judgments to be made that match the vehicle type.
The functions of the car battery lifespan diagnose unit
1

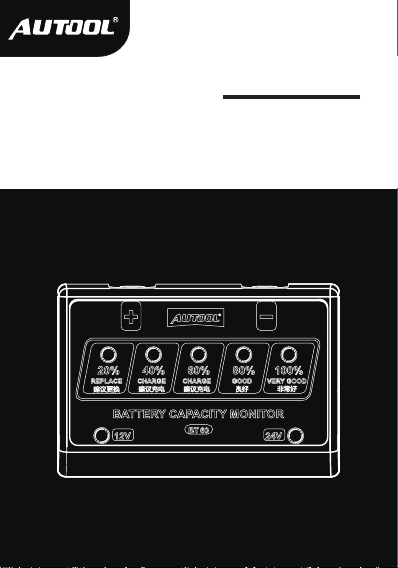
● Engine starting performance is displayed in 5 stages with
LED indicators to inform you of battery status.
● The battery is detected to be discharged due to forgetting
to turn off switches such as headlights and notifies you that it
needs to be recharged.
● A failure of the vehicle's charging system is detected and
you are notified that the vehicle needs to be inspected.
Precautions for using the car battery lifespan diagnose
unit
● Since this product needs to diagnose the status of the
battery when starting the car engine, it needs to be installed
and used on the battery with the car.
● This product determines the battery status at the time of
engine starting, as well as determines the battery status at the
time of engine stop. Please always use it together with the
battery.
● This product consumes very little current and has almost
no effect on the car battery even if it is kept always installed in
the car.
Installation
After confirming that the car battery is in normal condition,
please install the product in the following order.
● After connecting the⊕cable connector to the “+”
connector of the battery, insert the⊕side connector (red) of
this product into the bolt of the⊕side cable connector from the
side to firmly fix the nut.
● After connecting the cable connector to the “-”
connector of the battery, insert the side connector (black) of
this product into the bolt of the side cable connector from
2

the side to firmly fix the nut. (It will automatically identify the
type of 12V or 24V battery voltage and is displayed by LED )
● After this product is properly connected, it will detect the
voltage of the battery and display the corresponding voltage
value through 5 LEDs.
● Peel off the double-sided tape on the back of the product
and stick it to the top of the battery.
● Start the engine and the LED will light up in accordance
with the corresponding voltage value.
● The working mode of this product is to detect the battery
voltage and display the corresponding voltage value by LED,
which is kept for 3s. If it detects low voltage, the buzzer will
beep three times and then enter sleep mode. After keeping it
for 8s, it will switch to working mode again and the cycle
repeats.(When a 12V battery is detected, the buzzer will beep
three times if the voltage is below 10.5V; when a 24V battery
is detected, the buzzer will beep three times if the voltage is
below 21V)
※Cautions
● This connector is of the anti-drop type, so there is some
resistance to insertion.
*Place the connector on the cable connector bolt and push
slowly and firmly.
● If the battery is installed with a connector cover, be careful
not to interfere with this connector cover when installing the
product.
● Do not install it on the liquid port plug (vent) of the battery,
as this may cause rupture.
● Install this product in a location where the liquid nozzle
3

can be removed.
● Before using double-sided adhesive tape to attach this
product, please wipe off all dirt (oil, dust) from the adhesive
surface with a cloth dampened with water.
● For vehicles with battery protection cover, please check
the installation space before installation.
● If the battery installed outside the engine compartment
has a battery protective cover, please install this product on
the inside of it.
● If the wires are too long and may come in contact with
moving parts such as valve covers or belt fans, keep the wires
in a ball when installing to avoid contact with moving parts.
● As it is necessary to read data when the product is in use,
please take care to leave a mounting space of about 1 cm
around the product.
● When this product is installed in the battery of a car
whose engine has stopped, please make sure to follow the
vehicle maintenance manual completely, otherwise you will be
responsible for the consequences.
● When this product is installed in a truck or other vehicle
where the battery location can be seen from the outside of the
vehicle, please install it in a place that is normally invisible
from the outside of the vehicle, but it can be seen during the
inspection.
How to interpret LEDs and how to deal with?
How to interpret the engine start performance LED and
how to deal with it
Engine starting performance of the battery is divided into 5
levels to display by LED.
4

※Cautions
● The engine starting performance of the battery varies with
factors such as temperature, and the starting performance at
low temperatures is poor.Therefore, even if the battery decays
to the same extent, it shows a poorer starting performance at
low temperatures than at room temperature.
● Since this product diagnoses the engine starting
performance of the battery based on the engine starting
characteristics of the vehicle, this result may differ from that of
a battery tester.
● If an external power supply is used to start the engine
through the booster cable, the correct engine starting
performance will not be displayed.(Usually, the engine starting
will show the correct engine cranking performance.)
● If the motor is turned without stepping on the clutch while
the manual vehicle is in gear, the correct engine starting
performance will not be displayed.(Usually, the engine starting
will show the correct engine cranking performance.)
Reasons for buzzer warning and solutions
● If the buzzer beeps, the battery performance LED will not
light.
● If the buzzer beeps, there may be a problem with the
vehicle's charging system. It is recommended that to have
your vehicle checked.
● If the buzzer beeps: the vehicle's charging system is
malfunctioning, or there is heavy discharge and the battery is
undercharged. It is recommended that the vehicle be charged
and checked.
● If the buzzer beeps: it' s probably because you forgot to
5

turn off the lights or drive for a long time and the battery is
badly discharged. Please charge the battery according to the
instruction manual of the battery. (There is no problem even if
you remove this product while charging. )
Maintenance/inspection
Clean car battery lifespan diagnose unit
● Wet the cloth with water, wring out, and wipe the dirt.
● Do not wipe with a dry cloth or other materials that may
generate static electricity.
● Do not use volatile oil (petroleum), thinner, gasoline and
other organic solvents as cleaning agents.
Installation inspection of Connectors
● Make sure the connectors are secure.
● If it is loose, tighten the nut to secure it firmly.
Parameter
6
Battery type 12V 24V
1#LED voltage value 10.5v~11.2v 21.0v~22.4v
2#LED voltage value 11.3v~12.0v 22.5v~24.0v
3#LED voltage value 12.1v~12.8v 24.1v~25.6v
4#LED voltage value 12.9v~13.5v 25.6v~27.0v
5#LED voltage value >13.5v >27.0v

Copyright Information
All rights reserved by AUTOOL TECH. CO., LTD. No part of
this publication may be reproduced, stored in a retrieval
system, or transmitted in any form or by any means,
electronic, mechanical, photocopying, recording or otherwise,
without the prior written permission of AUTOOL. The
information contained herein is designed only for the use of
this unit. AUTOOL is not responsible for any use of this
information as applied to other units.
Neither AUTOOL nor its affiliates shall be liable to the
purchaser of this unit or third parties for damages, losses,
costs, or expenses incurred by purchaser or third parties as a
result of: accident, misuse, or abuse of this unit, or
unauthorized modifications, repairs, or alterations to this unit,
or failure to strictly comply with AUTOOL operating and
maintenance instructions.
AUTOOL shall not be liable for any damages or problems
arising from the use of anyoptions or any consumable
products other than those designated as OriginalAUTOOL
Products or AUTOOL Approved Products by AUTOOL.
Other product names used herein are for identification
purposes only and may betrademarks of their respective
owners. AUTOOL disclaims any and all rights in those marks.
Manual are either trademarks, registered trademarks, service
marks, domain names, logos, company names of or are
otherwise the property of AUTOOL or its affiliates. Incountries
where any of the AUTOOL trademarks, service marks, domain
names, logos and company names are not registered,

AUTOOL claims other rights associated with unregistered
trademarks, service marks, domain names, logos, and
company names. Other products or company names referred
to in this manual maybe trademarks of their respective
owners. You may not use any trademark, service mark,
domain name, logo, or company name of AUTOOL or any
third party without permission from the owner of the applicable
trademark, service mark, domain name, logo, or company
name. You may contact AUTOOL by visiting AUTOOL at
https://www.autooltech.com, or writing to aftersale
@autooltech.com, to requestwritten permission to use
Materials on this manual for purposes or for all other questions
relating to this manual.

Warranty
● Thank you for choosing our products, we will provide you
with the following
services and promises.
● The warranty period of this product is 1 year.
● After the warranty period expires, repairs will be charged for
replacement parts.
● After the failure, please contact the manufacturer, we will
give you the most complete service in the shortest time.
The following items are not covered by the warranty:
● Vulnerable parts are not covered by the warranty, including:
glass tube, signal
sire, stickers, connectors pressure gauge, oil outlet pipe.
● When no cleaning agent is added to the ultrasonic tank,
turning on the ultrasonic
cleaning switch will damage the ultrasonic system, which is
not covered by the
warranty.
● If the testing agent is not replaced in time after long-term
use, the oil pump filter
screen is blocked and the oil pump is burned out of the
warranty.
● The use of fuel injector cleaning agent as fuel injector testing
agent will cause the
fuel pump to burn out, which is not covered by the warranty.
● Man-made faults are not covered by the warranty.
Disclaimer: All information, illustrations, and specifications
contained in this manual, AUTOOL resumes the right of

modify this manual and the machine itself with no prior notice.
The physical appearance and color may differ from what is
shown in the manual, please refer to the actual product. Every
effort has been made to make all descriptions in the book
accurate, but inevitably there are still inaccuracies, if in doubt,
please contact your dealer or AUTOOL after-service centre,
we are not responsible for any consequences arising from
misunderstandings.

深圳市偶然科技有限公司
广东省深圳市宝安区北八路航城锦驰产业园
Shenhua Innovation Park, Baoan, Shenzhen, China
www.autooltech.com
+86-400 032 0988 / +86-755-27807580
Table of contents
Other AU Tool Measuring Instrument manuals

AU Tool
AU Tool X91 TPMS User manual

AU Tool
AU Tool LM120 Plus User manual

AU Tool
AU Tool X50 Plus User manual

AU Tool
AU Tool X50 PRO User manual

AU Tool
AU Tool X90 User manual

AU Tool
AU Tool TW 500 User manual

AU Tool
AU Tool X60 User manual

AU Tool
AU Tool X60 User manual

AU Tool
AU Tool SDT 206 User manual

AU Tool
AU Tool LM110 User manual

Popular Measuring Instrument manuals by other brands

PASCO
PASCO PASPORT PS-2152 instruction manual

YSI
YSI 550A Operation manual

Bosch
Bosch GLM 120 C Professional Original instructions

Emerson
Emerson Micro Motion quick start guide

Endress+Hauser
Endress+Hauser Liquistation CSF48 installation instructions

TECALEMIT
TECALEMIT TecSonic 225800200 operating manual


