Audifon sino S User manual

BEHIND-THE-EAR HEARING AIDS
sino
kami
rega
User Manual

3
CONTENTS
INTRODUCTION ...............................................................
YOUR HEARING AID ..........................................................
. Type ...........................................................................
. Technical features ........................................................
. Batteries......................................................................
.. Information on battery........................................
.. Low battery warning...........................................
.. Battery compartment lock ..................................
OPERATION SINO, KAMI, REGA S/P ................................
. Construction ...............................................................
. Inserting battery..........................................................
. Removing battery........................................................
. Switching hearing aids on and o.................................
. Inserting and removing hearing aids ............................
.. Inserting with Thin Tube......................................
.. Inserting with ear mould .....................................
.. Removing hearing aids ........................................
. Volume control and program selection ........................
.. Multifunctional rocker switch .............................
.. Volume selection.................................................
.. Selecting hearing programs.................................
.. Direct audio input ...............................................
OPERATION SINO, KAMI, REGA XS .................................
. Construction ...............................................................
. Inserting battery..........................................................
. Removing battery........................................................
. Switching hearing aids on and o.................................
. Inserting and removing hearing aids ............................
. Volume control and program selection ........................
.. Volume selection.................................................
.. Selecting hearing programs.................................
Intended purpose
Hearing aids reduce the eects of hearing loss as much as
possible. Personal discomfort thresholds in loud noises are also
taken into account.
In quiet environments as well as in situations with background
noise, speech intelligibility should be improved and hearing
eort reduced.
The hearing aids are designed to last 6 years. Further
restrictions on use are listed in section 9 Safety instructions.
Hearing aids and the noiser module must be individually
fitted by a hearing care professional or an ENT doctor.
Updated: 08.12.2021

54
INTRODUCTION
Congratulations on the purchase of your new audifon hearing
aids. Your hearing care professional has set this for your individu-
al requirements. These instructions are therefore intended to
help you use your audifon hearing aids properly.
Please read through the following operating and care instruc-
tions carefully to avoid malfunctions and damage. If you follow
the instructions, your hearing aids will prove an invaluable help
in day-to-day communication in your surroundings and with
other people.
The specific model of your hearing aids is shown on the sticker
on the packaging, on the warranty card or printed on the the
body of the hearing aid.
A hearing aid cannot restore your hearing to normal or cure your
hearing loss and neither will it make your hearing worse. How-
ever, a hearing aid will go a long way to restoring normal hearing
levels for many of those activities you may have been missing
out on. Hearing aids are the treatment of choice for most types
of hearing loss.
If you have any further questions, please contact your hearing
care professional.
TINNITUS FUNCTIONT......................................................
MAKING PHONE CALLS .....................................................
. Telephone loop TCoil ................................................
. Automatic program change .........................................
.. Auto TCoil ..........................................................
.. Auto Phone .........................................................
.. Attaching magnet...............................................
ACCESSORIES....................................................................
CARE INSTRUCTIONS .......................................................
. General .......................................................................
. Cleaning......................................................................
. Drying hearing aids......................................................
TROUBLESHOOTING ........................................................
SAFETY INFORMATION.....................................................
. Important warnings....................................................
. Information about product safety ...............................
SIDE EFFECTS AND CONTRAINDICATIONS .......................
. Side eects ................................................................
. Contraindications ......................................................
OPERATING CONDITIONS.................................................
TRANSPORT AND STORAGE CONDITIONS .......................
ENVIRONMENTALLY COMPATIBLE DISPOSAL ...................
OTHER INFORMATION .....................................................
. EU declaration of conformity......................................
. FCC Statement...........................................................
SERVICE ...........................................................................
KEY TO SYMBOLS ..............................................................
WARRANTY CARD
76
YOUR HEARING AID
. Type
Your hearing aids are behind-the-ear hearing aids.
. Technical features
This user manual applies to the following types:
Detailed acoustic data for your hearing aid can be
found in a separate data specification. This and further
information are available from your hearing care
professional or www.audifon.com.
sino S
kami S
rega S
sino P
kami P
rega P
sino XS
kami XS
rega XS
. Batteries
To start your hearing aids, first insert a battery in the battery
compartment.
Make sure you only use zinc air batteries. Please follow the
instructions on the battery packaging. For the exact type of
battery in your hearing aid please see the overview table.
Always switch your hearing aids o after use. To avoid damage,
remove the battery if you are not using your hearing aids for a
long time.
.. Information on battery
A zinc air battery is used to supply the power for your hearing
aids. This type of battery is only activated when oxygen comes
through the air holes into the button cell and a chemical
reaction is initiated. During production, the air holes are sealed
with a protective strip.
This ensures the battery remains fresh until use and lasts longer
when it is sealed. Removing the protective strip allows oxygen
to enter and the chemical reaction is initiated.
Refitting the strip when the battery is not in use will not
extend its service life.
Battery should be stored at room temperature. Avoid
keeping them in hot places or rooms with high humidity
(e.g. bathroom). Storage in a cooled location is not
necessar y.
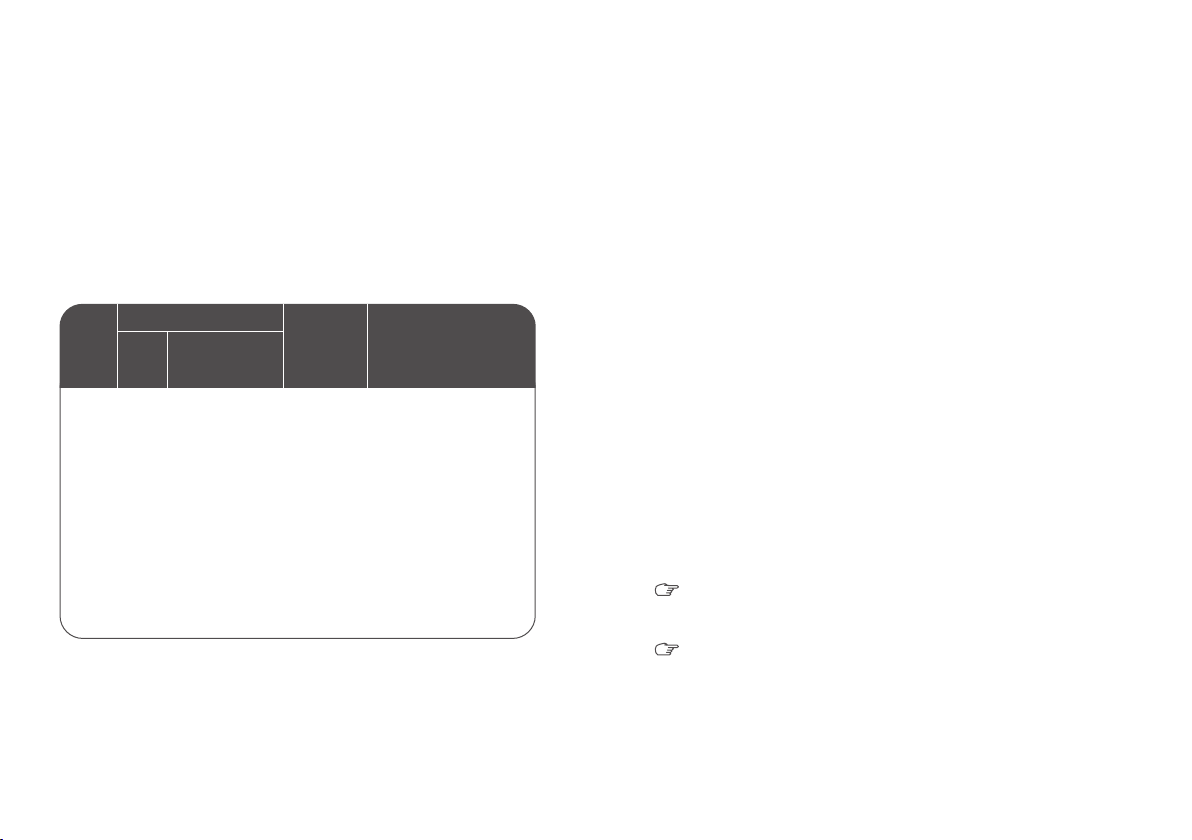
Minor to moderate
hearing loss
Minor to profound
hearing loss verging
on deafness
Minor to severe
hearing loss
Model Indication range
Size Average service
life (zinc air)
in h Gain
in dB
Battery

98
4
5
6
3
2
2
1
1
1
4
5
6
OPERATION SINO, KAMI, REGA S/P
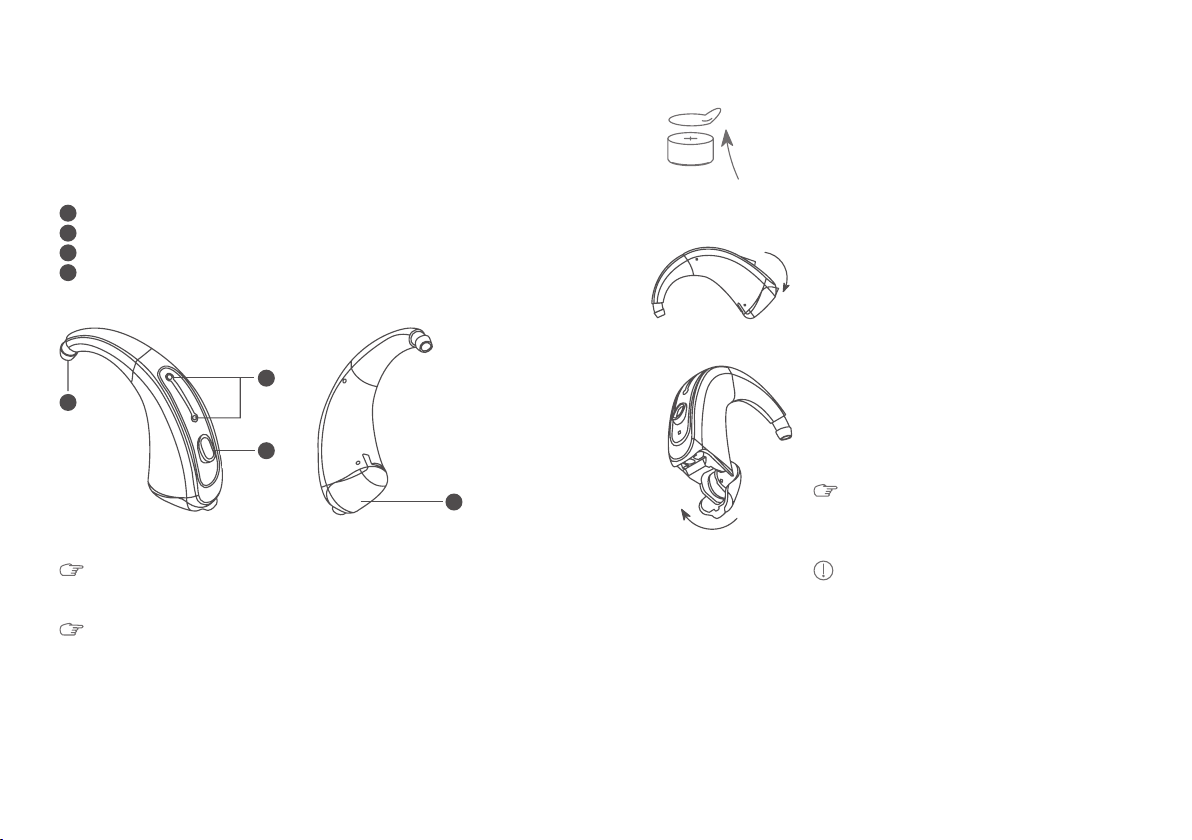
The hearing aids consist of the following elements:
The hearing aids have markings for the sides:
blue = left, red = right
Your hearing aids may dier from the illustrations.
Ear hook
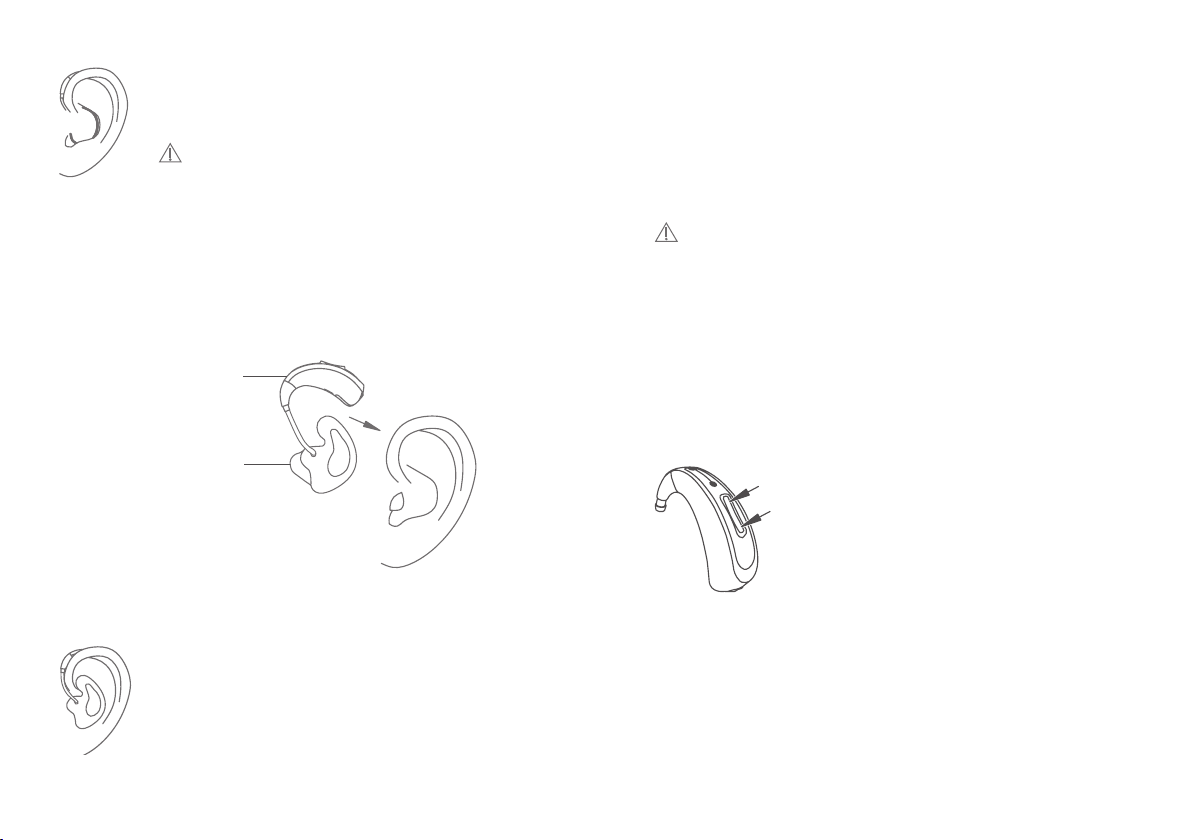
Microphone inlets
Multifunctional rocker switch
Audio input, optional
Battery compartment / ON/OFF switch
Battery compartment lock
. Construction
3
Used batteries are considered hazardous materials and
contain toxic materials, should never be disposed of in the
trash. Ask about recycling programs in your area where
you live or return them to your hearing care professional to
dispose them appropriately.
Further safety instructions can be found on the battery
packaging.
.. Low battery warning
An audible signal indicates the end of the battery life in good
time (approx. 30 minutes before the battery runs out).
.. Battery compartment lock
The battery compartment can be locked by
sliding the lock up using a small screwdriver.
In this position the hearing aid can still
be switched o, but the battery cannot
be removed.
1110
First, push the battery compartment up
until it clicks into the first catch position
(OFF position). You should now be able to
open it fully.
Then remove the battery from the battery
compartment.
Please do not open the battery
compartment any wider than shown on
page 9. This might damage the device.
. Removing battery
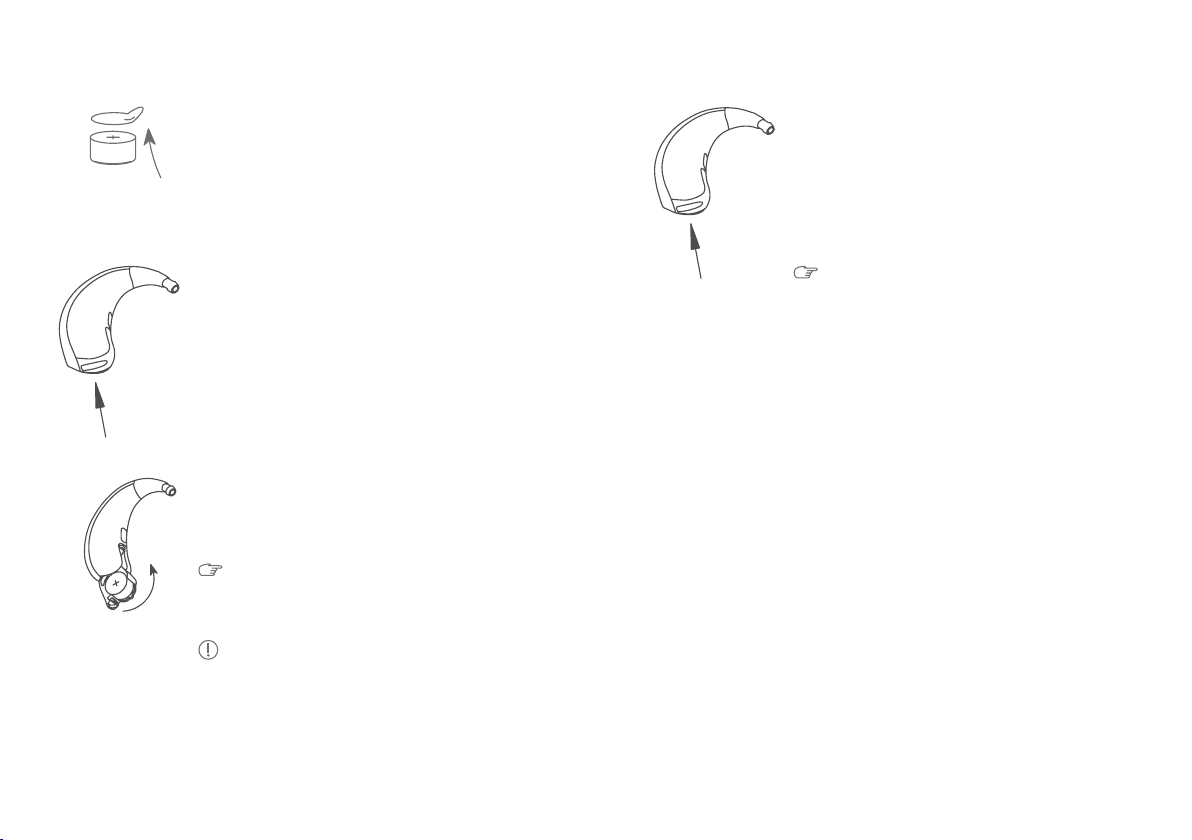
Remove a battery from its packaging.
If the battery has a protective film, remove
and wait a few minutes before inserting
the battery.
First, push the battery compartment up
until it clicks into the first catch position
(OFF position). You should now be able to
open it fully.
Then insert the battery in the battery
compartment. Ensure that the + symbol
marked on the battery is visible when you
have inserted it.
Please do not open the battery
compartment any wider than shown
here. This might damage the device.
Note: Do not force the battery into the
battery compartment. If it does not
fit, check whether you are inserting it
correctly and that it is the correct type of
battery (see Section 2.2).
. Inserting battery

1312
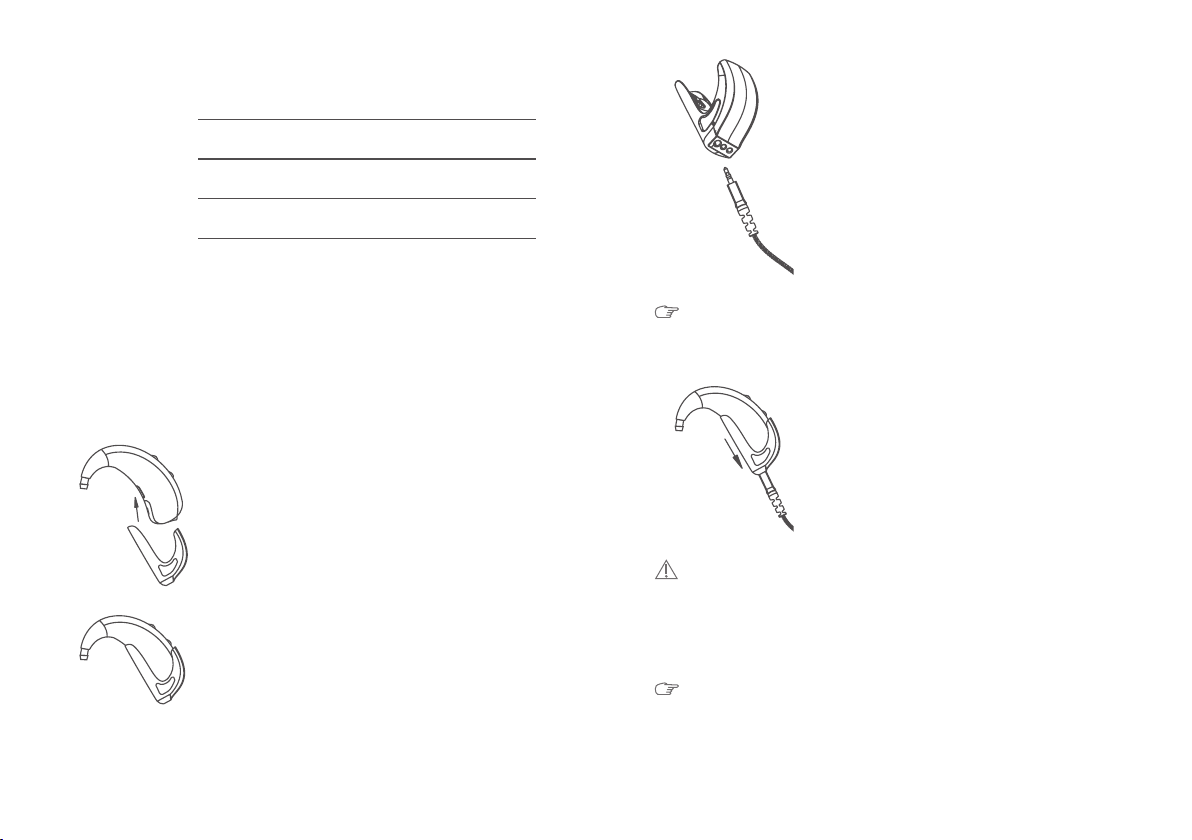
3.5.1 Inserting with Thin Tube
Switch the hearing aid on by closing the battery compartment
securely.
Place the hearing aid behind your ear.
Slide the earpiece carefully into your
ear canal.
Rotate slightly until it is positioned properly.
Open and close your mouth to avoid air being
trapped in the ear canal.
The optional concha support helps improve
the fit of the earpiece in the ear.
. Inserting and removing hearing aids
Easy Thin
Tube + dome
Concha clip
(optional)
Hearing aid
Switching on
Close the battery compartment securely by
moving it past the catch of the OFF position
into the casing.
You will feel the battery compartment
clicking into place as you close it.
The hearing aids are now switched on. After
a preset delay and a start-up jingle, the first
program will activate and the hearing aids
are ready for use.
Your hearing aids are switched on and o via the battery
compartment.
. Switching hearing aids on and o
Switching o
To switch the device o, press the battery
compartment out to the first catch position.
This is the OFF position.
If the devices are going to be out of use for a
long time, open the battery compartment
fully and remove the battery.
1514
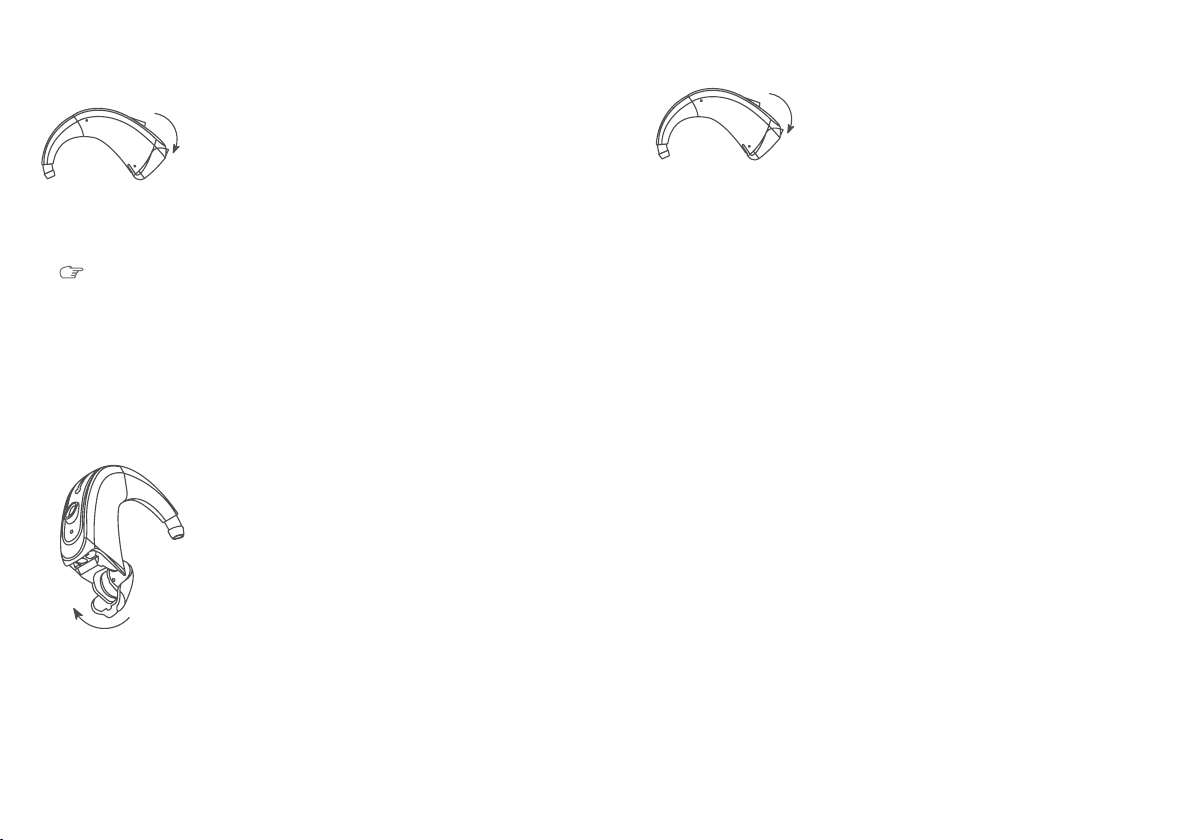
3.5.3 Removing hearing aids
Lift your hearing aid and slide it carefully over the outer part
of your ear. Carefully pull the tube with the earpiece out of the
ear canal. Switch the hearing aid o by moving the battery
compartment to the OFF position.
Warning: Risk of injury!
In some very rare cases the dome may remain in the ear
canal on removal. Should this happen, please contact your
doctor or hearing care professional at once.
Please do not try to remove the dome yourself.
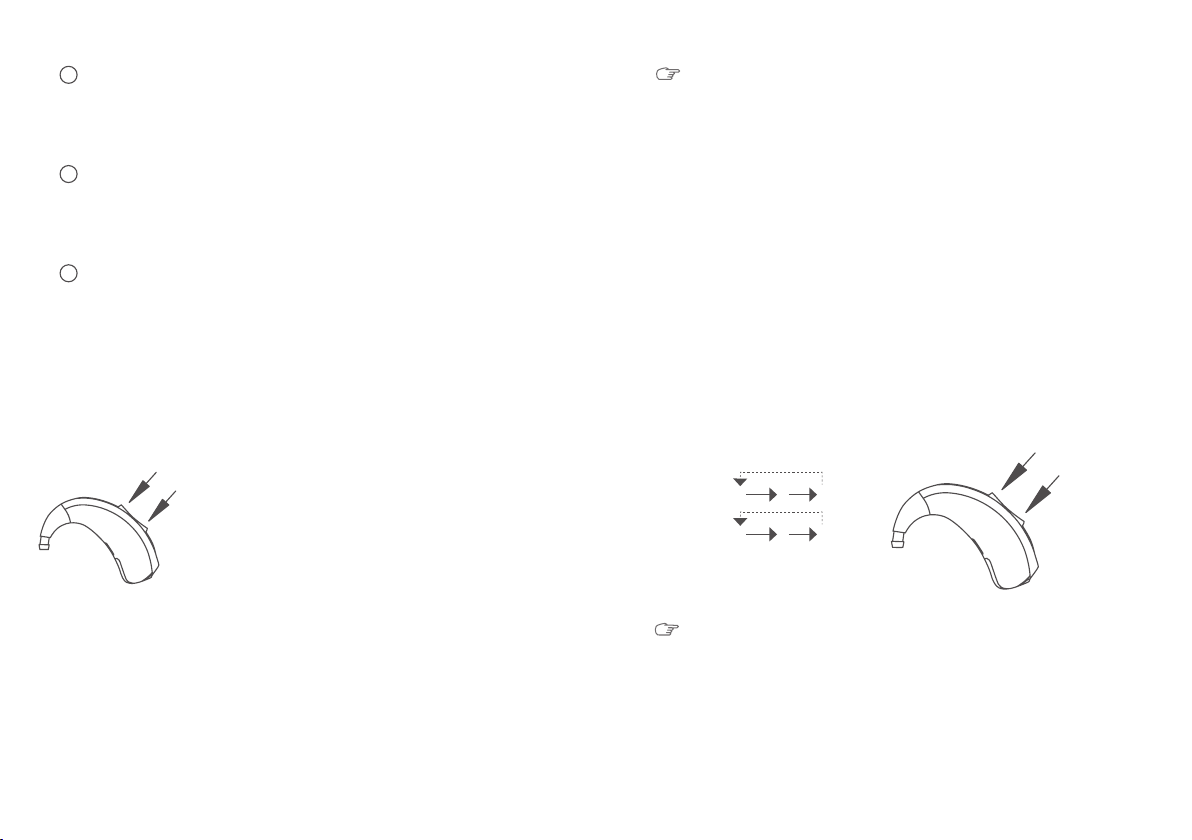
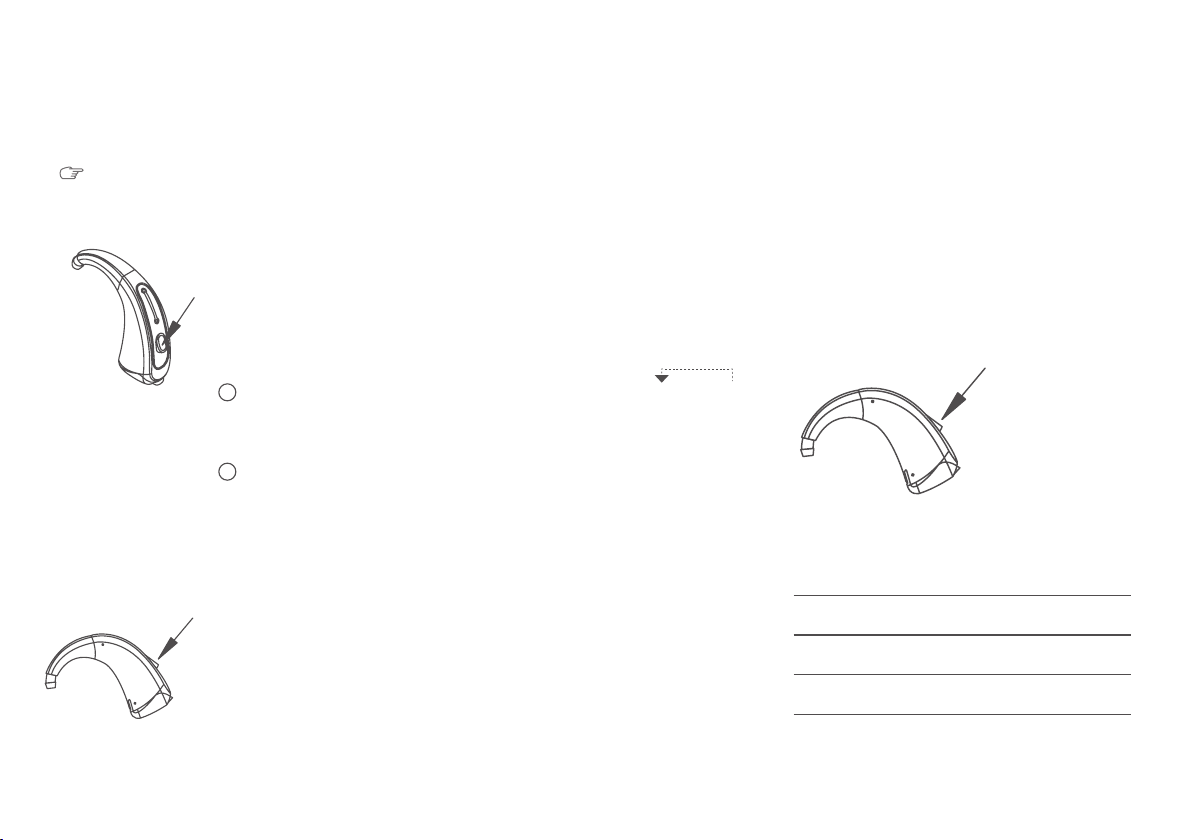
Your hearing aids feature a multifunctional
rocker switch for controlling the volume and
selecting the dierent programs. The rocker
switch can be activated by pressing the top
(+) and bottom end (-).
The rocker switch can be programmed with
one of three functions. Your hearing care
professional has marked here which of the
functions has been set for your hearing aids:
. Volume control and program selection
.. Multifunctional rocker switch
+
To position the concha support, bend slightly
and place it carefully in the outer part of
your ear.
Warning: Risk of injury!
Always wear the thin sound tube with the dome
and check that the dome is positioned securely on
the tube.
3.5.2 Inserting with ear mould
Switch the hearing aid on by closing the battery compartment
securely.
Place the hearing aid behind your ear.
Hearing aid
Ear mould
Insert the ear mould in your ear, rotating slightly as
you do so.
Move the upper part of the ear mould backwards
and forwards slightly to adjust.
1716
.. Volume selection
The volume can be adjusted in steps using
the rocker switch. Briefly pressing the top
end of the switch increases the volume,
while briefly pressing the bottom end
reduces the volume.
When you switch your devices on, they will
be at the volume set for you. You can now
increase or reduce the volume in steps.
Each time you press the switch, you will
hear audible confirmation.
Once you have reached the upper or lower
volume limit, you will hear a clear signal.
Volume control and program selection are optional
functions. Your hearing care professional will adjust your
devices to your individual requirements.
+
.. Selecting hearing programs
Multifunctional rocker switch
Your hearing care professional will have adjusted your hearing
aids to various hearing situations with you and assigned them
to specific hearing programs.
The rocker switch allows you to swap between the hearing
programs. To do so, simply hold down one end of the rocker
switch until you hear audible confirmation of the change in
program. The number of signals indicates the number of the
program selected. You can move up or down through the
hearing situations.
+ switch:
switch:
Program change sequence*:
* Example with three hearing programs
Volume control and program selection are optional
functions. Your hearing care professional will adjust your
hearing aids to your individual requirements.
Volume control
To control the volume, press the multifunction
rocker switch briefly on the top or bottom
also see ...
Program selector switch
To change the program, press the multifunction
rocker switch briefly on the top or bottom
also see ...
Volume control and program selector switch
combined
To control the volume, press the multifunction rocker
switch briefly on the top or bottom; to change the program
hold the switch down for approx. second see also ..
and ...
+
1918
Hearing program
Description of setting
.. Direct audio input
Your hearing aid is equipped with direct audio input DAI.
DAI allows you to use the audio shoe to directly connect
your hearing aid to external sound sources, e.g. portable
MP players.
Fitting the audio shoe
Unscrew the cover of the audio contacts
using a small screwdriver.
Fit the audio shoe onto the hearing aid
from below as shown.
Please do not use force here! If the connector does not fit
into your audio shoe, your hearing care professional will be
pleased to assist.
Removing the audio shoe
Remove the audio shoe by pulling
straight down. Protect the audio
contacts of the hearing aid with
its cover.
Warning: Risk of electric shock!
Audio devices supplied with mains power must comply with
IEC , IEC or similar safety standards to ensure
that they can be connected to your hearing aids without any
risk to safety.
The audio shoe is an optional accessory which is available
from your hearing care professional.
Connecting sound sources to the
hearing aid
Insert the connector of the sound source
you are using into the underside of the
audio shoe.
2120
4
3
2
1
1
2
3
4
OPERATION SINO, KAMI, REGA XS
The hearing aids consist of the following elements:
The hearing aids have markings for the sides:
blue = left, red = right
Your hearing aids may dier from the illustrations.
Ear hook
Microphone inlets
Switch
Battery compartment / ON/OFF switch
. Construction
Remove a battery from its packaging.
If the battery has a protective film, remove
and wait a few minutes before inserting
the battery.
Open the battery compartment carefully
with your fingernail at the edge for
opening and swing it right out.
Then insert the battery in the battery
compartment. Make sure the (+) symbol
on the battery matches the (+) symbol on
the battery compartment.
Please do not open the battery
compartment any wider than shown
here. This might damage the device.
Note: Do not force the battery
into the battery compartment. If it
does not fit, check whether you are
inserting it correctly and that it is
the correct type of battery (see also
Section 2.2).
. Inserting battery
2322
Open the battery compartment carefully
with your fingernail at the edge for
opening and swing it right out.
Then remove the battery from the battery
compartment.
. Removing battery
Switching on
Close the battery compartment securely
by moving it past the catch of the OFF
position into the casing.
You will feel the battery compartment
clicking into place as you close it.
The hearing aids are now switched on.
After a preset delay and a start-up jingle,
the first program will activate and the
hearing aids are ready for use.
. Switching hearing aids on and o
Your hearing aids are switched on and o via the battery
compartment.
Please do not open the battery compartment any wider
than shown in Section 4.2. This might damage the device.
Switching o
To switch the device o, press the battery
compartment out to the first catch
position. This is the OFF position.
If the devices are going to be out of
use for a long time, open the battery
compartment fully and remove
the battery.
. Inserting and removing hearing aids
To insert hearing aids of the type XS, please note the
information in Section 3.5.
2524
The switch can be programmed with one
of two functions.
Your hearing care professional has marked
here which of the functions has been set
for your hearing aids:
Volume control
Press briefly to adjust the volume
see also Section 4.7).
Program selector switch
Press briefly to change the program
(see also Section 4.8).
. Volume control and program selection
.. Volume selection
Your hearing aid features a switch which can be used to adjust
the volume or select programs.
Volume control and program selection are optional
functions. Your hearing care professional will adjust your
hearing aids to your individual requirements.
The volume can be adjusted in steps using
the switch.
When you switch your devices on,
they will be at the volume set for you.
Each press of the switch is followed by
audible confirmation.
+
.. Selecting hearing programs
Switch
Your hearing care professional will have adjusted your hearing
aids to various hearing situations with you and assigned them
to specific hearing programs. The switch allows you to swap
between the hearing programs. To do so, press the switch
until you hear audible confirmation of the change in program.
The number of signals indicates the number of the program
selected.
The switch allows you to move to hearing situations in
ascending order.
Program change sequence*:
* Example with three hearing programs
> >
Hearing program
Description of setting
+

2726
MAKING PHONE CALLS
. Telephone loop TCoil*
A telephone loop receives the magnetic signal from telephones
and converts it to sound. This optional telephone program may
help you to understand better what people are saying on the
telephone.
When making calls with the telephone loop program, hold the
handset as normal.
To find the correct position for optimum reception, move
the handset backwards and forwards slightly.
. Automatic program change*
The hearing aids belonging to the kami and rega families feature
automatic telephone program activation. The hearing aids can
automatically switch either to telephone loop (Auto T-Coil) or to
a microphone program for telephony (Auto Phone).
To prevent the hearing aids from accidentally switching
programmes during a telephone call, the program switch is
disabled during this time.
Depending on which type of hearing aid you have, it may
not feature the elements marked with an *.
TINNITUS FUNCTION
Combi hearing aids from audifon play an eective part in
tinnitus therapy.
Your hearing care professional would have adjusted the combi
hearing aids to your individual hearing situation with you.
Information on operating devices with active tinnitus modules
can be found in Section 3 on this user manual.
. Intended purpose
The integrated noiser module can be optionally activated and
can be used to support tinnitus therapy.
In combination with other therapeutic measures, the noise is
intended to help reduce the perception of tinnitus.
Activation of the noiser module as part of a tinnitus therapy
is suitable for adults aged 18 and over.
2928
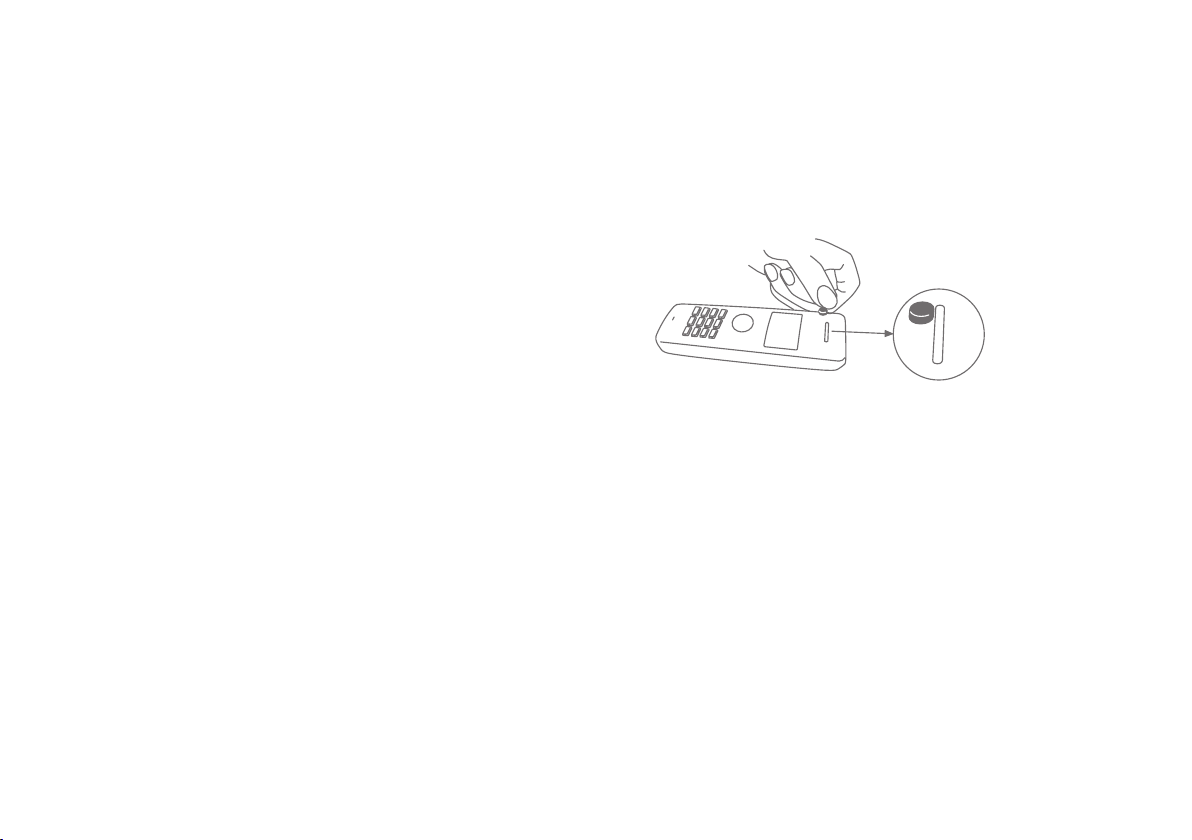
.. Attaching magnet
To attach the magnet, proceed as follows:
. Clean the telephone handset thoroughly.
. Attach the magnet as shown in the illustration.
. If necessary, you can reposition the magnet.
.. Auto TCoil
Automatic switchover to the telephone loop program is
designed for landline phones and only works with older
telephones or phones which have been specially designed
for use with telephone loops. Attaching the optional magnet
sticker increases the reliability of the switching function.
Familiarise yourself with how the automatic telephone loop
switching function works before making a call.
When you move the telephone handset away from your ear again,
your hearing aids will return to the program previously in use.
.. Auto Phone
Automatic switchover to an acoustic telephone program can
be used with conventional landline and mobile phones and
optimises playback for telephony.
Attaching the optional magnet sticker increases the reliability
of the switching function. Familiarise yourself with how the
automatic telephone program switching function works before
making a call.
When you move the telephone handset away from your ear again,
your hearing aids will return to the program previously in use.

3130
CARE INSTRUCTIONS
audifon hearing aids will improve your hearing ability as well as
your quality of life. To ensure your hearing aids function perfect-
ly and so make hearing a pleasant experience for years to come,
audifon oers special care products designed to enable optimum
cleaning of your devices.
Protect your hearing aids against moisture (e.g. showers, sweat,
rain), and take your hearing aids out before using hairspray or
similar cosmetic products.
No matter what type of hearing aid you use, we also recommend
carrying out daily care on them as these devices are exposed to
moisture and dust through intended use, even when handled
with care: Each one is in direct contact with the skin. Resulting
perspiration may damage your hearing aid in the long term un-
less dried on a daily basis. audifon’s behind-the-ear hearing aids
are coated with a water-repellent finish to prevent any damage
from moisture.
Wearing a hearing aid or inserting the ear adapter piece in the
ear canal will always involve soiling with earwax. For this reason
we recommend regular cleaning. Do not use a damp cloth to
clean your hearing aids. Always use a soft, dry cloth.
Should your hearing aid still not function correctly despite regu-
lar care, call on your hearing care professional. Do not try under
any circumstances to repair your hearing aid yourself.
. GeneralThe hearing aids from the rega, kami and sino families oer the
following accessories, which are available from your hearing
care professional. For further information please contact your
hearing care professional.
ACCESSORIES
Accessories
Magnet
Side marking
UniTip Soundshell
UniTip domes
Easy Thin Tubes
Concha clip
Open Fit adapter
A little magnet that can be axed to your telephone
Shows the side of your hearing aids: red = right, blue = left
Individual ear adapter piece for your hearing aids
Universal earpieces for use with your hearing aids
Thin Tube for use of your hearing aids with minor to
moderate hearing loss
Secures the Thin Tube in your ear
Adapter for connecting Easy Thin Tubes to your hearing aid
Description

3332
. Cleaning
The ear adapter pieces and the flexible
plastic tubing attached to them must
be detached from the ear hook before
cleaning. Only use the recommended
care products for cleaning the ear
adapter pieces.
In the case of hearing aids with a thin
sound tube, the screwed connection
between the tube and hearing aid can
be detached. The dome is removed
for cleaning.
Ear adapter piece
Thin Tube
. Drying hearing aids
Your hearing aids should be dried after use at the end of the day
and above all after cleaning. If you take care of your hearing
aids by drying them carefully, this will significantly increase
their service life. There are two ways of doing this. If you
have an audifon drying station of the type dry star UV or
dry go, use this for drying. Take note of the individual product
instructions for further details. Alternatively, you can dry your
hearing aids in the audifon pro care Drying-Tub with an audifon
Drying-Capsule.
Dry Go
The audifon Dry Go is the perfect solution for drying your devices
when on trips or when out and about. Once connected, for example
to the USB port on your laptop, the drying program can be conven-
iently started at the touch of a single button. A flow of warm air
inside the audifon Dry Go will then dry your devices reliably. The
drying station switches o automatically at
the end of the drying program.
Dry Star UV
The audifon Dry Star UV will dry your hearing aids gently yet
thoroughly through the constant circulation of uniformly warm
air inside the It utilises a ultraviolet light to disinfect and prevent
fungal, bacterial, and viral growth.
The audifon Dry Star UV is not only has an auto-power cut o
function but also consumes very little power, switching itself o
at the end of the drying program. The drying station is simple to
operate using a single sensor button.
at the end of the drying program. The drying station is simple to
operate using a single sensor button.
33
inside the audifon Dry Go will then dry your devices reliably. The
drying station switches o automatically at
the end of the drying program.

3534
TROUBLESHOOTING
If you experience any malfunctions when using your hearing
aids, this does not necessarily mean that they are faulty.
Therefore please first check your hearing aid to make sure that:
•the hearing aid is switched ON (see "Switching ON and OFF"
Section 3.4),
•the batteries are not weak or dead,
•the volume control is not at the lowest setting (increase the
volume slightly if necessary),
•the right program has been set
(change program if necessary),
•the receiver unit / earwax protection system is not blocked.
If this does not eliminate the fault, consult your hearing care
professional, who will be pleased to help.
Note: Malfunctions!
Your devices may be subject to interference from other
electrical equipment despite their EMC-compatible design.
In this case move away from the source of interference.
Warning: Risk of suocation!
Batteries, hearing aids and other small parts can be swallo-
wed. For this reason, these hearing aids are not intended for
use by children under 36 months of age. Never leave children
unattended with your hearing aids! Should a battery,
hearing aid or other small parts be accidentally swallowed,
please consult a doctor immediately.
Warning: Risk of injury!
In some very rare cases the dome may remain in the ear
canal on removal. Should this happen, please contact your
doctor or hearing care professional at once. Please do not
try to remove the dome yourself.
Warning: Damage to hearing!
The maximum volume of the noiser modul is in a range that
may lead to hearing loss according to OSHA regulations.
For users without hearing loss, the noiser modul should not
exceed sound pressure levels above 70 dB SPL (as measured
at a 2cc coupler). For users with hearing loss, the hearing
loss needs to be taken into consideration when adjusting
the noise levels. Under no circumstances should the noiser
module be used at a volume that is uncomfortable to the
user.
For sound pressure levels up to 80 db SPL (as measured at
the 2cc coupler) the noiser module can be used for up to 8
hours daily. For higher sound pressure levels, the uncritical
duration of applications is reduced. The noiser modul should
not be used for more than 2 hours daily at higher sound
pressure levels.
SAFETY INFORMATION
. Important warnings

3736
Higher sound levels and/or longer times of application
might harm the hearing ability over time.
Warning: Risk of explosion!
Do not use hearing aids in environments where there is a
risk of explosion (e.g. in mines or industrial plants subject to
such risk).
Warning: Risk of injury!
Hearing aids are adjusted to the individual hearing loss
of each wearer and should therefore only be used by this
person.
If the hearing aid is worn by other persons, this may harm
their hearing.
Warning: Risk of injury!
Please only use genuine consumables specified by the manu-
facturer (dome, tubing, etc.) and accessories.
Unauthorised changes or modifications that have not been
explicitly approved may in the worst-case scenario result in
injur y.
Warning: Interference with active and inactive
implants!
If you have an active or inactive implant (e.g. defibrillator,
pacemaker), follow the implant manufacturer's instructions
regarding the use of mobile devices. In the event of malfunc-
tions, stop using your hearing aid and contact your doctor or
the implant manufacturer.
If you have an active brain implant, ask your doctor or the
implant manufacturer for a risk analysis.
Warning: Risk of injury!
Always wear your earpiece with the appropriate Dome
or customized earmold and check that they are securely
positioned on the tube.
. Information about product safety
Note: Interference with electronic devices!
If you are in an environment where use of electronic or
wireless devices is restricted, check whether your hearing
aids must be turned o.
Note: Damage to hearing aid!
Hearing aids are susceptible to impact, so avoid any hard
knocks (e.g. by dropping them).
Note: Damage to hearing aid!
To avoid damage to your hearing aids, please do not wear
them in the following situations:
•when swimming, in the shower or bath
•when washing or blow-drying your hair
•when using hair spray, perfume, aftershave or body lotion
•during high-frequency heat therapy treatment
• when it is very hot or raining heavily
Should your hearing aid become damp, remove the battery .
and dry the hearing aid in one of the drying containers .........
specified by the manufacturer. Do not dry your hearing aid ..
in the microwave under any circumstances.
Note: Damage to hearing aid!
No modifications should be made to the hearing aids unless
performed directly by the manufacturer.

3938
Note: Damage to hearing aid!
Do not force the battery into the battery compartment. If it
does not fit, check whether you are inserting it correctly and
that it is the correct size of battery.
Note: Leaking batteries can damage your hearing aid!
If you do not intend to use your hearing aids for a long time,
remove the battery to increase its service lifespan, to avoid
leakage and to prevent corrosion to the battery contacts.
Note: Strong radiation can damage hearing aids!
Make sure you take out your hearing aids if you are under-
going a CT or MRI scan, other magnetic field-based examina-
tions or radiotherapy.
Note: Damage to hearing aid!
Never leave your hearing aid in the sun, near a naked flame
or in a hot vehicle. Otherwise your hearing aids might be-
come damaged.
Note: Damage to hearing aid!
Never try to change the shape of your hearing aid, ear mould
or tubing yourself. Otherwise your hearing aids might be-
come damaged.
Note: Malfunctions!
Your devices may be subject to interference from other elec-
trical equipment despite their EMC-compatible design. In
this case move away from the source of interference.
SIDE EFFECTS AND CONTRAINDICATIONS
. Side Eects
Please consult a doctor at once if you notice the following side
eects:
•Sensation of a foreign body
•Build-up of earwax
•Skin irritation
•Dizziness
•Vomiting
•Headache
•Pain in or behind the ear
•Any subjective deterioration in your hearing or increase in the
tinnitus level
This manual suits for next models
8
Table of contents
Other Audifon Hearing Aid manuals

Audifon
Audifon lewi R User manual

Audifon
Audifon Sueno Pro User manual

Audifon
Audifon lewi S User manual

Audifon
Audifon MULTISTREAMER PRO User manual

Audifon
Audifon lewi S User manual

Audifon
Audifon MULTISTREAMER PRO User manual

Audifon
Audifon lewi S User manual

Audifon
Audifon sino R User manual

Audifon
Audifon aviva Series User manual

Audifon
Audifon via pro User manual


