TX3O1O VOICE OPERATED MUTING MODULE
I NSTALI-ATION I NSTRUCTIO N S
Thank you for choosing an Audio Telex TX30l0 voice operated mute module. The TX30l0 allows for muting of background music
sources such. as a CD player or cassette deck when a signal is detected at the microphone input Ch. l, (which is usually the paging
microphore input) and also Ctr. 2 on the AT series. Installation into any Audio Telex manuhcttned mixer or amplifier is made simpti
by utilising a standard 'end' qrpe connector plug, supplied on the module and a receptacle, already installld into the mixer gr
amplifier. Please follow these easy instnrctions for installatiqr.
g The installation of the TK30l0 involves rccess to the inside of the amplifiers or mirers. Installation should onty bc
attempted by a qualified technician. Always turn oIT the AC power and r:move thc AC powcr cord before attempting
to rccess the inside of these products. Pleasc coottct your nearest Audio Telcx oftice for details of your oetrest
qualilied technician"
For installatlon into an lC30 amplifier: Locate the 5 pin 'end' connector fountl on the mixer PCB in berween the input gain
pots for Ch. I and Ch. 2. Remove the tiller plug and discard. Connect the module to this receptacle. ensuring that the wires from the
connector exit towards the rear of the empliticr.
For lnstallatlon lnto an AT SERIES amplifler: Locate the 5 pin'end'connector found on the mixer PCB at the rear of the
input gain pot for Ch. l. Remove the fillcr plug and discard. Connect the mo<Iule to this receptacle, ensuring that the wires from the
connector exit towards the right hand side of the amplifier whcn looking from the front panel. {For installarion ir,to eittrer an ATl20R
or AT|2ORC the 5 pin 'end' connector is found below the nrncr tr srssene module (whichever is to the left hand side of the
amplifier)). Note: ort the AT series the TX30l0 mo<Iule is designed to operate so that either input channels I and/or 2 wilt mure
channels 3 and.l.
For lnstallatlon lnto an SA SERIES ampllfler: Locate the I pin 'end' connector found on the mixer PCB berween input gain
pots for Ch. 2 and Ch. 3 on the mixer PCB. This 'end' connector is divided into two sepamte parts consisting of 5 pins -d 3 p-inr.
Remove the 5 pln filler plug anC discard. Connect the mcdule tc this receptacle, ansgring that the wires from the connector exir
towards thc right hand side of thc amplifier whcn looking from the front panel.
For lnstallatlon lnto a TX6000 or TX8000 mlxer: Locate the 8 pin 'end' connector found on the mixer pCB behind ttre
input gain pot for Ch. I on ttre mixer PCB. This 'cnd' connertor is divided into rwo separate parts consisting of 5 pins and 3 pins.
Remove the -5 nin filler plug and discard. Connect the module to this receptaclg ensgring that the wires &om the connector exit
towards the right hand side of the mixcr when looking from the front panel.
ConnecUon to ampllfier:
Connections
White = Output
Yellow = lnput
Red = DC Supply (Min. I2VDC, Ma:c ISVDC)
Black = Ground
Purple = Sigrral Detection
Notes
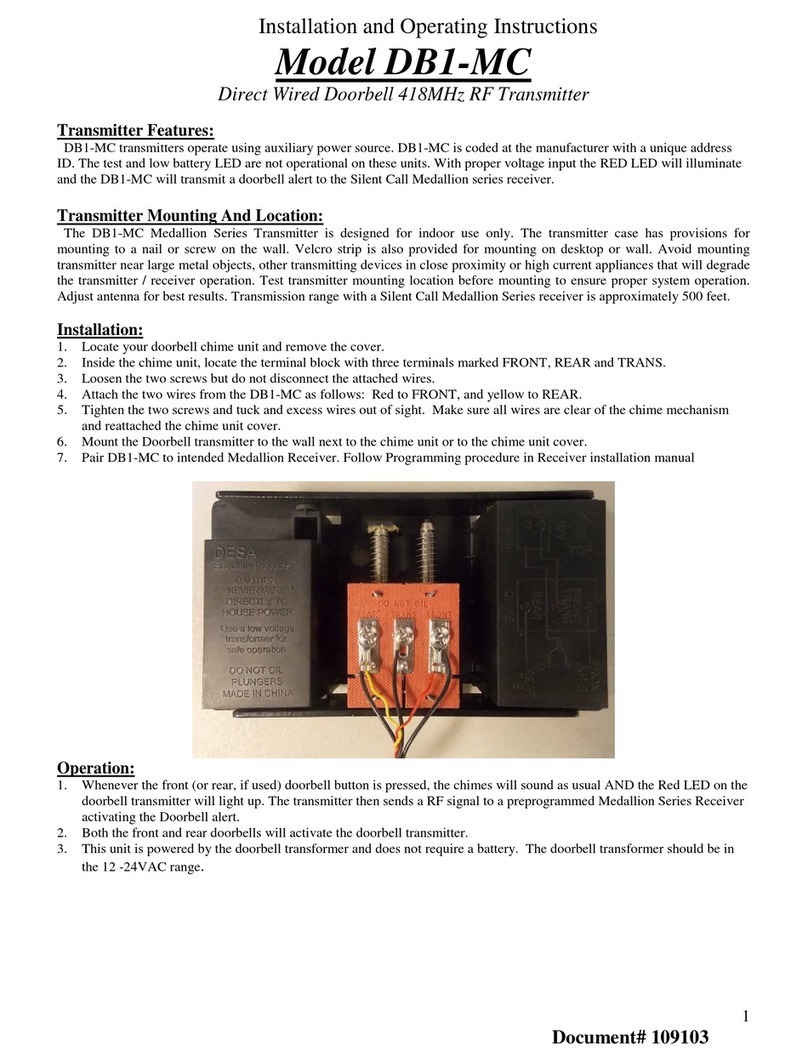
Trlm Pot Note that dtq tirn pot tocat€d on the module adjusts the sensitivity of the incoming signal to the TX30l0. kr other words,
how loud tre incoming signal needs to be for suitable atenuation of the background music -*"".
TX8200: This module is not suitable fc installation into the fi8200 mixer. Pleasc refer to the TX3028 mute module.
C c' t', Ivr tJ N I C A f I O N S . , . ,'
