Aukey SK-M52 User manual

User Manual
Soundbar

Contents
English
Deutsch
Français
Español
Italiano
01~09
10~18
19~27
28~36
37~45

- 01 -
Thank you for purchasing the AUKEY SK-M52 Soundbar. Please read this user manual carefully and keep it for future
reference. If you need any assistance, please contact our support team with your product model number and
Amazon order number.
Package Contents
Soundbar
Remote Control
Twin Speaker Stands
Toslink Optical Cable (1m / 3.28ft)
3.5mm Audio Cable (0.6m / 1.97ft)
3.5mm to RCA Audio Cable (1.15m / 3.77ft)
Wall Mounting Kit (Two Screws and Anchors)
Two Rubber Foot Pads
User Manual
Warranty Card
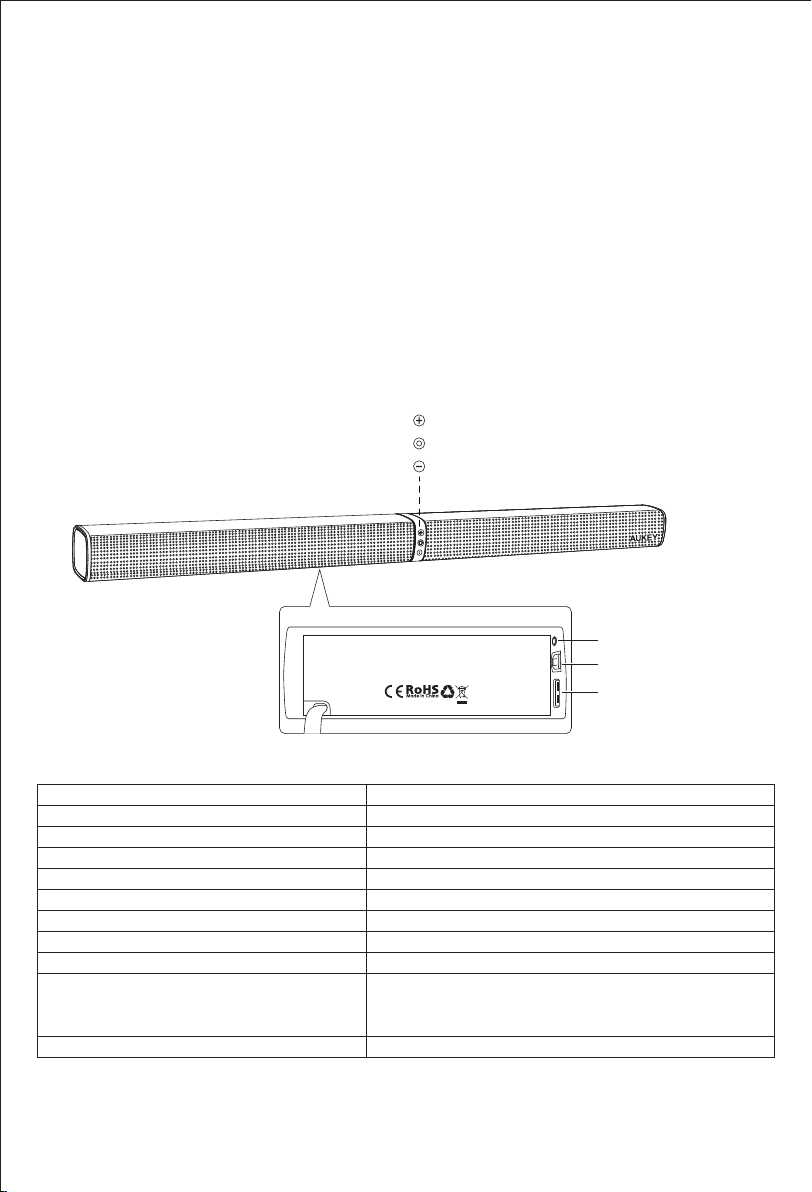
Product Diagram
+
Volume Up / Next Track
Multi-Function Button / LED Indicator
Volume Down / Previous Track
Specifications
Model
Technology
Drivers
Audio Output Power
Frequency Response
Signal-to-Noise Ratio
Impedance
Power Input
Bluetooth Operating Range
SK-M52
BT 4.2, A2DP, AVRCP, DSP
2 x 75mm / 2.95” speaker drivers
2 x 30W
80Hz – 20kHz
≥80dB
8 ohm
AC 110–240V 50/60Hz
Up to 10m / 33ft
Weight
Dimensions
L: 495 x 75 x 66mm / 19.48” x 2.95” x 2.59”
R: 475 x 75 x 66mm / 18.7” x 2.95” x 2.59”
Pedestal: 165 x 155mm / 6.5” x 6.09”
1.8kg / 3.96oz
FCC ID: 2AFHP-SK-M52
3.5mm In
Optical In
USB
Input: AC 100V - 240V
50Hz / 60Hz
3.5mm Audio Input
Optical Input
USB Port

- 02 -
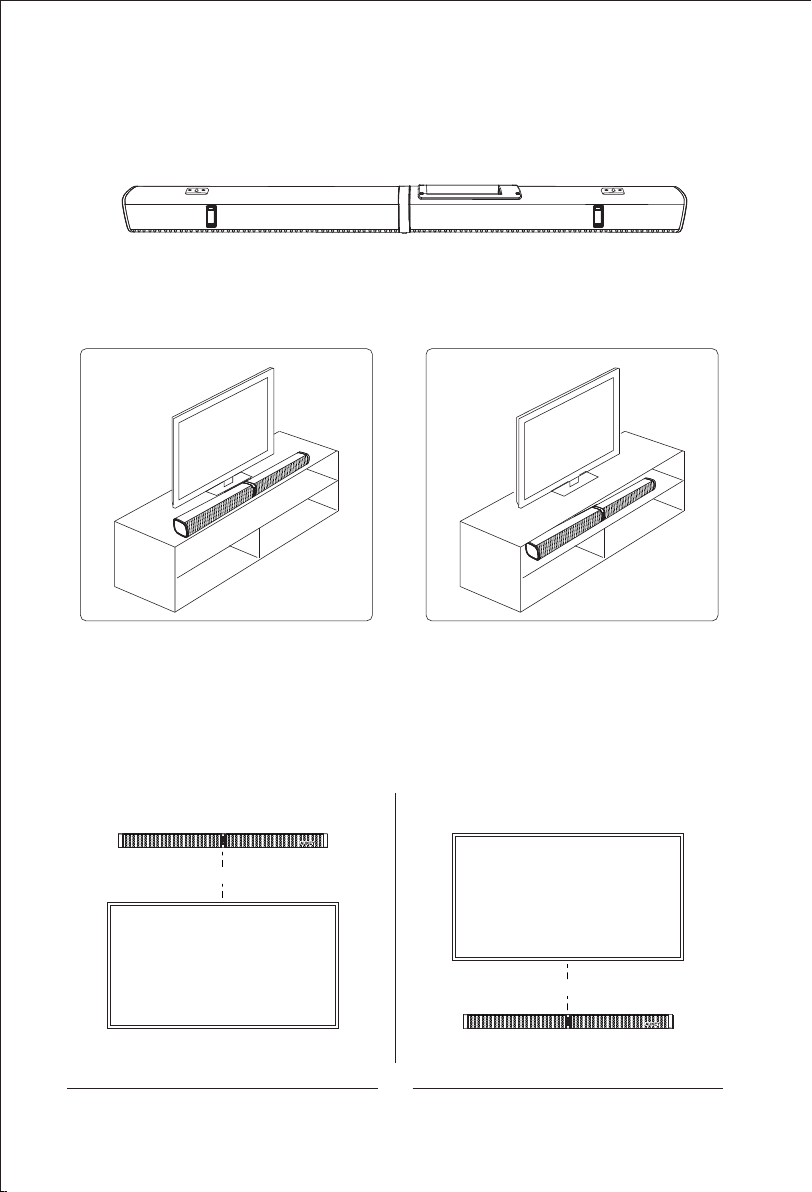
Positioning the Soundbar
For the best sound experience, position the soundbar 3 to 8 meters from the listening area.
The soundbar has a flexible, detachable design that allows three main setups. Lay flat on your tabletop, wall mount
above or below the TV, or use as twin tower speakers on the provided stands.
3-8 meters
Soundbar
- 03 -
Place on a Flat Surface
Attach the two included rubber foot pads to the bottom of the soundbar (only if using this setup) for stable use
and soft surface contact without vibration. For best stability and support, use the position of the two keyhole
mounting slot brackets as a reference and place the pads slightly nearer the center of the soundbar
WARNING: If you don’t feel confident to correctly and securely wall-mount the soundbar, seek the assistance
of an experienced person or professional
Install the speaker on a vertical, flat, reinforced area of wall. For plaster walls, it is recommended to screw into
wall studs for greater security. For optimum performance, allow at least 25mm / 1” distance between the
soundbar and the TV.
A.
1.
Mount on the WallB.
Place the soundbar horizontally on a flat surface such as a TV unit or shelves and align it centrally with the TV
screen. Allow some space between the speaker and the wall. Don’t place inside a cabinet or on a walled shelf.
Follow this guidance for best sound output and good airflow around the soundbar
2.
Keyhole Mounting Slot Bracket
Suggested Pad Position
Keyhole Mounting Slot Bracket
Suggested Pad Position
×
√
25mm / 1”
25mm / 1”
- 04 -
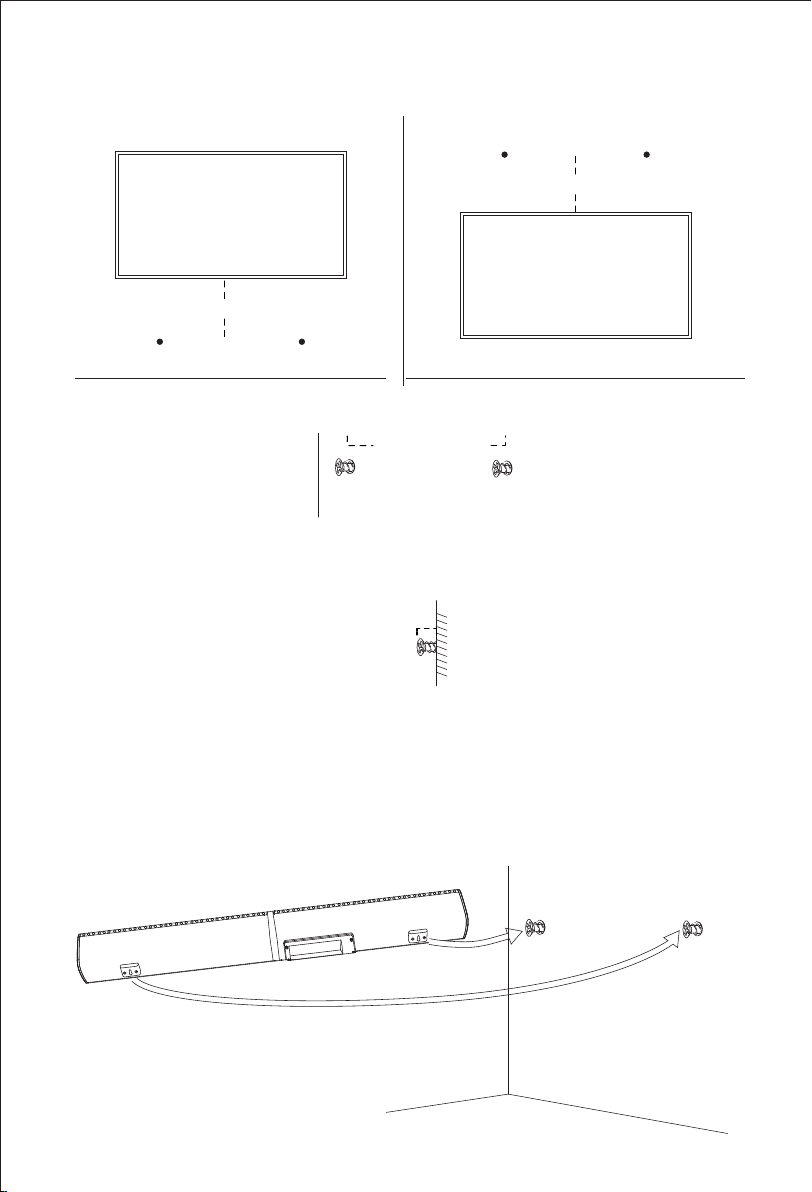
Drill two holes in the wall. The holes should be:
At least 54mm / 21/8” below the TV or 37mm / 17/16” above the TV (for 25mm / 1” distance between the TV and
soundbar). Add to this for greater spacing if desired
1.
●
727mm / 285/8” apart (and level)●
Insert the anchors (unless screwing into wall studs); then screw in the screws (included) until they protrude from
the wall by 5–6mm / about 7/32” (including screw head)
2.
5–6mm / about 7/32”
Connect the included Toslink optical cable to the unit, and the 3.5mm cable too if you intend to use it. You can also
connect a USB extension cable (not included) to conveniently connect external USB devices to the unit
Before hanging the soundbar on the wall, decide whether you need to route connected cables up or down.
According to this, either loop them over the top of the soundbar or allow them to hang down from the back so
they are ready to connect directly once the soundbar is mounted
Align the keyhole mounting slot bracket holes on the rear of the unit with the screws. Hang the unit on the two
screws by slightly tilting the unit, pushing it onto the screws, and then lowering to slot in. Support the unit until you
are sure it’s correctly and securely fitted
3.
4.
5.
727mm / 285/8”
54mm / 21⁄8”
37mm / 17⁄16”

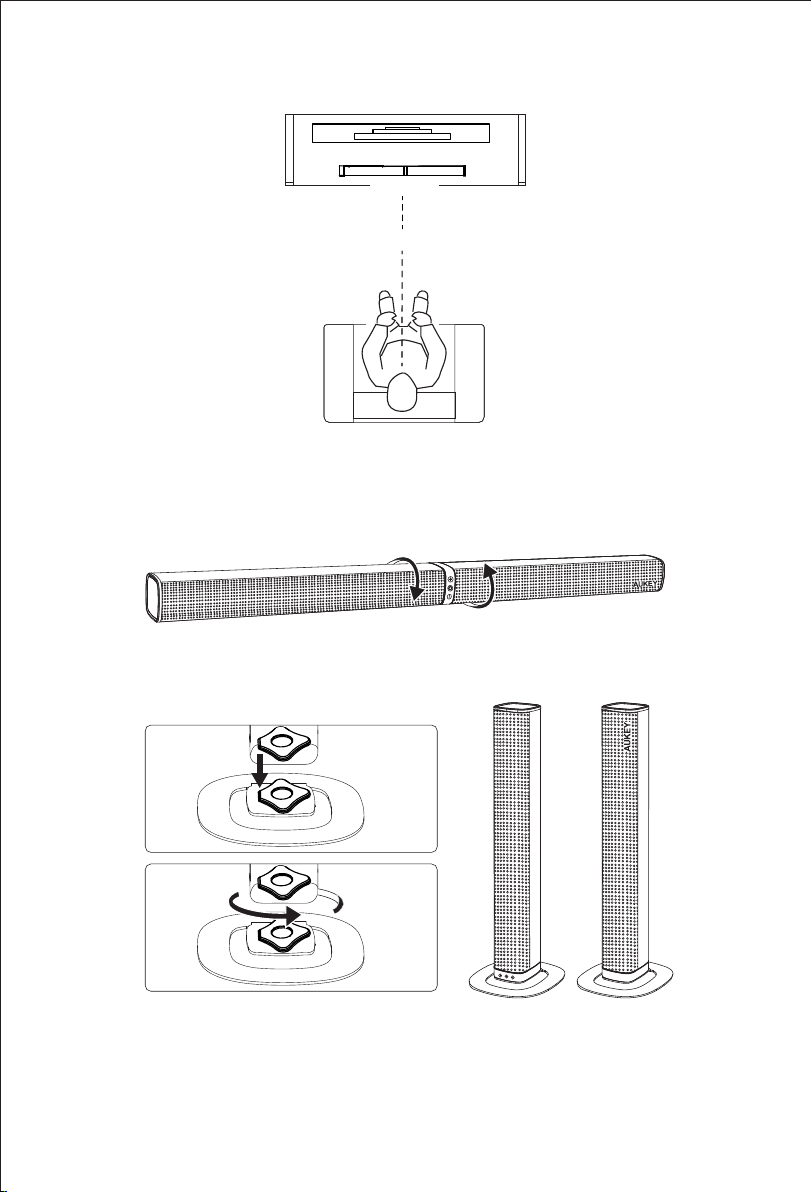
Use as Tower Speakers
Place the included speaker stands to the left and right of your TV or PC. The stand with the black part on top
goes on the left and the thicker stand on the right (as you face the screen)
Separate the left and right speakers by twisting the two sides of the soundbar in opposite directions (rotate the
sections clockwise relative to the center)
Place the speakers on the stands by matching the flat corners of the two shapes and twist 45 degrees
counter-clockwise so the speakers face directly forward. The soundbar section with the silver end and controls
goes on the left stand and the other section on the right stand
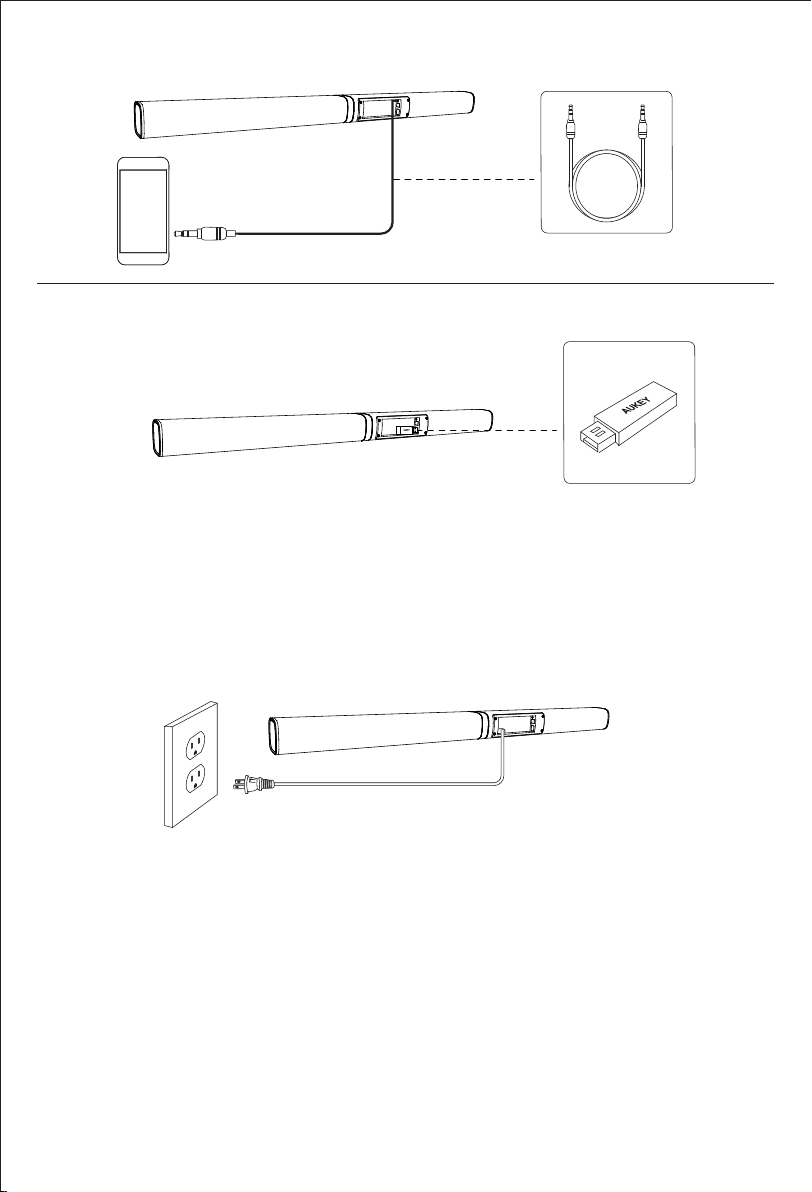
Connecting Your Device to the Soundbar
There are three connection ports to choose from.
A. Connect to Optical Input
B.Connect to Audio Input
C.
1.
2.
3.
Optical Input
Optical Output
- 05 -
Toslink Optical Cable
Toslink Optical Cable
Audio Input
Audio Output 3.5mm to RCA Cable

- 06 -
Plug the soundbar into a wall outlet. It will automatically enter standby mode and the LED indicator will light
solid red
Short-press the multi-function button to turn on the soundbar
To turn off, press and hold the multi-function button for 2 seconds or unplug from wall outlet
1.
2.
3.
Remove the small protective rubber end caps from the connectors of the included Toslink optical cable.
Connect the soundbar to your TV using this cable, fully inserting the connectors so they click in
Turn on the soundbar and then short-press the multi-function button to switch to optical input mode with
the LED indicator lit up white
In TV sound settings, select the soundbar optical connection (‘Audio Out/Optical,’ ‘Audio System,’ or
similar) as the speaker (output for audio) instead of the TV speakers
Set your TV audio format to PCM (digital audio out / optical) instead of DTS or others
1.
2.
3.
4.
3.5mm Audio Cable
Audio Input
C. Connect to USB Port
USB Flash Drive
(up to 32GB)
USB Port
Using the Soundbar
Powering On / Off
Playing Audio via Optical Input Connection

The required settings may be in an ‘Advanced’ or ‘Expert’ section of the sound settings
Refer to your TV’s user manual for further details about sound settings and connections
●
●
If your paired device is switched off or manually disconnected, the soundbar will automatically enter pairing
mode
If the connected device exceeds the operating range, the soundbar will disconnect. The connection to the last
successfully connected device will be re-established once you re-enter wireless range. To connect to other
devices, repeat the above pairing steps
There is no automatic shutdown in pairing mode. The soundbar will remain in pairing mode even if no device is
paired, so switch off if not in use
●
●
●
Maximum storage size supported for USB flash drive is 32GB
USB input mode won’t function if the USB flash drive has no MP3 or WMA audio files
When USB flash drive is removed, the soundbar will automatically enter audio input mode with the LED indicator
flashing green
The soundbar automatically plays compatible audio tracks continuously in a loop in USB input mode unless you
manage playback with USB input mode playback controls
●
●
●
●
For some computers, you may need to access the audio control panel to manually set the soundbar as the
default audio device
●
Turn on soundbar and then short-press the multi-function button to switch to BT mode with the LED indicator
flashing blue rapidly
Activate the pairing function on your phone or other compatible device and select ‘AUKEY SK-M52’
If a code or PIN is required for pairing, enter ‘0000’
When successfully paired, you will hear a tone and the LED indicator will stay on
The remote control includes BT mode playback controls
1.
2.
3.
4.
5.
Connect the soundbar to your PC, tablet, smartphone, TV, or other device using the included 3.5mm audio
cable or 3.5mm to RCA audio cable
Short-press the multi-function button to switch to audio input mode with the LED indicator lit up green
In this mode, playback can only be controlled on your connected device
1.
2.
3.
Ensure that your USB flash drive contains MP3 or WMA audio files (other file types not supported)
Connect the USB flash drive to the USB port on the soundbar (or your own USB extension cable connected to the
USB port); music will automatically play
The remote control includes USB input mode playback controls
1.
2.
3.
- 07 -
Notes
Notes
Note
Notes
Playing Audio via 3.5mm Audio Input (Aux) Connection
Playing Audio via BT Connection
Playing Audio via USB Port
The soundbar automatically switches to USB input mode with the LED indicator lit up purple when a USB flash drive
is inserted (this mode isn’t selectable on the soundbar or remote control unless a USB flash drive is connected).
- 08 -
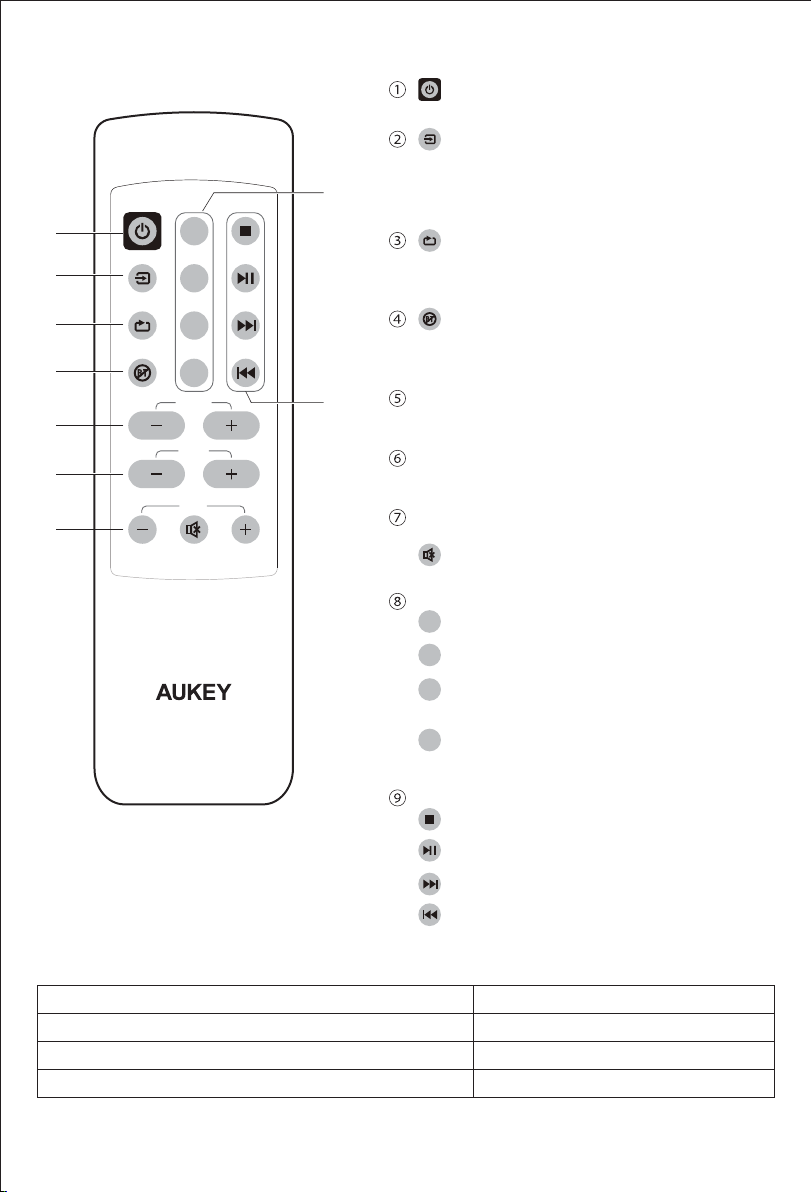
Using the Remote Control
POWER
MUSIC
MOVIE
SPEECH
3D
BT CANCEL
RESET
TREBLE
INPUT
BT/USBEQ
BASS
VOL
①
②
③
④
⑧
⑤
⑥
⑦
⑨
Controls on the Soundbar
Control
Adjust master volume
Skip to next / previous track (only in BT or USB input modes)
Switch input modes
Operation
Short-press volume up or volume down
Long-press volume up / volume down
Short-press multi-function button
Switch soundbar on or off (standby)
Toggle between different input modes (BT, Audio
Input, Optical). Your selected input mode is saved
for next time. USB input mode is only accessible
when a USB flash drive is inserted
Reset all soundbar volume levels and switch EQ
back to Music setting. Press and hold button for 2
seconds
Cancel BT connection. Press and hold button for 2
seconds to disconnect from the paired device.
Use the paired device to reconnect
Increase or decrease higher frequencies. Your
setting is saved for next time
Increase or decrease lower frequencies. Your setting
is saved for next time
Volume Control
Increase or decrease master volume
Mute or restore volume
EQ settings
Optimized for music
Optimized for movies
Optimized for voice clarity such as for news
broadcasts and TV shows
Enhanced with surround sound effects for a
bigger movie experience
Playback controls (for BT and USB input modes only)
MUSIC
MOVIE
SPEECH
3D
Stop
Play / Pause
Next Track
Previous Track

AUKEY Direct isn’t responsible for damage or injury caused by incorrect installation or use
Keep away from liquids, extreme heat, and strong magnetic fields
Don’t use this soundbar at high volume for extended periods, as this may cause permanent hearing damage or loss
Unplug during thunderstorms or when not in use for extended periods of time
Warranty & Customer Support
For questions, support, or warranty claims, contact us at the address below that corresponds with your region.
Please include your Amazon order number and product model number.
*Please note, AUKEY can only provide after sales service for products purchased directly from AUKEY. If you have purchased from a different seller, please
contact them directly for service or warranty issues.
Notice for US
Changes or modifications not expressly approved by the party responsible for compliance could void the user's
authority to operate the equipment. This device complies with Part 15 of the FCC Rules. Operation is subject to the
following two conditions:
1. This device may not cause harmful interference, and
2. This device must accept any interference received, including interference that may cause undesired operation
FCC Rules
This equipment has been tested and found to comply with the limits for a Class B digital device, pursuant to part 15
of the FCC Rules. These limits are designed to provide reasonable protection against harmful interference in a
residential installation. This equipment generates, uses, and can radiate radio frequency energy and, if not installed
and used in accordance with the instructions, may cause harmful interference to radio communications. However,
there is no guarantee that interference will not occur in a particular installation. If this equipment does cause
harmful interference to radio or television reception, which can be determined by turning the equipment off and
on, the user is encouraged to try to correct the interference by one or more of the following measures:
● Reorient or relocate the receiving antenna
● Increase the separation between the equipment and receiver
● Connect the equipment into an outlet on a circuit different from that to which the receiver is connected
● Consult the dealer or an experienced radio/TV technician for help
Caution
Changes or modifications made to this device that are not expressly approved by AUKEY may void the user's authority
to operate this equipment.
●
●
●
●
- 09 -
LED Indicators
Product Care & Use
LED Indicator
Blue flashing rapidly
Blue on
White on
Purple on
Green on
Flashing steadily
Red on
Status
BT pairing mode
BT connected
Optical input mode
USB input mode
3.5mm audio input mode
Outputting sound (any mode)
Standby
- 10 -
Vielen Dank für Ihren Kauf von AUKEY SK-M52 Soundbar. Lesen Sie bitte diese Bedienungsanleitung sorgfältig
durch und bewahren für zukünftige Referenz auf. Sollten Sie jegliche Unterstützung brauchen, kontaktieren Sie
bitte unser Support-Team mit Ihrer Produktmodellnummer und Amazon-Bestellnummer.
Lieferumfang
Soundbar
Fernbedienung
Standfüße Doppellautsprecher
optisches Kabel TOSLINK (1 m)
3,5-mm-Audiokabel (0,6 m)
3,5-mm- zu RCA-Audiokabel (1,15 m)
Wandmontageset (2 Schrauben und Dübel)
2 Gummifuß-Pads
Bedienungsanleitung
Garantiekarte
Produktbild
+
Lautstärke +/Nächster Titel
Multifunktionstaste/LED-Anzeige
Lautstärke -/Vorheriger Titel
Technische Daten
Modell
Technologie
Treiber
Audioausgangsleistung
Frequenzbereich
Rauschabstand
Impedanz
Netzeingang
Bluetooth-Reichweite
SK-M52
BT 4.2, A2DP, AVRCP, DSP
2 x 75 mm Lautsprechertreiber
2 x 30 W
80 Hz – 20 kHz
≥ 80 dB
8 Ohm
110 – 240 V, 50/60 Hz (Wechselstrom)
bis zu 10 m
Gewicht
Abmessungen
L: 495 x 75 x 66 mm
R: 475 x 75 x 66 mm
Standfuß: 155 x 165 mm
1,8 kg
FCC ID: 2AFHP-SK-M52
3.5mm In
Optical In
USB
Input: AC 100V - 240V
50Hz / 60Hz
3,5-mm-Audioeingang
Optischer Eingang
USB-Anschluss
- 11 -
Positionierung der Soundbar
Für ein optimales Klangerlebnis sollten Sie die Soundbar in 3 bis 8 Metern Entfernung vom Zuhörerbereich
positionieren.
Das Design der Soundbar ist flexibel und bietet drei Optionen: horizontal auf dem Sideboard/TV-Schrank/Fernseht-
isch, an der Wand über bzw. unter dem Fernseher oder im Doppelpack als Säulenlautsprecher unter Verwendung
der mitgelieferten Standfüße.
3-8 meters
Soundbar

- 12 -
Auf einer ebenen Unterlage
Bringen Sie die zwei mitgelieferten Gummifuß-Pads an der Unterseite der Soundbar (nur bei diesem Aufbau) an,
damit sie stabil steht und Schwingungen absorbiert bzw. gemindert werden. Tipp: Wir empfehlen die Anbrin-
gung von den beiden Schlüssellochbefestigungen aus gesehen etwas Richtung Mitte, um maximale Stabilität
zu gewährleisten
WARNUNG: Wenn Sie Bedenken haben, ob Sie die Soundbar korrekt an der Wand montieren können, sollten
Sie ggf. einen Handwerker engagieren.
Montieren Sie die Soundbar an einem vertikalen, flachen und stabilen Wandbereich. Bei Gipswänden empfe-
hlen wir die Verwendung von Wandstutzen, um die Stabilität zu erhöhen. Zum Zweck der optimalen Leistung
sollte der Abstand zwischen Soundbar und Fernseher mindestens 25 mm betragen.
A.
1.
WandmontageB.
Positionieren Sie die Soundbar horizontal auf einer ebenen Oberfläche wie einem TV-Schrank oder Regal und
richten Sie die Soundbar mittig zum Bildschirm aus. Die Soundbar sollte nicht direkt an die Wand angrenzen. Die
Soundbar sollte frei dastehen, d. h. nicht in Schubladen oder Ähnlichem positioniert werden. Bei Beachtung
dieser Anleitung versprechen wir ein optimales Klangerlebnis und gute Luftzirkulation um die Soundbar herum
2.
Schlüssellochbefestigung Schlüssellochbefestigung
Empfohlene Pad-Position Empfohlene Pad-Position
×
√
25mm
25mm

- 13 -
Bohren Sie zwei Löcher in die Wand. Die Löcher sollten
mindestens 54 mm unter dem Fernseher oder 37 mm über dem Fernseher (für einen Abstand von 25 mm
zwischen Fernseher und Soundbar) sein. Falls Sie einen größeren Abstand wünschen, bohren Sie die Löcher
entsprechend höher oder tiefer
1.
●
Abstand: 727 mm (und waagerecht)●
Setzen Sie die Dübel ein (sofern Sie keine Wandstutzen verwenden); schrauben Sie nun die (mitgelieferten)
Schrauben ein, bis sie 5 – 6 mm aus der Wand herausragen (einschließlich Schraubenkopf)
2.
5–6mm / about 7/32”
Schließen Sie das mitgelieferte optische Kabel (TOSLINK) an die Soundbar an und ebenso das 3,5-mm-Kabel, falls Sie
es benötigen. Sie können zudem ein USB-Verlängerungskabel (nicht inbegriffen) anschließen, um externe
USB-Geräte bequem an die Soundbar anschließen zu können
Bevor Sie die Soundbar an die Wand hängen, sollten Sie sich über die Kabelverlegung Gedanken machen. Je
nachdem, wie die Kabel verlaufen sollen, können Sie sie über die Soundbar verlaufen lassen oder an der Rückseite
herunterhängen lassen. Dies erleichtert die Wandmontage enorm
Richten Sie die Schlüssellochbefestigungen an der Rückseite der Soundbar an den Schrauben aus. Durch leichtes
Kippen der Soundbar lässt sich diese an den beiden Schrauben einhängen. Drücken Sie die Soundbar auf die
Schraubenköpfe und ziehen Sie die Soundbar dann leicht nach unten. Halten Sie die Soundbar so lang fest, bis sie
sicher hält
3.
4.
5.
727mm
54mm
37mm

Verwendung als Säulenlautsprecher
Positionieren Sie die mitgelieferten Lautsprecherstandfüße rechts und links neben Ihrem Fernseher oder PC. Der
Standfuß mit der schwarzen Komponente oben muss links stehen und der massivere Standfuß rechts (Blick von
vorne auf den Bildschirm)
Durch Drehen des linken und rechten Segments der Soundbar in entgegengesetzter Richtung lassen sich aus
der Soundbar zwei Lautsprecher machen (drehen Sie an beiden Segmenten relativ mittig im Uhrzeigersinn)
Positionieren Sie die Lautsprecher auf den Standfüßen, sodass sie stabil stehen. Drehen Sie die Lautsprecher so,
dass beide zueinander ausgerichtet sind (Winkel 45 Grad). Das Segment der Soundbar mit dem silberfarbigen
Ende und den silberfarbigen Tasten muss auf dem linken Standfuß stehen und das andere Segment auf dem
rechten
Verbindung von Geräten mit der Soundbar
Es stehen 3 Anschlüsse zur Verfügung.
A.Verbindung mit dem optischen Eingang
B.Verbindung mit dem Audioeingang
C.
1.
2.
3.
Optischer Eingang
optischer Ausgang
- 14 -
optisches Kabel TOSLINK
Audioeingang
Audioausgang 3,5-mm- zu RCA-Kabel
- 15 -
Verbinden Sie die Soundbar mit dem Stromnetz. Sie befindet sich automatisch im Stand-by-Modus und die
LED-Anzeige leuchtet rot
Drücken Sie kurz auf die Multifunktionstaste, um die Soundbar einzuschalten
Zum Ausschalten drücken und halten Sie die Multifunktionstaste 2 Sekunden lang oder trennen sie vom
Stromnetz
1.
2.
3.
Entfernen Sie die kleinen Gummischutzkappen von den Steckern des mitgelieferten optischen Kabels
(TOSLINK). Verbinden Sie die Soundbar unter Verwendung dieses Kabels mit Ihrem Fernseher und stecken
Sie die Stecker ganz ein, bis Sie ein Klick-Geräusch hören
Schalten Sie die Soundbar ein und drücken Sie dann kurz auf die Multifunktionstaste, um in den optischen
Eingangsmodus zu schalten – die LED-Anzeige leuchtet weiß auf
Wählen Sie bei den Einstellungen Ihres Fernsehers die Soundbar als optische Verbindung („Audioausgang/op-
tisch“, „Audiosystem“ oder ähnlich) bei der Lautsprecherausgabe aus (Ausgang für Audio) – anstatt der
Fernsehlautsprecher
Stellen Sie das Audioformat Ihres Fernsehers auf PCM (digitaler Audioausgang/optisch) anstatt DTS oder
anderer Optionen
1.
2.
3.
4.
3,5-mm-Audiokabel
Audioeingang
C. Verbindung mit dem USB-Anschluss
USB-Stick (bis zu 32 GB)
Verwendung der Soundbar
Ein-/Ausschalten
Audiowiedergabe über den optischen Eingang

Die erforderlichen Einstellungen finden sich womöglich im Bereich „Erweitert“ oder „Expertenmodus“ der
Toneinstellungen
Weitere Informationen zu den Toneinstellungen und Anschlüssen entnehmen Sie bitte der Bedienungsanleitung
für Ihren Fernseher
●
●
Wenn das gekoppelte Gerät aus ist oder manuell entfernt wurde, schaltet die Soundbar automatisch in den
Pairing-Modus
Wenn das verbundene Gerät sich außerhalb der Reichweite befindet, wird die Verbindung zur Soundbar getrennt.
Die Verbindung zum letzten erfolgreich verbundenen Gerät wird wiederhergestellt, sobald es sich innerhalb der
Reichweite befindet. Um andere Geräte zu verbinden, wiederholen Sie oben genannten Schritte zum Pairing
Im Pairing-Modus gibt es keine automatische Abschaltung. Die Soundbar bleibt auch dann im Pairing-Modus,
wenn kein Gerät gekoppelt ist. Schalten Sie die Soundbar also aus, wenn sie nicht in Verwendung ist
●
●
●
Bei USB-Sticks werden als maximale Speichergröße 32 GB unterstützt
Der Modus USB-Eingang funktioniert nur, wenn sich auf dem USB-Stick MP3- oder WMA-Dateien befinden
Wenn der USB-Stick entfernt wird, schaltet die Soundbar in den Modus Audioeingang und die LED-Anzeige blinkt grün
Die Soundbar spielt im Modus USB-Eingang kompatible Audiotitel automatisch in einer Dauerschleife ab, außer
Sie steuern die Wiedergabe für den Modus USB-Eingang mit der Fernbedienung
●
●
●
●
Bei einigen Computern müssen Sie womöglich unter Audioeinstellungen manuell festlegen, dass die Soundbar
nun das standardmäßige Audiowiedergabegerät sein soll
●
Schalten Sie die Soundbar ein und drücken Sie dann kurz auf die Multifunktionstaste, um in den Bluetooth-Modus
zu schalten – die LED-Anzeige blinkt schnell blau
Aktivieren Sie die Pairing-Funktion an Ihrem Smartphone oder einem anderen kompatiblen Gerät aus und
wählen Sie „AUKEY SK-M52“
Falls ein Code oder eine PIN angefordert wird, geben Sie „0000“ ein
Nach erfolgreichem Pairing hören Sie einen Ton und die LED-Anzeige leuchtet dauerhaft
Mit der Fernbedienung können Sie die Wiedergabe im Bluetooth-Modus steuern
1.
2.
3.
4.
5.
Verbinden Sie die Soundbar mit Ihrem PC, Tablet, Smartphone, Fernseher oder einem anderen Gerät über das
mitgelieferte 3,5-mm-Audiokabel oder das 3,5-mm- zu RCA-Audiokabel
Drücken Sie dann kurz auf die Multifunktionstaste, um in den Modus Audioeingang zu schalten – die LED-An-
zeige leuchtet grün auf
In diesem Modus können Sie die Wiedergabe über Ihr verbundenes Gerät steuern
1.
2.
3.
Stellen Sie sicher, dass die Dateien auf Ihrem USB-Stick im MP3- oder WMA-Format sind (andere Dateitypen
werden nicht unterstützt)
Stecken Sie den USB-Stick in den USB-Anschluss der Soundbar (oder in Ihr eigenes USB-Verlängerungskabel, das
mit dem USB-Anschluss verbunden ist); Ihre Musik wird automatisch abgespielt
Über die Fernbedienung können Sie die Wiedergabe für den Modus USB-Eingang steuern
1.
2.
3.
- 16 -
Anmerkungen
Anmerkungen
Anmerkung
Anmerkungen
Audiowiedergabe über 3,5-mm-Audioeingang (Aux)
Audiowiedergabe über Bluetooth
Audiowiedergabe über USB-Anschluss
Die Soundbar schaltet automatisch in den Modus USB-Eingang (wobei die LED-Anzeige violett aufleuchtet), wenn
ein USB-Stick eingesteckt wird (dieser Modus lässt sich weder an der Soundbar noch über die Fernbedienung
auswählen)

- 17 -
Verwendung der Fernbedienung
POWER
MUSIC
MOVIE
SPEECH
3D
BT CANCEL
RESET
TREBLE
INPUT
BT/USBEQ
BASS
VOL
①
②
③
④
⑧
⑤
⑥
⑦
⑨
Steuerung an der Soundbar
Aktion
Gesamtlautstärke anpassen
Zu nächstem/vorherigem Titel wechseln (nur in den Modi Bluetooth oder USB-Eingang)
Zwischen Eingangsmodi wechseln
Bedienung
Lautstärke +/- kurz drücken
Lautstärke +/- lang drücken
Multifunktionstaste kurz drücken
Soundbar ein- oder ausschalten (Stand-by)
Hin- und herschalten zwischen den verschiedenen
Eingangsmodi (Bluetooth, Audioeingang, optisch).
Der gewählte Eingangsmodus wird für das nächste
Mal gespeichert. Der Modus USB-Eingang wird nur
aktiviert, wenn ein USB-Stick verbunden ist.
Reset aller Lautstärkeeinstellungen der Soundbar
und umschalten des Equalizers in die Musikeinstellung.
Taste zwei Sekunden drücken und halten
Bluetooth-Verbindung abbrechen. Taste zwei
Sekunden drücken und halten, um die Verbindung
zum gekoppelten Gerät zu trennen. Gekoppeltes
Gerät für die erneute Verbindung verwenden
Höhere Frequenzen verstärken oder reduzieren. Die
Einstellung wird für das nächste Mal gespeichert
Niedrigere Frequenzen verstärken oder reduzieren.
Die Einstellung wird für das nächste Mal gespeichert
Lautstärkeregelung
Gesamtlautstärke leiser oder lauter
Stumm ein/aus
Equalizer-Einstellungen
Optimiert für Musik
Optimiert für Filme
Optimiert für Sprachverständlichkeit, z. B. bei
Nachrichtensendungen oder Serien
Bessere Soundeffekte für ein optimales Klangerlebnis,
fast wie im Kino
Wiedergabesteuerung (nur bei Bluetooth und USB)
MUSIC
MOVIE
SPEECH
3D
Stop
Play/Pause
Nächster Titel
Vorheriger Titel

AUKEY Direct ist für Schäden oder Verletzungen infolge unsachgemäßer Montage oder Verwendung nicht
verantwortlich oder haftbar
Von Flüssigkeiten, extremer Hitze und starken Magnetfeldern fernhalten
Soundbar nicht über einen längeren Zeitraum bei hoher Lautstärke verwenden, da dies zu dauerhaften
Gehörschäden oder Gehörverlust führen kann
Bei Gewittern oder wenn die Soundbar über einen längeren Zeitraum nicht benutzt wird, vom Stromnetz trennen.
Garantie & Kundenservice
Bei Fragen, Unterstützungen oder Garantieansprüchen kontaktieren Sie uns bitte unter der jeweiligen Adresse,
die Ihrer Region entspricht. Bitte geben Sie Ihre Amazon-Bestellnummer und die Produktmodellnummer an.
*Wichtiger Hinweis: AUKEY bietet nur für die Produkte einen Kundenservice an, die direkt bei AUKEY erworben wurden. Sollten Sie Ihr Produkt bei einem
anderen Händler gekauft haben, kontaktieren Sie bitte dessen Kundendienst bezüglich Fragen oder Garantieansprüchen.
●
●
●
●
- 18 -
LED-Anzeige
Produktpflege & Verwendung
LED-Anzeige
blinkt schnell blau
blau
weiß
violett
grün
blinkt dauerhaft
rot
Status
Pairing-Modus Bluetooth
Bluetooth verbunden
Modus optischer Eingang
Modus USB-Eingang
Modus 3,5-mm-Audioeingang
Soundwiedergabe (alle Modi)
Stand-by
Table of contents
Languages:
Other Aukey Speakers manuals


