AURES ODP 444 User manual

Receipt Printer User’s Manual
MODEL : ODP 444
All specifications are subject to change without notice

This device complies with part 15 of the FCC Rules.
Operation is subject to the following two conditions.
1) This device may not cause harmful interference, and
2) This device must accept any interference received,
including interference that may cause undesired operation.
Jeff Burroughs
15042 Parkway Loop, Building D, Tustin, CA 92780 | USA
+714.669.3111

FR
Le Groupe Aures vous remercie de votre confiance.
Téléchargez nos derniers drivers et utilitaires
ainsi que nos conseils d’installation sur le site
du Support Technique AURES :
www.aures-support.fr
UK
The AURES Group thanks you for your loyalty.
To download out most recent drivers and utilities and
obtain advice regarding the installation of your equipment,
please visit the AURES Technical Support Website :
www.aures-support.fr/UK
DE
Die AURES Gruppe bedankt sich für lhre Bestellung.
Um unsereneuesten Treiber, Utilities
und Konfigurationsratschläge zu lhren Produkten
herunterzuladen besuchen Sie bitte unsere
technische Support-Website :
www.aures-support.fr/DE

2
Table of Contents
1. Parts Identications 3
2. Setting up the printer 4
2.1 Unpacking 4
2.2 Connecting the cables 5
2.3 Loading the roll paper 8
2.4 Cable cover 설치 및 분리 10
2.5 Jam Error 12
3. Control panel and other functions 15
3.1 Control panel 15
3.2 Error Indicating 15
4. Self Test 16
5. ASCII Print 17
6. ECO Mode 17
6.1 Font 17
6.2 Paper Reduce 18
6.3 Density 18
7. Printer Setting 19
7.1 Baudrate 19
7.2 Cutter 19
7.3 Error Beep 19
8. Hexadecimal Dump 20
9. Peripherals Connection 21
9.1 Bluetooth Connection 21
9.2 Wi-Fi Connection 21
9.3 NFC Connection 22
10. Printer Cleaning 23
11. Specications 24
12. Command List 26

3
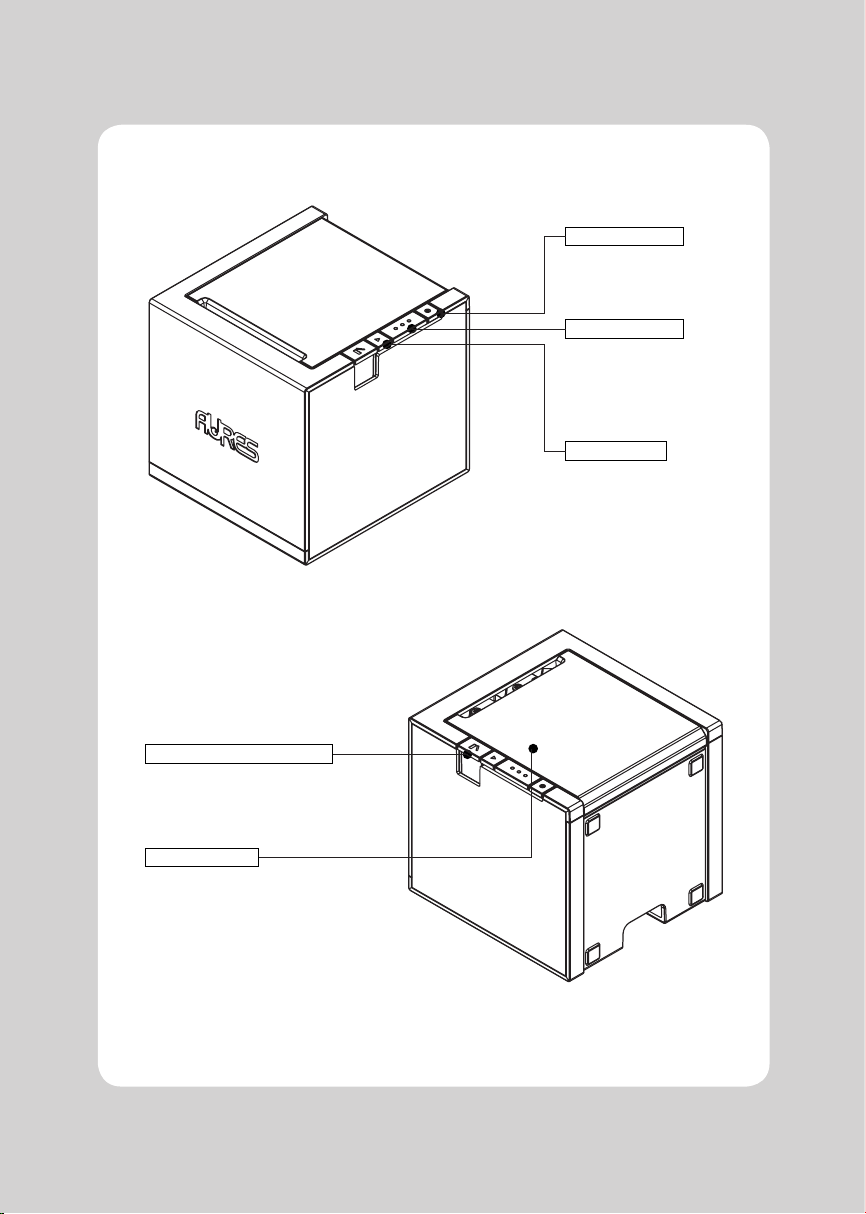
1. Parts Identifications
CONTROL PANEL
FEED BUTTON
COVER OPEN PUSH BUTTON
POWER SWITCH
Features LED indicators
to indicate printer status
and switches to operate
the printer.
Push down this button to
open the printer cover.
Used to turn on/off
power to the printer.
PRINTER COVER
Open this cover to load or
replace a paper roll.

4
2-1. Unpacking
Your printer box should include these items. If any items are damaged or missing, please contact your
dealer for assistance.
The Printer CD Roll Paper
2. Setting Up the Printer
Adaptor Serial Cable 1 Serial Cable 2
USB Cable

5
2-2. Connecting the Cables
All cables connect to the connector panel on the back of the printer which is shown below:
Before connecting any of the cables, make sure that both the printer and the computer are turned off.
CASH DRAWER CONNECTOR ETHERNET CONNECTOR
ETHERNET SWITCH
POWER CONNECTOR USB CONNECTOR SERIAL CONNECTOR

6
2-2-1. Interface Connector
<9 Pin Serial> <USB “B” Type>
<Ethernet>
9Pin Serial Interface
Pin Signal I/O Description
2 RXD Input Printer receive data line RS-232C level
3 TXD Output Printer transmit data line RS-232C level
4, 7 DTR Output Printer handshake to host line RS-232C level
5 GND - System Ground
6 DSR Input Data Send Ready
1,8,9 NC -
USB Interface
Pin Signal I/O Description
1 +5V - +5V
2DATA- - Printer transmit data line
3DATA+ - Printer transmit data line
4 GND - System Ground

7
Ethernet Interface
PIN SIGNAL I/O
1 Data Out + Output Data +
2 Data Out - Output Data -
3 Data IN + Input Data +
4N.C
5N.C
6 Data IN - Input Data -
7N.C
8N.C
This equipment is indoor use and all the communication wirings are limited to inside of the building.
2-2-2. Cash Drawer Connector
The printer can operate a cash drawer with a 6 pin RJ-11 modular connector.
The driver is capable of supplying a maximum current of 1.0A for 510ms or less when not printing.
PIN SIGNAL DESCRIPTION
1 Signal GND -
2 Drawer kick-out drive signal 1 Output
3 Drawer open/close signal Input
4 +24V -
5 Drawer kick-out drive signal 2 Output
6 Signal GND -

8
2-3. Loading the Roll Paper
Notes: Be sure to use paper rolls that meet the specifications. Do not use paper rolls that have the
paper glued to the core because the printer cannot detect the paper end correctly.
♣Turn off power switch.
1. Make sure that the printer is not receiving data; Otherwise, data may be lost.
2. Open the printer cover by pushing down the cover open push button.
3. Remove the used paper roll core if there is one inside.
4. Insert new paper roll as shown.

9
5. Note the correct direction that the paper comes off the roll:
6. Pull out a small amount of paper roll as shown. Then, close the cover.
7. Tear off the paper as shown.
O X

10
2-4. Cable cover installation and removal
♣How to install Cable cover
1. Prepare the Printer and Cable cover.
2. Tighten the bottom hook of the Cable cover to the bottom hole of the printer
as shown below.
3. Slide the hook on the top of the Cable cover to the hook on the top of the printer.
- Cable cover - - Printer -
Printer Hole
Printer Hole
Cable cover
Hook
Cable cover Hook

11
♣How to remove Cable cover
1. While pressing the Cable cover open switch, remove the Cable cover in the direction of
the arrow shown below.
Cable cover open
switch

12
2-5. Jam Error
When the cutter is jammed, please follow the steps below.
Section 1
1. With printer on, press the cover open button to open the printer cover lightly.
(Printer cover is not fully opened with the cutter protruding.)
2. Turn the printer off and on, and when the cutter returns to its original position,
remove the jammed paper and close the printer cover.

13
※
If section 1 does not solve the cutter jam, please follow section 2.
Section 2
1. Turn off the power.
2. Insert the screwdriver into the hole while pressing the cover open button as shown in the figure.
3. Align the screwdriver with the second hole located inside the hole and screw.
Any direction would be ok.
Hole
Second Hole
♣CAUTION:
The second hole is not visible to
the naked eye.
OPEN

14
4. Close the printer cover after removing the jammed paper.
5. Turn On the Power.
CLOSE

15
3-1. Control panel
You can control the basic paper feeding operations of the printer with the button on the control panel.
The indicator lights let you to monitor the printer’sstatus.
Press the FEED button once to advance paper one line. You can also hold down the FEED button to
feed paper continuously.
3-2. Error indicators
STATUS PAPER ERROR POWER REMARKS
RED RED GREEN
Power Off OFF OFF OFF Normal power is not supplied to the
printer
Power On OFF OFF ON Normal power is supplied to the printer
On Line OFF OFF ON Normal error-free mode
Cover Open OFF ON ON Close cover
Paper End ON ON ON Insert new paper roll
3. Control panel and other functions
CONTROL PANEL
POWER
ERROR
PAPER
FEED BUTTON
POWER SWITCH

16
The self-test result indicated whether the printer is operating properly. Also with this, user can check
following options or status of the printer.
Controlcircuit
Printermechanism
Printingquality
ROMversion
Interfacesetting
This test is independent of any other equipment or software.
Running the self test
1. Make sure the printer is turned off and the printer cover is closed properly before performing the self test
2. Turn the printer on holding the FEED button, then the self-test will start. The self-test prints the printer
setting value and then prints the following, and pauses. (Error LED On)
SELECT MODE BY BUTTON
1. ASCII PRINT
2. ECO MODE
3. PRINTER SETTING
4. HEXADUMP MODE
3. Press the FEED button consecutively (1~4)
1. ASCII PRINT
(press the FEED button once) Printing test page constructed with ACII code.
2. ECO MODE
(press the FEED button twice)
Set the ECO mode for saving paper and power.
(Default font type, Reduce paper margin, Density)
3. PRINTER SETTING
(press the FEED button triple time)
Set the printer option.
(Serial baudrate, Cutting mode, Error beep)
4. HEXADUMP MODE
(press the FEED button quad time) Printing the HEX value received from the interface
♣Wait for 5~6 seconds if you want to exit. Printer performs a cutting when exiting this mode
4. The printer is ready to receive data after finishing setting.
4. Self Test

17
ASCII PRINT is printing a test page constructed ASCII code. You can able to check the printer works
properly with this
The ASCII PRINT test automatically ends and cuts the paper after printing the following:
*** Completed ***
The printer is ready to receive data as soon as it completes the ASCII PRINT.
5. ASCII Print
After entering the ECO MODE, the list which can select the ECO option will be printed. Similar like
Self Test, you can press the FEED button to select a ECO option.
Once the input performs properly, the printer shows a result and store.
ECO MODE
1. FONT SETTING
2. LINE SPACE SETTING
3. LINE FEED SETTING
4. BARCODE[1D] HEIGHT
5. DENSITY SETTING
6-1. Font
FONT SETTING menu can be change the Font mapping(FONT A / FONT B).
If you did not want other side font, you can disable that.
- FONT A : 12x24 / - FONT B : 9x17
FONT SETTING
6. ECO Mode
When Font A print When Font B print Description
1. Font A-> A / Font B -> B FONT A FONT B Normally print Font A/B
2. Font A-> B / Font B -> B FONT B Always print Font B
3. Font A-> A / Font B -> A FONT A Always print Font A
4. Font A-> B / Font B -> A FONT B FONT A Reverse print Font A/B

18
6-2. Paper Reduce
Reduce menu (Line space, Line feed, barcode[1D] height) was developed for paper saving.
- Line space
"Line space" means the amount of feed when you intentionally generate newlines.
- Line feed
"Line feed" means the amount of feed when there is an automatic line break.
- Barcode Height
“Barcode Height” means the height of the barcode when creating a one-dimensional barcode.
LINE SPACE SETTING
1. NORMAL
2. REDUCE 50%
3. REDUCE 75%
4. REDUCE 90%
LINE FEED SETTING
1. NORMAL
2. REDUCE 50%
3. REDUCE 75%
4. REDUCE 90%
1D BARCODE HEIGHT SETTING
1. NORMAL
2. REDUCE 50%
3. REDUCE 75%
4. REDUCE 90%
6-3. Density
Adjust the print density to save the power consumed by the printer.
SELECT DENSITY
1. NORMAL
2. LOW
3. DARK
Table of contents
Other AURES Printer manuals

AURES
AURES ODP 333 User manual

AURES
AURES ODP 300 User manual

AURES
AURES SMP 58 Instruction sheet

AURES
AURES ODP 300 User manual

AURES
AURES SMP 58 User manual

AURES
AURES Posligne ODP-1000 User manual

AURES
AURES SLP 580 User manual

AURES
AURES TRP100 User manual

AURES
AURES TRP100-III User manual

AURES
AURES TRP100 User manual