AURES YUNO-K215-BLACK User manual

Rev.A
YUNO-K215-BLACK I ART-03558
USER’S MANUAL

FCC Notice
This equipment has been tested and found to comply with the limits for a Class
A digital device, pursuant to Part 15 of the Federal Communications Commission
(FCC) Rules. These limits are designed to provide reasonable protection against
harmful interference in a residential installation. This equipment generates,
uses, and can radiate radio frequency energy and, if not installed and used
in accordance with the instructions, may cause harmful interference to radio
communications. However, there is no guarantee that interference will not occur
in a particular installation. If this equipment does cause harmful interference to
radio or television reception, which can be determined by turning the equipment
off and on, the user is encouraged to try to correct the interference by one or
more of the following measures:
• Increase the separation between the equipment and the receiver.
• Connect the equipment into an outlet on a circuit different from that to which
the receiver is connected.
• Consult the dealer or an experienced radio or television technician for help.
NOTE: THE MANUFACTURER IS NOT RESPONSIBLE FOR ANY RADIO OR
TV INTERFERENCE CAUSED BY UNAUTHORIZED MODIFICATIONS TO THIS
DEVICE. SUCH MODIFICATIONS COULD VOID THE USER'S AUTHORITY TO
OPERATE THE DEVICE.
CE Notice
This device complies with EMC Directive 2004/108/EC and 2006/95/EC “Low
Voltage Directive” issued by the Commission of the European Community.
WEEE Notice
The WEEE mark applies only to countries within the European Union (EU) and
Norway.
This appliance is labeled in accordance with European Directive 2002/96/EC
concerning waste electrical and electronic equipment (WEEE). The Directive
determines the framework for the return and recycling of used appliances as
applicable throughout the European Union. This label is applied to various
products to indicate that the product is not to be thrown away, but rather
reclaimed upon end of life per this Directive.

Safety
IMPORTANT SAFETY INSTRUCTIONS
To disconnect the machine from the electrical Power Supply, turn off the
power switch and remove the power cable plug from the wall socket.
The wall socket must be easily accessible and in close proximity to the
machine.
Read these instructions carefully. Save these instructions for future
reference.
Follow all warnings and instructions marked on the product.
Do not use this product near water.
Do not place this product on an unstable cart, stand, or table. The product
may fall, causing serious damage to the product. Slots and openings in
the cabinet and the back or bottom are provided for ventilation; to ensure
reliable operation of the product and to protect it from overheating. These
openings must not be blocked or covered. The openings should never be
blocked by placing the product on a bed, sofa, rug, or other similar surface.
This product should never be placed near or over a radiator or heat
register, or in a built-in installation unless proper ventilation is provided.
This product should be operated from the type of power indicated on the
marking label. If you are not sure of the type of power available, consult
your dealer or local power company.
Do not allow anything to rest on the power cord. Do not locate this product
where persons will walk on the cord. Never push objects of any kind into
this product through cabinet slots as they may touch dangerous voltage
points or short out parts that could result in a re or electric shock. Never
spill liquid of any kind on the
product.

Table of Contents
Package Overview ................................................................................................ 2
Product Overview ................................................................................................. 3
Specication .......................................................................................................... 4
How to start the module......................................................................................... 6
How to Install YUNO board to YUNO-K215-BLACK ............................................. 7
How to Install or Remove the Mylar....................................................................... 7
Attaching the Side Bracket .................................................................................... 8
Side Mounting Instructions .................................................................................... 9
Product Dimensions ............................................................................................ 10
Appendix A: Driver Install .................................................................................... 10
2
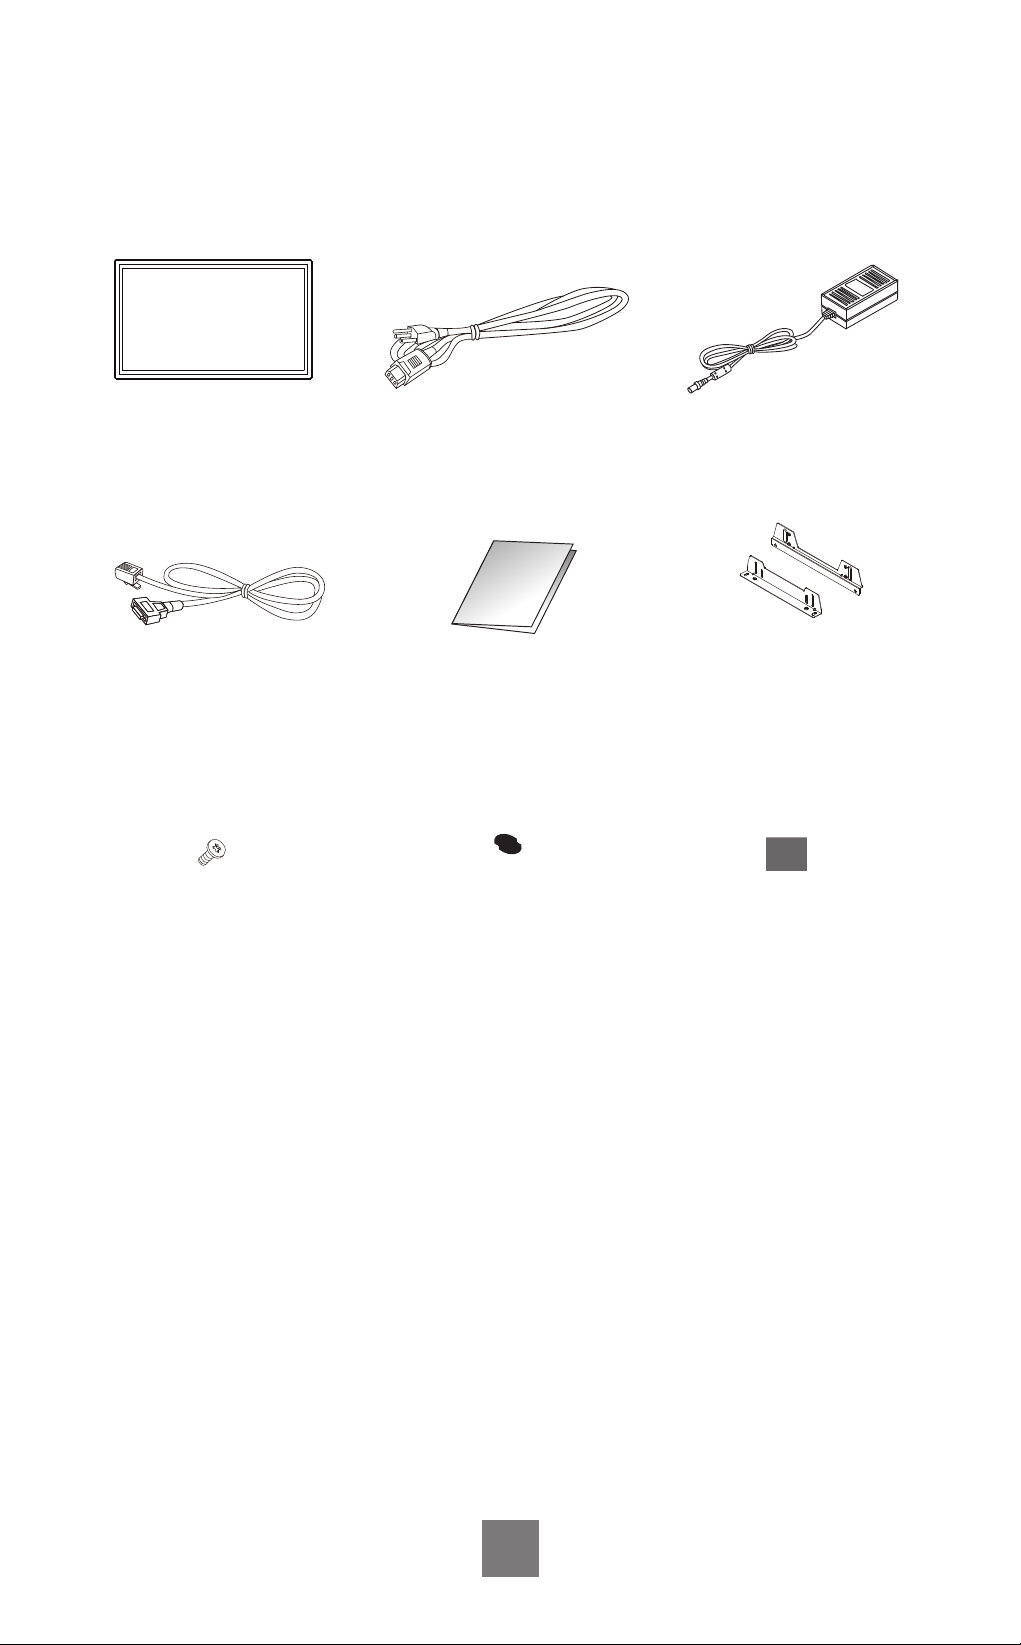
YUNO-K215-BLACK Power Cord
User Manual
RJ-50 to DB-9M Cable x 2
DC Power Supply
Side Bracket x 4
Bracket Screws Mylar x 8
Package Overview
Thermal Pad
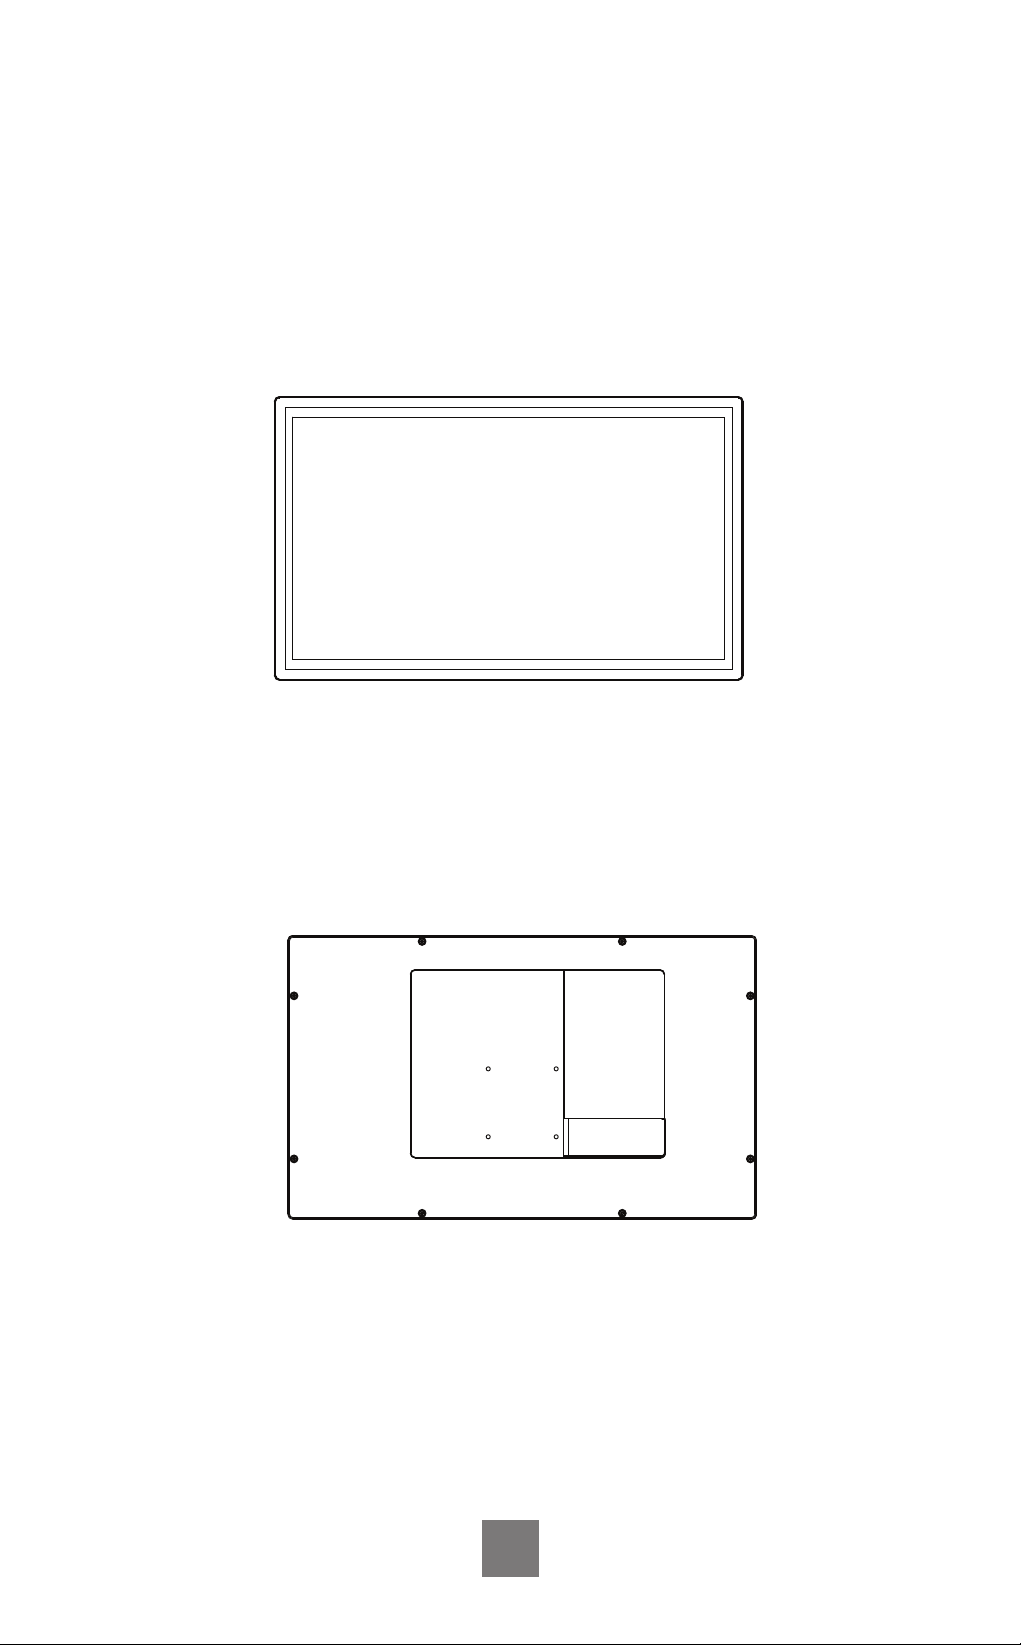
Product Overview
YUNO-K215-BLACK is an 22inch touch display module designed for point of
sale and kiosk applications. The product is a modular design for easy
maintenance.
• Front View
• Back View
3

Model Name YUNO-K215-BLACK
CPU support Intel® Bay Trial-M SoC
Processor J1900
(2M Cache, up to 2.16 GHz)
Intel® Core™ i3-5010U
Processor
(3M Cache, 2.10 GHz)
System Memory 4GB
BIOS Phoenix uEFI BIOS
LCD Panel
LCD Size 21.5" (AUO T215HVN01.1)
Brightness 250 cd/m²
Maximal resolution 1920 x 1080
Aspect Ratio 16:9
Backlight Type LED
LED Life Time 30,000 Hours (min.)
Touch Sensor
P-CAP Touch
Touch Screen 10 points
Controller IC EETI 7900
Interface USB
Storage
1st SSD 64GB
2nd SSD 1 x 2.5" 7mm SATA MLC SSD
Side I/O
Power button 1 x with Power indicator (Blue color when power ON)
USB 1 x USB 2.0 and 1 x USB 3.0 2 x USB 3.0
Rear Bottom I/O
DC-IN jack 1 x Radio jack connector for 19VDC input
Audio jack 1 x 4-conductor 3.5mm audio jack for MIC-in and Line-out
Serial / COM
2 x RJ50 connector with RJ50 to DB9 cable for RS-232 port
COM1/COM2: RS232, wake on ring (S1, S3, S4, S5) support
COM3/COM4: RS232, powered COM with BIOS select none
(Default setting)/ +5V (Default) / +12V for DB9 pin9 by BIOS setting.
LAN 1 x RJ45 port for Gigabit Ethernet, support Wake on LAN
USB 4 x USB 2.0
Cash Drawer 1 x RJ12, Support 12V/24V DC Cash Drawer
Display Port Baytrail has no supported
mini Display Port
1 x mini Display Port
(supporting active converter
cable to VGA, DVI, HDMI)
Specication
4
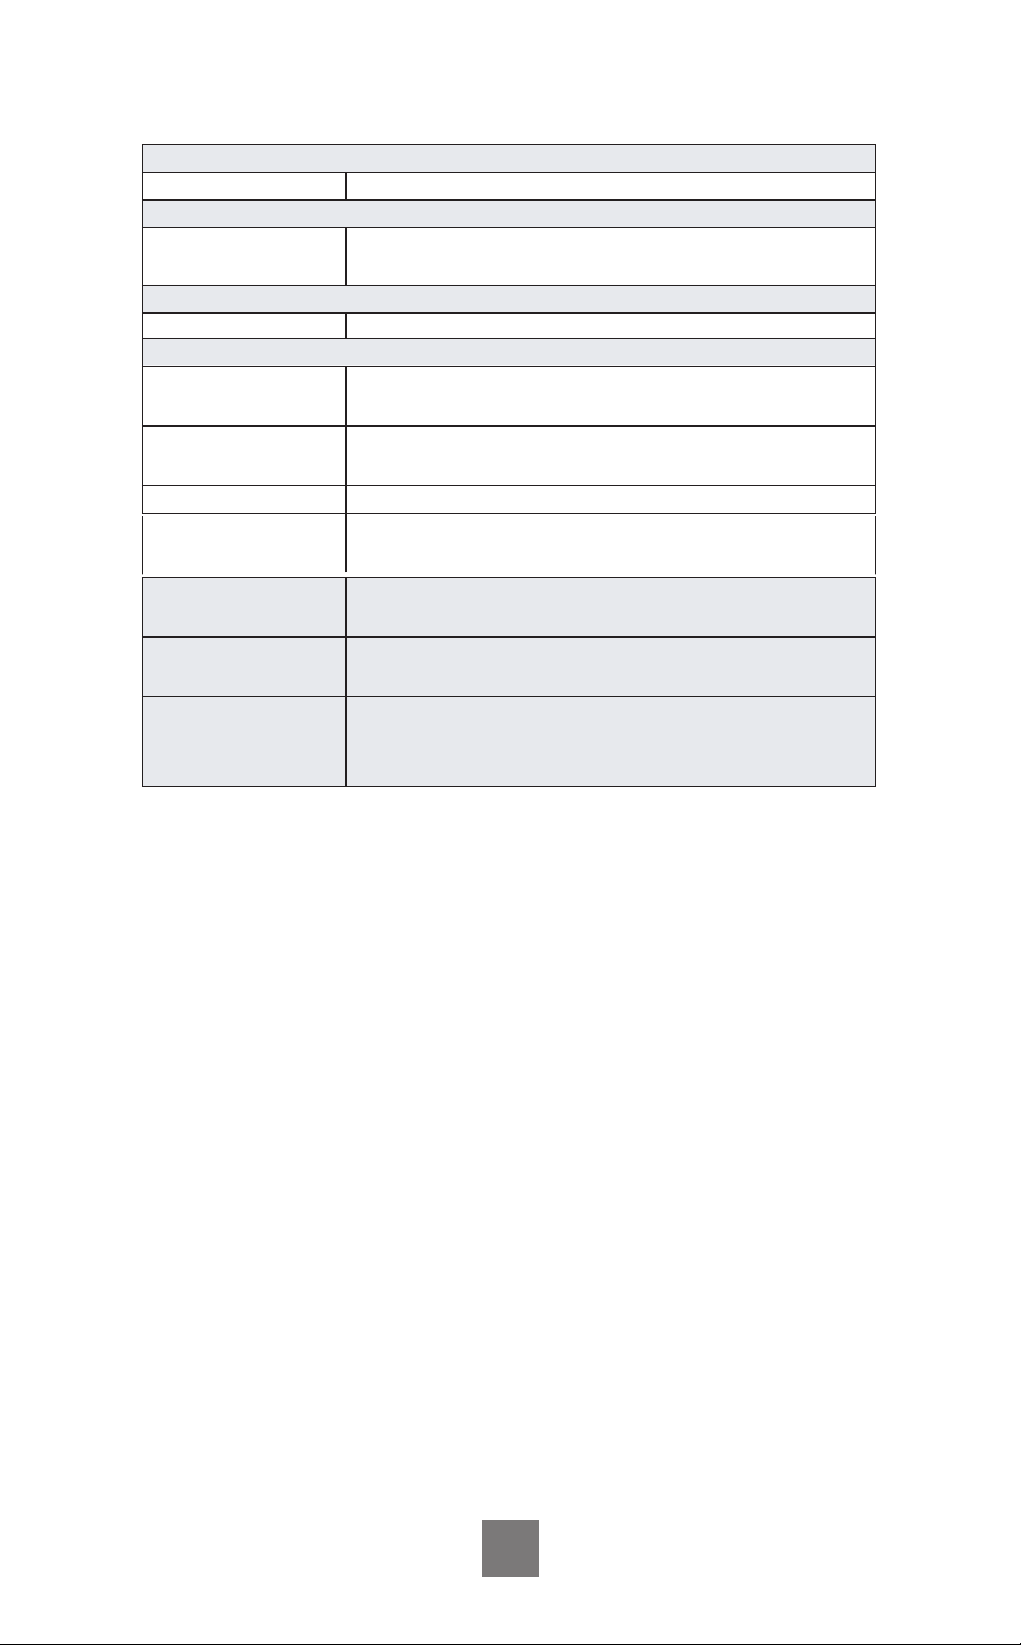
Power
Power Adapter External 19V / 4.74A 90Watt Adapter
Communication
Wireless LAN 2.4/5 GHz, 802.11ac, a/b/g, n
Wi-Fi Bluetooth Module (YUNO-WBM option)
Certications
EMI FCC Class A / CE / LVD
Environment
Operating
Temperature
0-35°C (32°F-95°F)
Storage
Temperature -20°C-60°C (-4°F-140°F)
Humidity 5%-80% non-condensing
Dimension
(W x D x H) LCD 0 degree : 517.44 x 54.08 x 313.31mm
Weight
(N.W./G.W.) 5.75kg / 7.73kg
OS support Windows® 7 Professional for Embedded Systems,
Windows® Embedded POSReady 7, Windows®
Embedded 8 Industry Retail
* This specication is subject to change without prior notice.
5
Dust & Water
Proof IP 54 (front panel)

How to start the module
1. Remove the cover of module.
2. Connect the DC adapter to the power connector on the module.
3. Press the “Power Switch” button to ON/OFF the module.
4. Add the cover to module.
Power Switch
6
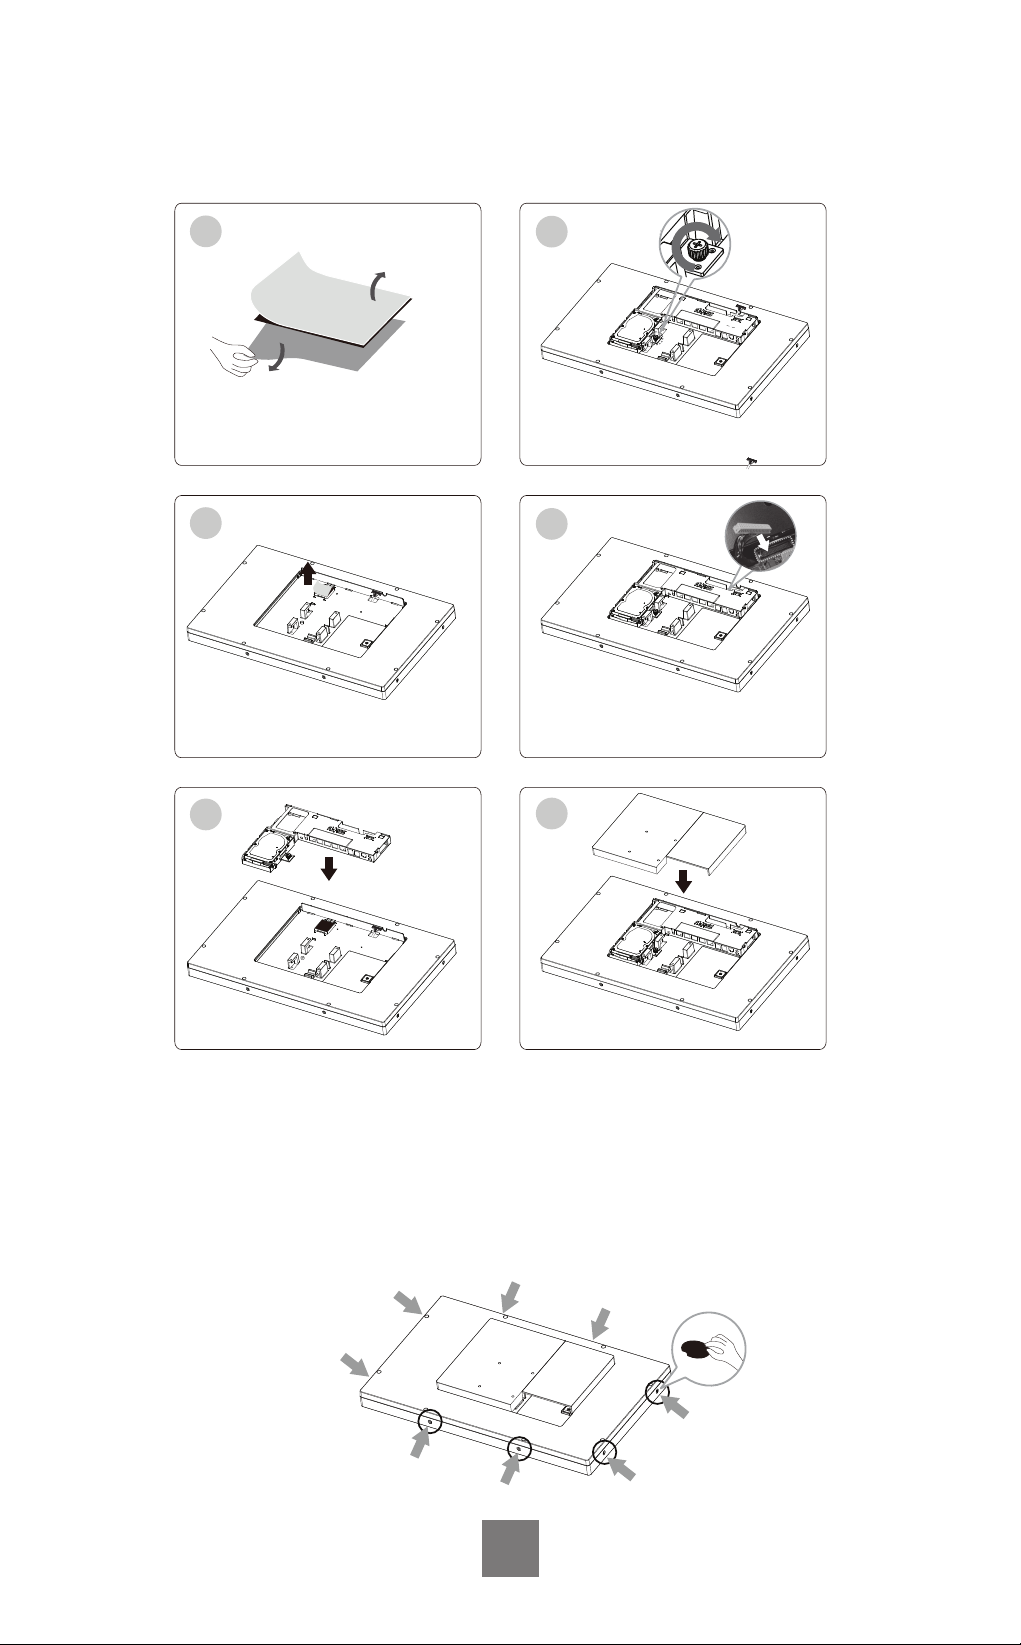
How to Install Yuno board to YUNO-K215-BLACK
How to Install or Remove the Mylar
1. Mylar x 8 units is located in the accessory box.
2. There are 8 places where the mylar can be added (see below).
3. To install the mylar simply place it over one of the holes.
4. To remove the mylar, use a pointy object to dislodge it.
7
Add M/B to module.
3
Turn and tighten the thumb screw.
4
Add the cover to module.
6
Place thermal pad onto the heat sink and
remove the second side of the protection.
2
1
Take the thermal pad from accessory box,
and remove one side of the protection.
Connect 40pin eDP cable to MB 40pin
connector.
5

Attaching the Side Brackets
Tighten Bracket A to B using the screws supplied.
Depending on your mounting scheme, alternately, you may use the side brackets to
mount your displays onto your wall or device.
Find a suitable location for attaching side brackets.
A. The left and right sides
B. The Top and bottom sides
8
OR
Bracket
Bracket
Bracket
Bracket
or Bracket B
Bracket B
Bracket A
Bracket A
Bracket A
Bracket B
Bracket B
Bracket A

9
Side Mounting Instructions
This monitor can be mounted to the wooden or concrete wall with 8 screws and two
pairs of brackets on the opposites.
OR
186.0
20.0
1.0
37.4
1.0
220.0
4.1
51.6

Product Dimensions
10
517.44
313.31 23.58
13.00
54.08
200.00
200.00
221.23
75.00
147.25
75.00
4-M4
Appendix A: Driver Installation
To download the most recent drivers and utilities, and obtain advice regarding the
installation of your equipment, please visit the AURES Technical Support Website
www.aures-support.fr (French)
www.aures-support.fr/UK (English)
www.aures-support.fr/GE (German)

Rév.A
YUNO-K215-BLACK I ART-03558
MANUEL DE L'UTILISATEUR
Avis de la FCC
Cet équipement a été testé et jugé conforme aux limites des appareils
numériques de classe A, conformément à la partie 15 des règles de la FCC
(Federal Communications Commission). Ces limites sont conçues pour fournir
une protection raisonnable contre les interférences nuisibles dans une installation
résidentielle. Cet équipement génère, utilise et peut émettre de l'énergie de
radiofréquence et, s'il n'est pas installé et utilisé conformément aux instructions, il
peut causer des interférences nuisibles aux communications radio. Cependant, il
n'est pas garanti que des interférences ne se produiront pas dans une installation
particulière. Si cet appareil provoque des interférences nuisibles à la réception
radio ou de télévision, ce qui peut être déterminé en mettant l'appareil hors
tension, l'utilisateur est invité à essayer de corriger les interférences par une ou
plusieurs des mesures suivantes :
• Eloignez l'équipement du récepteur.
• Branchez l'équipement dans une prise sur un circuit différent de celui auquel
le récepteur est connecté.
• Consultez le revendeur ou un technicien de radio ou de télévision
expérimenté.
REMARQUE : LE FABRICANT EST PAS RESPONSABLE DES
INTERFÉRENCES DE RADIO OU DE TV PROVOQUÉES PAR DES
MODIFICATIONS NON AUTORISÉES À CET APPAREIL. DE TELLES
MODIFICATIONS PEUVENT ANNULER LE DROIT DE L'UTILISATEUR DE
FAIRE FONCTIONNER L'APPAREIL.
Avis CE
Cet appareil est conforme à la directive EMC 2004/108/EC et 2006/95/EC
« Directive basse tension » délivrée par la Commission de la Communauté
Européenne.
Avis DEEE
La marque DEEE s’applique uniquement aux pays de l’Union européenne (UE)
et la Norvège.
Cet appareil est marqué conformément à la directive européenne 2002/96/EC
concernant les déchets d'équipements électriques et électroniques (DEEE).
La directive dénit le cadre pour le retour et le recyclage des appareils usagés
applicables dans toute l'Union européenne. Cette étiquette est apposée sur
différents produits pour indiquer que le produit ne doit pas être jeté, mais
récupéré en n de vie en vertu de la présente directive.

Sécurité
CONSIGNES DE SÉCURITÉ IMPORTANTES
Pour déconnecter l'appareil de l'alimentation, mettez l'interrupteur
d'alimentation sur la position arrêt et débranchez la fiche du câble
d'alimentation de la prise murale. La prise murale doit être facilement
accessible et à proximité de l'appareil.
Lisez attentivement ces instructions. Conservez ces instructions comme
référence ultérieure.
Respectez tous les avertissements et les instructions gurant sur le produit.
N'utilisez pas ce produit près de l'eau.
Ne placez pas ce produit sur un chariot, un support ou une table. Le produit
peut tomber, risquant d'être sérieusement endommagé. Les fentes et les
ouvertures du boîtier et l'arrière ou le fond sont prévus pour la ventilation;
pour assurer un fonctionnement able du produit et pour le protéger contre
la surchauffe. Ces ouvertures ne doivent pas être obstruées ou couvertes.
Les ouvertures ne doivent jamais être obstruées en plaçant le produit sur
un lit, un canapé, un tapis ou autre surface similaire.
Ce produit ne doit jamais être placé près ou sur un radiateur ou un
chauffage, ou dans une installation intégrée à moins qu'une ventilation
adéquate ne soit prévue.
Ce produit doit être utilisé avec le type d'alimentation indiqué sur l'étiquette.
Si vous n'êtes pas sûr du type d'alimentation disponible, consultez votre
revendeur ou la compagnie d'électricité locale.
Ne laissez rien reposer sur le cordon d'alimentation. Ne placez pas ce
produit à un endroit où des personnes risqueraient de marcher sur le
cordon. N'introduisez jamais d'objets de quelque sorte que ce soit dans
ce produit à travers les fentes du boîtier car ils pourraient toucher des
points de tension dangereux ou mettre des pièces en courts-circuits, ce qui
pourrait provoquer un incendie ou un choc électrique. Ne jamais renverser
de liquide d'aucune sorte sur le
produit.

Table des matières
Présentation de l'emballage .................................................................................. 2
Présentation du produit ......................................................................................... 3
Spécification .......................................................................................................... 4
Comment démarrer le module............................................................................... 6
Comment installer la carte Yuno sur YUNO-K215-BLACK.................................... 7
Comment installer ou retirer le Mylar..................................................................... 7
Instructions de montage des côtés........................................................................ 9
Dimensions du produit......................................................................................... 10
Annexe A : Installation du pilote........................................................................... 10

2
YUNO-K215-BLACK Cordon d'alimentation
Manuel de l'utilisateur
Câble RJ-50 vers DB-9M
x 2
Alimentation CC
Support latéral x 4
Vis de support Mylar x 8
Présentation de l'emballage
Coussinet thermique

3
Présentation du produit
YUNO-K215-BLACK est un module d'affichage tactile de 22 pouces conçu
pour des applications de point de vente et de kiosques. Le produit est d'une
conception modulaire permettant un entretien facile.
• Vue de face
• Vue arrière
3

4
Nom du modèle YUNO-K215-BLACK
Support de CPU Processeur Intel®
Bay Trial-M SoC J1900
(Cache 2M, jusqu'à
2,16 GHz)
Processeur Intel® Core™
i3-5010U
(Cache 3M, 2,10 GHz)
Mémoire système 4Go
BIOS Phoenix uEFI BIOS
Écran LCD
Taille de l'écran LCD 21,5" (AUO T215HVN01.1)
Luminosité 250 cd/m²
Résolution
maximale 1920 x 1080
Rapport hauteur/
largeur 16:9
Type de
rétroéclairage LED
LED, Durée de vie 30.000 heures (min.)
Capteur tactile
P-CAP tactile
Écran tactile 10 points
CI du contrôleur EETI 7900
Interface USB
Stockage
1er SSD 64Go
2ème SSD 1 x SSD SATA MLC 7mm 2,5"
E/S côté
Bouton
d'alimentation
1 x avec indicateur d’alimentation
(Couleur bleue quand il est sur MARCHE)
USB 1 x USB 2.0 et 1 x USB 3.0 2 x USB 3.0
E/S base arrière
Prise d'entrée CC
(DC-IN) 1 x Connecteur de prise radio pour entrée 19VCC
Prise audio 1 x prise audio de 3,5 mm à 4 conducteurs pour entrée
micro (MIC-in) et ligne de sortie (Line-out)
Série / COM 2 x connecteur RJ50 avec câble RJ50 vers DB9 pour port
RS-232
COM1/COM2: RS232, prise en charge de wake on ring
(S1, S3, S4, S5)
COM3/COM4: RS232, COM alimenté avec BIOS
select none (Paramètre par défaut)/ +5V (Par défaut) /
+12V pour DB9 pin9 par paramètre BIOS.
LAN 1 x port RJ45 pour Gigabit Ethernet, prise en charge
de Wake on LAN
USB 4 x USB 2.0
Cash Drawer 1 x RJ12, Prise en charge de Cash Drawer 12V/24V CC
Display Port Baytrail n'a pas de mini
Display Port pris en charge
1 x mini Display Port
(Prise en charge du
câble de convertisseur
actif VGA, DVI, HDMI)
Spécification
This manual suits for next models
1
Table of contents
Languages:
Other AURES Touch Panel manuals


Popular Touch Panel manuals by other brands


Mitsubishi Electric
Mitsubishi Electric AT-50A Instruction book

Topway
Topway LMK070DDCFWD-NNA user manual

Advantech
Advantech TPC-1071H user manual

Philips
Philips 24BDL4151T/75 user manual

TechNexion
TechNexion TEP-1560-BSW quick start guide

Carrier
Carrier Touch Pilot 33CNTPILOT Installation and operation instructions


