Phonocar 05730 User manual

05730
FAST
wireless
CHARGING
Golf VII 2012>
VOLKSWAGEN
INSTALLAZIONE / INSTALLATION / INSTALLATION
INSTALLATION / INSTALACIÓN / INSTALAÇÃO
INSTALLATIE / INSTALACJA
A(pag. 7-9)
INSTALLAZIONE / INSTALLATION / INSTALLATION
INSTALLATION / INSTALACIÓN / INSTALAÇÃO
INSTALLATIE / INSTALACJA
B(pag. 10-15)
IT VANO PORTAOGGETTI CON
CARICABATTERIA WIRELESS
MANUALE ISTRUZIONI
FR COMPARTIMENT DE RANGEMENT
AVEC CHARGEUR SANS FIL
NOTICE
EN FAST WIRELESS CHARGING
POCKET COMPARTMENT
INSTRUCTIONS MANUAL
DE ABLAGEFACH MIT WIRELESS LADEGERÄT
BEDIENUNGSANLEITUNG
ES COMPARTIMENTO DE ALMACENAMIENTO
CON CARGADOR INALÁMBRICO
MANUAL INSTRUCIONES
PT COMPARTIMENTO DE ARMAZENAMENTO
COM CARREGADOR SEM FIOS
MANUAL DE INSTRUÇÕES
NL OPBERGVAK MET
DRAADLOZE OPLADER
GEBRUIKSAANWIJZING
PLSCHOWEKZŁADOWARKĄBEZPRZEWODOWĄ
INSTRUKCJA OBSŁUGI

05730
2
1 3
2
4
CARICABATTERIA (1)
CAVO ALIMENTAZIONE (2)
CAVO ALIMENTAZIONE ALTERNATIVO (3)
INDICATORE LED (4)
CARGADOR (1)
CABLE DE ALIMENTACIÓN (2)
CABLE DE ALIMENTACIÓN ALTERNATIVO (3)
INDICADOR LED (4)
CHARGEUR (1)
CABLE D’ALIMENTATION (2)
FAISCEAU D’ALIMENTATION SUPPLEMENTAIRE (3)
INDICATEUR LED (4)
CARREGADOR (1)
CABO DE ALIMENTAÇÃO (2)
CABO DE ALIMENTAÇÃO ALTERNATIVO (3)
LED INDICADOR (4)
CHARGER (1)
POWER CABLE (2)
ADDITIONAL POWER CABLE (3)
LED LIGHT (4)
OPLADER (1)
VOEDINGSKABEL (2)
EXTRA VOEDINGSKABEL (3)
LED-INDICATOR (4)
LADEGERÄT (1)
STROMKABEL (2)
ZUSÄTZLICHES STROMKABEL (3)
LED-STATUSANZEIGE (4)
ŁADOWARKA (1)
KABEL ZASILAJĄCY (2)
ALTERNATYWNY PRZEWÓD ZASILAJĄCY (3)
WSKAŹNIK LED (4)
IT Contenuto della confezione: ES Contenido del envase:
FR Contenu de la boite: PT Conteúdo da embalagem:
EN Supplied: NL Inhoud verpakking:
DE Im Lieferumfang enthalten: PL Zawartość opakowania:

05730
3
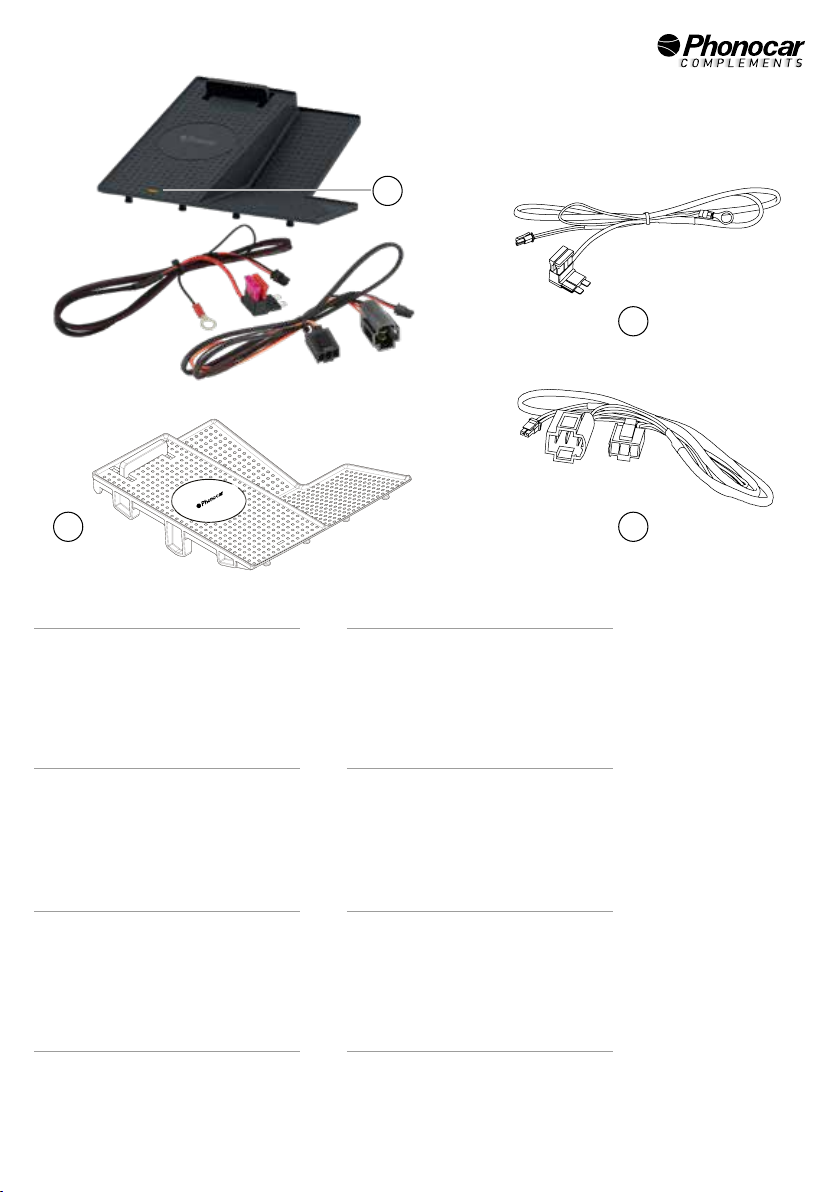
IT CARICABATTERIA A INDUZIONE CON TECNOLOGIA QiPER LA RICARICA VELOCE INTEGRATO IN VANO
PORTAOGGETTI ORIGINALE
Certificato“Qi standard”.
Ricarica stabile e veloce.
3 bobine per l’induzione elettromagnetica.
Alimentazione 10-24V.
Regolazione automatica della potenza in uscita.
Temperatura di ricarica >60°C.
Distanza di ricarica 2,3 - 7,5 mm.
Compatibile con tutti gli smartphone con tecnologia Qi.
INDICATORE LED 4:
luce arancione = in carica
luce verde = per gli smartphone che trasmettono al caricatore
lo stato di carica 100%.
luce arancione intermittente = rilevamento di oggetti estra-
nei come monete, ecc. (FOD). Il processo di ricarica viene in-
terrotto per ragioni di sicurezza.
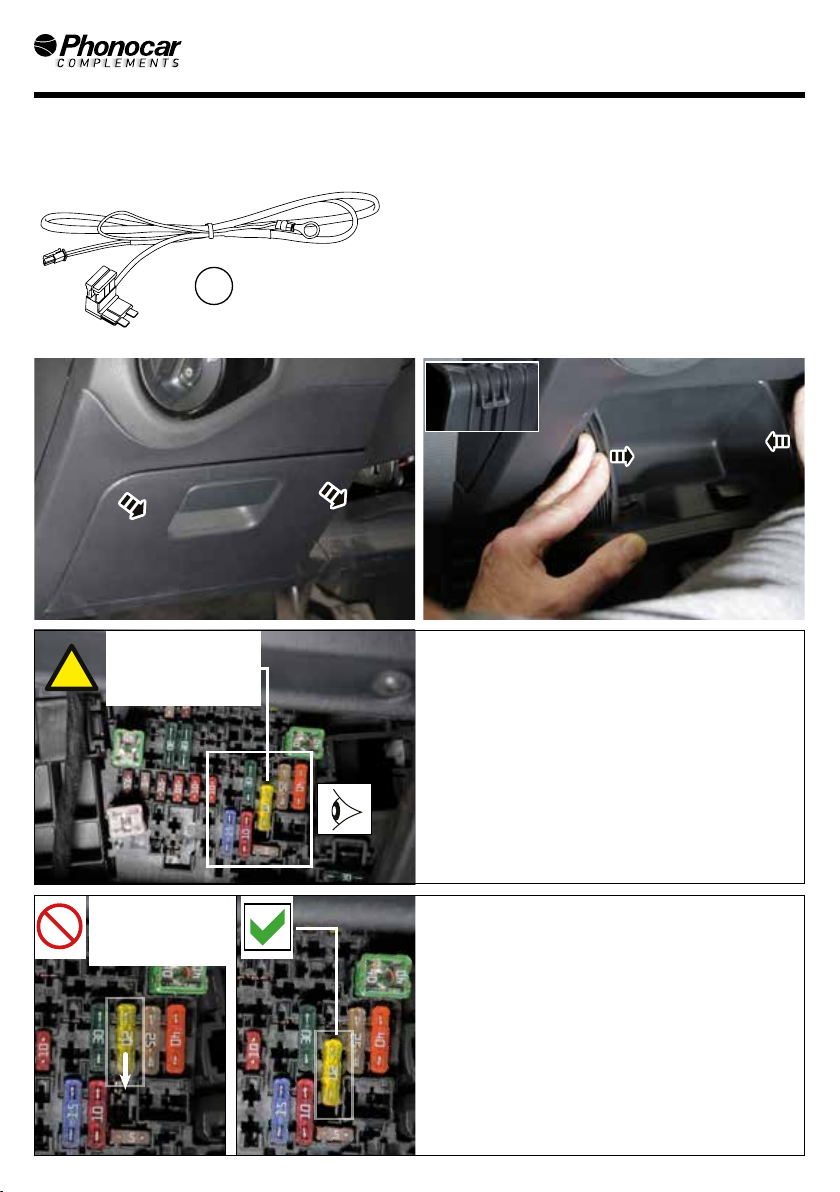
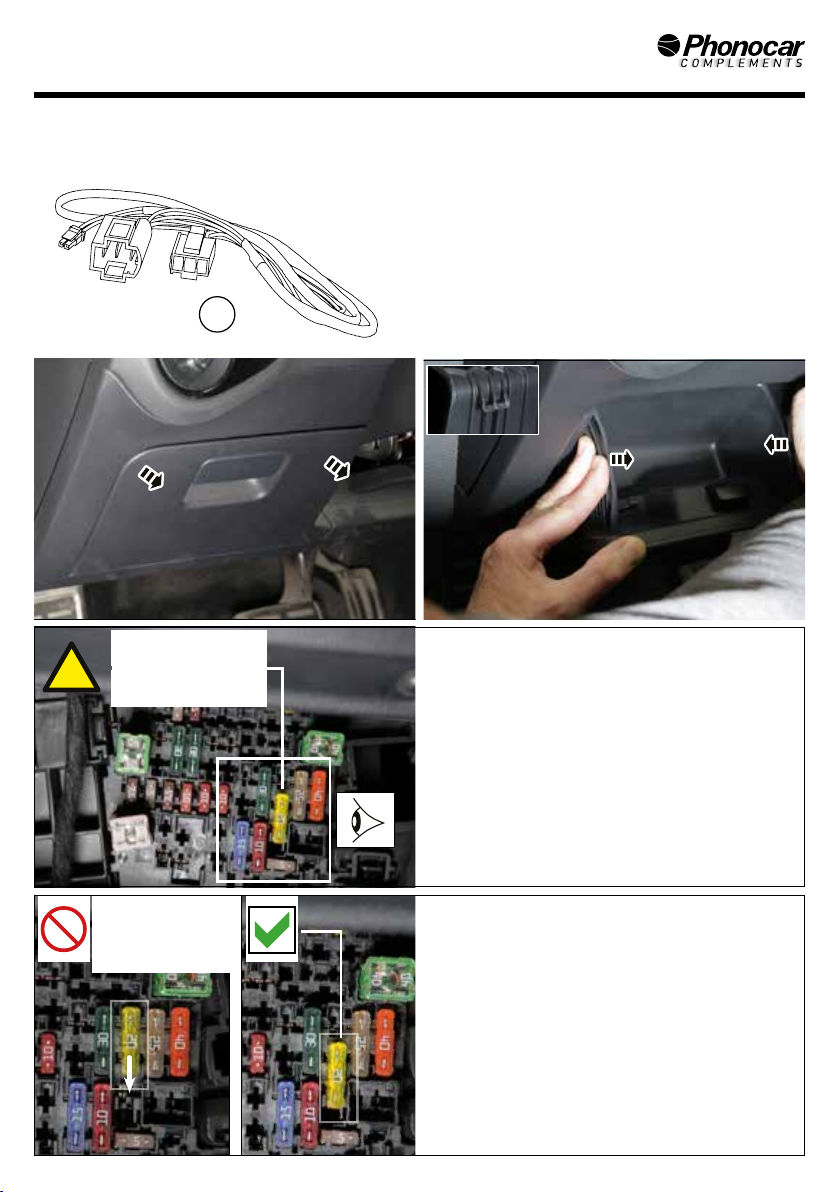
IT AVVERTENZE Per un’installazione adeguata fare riferimento al presente
manuale d’uso. Assicurarsi che il cablaggio sia disposto in modo da non
piegarsi per evitare che si rompa.
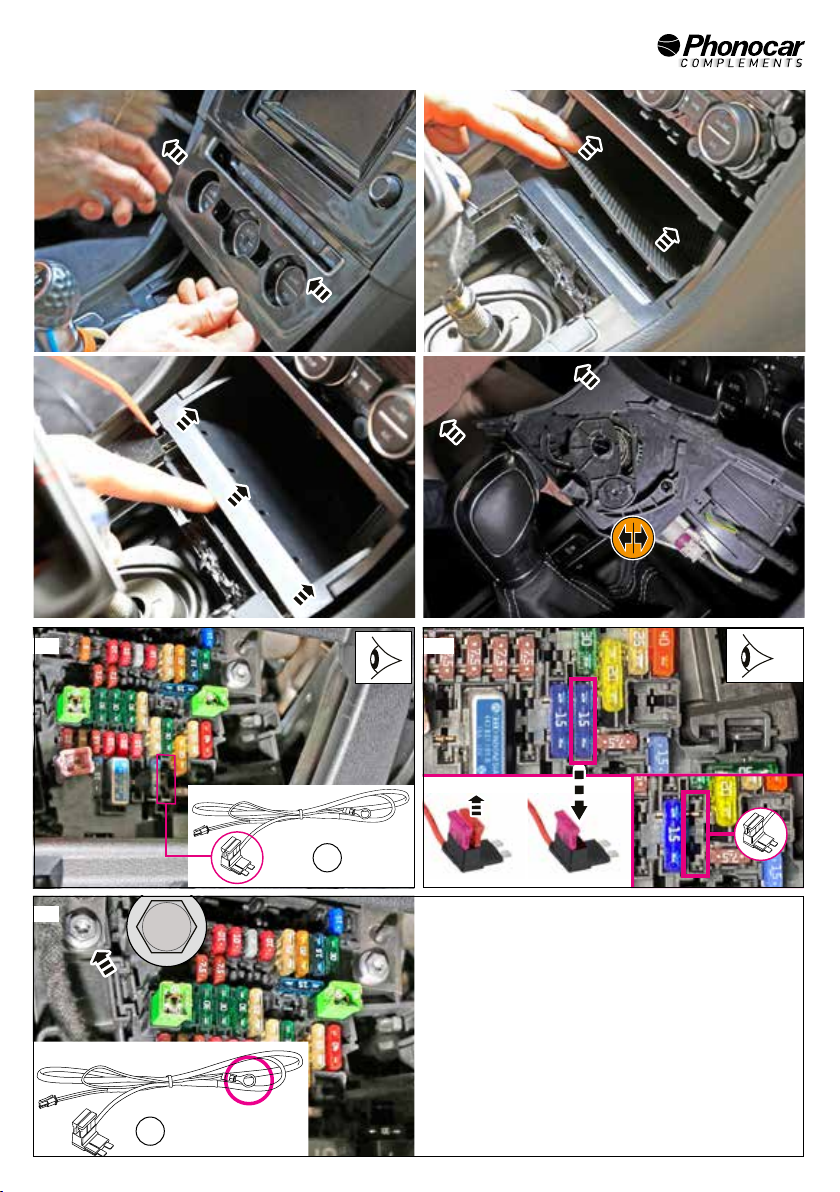
Verificare che tutti i collegamenti siano stati effettuati correttamente.
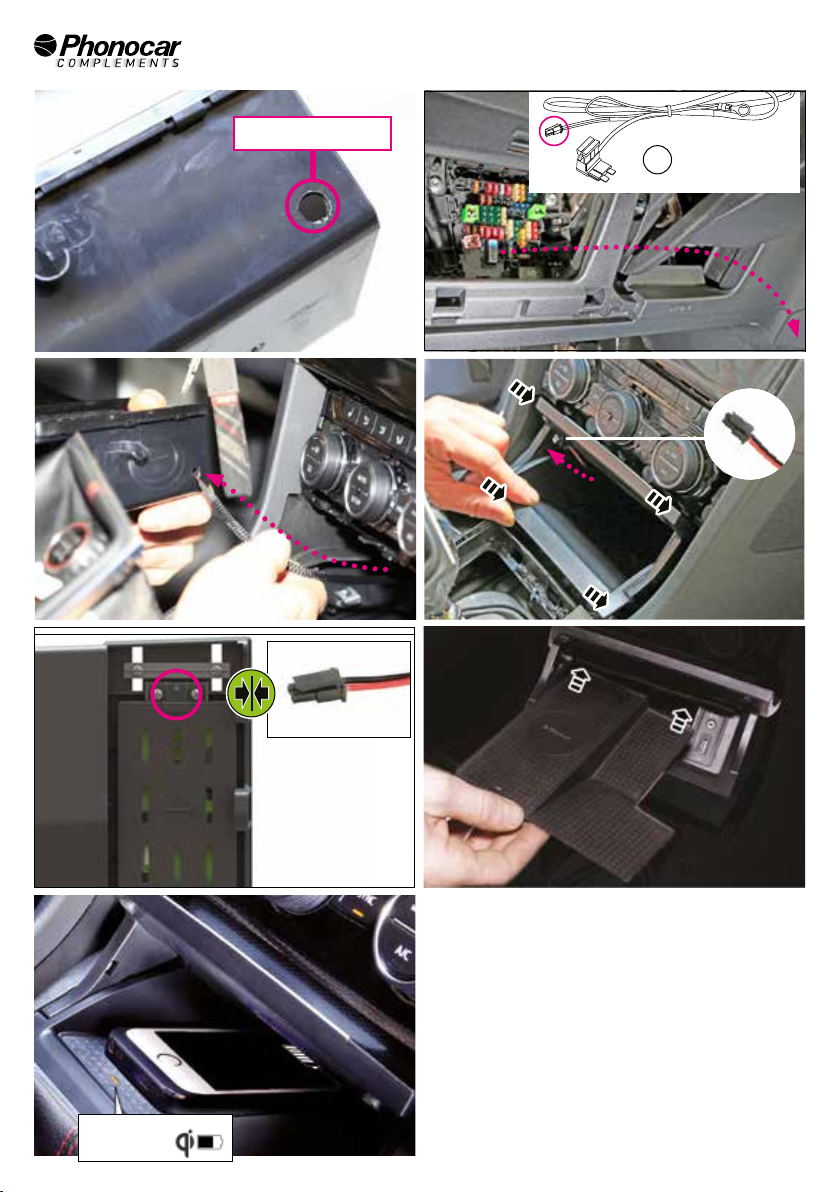
Posizionare il cavo lontano da altri oggetti per evitare che possa impigliarsi,
schiacciarsi o rovinarsi.
Phonocar S.p.A. declina ogni responsabilità per danni derivanti da
un’installazione o da un utilizzo improprio del prodotto.
Si raccomanda di utilizzare soltanto il materiale fornito in dotazione per
evitare qualsiasi malfunzionamento del prodotto.
Phonocar S.p.A. si riserva il diritto di apportare variazioni al prodotto anche
senza preavviso. Eventuali modifiche ai prodotti sono da considerarsi
migliorative e non influiscono sulla loro funzionalità.
Tutte le immagini sono inserite a scopo illustrativo. Tutti i marchi citati e i
loghi riprodotti appartengono ai legittimi proprietari e sono stati indicati a
solo scopo informativo.
Il logo "Qi" è un marchio del "Wireless Power Consortium".
FR LE CHARGEUR A INDUCTION AVEC TECHNOLOGIE QI POUR LA RECHARGE RAPIDE, INTEGRÉ DANS LE
COMPARTIMENT DE RANGEMENT ORIGINAL
Certifié“Qi standard”.
Recharge stable et rapide.
3 bobines pour l’induction électromagnétique.
Alimentation 10-24V.
Réglage automatique de la puissance de sortie.
Température de recharge >60°C.
Distance de recharge 2,3 - 7,5 mm.
Compatible avec tous les smartphones intégrés de la
technologie Qi.
INDICATEUR LED 4:
voyant orange = en charge
voyant vert = pour les smartphones qui indiquent sur le char-
geur le niveau de recharge 100%.
voyant orange intermittent = détection des objets externes
tels que monnaie, etc. (FOD). Le processus de recharge est in-
terrompu pour des raisons de sécurité.
FR ATTENTION Pour une installation correcte, suivre les indications de cette
notice d’utilisation.Vérifier que les câbles soient bien positionnés pour ne pas
se plier et risquer de se couper.
Vérifier que tous les branchements soient corrects.
Éloigner le câble des autres objets pour éviter qu’il s’emmêle ou s’endommage.
Phonocar S.p.A n’est en aucun cas responsable des dommages causées par
une mauvaise installation et utilisation du produit.
Il est conseillé d’utiliser uniquement les accessoires fournis dans la boite afin
d’éviter le mauvais fonctionnement du produit.
Phonocar S.p.A. se réserve le droit d’apporter toute sorte de modification,
même sans preavis.
Toutes les images insérées sont uniquement pour des finalites illustratives.
Toutes les eventuelles modifications sur les produits sont considerées des
améliorations et n’affectent en aucun cas leur correcte fonctionnement.
Toutes les marques mentionnées et les lieux reproduits appartiennent a leurs
proprietaires légitimes. L’indication est uniquement a titre d’information.
Le logo“Qi”est une marque du“Wireless Power Consortium”.

05730
4
EN INDUCTION CHARGER WITH QI TECHNOLOGY FOR FAST CHARGING DIRECTLY INTO THE ORIGINAL
POCKET COMPARTMENT
“Qi standard”certified.
Stable and fast charging.
3 Coils for electromagnetic induction.
Power supply 10-24V.
Automatic power output adjustment.
Charging temperature >60°C.
Charging distance 2,3 - 7,5 mm.
Compatible with all smartphones with Qi technology.
LED LIGHT 4:
orange light = charging
green light = for smartphones displaying 100% charge status
to the charger.
orange light flashing = detection of foreign objects such as
coins, etc. (FOD). The charging process is stopped for safety
reasons.
EN ATTENTION An appropriate installation in observance of these operating
instructions is necessary. Please make sure the wiring is arranged so it is
not bended or crimped due to the risk of cable break. Make sure that all
connections are correct. Route the cable away from moving parts, do not
allow the cable to be entangled, pinched or damaged in any way.
We will not be liable for damage due to improper installation or utilization.
Use the specified accessory parts to prevent product failure.
Subject to technical modifications; no responsibility is accepted for the
accuracy of this information.
All images are included for illustrative purposes only.
Phonocar S.p.A. reserves the right to make changes to the products even
without notice.
Any changes to the products are to be considered improvements and do not
affect their functionality.
All mentioned trademarks and reproduced logos belong to their legitimate
owners and have been indicated for information purposes only.
The“Qi”symbol is a trademark of the“Wireless Power Consortium”.
DE INDUKTIONSLADEGERÄT MIT QI-TECHNOLOGIE FÜR SCHNELLES LADEN IN DEM
ORIGINAL-HANDSCHUHFACH
“Qi-Standard”Zertifizierung.
Stabiles und schnelles Aufladen.
3 Spulen fur elektromagnetische Induktion.
10-24V-Stromversorgung.
Automatische Anpassung der Ausgangsleistung.
Ladetemperatur >60°C.
Ladeasbtand 2,3 - 7,5 mm.
Für Smartphones mit Qi-Technologie.
LEDSTATUSANZEIGE 4:
orange Licht = wird geladen
grünes Licht = für Smartphones, die den 100% Ladezustand
am Ladegerät anzeigen.
Blinkendes orange Licht = erkennung von Fremdkörpern wie
Münzen, etc. (FOD). Ladevorgang wird aus Sicherheitsgrün-
den unterbrochen.
DE HINWEIS Sachgemäße Installation unter Beachtung dieser
Einbauanleitung erforderlich. Achten Sie auf korrekte Anschlüsse. Verlegen
Sie die Kabel so, dass Sie weder geknickt, gequetscht oder beschädigt werden
können.
Sorgen Sie dafür, dass sich die Kabel nicht in Gegenständen verfangen können.
Wir können keine Haftung für Schäden übernehmen, welche durch un-
sachgemäße Installation oder Nutzung verursacht wurden.
Verwenden Sie darum ausschließlich das mitgelieferte Montagematerial.
Technische Änderungen vorbehalten, alle Angaben ohne Gewähr.
Alle Bilder sind nur zu Illustrationszwecken angegeben. Phonocar S.p.A.
behält sich das Recht vor, auch ohne Vorankündigung Änderungen an den
Produkten vorzunehmen.
Jede Art von Änderungen an den Produkten sind als Verbesserungen zu
betrachten und beeinträchtigen nicht deren Funktionalität. Alle erwähnten
Markenzeichen und Handelsnamen gehören ihren rechtmäßigen
Eigentümern und wurden nur zu Informationszwecken angegeben.
Das“Qi”-Logo ist einWarenzeichen des“Wireless Power Consortium”.

05730
5
PT CARREGADOR DE INDUÇÃO COM TECNOLOGIA QI PARA CARGA RÁPIDA INTEGRADO NO PORTA-LUVAS
ORIGINAL
Certificado“Qi Standard”.
Carga rápida e estável.
3 bobinas para a indução eletromagnética.
Alimentação 10-24V.
Regulação automática da potência de saída.
Temperatura de carga >60°C.
Distância de carga 2,3 - 7,5 mm.
Compatível com todos os smartphones com tecnologia Qi.
LED INDICADOR 4:
luz laranja = em carga.
luz verde = para os Smartphones que transmitem ao carrega-
dor o estado de carga 100%.
luz laranja piscando = detecção de objetos estranhos como
moedas, etc. (FOD). O processo de recarga é interrompido por
razões de segurança.
PT ATENÇÃO Para uma instalação adequada, consulte o presente manual do
usuário. Certifique-se de que a fiação é colocada de modo que não dobrar-se
para evitar que se quebre.
Certifique-se de que todas as conexões foram feitas corretamente.
Coloque o cabo longe de outros objetos para evitar que se enrole, esmagar-se
ou afundar-se.
A Phonocar S.p.A. declina qualquer responsabilidade por danos decorrentes
de uma instalação ou de uma utilização indevida do produto.
Recomenda-se a utilização apenas do material fornecido para evitar qualquer
anomalia do produto.
Phonocar S.p.A. reserva-se o direito de fazer modificações no produto
também sem aviso prévio. Os modos que os produtos são considerados
melhora e não afeta a sua funcionalidade.
Todas as imagens são inseridas para fins ilustrativos. Todas as marcas
mencionadase logotiposreproduzidospertencemaos proprietárioslegítimos
e foram indicados unicamente para efeitos de informação.
Logótipo“Qi”é uma marca do“Wireless Power Consortium”.
ES CARGADOR DE INDUCCIÓN CON TECNOLOGÍA QI PARA CARGA RÁPIDA INTEGRADO EN LA GUANTERA
ORIGINAL
Certificado“Qi Standard”.
Carga rápida y estable.
3 bobinas para la inducción electromagnética.
Alimentación 10-24V.
Regulación automática de la potencia de salida.
Temperatura de carga >60 °C.
Distancia de carga 2,3 - 7,5 mm.
Compatible con todos los teléfonos inteligentes con tecnología Qi.
INDICADOR LED 4:
luz naranja = en carga
luz verde = epara los Smartphones que transmiten al carga-
dor el estado de carga 100%.
luz naranja intermitente = detección de objetos extraños
como monedas, etc. (FOD). El proceso de recarga se interrum-
pe por razones de seguridad.
ES ATENCIÓN Para una instalación adecuada, consulte el manual de usuario.
Asegúrese de que el cableado sea colocado de modo que no se doble para
evitar que se rompa.
Asegúrese de que todas las conexiones se han llevado a cabo correctamente.
Coloque el cable lejos de otros objetos para evitar que se enrede, aplastaste
o estropee.
Phonocar S.p.A. declina toda responsabilidad por daños derivados de una
instalación o de un uso indebido del producto.
Se recomienda utilizar únicamente el material suministrado para evitar
cualquier mal funcionamiento del producto.
Phonocar S.p.A. se reserva el derecho de efectuar modificaciones en el
producto también sin previo aviso. Las eventuales modificaciones a los
productos se consideran mejoras y no afectan a su funcionalidad.
Todas las imágenes se insertan con fines ilustrativos.
Todas las marcas mencionadas y logotipos reproducidos pertenecen a los
legítimos propietarios y se han indicado solo con fines informativos.
El logotipo“Qi”es una marca del“Wireless Power Consortium”.

05730
6
NL INDUCTIELADER MET QI-TECHNOLOGIE VOOR SNEL OPLADEN. GEÏNTEGREERD IN HET ORIGINELE
OPBERGVAK
PL ŁADOWARKA INDUKCYJNA Z TECHNOLOGIĄ QI DO SZYBKIEGO ŁADOWANIA W ORYGINALNYM
SCHOWKU
Gecertificeerd“Qi standaard”.
Stabiel en snel opladen.
3 spoelen voor elektromagnetische inductie.
Stroom 10-24V.
Automatische aanpassing van het uitgangsvermogen.
Oplaadtemperatuur >60°C.
Laadafstand 2,3 - 7,5 mm.
Voor smartphones met Qi-technologie.
LEDINDICATOR 4:
oranje licht = opladen
groen licht = voor smartphones die op de lader het 100%
oplaadniveau aangeven.
oranje licht knippert = detectie van vreemde voorwerpen
zoals munten, enz. (FOD). Het laadproces wordt om veili-
gheidsredenen onderbroken.
Certyfikowany“standard Qi”.
Stabilne i szybkie ładowanie.
Zasilanie 10-24V.
3 cewki do indukcji elektromagnetycznej.
Automatyczna regulacja mocy wyjściowej.
Temperatura ładowania >60°C.
Odległość ładowania 2,3 mm / 7,5 mm.
Dla smartfonów z technologią Qi.
WSKAŹNIK LED 4:
dioda pomarańczowa = bateria jest w trakcie ładowania
zielonadioda= dlasmartfonów, któreprzesyłajądo ładowarki
stan naładowania 100%.
pomarańczowa dioda led migająca =wykrywanie obcy-
ch obiektów, takich jak monety, itp. (FOD). Ze względów
bezpieczeństwa proces ładowania zostaje przerwany.
NL WAARSCHUWING Lees voor een veilige en correcte bediening de
handleiding aandachtig door.
Verzeker u er van dat de kabel zo ligt dat hij niet kan buigen of breken.
Controleer of alle verbindingen correct zijn aangesloten.
Plaats de kabel uit de buurt van andere voorwerpen om te voorkomen dat hij
bekneld of beschadigd raakt.
Phonocar S.p.A. wijst alle verantwoordelijkheid af voor schade als gevolg van
onjuiste installatie of onjuist gebruik van het product.
Het wordt aanbevolen alleen het bijgeleverde materiaal te gebruiken om
storingen van het product te voorkomen.
Phonocar S.p.A. behoudt zich het recht voor wijzigingen aan de producten
aan te brengen - ook zonder voorafgaande kennisgeving.
Eventuele wijzigingen aan de producten zijn verbeteringen en hebben geen
invloed op de goede werking.
Alle weergegeven handelsmerken en logo’s zijn eigendom van hun
rechtmatige eigenaars en zijn louter ter informatie.
Het“Qi”-logo is een handelsmerk van het“Wireless Power Consortium”.
PL OSTRZEŻENIA Informacje na temat prawidłowej instalacji znajdują się w
niniejszej instrukcji obsługi.
Upewnij się, że okablowanie jest prawidłowo ułożone.
Sprawdź, czy wszystkie połączenia zostały wykonane prawidłowo.
Poprowadzić kabel z dala od innych przedmiotów.
Phonocar S.p.A. nie ponosi żadnej odpowiedzialności za szkody wynikłe z
niewłaściwej instalacji lub użytkowania produktu.
Zaleca się stosowanie wyłącznie dostarczonych materiałów, aby uniknąć
nieprawidłowego działania produktu.
Phonocar S.p.A. zastrzega sobie prawo do wprowadzania zmian w
produktach bez uprzedzenia.
Wszelkie zmiany w produktach są traktowane jako ulepszenia i nie mają
wpływu na ich funkcjonalność.
Wszystkie odtworzone znaki towarowe i loga należą do ich prawowitych
właścicieli i zostały podane wyłącznie w celach informacyjnych.
Logo“Qi”jest znakiem towarowym“Wireless Power Consortium”.

05730
7
FR Changez la position du fusible 20A s’il se trouve dans une autre position!
EN Switch the place of the 20A fuse if it is not at this position !
DE Falls sich die 20A Sicherung an einer anderen Position benden sollte,
stecken Sie diese um !
ES Cambie la posición del fusible de 20A si está en otra posición.
PT Mude a posição do fusível de 20A se ele estiver em outra posição!
NLVerwissel de plaats van de 20A-zekering als deze zich op een andere
plaats bevindt!
PL Zmienić pozycję bezpiecznika 20A, jeśli znajduje się on w innym
miejscu !
FR ATTENTION! Le fusible jaune de 20A doit se trouver exactement dans
cette position.
EN IMPORTANT!The yellow 20A fuse has to be exactly in this position !
DE ACHTUNG! Die gelbe 20A Sicherung muss sich genau an dieser Position
benden !
ES ATENCIÓN El fusible amarillo de 20A debe estar exactamente en esta
posición!
PT ATENÇÃO! O fusível amarelo 20A deve estar exactamente nesta posição!
NLVOORZICHTIG! De gele 20A-zekering moet precies op deze plaats zitten.
PL UWAGA! Jeśli bezpiecznik 20A znajduje się w innym położeniu, należy
zmienić jego pozycję!
www.inbay.systems
3
ACHTUNG!
Die gelbe 20A Sicherung muss sich
genau an dieser Position befinden !
Falls sich die 20A Sicherung an
einer anderen Position befinden
sollte, stecken Sie diese um !
IMPORTANT!
The yellow 20A fuse has to
be excatly in this position !
Switch the place of the 20A
fuse if it is at this position !
!
3
IT ATTENZIONE!
Il fusibile giallo da 20A deve
trovarsi esattamente in
questa posizione!
IT Cambiare la posizione
del fusibile da 20A qualora
si trovi in una posizione
diversa da quella indicata!
2
Einbauanleitung / Install Manual
2
Einbauanleitung / Install Manual
2
1 2
IT Collegamento ad un connettore libero della scatola portafusibili.
FR Branchement à un connecteur libre dans la boite des porte-fusibles.
EN Connects to a free socket of the fuse holder box.
DE Anschluss an einem freien Steckplatz des Sicherungskastens.
ES Conexión a un conector libre en la caja de fusibles.
PT Conexão a um conector livre na caixa de fusíveis.
NL Aansluiting op een vrije connector in de zekeringkast.
PL Podłączenie do wolnego złącza w skrzynce bezpieczników.
INSTALLAZIONE / INSTALLATION / INSTALLATION / INSTALLATION /
INSTALACIÓN / INSTALAÇÃO / INSTALLATIE / INSTALACJA A

05730
8
www.inbay.systems
5
www.inbay.systems
5
7 8
Einbauanleitung / Install Manual
4
Einbauanleitung / Install Manual
4
5 6
FR Masse
EN Ground
DE Masse
ES Masa
PT Massa
NL Aard
PL Masa
www.inbay.systems
7
Ø ca. 10 mm
10 mm
(-) Masse / ground
IT Massa
2
11
Einbauanleitung / Install Manual
6
+12V
?
10V 15V
2
9
Einbauanleitung / Install Manual
6
+12V
?
10V 15V
10

05730
9
17
Einbauanleitung / Install Manual
8
14
www.inbay.systems
9
15
www.inbay.systems
7
Ø ca. 10 mm
10 mm
(-) Masse / ground
12
18
CHARGING
Einbauanleitung / Install Manual
8
13
2
www.inbay.systems
9
16

05730
10
IT Cavo aY (Collegamento alla presa +12V).
FR CâbleY (branchement à la prise +12V).
ENY-Cable (Connects to the +12V socket).
DEY-Kabel (Anschluss an der +12V Buchse).
ES CableY (Conexión a la toma de corriente +12V).
PT CaboY (Conexão à tomada +12V).
NLY-kabel (+12V-aansluiting).
PL KabelY (podłączenie do gniazda +12V).
3
Einbauanleitung / Install Manual
14
Einbauanleitung / Install Manual
14
1 2
www.inbay.systems
15
ACHTUNG!
Die gelbe 20A Sicherung muss sich
genau an dieser Position befinden !
Falls sich die 20A Sicherung an
einer anderen Position befinden
sollte, stecken Sie diese um !
IMPORTANT!
The yellow 20A fuse has to
be excatly in this position !
Switch the place of the 20A
fuse if it is at this position !
!
4FR Changez la position du fusible 20A s’il se trouve dans une autre position!
EN Switch the place of the 20A fuse if it is not at this position !
DE Falls sich die 20A Sicherung an einer anderen Position benden sollte,
stecken Sie diese um !
ES Cambie la posición del fusible de 20A si está en otra posición.
PT Mude a posição do fusível de 20A se ele estiver em outra posição!
NLVerwissel de plaats van de 20A-zekering als deze zich op een andere
plaats bevindt!
PL Zmienić pozycję bezpiecznika 20A, jeśli znajduje się on w innym
miejscu !
IT Cambiare la posizione
del fusibile da 20A qualora
si trovi in una posizione
diversa da quella indicata!
www.inbay.systems
15
ACHTUNG!
Die gelbe 20A Sicherung muss sich
genau an dieser Position befinden !
Falls sich die 20A Sicherung an
einer anderen Position befinden
sollte, stecken Sie diese um !
IMPORTANT!
The yellow 20A fuse has to
be excatly in this position !
Switch the place of the 20A
fuse if it is at this position !
!
3
IT ATTENZIONE!
Il fusibile giallo da 20A deve
trovarsi esattamente in
questa posizione!
FR ATTENTION! Le fusible jaune de 20A doit se trouver exactement dans
cette position.
EN IMPORTANT!The yellow 20A fuse has to be exactly in this position !
DE ACHTUNG! Die gelbe 20A Sicherung muss sich genau an dieser Position
benden !
ES ATENCIÓN El fusible amarillo de 20A debe estar exactamente en esta
posición!
PT ATENÇÃO! O fusível amarelo 20A deve estar exactamente nesta posição!
NLVOORZICHTIG! De gele 20A-zekering moet precies op deze plaats zitten.
PL UWAGA! Jeśli bezpiecznik 20A znajduje się w innym położeniu, należy
zmienić jego pozycję!
INSTALLAZIONE / INSTALLATION / INSTALLATION / INSTALLATION /
INSTALACIÓN / INSTALAÇÃO / INSTALLATIE / INSTALACJA B

05730
11
www.inbay.systems
17
7
www.inbay.systems
17
8
Einbauanleitung / Install Manual
18
TX20 (L+R)
(L+R)
Einbauanleitung / Install Manual
18
TX20 (L+R)
(L+R)
9 10
www.inbay.systems
19
TX20 (L+R)
(L+R)
www.inbay.systems
19
TX20 (L+R)
(L+R)
11 12
Einbauanleitung / Install Manual
16
Einbauanleitung / Install Manual
16
56

05730
12
Einbauanleitung / Install Manual
20
13
Einbauanleitung / Install Manual
20
14
www.inbay.systems
21
15
Einbauanleitung / Install Manual
22
Einbauanleitung / Install Manual
22
16
17
www.inbay.systems
23
www.inbay.systems
23
18 19

05730
13
www.inbay.systems
25
www.inbay.systems
25
22 23
Einbauanleitung / Install Manual
26
Ziehen Sie die gesamte Kon-
sole nach oben (von hinten)
und ziehen Sie den Stecker
von der +12V Buchse ab.
Pull the complete panel
upwards (from behind) and
unplug the plug from the +12V
Socket
24
FRTenant par derrière, tirez le panneau vers le haut et débranchez
le connecteur de la prise +12V.
EN Pull the complete panel upwards (from behind) and unplug
the plug from the +12V Socket.
DE Ziehen Sie die gesamte Konsole nach oben (von hinten) und
ziehen Sie den Stecker von der +12V Buchse ab.
ES Desplazar el panel completo hacia arriba (desde atrás) y
desconectar el conector de la toma de +12V.
PT Deslocar o painel completo para cima (de trás) e desligar o
conector da tomada de +12V.
NLTrek het volledige paneel naar boven (van de achterzijde) en
trek de stekker uit de +12V-aansluiting.
PL Pociągnij cały panel do góry (od tyłu) i odłącz wtyczkę od
gniazda +12V.
IT
Tirare l'intero pannello verso
l'alto (da dietro) e scollegare il
connettore dalla presa +12V.
Einbauanleitung / Install Manual
24
TX30 (L+R)
TX30 2x
Einbauanleitung / Install Manual
24
TX30 (L+R)
TX30 2x
20 21

05730
14
www.inbay.systems
27
+12 V Buchse
+12 V Socket
25
Einbauanleitung / Install Manual
30
Ø ca. 10 mm
Ø ca. 10 mm
30
Einbauanleitung / Install Manual
30
Ø ca. 10 mm
Ø ca. 10 mm
31
www.inbay.systems
27
+12 V Buchse
+12 V Socket
26
3
Einbauanleitung / Install Manual
28
27
3
Einbauanleitung / Install Manual
28
28
3
www.inbay.systems
29
29
3

05730
15
35
www.inbay.systems
31
33
36
CHARGING
www.inbay.systems
31
32
3
Einbauanleitung / Install Manual
32
34

CAUTION HOT!
NO METAL OBJECTS
05730 FI 4/2021
Phonocar S.p.A. Via F.lli Cervi, 167/C • 42124 Reggio Emilia (Italy)
Tel. 0522 941621 • Fax 0522 1602093 • e-mail: info@phonocar.it • www.phonocar.it
FRANCE Tél. 0811.48.55.59 • Fax 0811.48.17.39 • e-mail: info@phonocar.fr • www.phonocar.fr
DE/ATTel. +49 0521 89880932 • Fax +39 0522 1602093 • e-mail: info@phonocar.de • www.phonocar.com
ESPAÑA/PORTUGAL Tel. +34 958 302295 • Fax +34 958 302470 • Movil +34 607592406
e-mail: info@phonocar.es • info@phonocar.pt • www.phonocar.es
BE - LUX Tel. +352 398136 • Fax +352 398133 • Mobil +352 6 91194848
e-mail: info@phonocar.be • www.phonocar.com
GREECE and CYPRUSTel. +30 210-6925680 • e-mail: info@phonocar.gr • www.phonocar.com
POLANDTel. +48 71-3645358 • Fax +48 71-3645000 • e-mail: info@phonocar.pl • www.phonocar.com
Reach MADE IN E.U.
IT ATTENZIONE! Non posizionare nessun oggetto sulla
superficie di ricarica (monete, carte di credito e soprattutto
smartphone con anello di supporto)!
FR ATTENTION! Ne placer aucun objet (monnaies, cartes
bancaires et smartphones avec anneau de support) sur la
surface de chargement!
EN CAUTION! Don‘t place any other objects such as coins, credit
cards etc. onto the surface. Especially smartphones with attached
ring stand holder should not be used!
DE ACHTUNG! Legen Sie keine anderen Gegenstände wie z.B.
Münzen, Kreditkarten etc. in die Ablage. Insbesondere Smartphones
mit angebrachtem Ring Ständer dürfen nicht verwendet werden!
ES ¡ATENCION! No coloque ningún objeto como monedas, tarjetas
de crédito, etc. en la superficie de recarga. Especialmente os
Smartphones com objetos metalicos colados na parte traseira, não
deve ser usado!
PT ATENÇAO! Não coloque quaisquer outros objetos, tais como
moedas, cartões de crédito etc. na superfície de carga.
Especialmente Smartphones com suporte de anel anexado não deve
ser usado!
NL LET OP! Plaats geen andere voorwerpen zoals munten,
creditcards, enz. in het opbergvak.
In het bijzonder mogen smartphones met een ringstandaard niet
gebruikt worden!
PL UWAGĘ! Nie umieszczaj żadnych przedmiotów na powierzchni
ładowania (takich jak monety, karty kredytowe itp.).
Nie używaj smartfonów z podstawką pierścieniową!
Other Phonocar Automobile Accessories manuals

Phonocar
Phonocar 06890 User manual

Phonocar
Phonocar VM280 User manual

Phonocar
Phonocar 5/956 User manual

Phonocar
Phonocar 4/030 User manual

Phonocar
Phonocar VM350 User manual

Phonocar
Phonocar 03750 User manual

Phonocar
Phonocar 5/988 User manual

Phonocar
Phonocar 04994 User manual

Phonocar
Phonocar VM 031 User manual

Phonocar
Phonocar 4/087 Owner's manual

Phonocar
Phonocar VM549 User manual

Phonocar
Phonocar VM390 User manual

Phonocar
Phonocar 4/125 User manual

Phonocar
Phonocar VM362 User manual

Phonocar
Phonocar 06891 User manual

Phonocar
Phonocar 4/006 User manual

Phonocar
Phonocar 4/084 User manual

Phonocar
Phonocar VM 022 User manual

Phonocar
Phonocar 5/946 User manual

Phonocar
Phonocar VM495 User manual