Autodiagnos PC Pro User manual

PC PRO
Quick Reference Guide
Kurzbedienungsanleitung

Part Number I319461
- Issue 1 © Autodiagnos 2010
PC PRO
Part Number I319461
Issue 1
© Autodiagnos 2010
PC Pro Quick Start Guide.book Page 1 Thursday, September 23, 2010 12:51 PM


Contents
5
Quick Reference Guide
Introduction........................................................ 6
Product support hotline ..................................... 7
Software CD...................................................... 7
Hardware configuration..................................... 8
Configuring the PC............................................ 9
Getting started................................................. 11
Using Autodiagnos PC Pro.............................. 13
Cable identification.......................................... 15
PC Pro Quick Start Guide.book Page 5 Monday, September 13, 2010 10:02 AM

Quick Reference Guide
6
English
Quick Reference Guide
Introduction
CongratulationsonchoosingtheAutodiagnos PC Pro diagnostic system. The system
enables information to be extracted from various vehicle control modules when
connected via the vehicle’s diagnostic connector.
Bothpre-EOBD(European On-Board Diagnostics)and EOBD-compliantvehiclesare
covered.
Note: All post 2000 MY petrol cars and post 2004 MY diesel cars should conform to
the EOBD standard.
Overview
The kit includes the following items.
1. Carry case with foam insert.
2. Vehicle Interface.
3. USB cable.
4. J1962 OBD cable.
5. CD.
6. Quick reference guide.
7. Power supply unit.
7
CR0239
1
5
6
2
4
3
PC Pro Quick Start Guide.book Page 6 Monday, September 13, 2010 10:02 AM

Quick Reference Guide
7
Product support hotline
Alternatively, visit the Autodiagnos website at www.autodiagnos.com.
Note: To avoid delay, always quote the serial number of the Vehicle Interface when
requesting support.
Software CD
Installation instructions
1. Insert the CD into the CD drive.
2. The installation on the CD should auto-run. If it fails to do so, navigate to the CD
drive in Windows Explorer and double-press the ‘Setup.exe’ icon.
3. Follow the on-screen instructions to install the application, accepting all options
provided to achieve the default installation.
4. Restart the PC before first use.
+44 (0)844 665 7623.
+44 (0)844 665 7624.
PC Pro Quick Start Guide.book Page 7 Monday, September 13, 2010 10:02 AM

Quick Reference Guide
8
Hardware configuration
Vehicle Interface (VI)
This component acts as an interface between the vehicle being tested and the
software installed on a PC.
Externally, the VI has a number of connectors, but no switches or buttons. It is
operated by the user from the PC screen.
LEDs alert the user to the operational status of the VI.
1. Communicating with vehicle systems.
2. Power.
3. USB connection status.
4. Bluetooth connection status.
AU0022
2
2
2
4
4
3
3
1
1
PC Pro Quick Start Guide.book Page 8 Monday, September 13, 2010 10:02 AM

Quick Reference Guide
9
Configuring the PC
ThePCmustbe set uptorecognisethe Vehicle Interface(VI). There aretwomethods
of connecting the VI:
•USB - Hard wired,
•Bluetooth - Wireless.
USB is the default connection method setting.
USB - Hard wired
Follow the procedure below to connect the PC to the Vehicle Interface (VI) using a
USB cable.
1. From the drop-down menu on the ‘Settings’ tab, select ‘USB’.
2. Connect one end of a USB cable to the VI and the other end to a USB port on
the PC.
3. The drivers will install automatically. Press ‘Continue Anyway’ when prompted.
The operating system will display a notification when the process is complete.
Bluetooth - Wireless
Follow the procedure below to connect the PC to the Vehicle Interface using wireless.
1. Follow the instructions provided with your laptop or Bluetooth dongle to set up a
wireless connection to the Vehicle Interface. The Bluetooth device name is
‘Vehicle Interface’ and if requested enter the PIN code 1234.
2. Once the connection has been set up a COM port number will be displayed.
Make a note of this number.
3. From the ‘VI Mode’ drop-down list on the ‘Settings’ menu, select ‘Bluetooth’.
4. From the ‘Bluetooth Port’ drop-down list select the COM port number recorded in
step 2.
3
3
3
CR0236
PC Pro Quick Start Guide.book Page 9 Monday, September 13, 2010 10:02 AM

Quick Reference Guide
10
Settings
1. Language settings
2. Vehicle Interface (VI) settings
3. Vehicle Interface (VI) configuration
4. Company settings
5. Product information
From the ‘Settings’ screen, the software language can be selected. Please note the
Vehicle Interface (VI) must be connected to both the PC and a vehicle in order to
change the software language. This process may take up to twenty minutes.
The method of communication with the VI can also be changed. ‘USB’ is the default
communication method.
111
33
22
44
55
AU0077
PC Pro Quick Start Guide.book Page 10 Monday, September 13, 2010 10:02 AM
Quick Reference Guide
11
Getting started
Note:Ifthevehicle does not haveaJ1962cable socket, the appropriatemanufacturer
diagnostic cable will be required. See ‘Cable identification’, page 15.
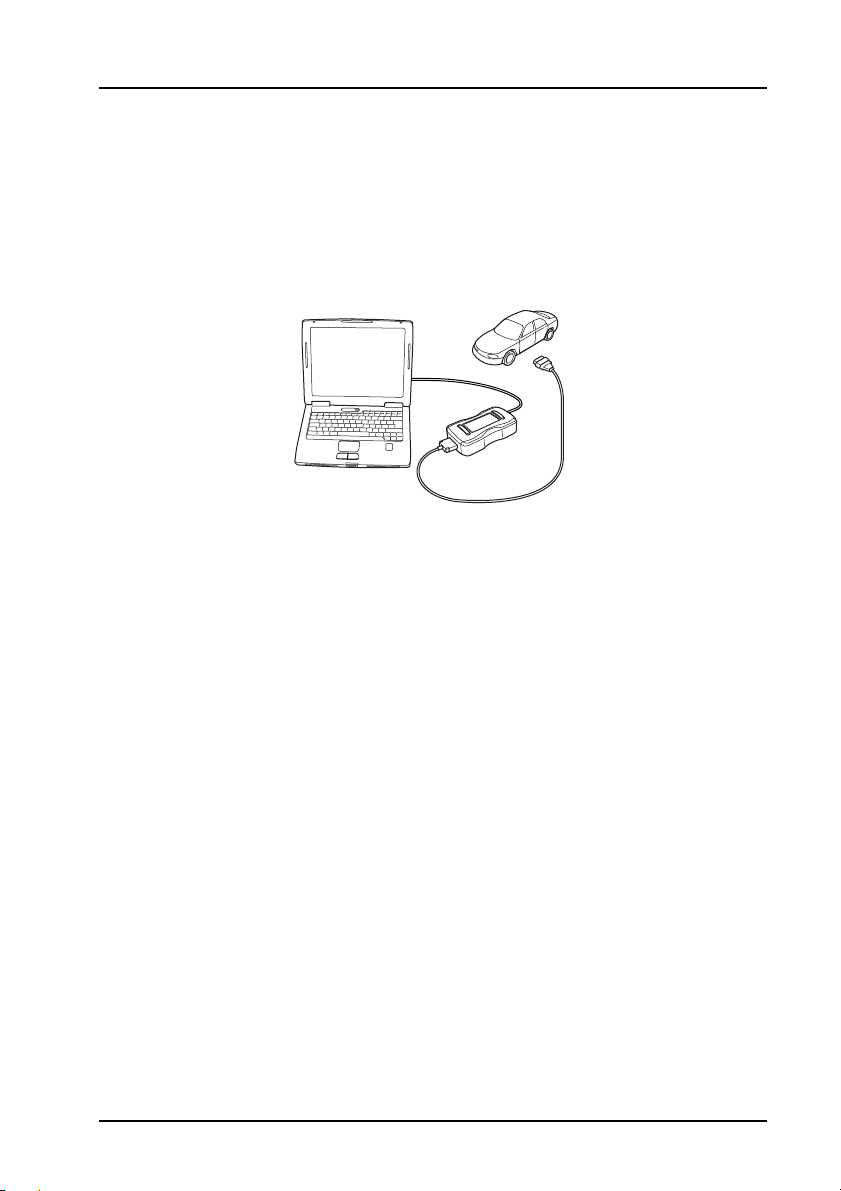
USB Connection
1. Connect the EOBD cable to the Vehicle Interface.
2. Connecttheappropriatemanufacturerdiagnosticcableifnecessarytothe EOBD
cable.
3. Connect the diagnostic cable to the vehicle’s diagnostic socket.
4. Connect the vehicle interface to the PC USB port.
5. Double-press the Autodiagnos PC Pro icon on the desktop to launch the
software.
CR0237
PC Pro Quick Start Guide.book Page 11 Monday, September 13, 2010 10:02 AM
Quick Reference Guide
12
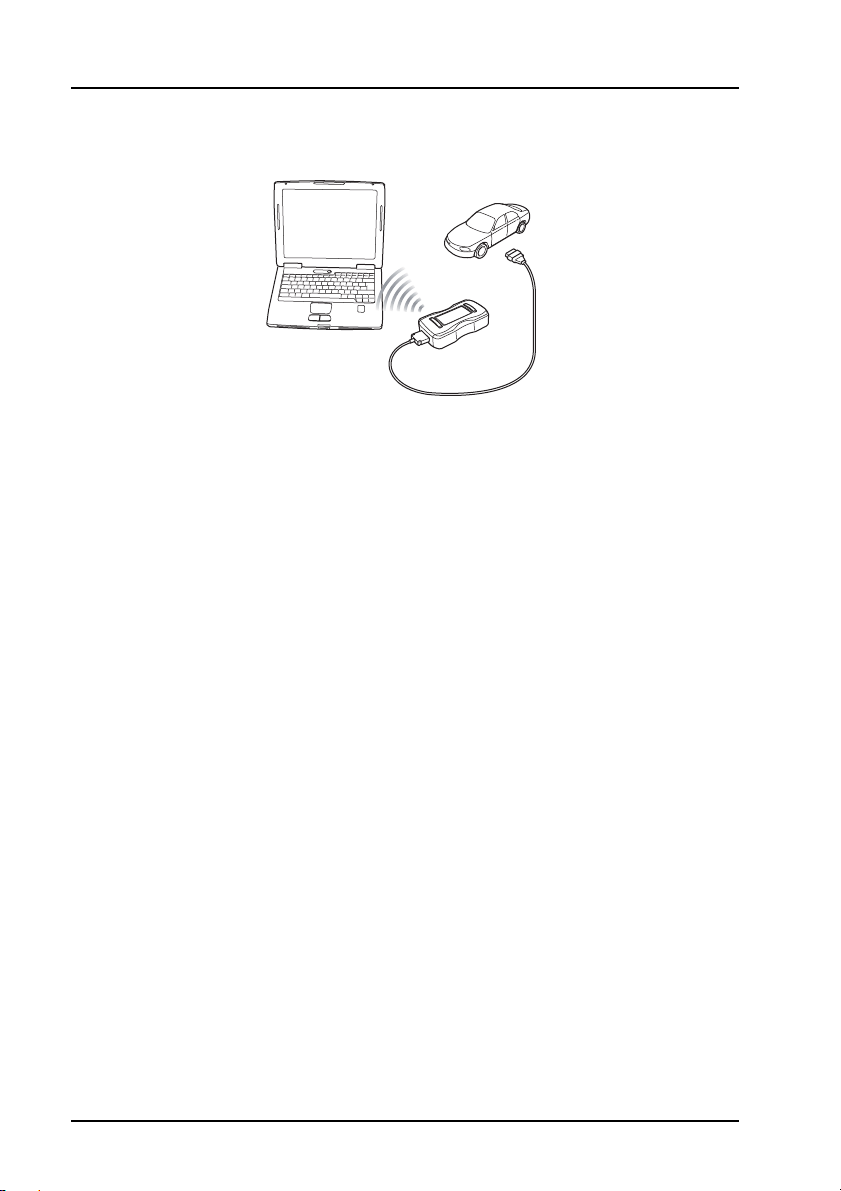
Bluetooth connection
1. Connect the EOBD cable to the Vehicle Interface.
2. Connectthe appropriate manufacturer diagnosticcable ifnecessarytothe EOBD
cable.
3. Connect the diagnostic cable to the vehicle’s diagnostic socket.
4. Double-press the Autodiagnos PC Pro icon on the desktop to launch the
software.
CR0238s
PC Pro Quick Start Guide.book Page 12 Monday, September 13, 2010 10:02 AM
Quick Reference Guide
13
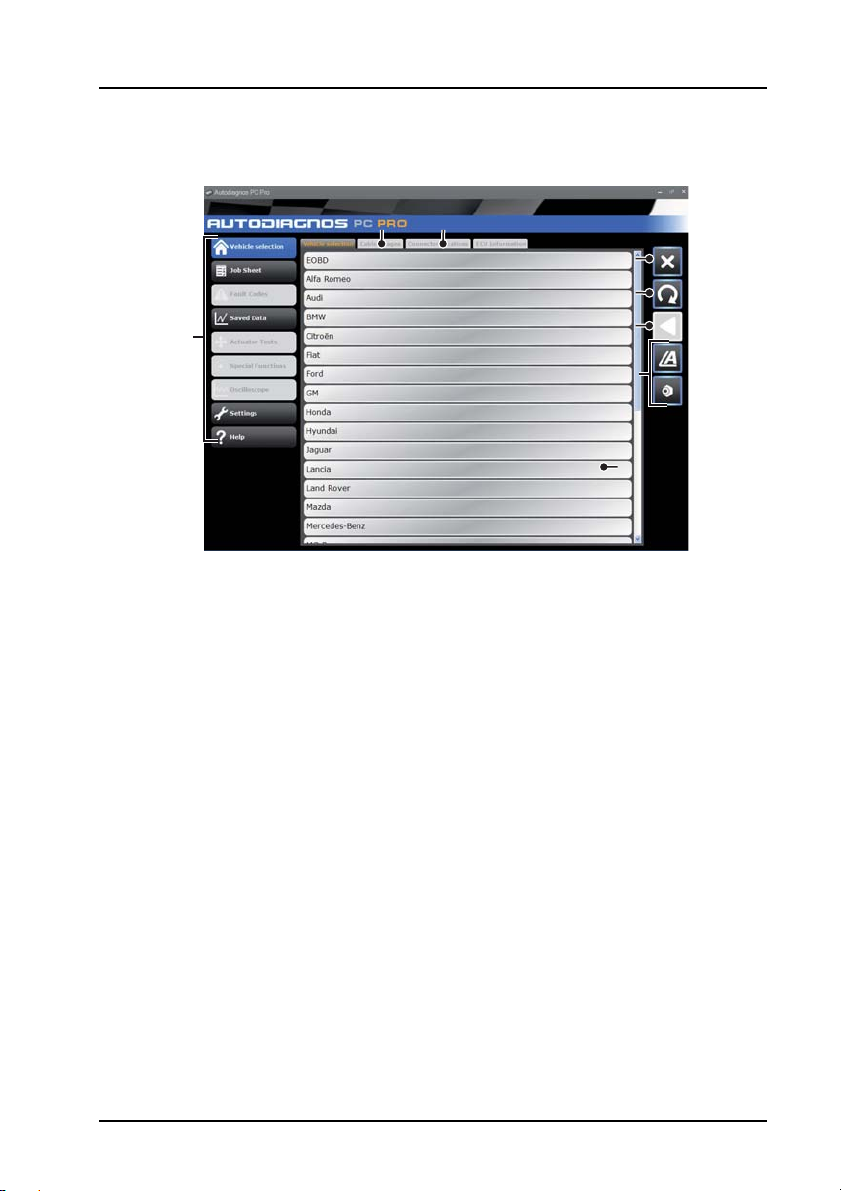
Using Autodiagnos PC Pro
1. Menu items
2. Vehicle/System selection
3. Exit the application
4. Restart vehicle selection
5. Return to previous screen
6. View technical data (where installed)
7. View cable images
8. View connector locations
The ‘Vehicle Selection’ screen is displayed when Autodiagnos PC Pro is started.
Each screen has a number of icons and buttons which control the diagnostic
functions.
Diagnostic cable drawings and connector locations can be viewed by pressing button
7 or 8 respectively.
Note: All tabs, buttons and icons are highlighted when available for use.
666
55
2
11
33
44
7788
AU0075
PC Pro Quick Start Guide.book Page 13 Monday, September 13, 2010 10:02 AM
Quick Reference Guide
14
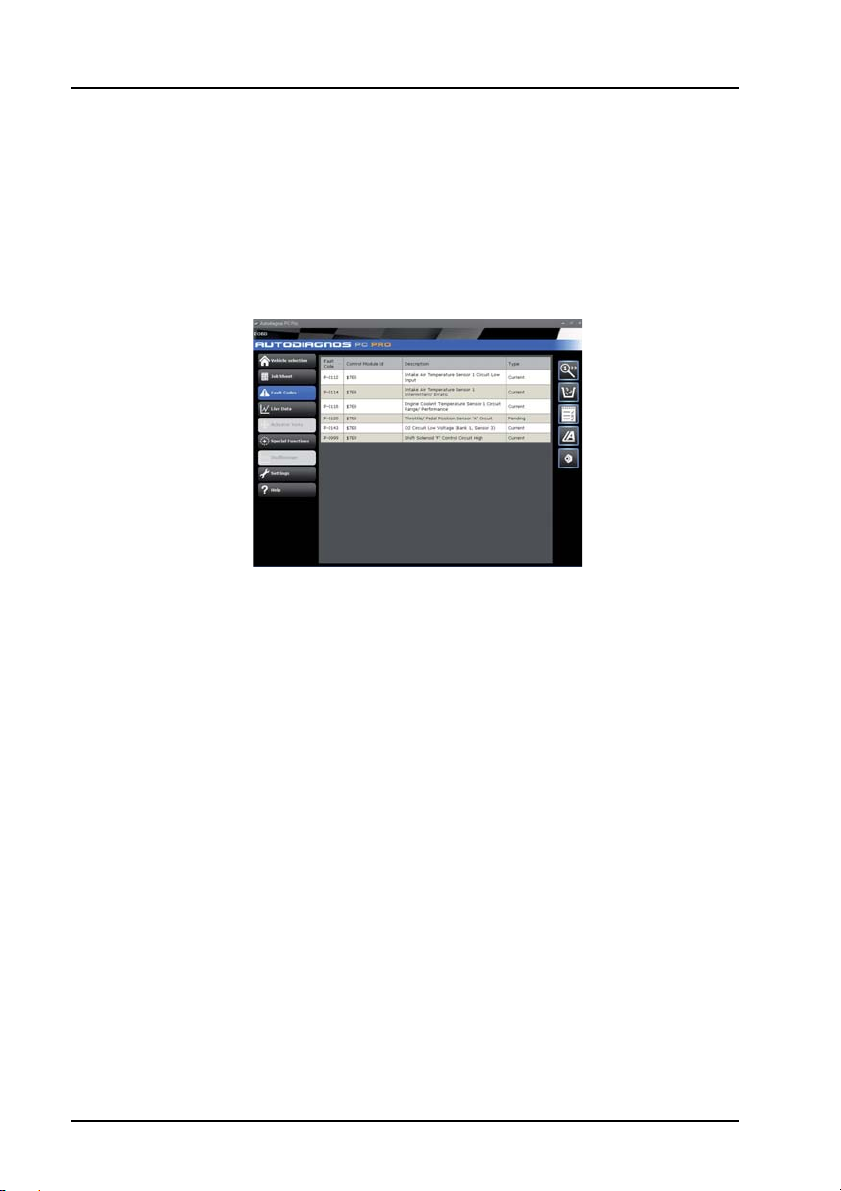
Starting a diagnostic session
1. From the ‘Vehicle Selection’ screen, select the relevant vehicle and then system
for diagnosis.These options will appear over a number of consecutive screens.
2. Selecting a system will automatically prompt the software to begin
communication.
3. The communication LED on the Vehicle Interface will begin to flash, confirming
that the Autodiagnos PC Pro software is connecting to the system.
4. When the vehicle is ready for diagnostic tests, the diagnostic menu items
become enabled.
AU0073s
PC Pro Quick Start Guide.book Page 14 Monday, September 13, 2010 10:02 AM

Quick Reference Guide
15
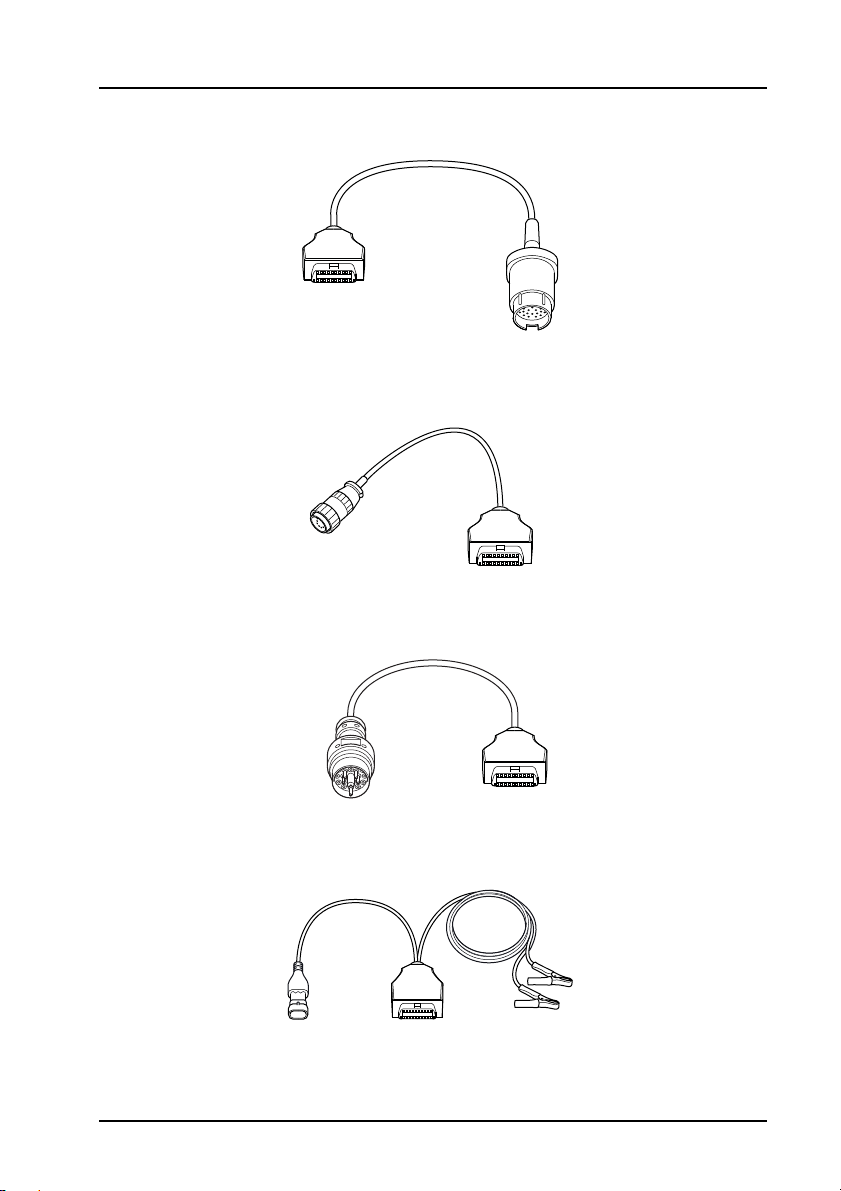
Cable identification
Standard cables
AS1215A USB cable
ASA32 EOBD cable
CR0226
CR0225
PC Pro Quick Start Guide.book Page 15 Monday, September 13, 2010 10:02 AM

Quick Reference Guide
16
Optional cables
ASA33 PSA adapter cable (2-pin)
ASA34 PSA adapter cable (30-pin)
ASA35 VAG adapter cable
CR0234
CR0231
CR0230
PC Pro Quick Start Guide.book Page 16 Monday, September 13, 2010 10:02 AM
Quick Reference Guide
17
ASA36 Mercedes adapter cable
ASA37 Mercedes Sprinter adapter cable
ASA38 BMW adapter cable
ASA39 Fiat/Alfa/Lancia Adapter Cable
CR0229
CR0227
CR0228
CR0235
PC Pro Quick Start Guide.book Page 17 Monday, September 13, 2010 10:02 AM

Inhalt
19
Kurzbedienungsanleitung
Einführung....................................................... 20
Produktsupport-Hotline.................................... 21
Software-CD.................................................... 21
Hardwarekonfiguration.................................... 22
Konfiguration des PC ...................................... 23
Erste Schritte................................................... 26
Verwendung von Autodiagnos PC Pro............ 28
Erkennung der Kabel....................................... 30
PC Pro Quick Start Guide.book Page 19 Monday, September 13, 2010 10:02 AM
Kurzbedienungsanleitung
20
Deutsch
Kurzbedienungsanleitung
Einführung
Herzlichen Glückwünsch zum Erwerb des Autodiagnos PC Pro Diagnosesystems.
Das System wird über die Diagnosebuchse des Fahrzeugs an die Steuermodule
angeschlossen und ermöglicht das Auslesen von Informationen aus den
verschiedenen Modulen.
Das Gerät lässt sich sowohl für Fahrzeuge ohne EOBD (European On-Board
Diagnostics) als auch für Fahrzeuge mit EOBD-System einsetzen
Hinweis: Alle MY-Fahrzeuge mit Benzinmotor nach 2000 bzw. MY-Fahrzeuge mit
Dieselmotor nach 2004 sollten EOBD unterstützen
Überblick
Das Kit enthält folgende Komponenten.
1. Tragekoffer mit Schaumstoffeinsatz
2. Vehicle Interface (Fahrzeugschnittstelle)
3. USB-Kabel
4. J1962 OBD-Kabel
5. CD
6. Kurzbedienungsanleitung
7. Netzteil
7
CR0239
1
5
6
2
4
3
PC Pro Quick Start Guide.book Page 20 Monday, September 13, 2010 10:02 AM

Kurzbedienungsanleitung
21
Produktsupport-Hotline
Alternativ können Sie die Autodiagnos-Website www.autodiagnos.com besuchen.
Hinweis: Für einen möglichst zügigen Produktsupport geben Sie bitte die
Seriennummer des Vehicle Interface an.
Software-CD
Installationshinweise
1. Legen Sie die CD in das CD-Laufwerk ein.
2. DerInstallationsvorgangaufderCD läuftin derRegel automatisch ab. Sollte dies
nicht der Fall sein, rufen Sie das CD-Laufwerk unter Windows Explorer auf und
doppelklicken Sie das Symbol 'Setup.exe'.
3. FolgenSiedenAnweisungen aufdemBildschirmzurInstallationder Anwendung
und akzeptieren Sie alle Voreinstellungen für die Standardinstallation.
4. Starten Sie den PC vor erstmaligem Gebrauch neu.
+44 (0)844 665 7623.
+44 (0)844 665 7624.
PC Pro Quick Start Guide.book Page 21 Monday, September 13, 2010 10:02 AM

Kurzbedienungsanleitung
22
Hardwarekonfiguration
Vehicle Interface (VI)
Diese Komponente fungiert als Schnittstelle zwischen dem zu prüfenden Fahrzeug
und der auf einem PC installierten Software.
Das VI verfügt über mehrere externe Verbinder, aber keine Schalter oder Tasten. Es
wird vom Bediener über den PC-Bildschirm betrieben.
LED teilen dem Bediener den Betriebsstatus des VI mit.
1. Kommunikation mit Fahrzeugsystemen
2. Stromversorgung
3. Status der USB-Verbindung
4. Status der Bluetooth-Verbindung
AU0022
2
2
2
4
4
3
3
1
1
PC Pro Quick Start Guide.book Page 22 Monday, September 13, 2010 10:02 AM
Other manuals for PC Pro
1
Table of contents
Languages:
Other Autodiagnos Diagnostic Equipment manuals

Popular Diagnostic Equipment manuals by other brands

Siemens
Siemens ACUSON P500 Quick reference guide

Midtronics
Midtronics GR8-1200 OEM instruction manual

BERNSTEIN
BERNSTEIN SRF DI Series Installation and operating instructions

TELEMED
TELEMED ArtUs EXT-1H user guide

VOLTCRAFT
VOLTCRAFT BS-16 USB operating instructions

Shenzhen
Shenzhen Auro OtoSys IM100 Tutorial


