manuals.online logo
Brands
  1. Home
  2. •
  3. Brands
  4. •
  5. Launch
  6. •
  7. Diagnostic Equipment
  8. •
  9. Launch CR529 User manual

Launch CR529 User manual

No Fa ult C od e Pen din g Fault C ode
Per man en t Fau lt C ode
I/M
OK
HELP
529
No Fa ult C od e Pen din g Fault C ode
Per man en t Fau lt C ode
I/M
OK
HELP
529
No Fa ult C od e Pen din g Fault C ode
Per man en t Fau lt C ode
I/M
OK
HELP
529
Quick Start Guide Guide de démarrage rapide Guía de Inicio Rápido
1. Update
The tool can be updated via USB cable.
Note: Make sure the computer has an Internet connection.
1. Go to and download the update tool to the
computer. Decompress and install it on your computer(compatible with
Windows XP, 7, 8 & 10).
2. After installation, connect one end of the USB cable to the USB port of the
computer, and the other end to the tool.
3.
5. Click [Upgrade] to start updating until the update is complete.
2. Start Diagnostics
2.1 Preparation
Turn the vehicle ignition on.
Vehicle battery voltage range should be 9-18Volts.
Throttle should be in a closed position.
2.2 Vehicle Connection
1. Locate vehicle's DLC socket: The DLC (Diagnostic Link Connector) is
usually located 12 inches from the center of the steering wheel, under or
around the driver's side for most vehicles. If the DLC cannot be found, refer
to the vehicle's service manual for the location.
2. Connect the diagnostic cable to the vehicle's DLC, the tool will be
automatically powered up.
3. The tool is now ready to work.
http://www.x431.com/CR529
Once the tool is powered up, launch the update tool on your computer, the
system starts reading the tool. Once it obtains the tool information, click
[Device Upgrade], a registration window will pop up.
4. Fill in the required information and click [Submit] to directly navigate to the
update center.
1.
1.
2.
3.
4.
2.
2.1



2.2
1.
2.
3.
Mise à jour
Allez sur http://www.x431.com/CR529 et téléchargez l'outil de mise à jour sur
votre ordinateur. Décompressez-le et installez-le sur votre ordinateur (
compatible avec Windows XP, 7, 8 et 10).
Après l'installation, connectez une extrémité du câble USB au port USB de
l'ordinateur et l'autre extrémité à l'outil.
Une fois que l'outil est mis sous tension, lancez l'outil de mise à jour sur votre
ordinateur, le système commence à le lire.
Cliquez sur [Mettre à niveau] pour lancer la mise à jour jusqu'à la fin de la
mise à jour.
Démarrage du Diagnostic
Préparation
Connexion du véhicule
Localisez la prise DLC du véhicule : Le connecteur DLC (connecteur de
liaison de diagnostic) est généralement situé à 12 pouces du centre du
volant, sous ou autour du côté du conducteur pour la plupart des véhicules.
Si le DLC ne peut pas être trouvé, reportez-vous au manuel d'entretien du
véhicule pour l'emplacement.
Connectez le câble de diagnostic au DLC du véhicule, l'outil sera
automatiquement mis sous tension.
L'outil est maintenant prêt à fonctionner.
L'outil peut être mis à jour via un câble USB.
Remarque: Assurez-vous que l'ordinateur dispose d'une connexion Internet.
Mettez le contact du véhicule.
Plage de tension de la batterie du véhicule doit être comprise entre 9 et
18Volts.
Le Papillon doit être dans une position fermée.
Une fois qu'il obtient les
informations de l'outil, cliquez sur [Mise à niveau de l'appareil], une fenêtre
d'enregistrement apparaîtra. Remplissez les informations requises et
cliquez sur [Soumettre] pour naviguer directement au centre de mise à jour.
1.
1.
2.
3.
4.
2.
2.1



2.2
1.
2.
3.
Actualizar
Vaya a http://www.x431.com/CR529 y descargue la herramienta de
actualización en su computadora. Descomprímala e instálela en su
computadora (compatible con Windows XP, 7, 8 y 10).
Tras la instalación, conecte un extremo del cable USB al puerto USB de la
computadora y el otro extremo a la herramienta.
Una vez que se enciende la herramienta, inicie la herramienta de
actualización en su computadora, el sistema comienza a leer la
herramienta.
Haga clic en [Actualizar] para iniciar la actualización hasta que se
complete la actualización.
Iniciar el Diagnóstico
Preparación
Conexión del Vehículo
Localice el enchufe DLC del vehículo: El DLC (Conector de Enlace de
Diagnóstico) generalmente está ubicado a 12 pulgadas del centro del
volante, debajo o alrededor del lado del conductor para la mayoría de los
vehículos. Si no se puede encontrar el DLC, consulte el manual de servicio
del vehículo para la localización.
Conecte el cable de diagnóstico al DLC del vehículo, la herramienta se
encenderá automáticamente.
La herramienta ya está lista para trabajar.
La herramienta se puede actualizar a través del cable USB.
Nota: Asegúrese de que la computadora tiene una conexión a Internet.
Encienda el encendido del vehículo.
El rango de voltaje de la batería del vehículo debe ser de 9-18 voltios.
El acelerador debe estar en una posición cerrada.
Una vez que obtenga la información de la herramienta, haga
clic en [Actualización del Dispositivo], aparecerá una ventana de registro.
Rellene la información necesaria y haga clic en [Enviar] para navegar
directamente al centro de actualizaciones.
Note: This Quick Start Guide is subject to change without written notice.
Remarque: Ce guide de démarrage rapide est sujet à changement sans avis écrit. Nota: Esta Guía de Inicio Rápido está sujeta a cambios sin previo aviso por escrito.
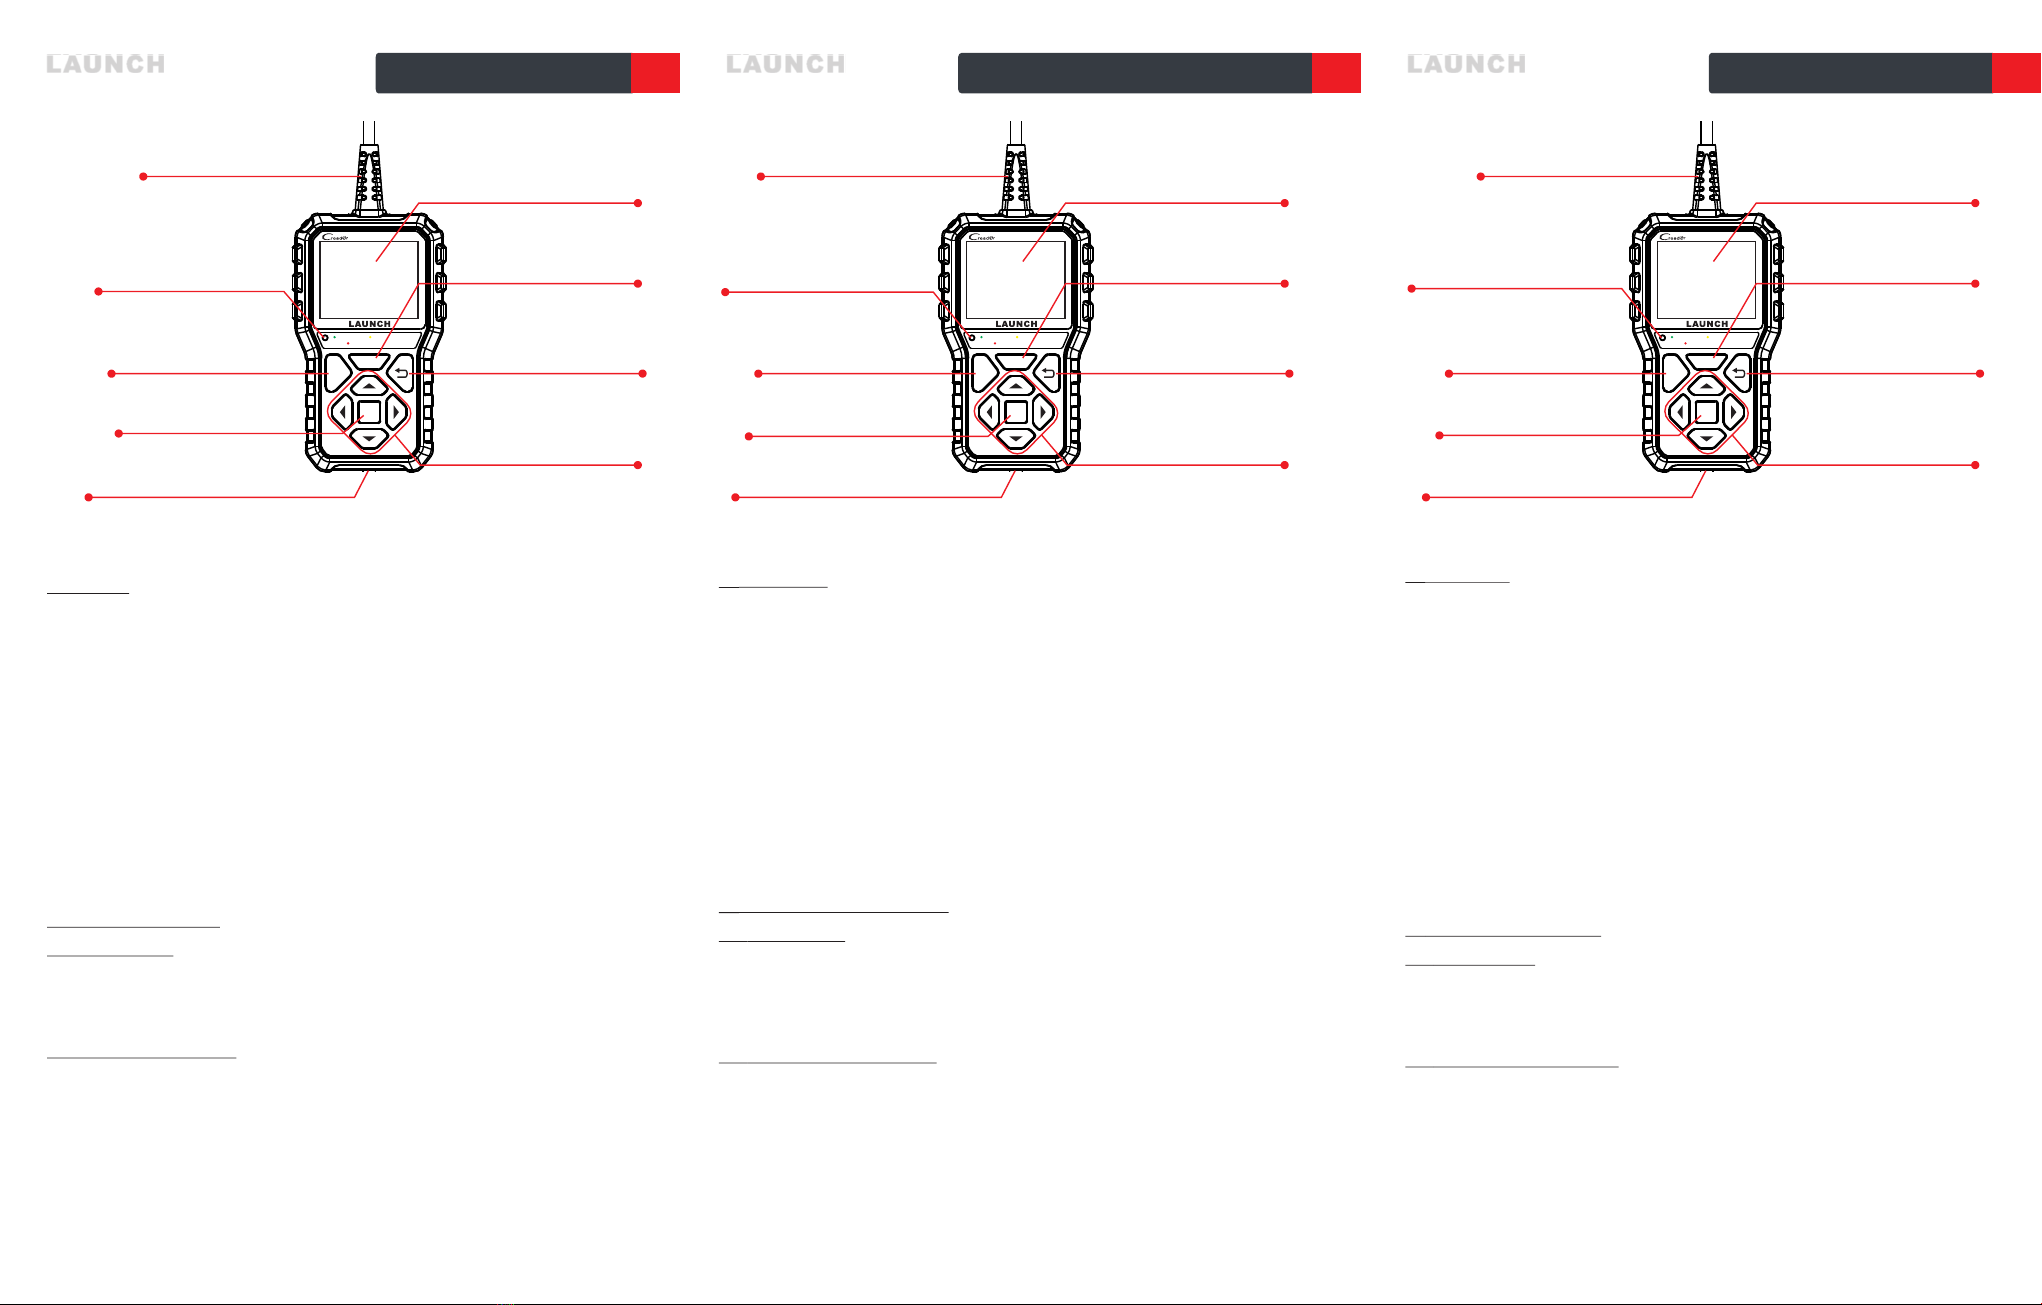
Diagnostic Cable Cable de Diagnóstico
LEDs for different DTCs LED para diferentes DTC
LED pour différents DTC
LCD Screen Pantalla LCD
I/M Button* Botón I/M*Bouton I/M*
ESC Button Bouton ESC
Selection Button Botón SelecciónBouton Sélection
Botón ESC
(Quick access to I/M
readiness function.)
(Acceso rápido a la función
de preparación de I/M.)
(Accès rapide à la fonction
de préparation I/M.)
(To return to the previous
screen.)
(
)
Pour revenir à l'écran
précédent.
(
)
Para volver a la pantalla
anterior.
(Connects the USB cable to PC for
device upgrade.)
(
)
Conecta el cable USB a la PC para
la actualización del dispositivo.
USB port Puerto USB
LAUNCH LAUNCH LAUNCH
Web: www.x431.com
Web: www.x431.com
Web: www.x431.com
EN FR ES
HELP Button* Botón HELP*Bouton HELP*
OK Button Botón OK
Câble de diagnostic
Écran LCD
Bouton OK
(
.)
Connecte le câble USB au PC pour
la mise à niveau du périphérique
Port USB
Note: The buttons marked with *
indicate the function hot keys
and only apply to Diagnostics.
Notas: Los botones marcados con *
indican las teclas rápida de función
y solo se aplican a Diagnóstico.
Remarque: Les boutons marqués avec
* indiquent les touches de raccourci
s'appliquent uniquement aux
Diagnostics.
Schnellstart-Anleitung Guida Rapida Краткое руководство
1. Update
1.
2.
3.
4.
2.
2.1



2.2
1.
2.
3.
Das Gerät ist über USB-Kabel aktualisierbar.
Hinweis: Stellen Sie sicher, dass Computer über eine Internetverbindung verfügt.
Schalten Sie die Zündung des Fahrzeugs ein.
Der Spannungsbereich der Fahrzeugbatterie sollte 9 - 18 Volt betragen.
Die Drosselklappe sollte sich in einer geschlossenen Stellung befinden.
Gehen Sie zu http://www.x431.com/CR529 und laden das Update-Tool auf
Computer herunter. Dekomprimieren und installieren Sie es auf Ihrem
Computer (kompatibel mit Windows XP, 7, 8 & 10).
Schließen Sie nach Installation ein Ende des USB-Kabels an den USB-
Anschluss des Computers und das andere Ende ans Gerät an.
Sobald das Gerät eingeschaltet ist, starten Sie das Update-Tool auf Ihrem
Computer. Das System beginnt mit dem Lesen des Geräts.
Klicken Sie auf [Upgrade], um die Aktualisierung zu starten, bis die
Aktualisierung abgeschlossen ist.
Diagnose starten
Vorbereitung
Fahrzeugverbindung
Finden Sie die DLC-Buchse des Fahrzeugs: DLC (Diagnostic Link
Connector) befindet sich normalerweise 12 Zoll von der Mitte des
Lenkrads entfernt unter oder um die Fahrerseite der meisten Fahrzeuge.
Wenn DLC nicht gefunden werden kann, beziehen Sie sich auf
Wartungshandbuch des Fahrzeugs für den Standort.
Schließen Sie das Diagnosekabel an DLC des Fahrzeugs an. Das Gerät
wird automatisch eingeschaltet.
Das Gerät ist jetzt einsatzbereit.
Wenn die
Geräteinformationen erhalten werden, klicken Sie auf [Geräte-Upgrade].
Ein Registrierungsfenster wird geöffnet. Geben Sie die erforderlichen
Informationen ein und klicken auf [Senden], um direkt zum Update-Center
zu navigieren.
1.
1.
2.
3.
4.
2.
2.1
2.2
1.
2.
3.
Aggiornare
Vai a http://www.x431.com/CR529 e scaricare il programma di
aggiornamento sul computer. Decomprimere e installare sul computer
(compatibile con Windows XP, 7, 8 & 10).
Dopo aver installato, collegare il cavo USB alla porta USB del computer, e
l'altra estremità allo strumeto.
Una volta acceso, avviare il programma di aggiornamento sul computer, il
sistema rileva lo strumento.
Tocca [Upgrade] per iniziare l'aggiornamento fino a quando
l'aggiornamento viene completo.
Avviare diagnostica
Preparazione
Collegamento del veicolo
Individuare presa DLC(Connettore collegamento dati) del veicolo: Il
DLC(Connettore collegamento dati) si trova di solito 12 pollici di distanza
al centro del volante, sotto o intorno lato del conducente per la maggior
parte dei veicoli. Se non riesci trovare il DLC, riferirsi al manuale di service
della vettura per la posizione.
Collegare il cavo diagnostico al DLC del veicolo, lo strumento sarà acceso
automaticamente.
Lo strumento è ora pronto per funzionare.
È possibile aggiornare lo strumento tramite il cavo USB.
Nota: Assicurarsi che il computer sia connesso a Internet.
Girare la chiave su marcia.
La tensione batteria del veicolo deve essere tra 9-18V.
Valvola a farfalla deve essere in una posizione chiusa.
Dopo aver ottenuto le informazioni sullo
strumento, premi su [Aggiornamento dispositivo], si apre un'interfaccia di
registrazione. Compilare le informazioni richieste e premi [Invia] per
accedere direttamente al centro di aggiornamento.
1.
1.
2.
3.
4.
2.
2.1



2.2
1.
2.
3.
Обновление
Вы можете обновить свой прибор с помощью USB-кабеля.
Внимание: Убедитесь, что компьютер подключен к Интернету.
Посетите интернет-сайт http://www.x431.com/CR529 и загрузите
средство обновления на компьютер. Распакуйте и установите его на
свой компьютер (Режим совместимости с Windows XP, Windows 7,
Windows 8 и Windows 10)
После установки подключите один конец кабеля USB к устройству, а
другой - к компьютеру.
После включения прибора запустите средство обновления на вашем
компьютере, система начнет читать средство. Когда-то получает
информацию об инструменте, нажмите [Обновление устройства],
появится окно регистрации. Заполните необходимую информацию и
нажмите [Отправить], чтобы прямо перейти в центр обновления.
Нажмите [Обновить],чтобы начать обновление, пока обновление не
будет завершено.
Начать диагностику
Подготовка
Включите зажигание автомобиля.
Напряжение аккумуляторной батареи автомобиля должно составлять
9-18 В.
Дроссельная заслонка должна быть закрыта.
Подключение к автомобилю
Найдите диагностическое гнездо автомобиля: На большинстве
автомобилей DLC обычно установлен в 12 дюймах от центральной
части приборной панели в водительской зоне. Если DLC не найден,
обратитесь к Инструкции по ремонту автомобиля, чтобы найти его
местоположение.
Подключите один конец диагностического кабеля к диагностическому
разъему DLC, инструмент будет автоматически включен.
Теперь инструмент готов к работе.
Hinweis: Die Schnellstart-Anleitung kann ohne schriftliche Ankündigung geändert
werden. Nota: Questa Guida rapida è soggetta a modifiche senza alcun avviso scritto. Внимание: Краткое руководство пользователя может быть изменено без
предварительного уведомления.
LAUNCH LAUNCH LAUNCH
Web: www.x431.com
Web: www.x431.com
Web: www.x431.com
DE IT RU
No Fa ult C od e Pen din g Fault C ode
Per man en t Fau lt C ode
I/M
OK
HELP
529
LED per diversi DTC I/M *-Taste
Auswahltaste
(Schneller Zugriff auf die
Funktion von I/M-
Readiness.)
HELP *-Taste
OK-Taste
Hinweis: Die mit * gekennzeichneten
Tasten zeigen die Funktionstasten an
und gelten nur für die Diagnosen.
ESC-Taste
(
)
Rückkehr zum vorherigen
Bildschirm.
Diagnosekabel
LCD-Bildschirm
(
)
Schließt das USB-Kabel an PC,
um das Gerät zu aktualisieren.
USB-Anschluss
No Fa ult C od e Pen din g Fault C ode
Per man en t Fau lt C ode
I/M
OK
HELP
529
Светодиоды для разных
кодов неисправностей Кнопка I/M*
Кнопка выбора
(
)
Для быстрого доступа к
I/M функции готовности.
Кнопка HELP*
Примечание: Кнопки, отмечены *,
означают функциональные
клавиши и применимы только к
диагностике.
Диагностический кабель
ЖК-дисплей
Кнопка OK
Кнопка ESC
(
)
чтобы вернуться к
предыдущему экрану.
(чтобы подключить USB-кабель
к ПК для обновления прибора.)
USB-порт
No Fa ult C od e Pen din g Fault C ode
Per man en t Fau lt C ode
I/M
OK
HELP
529
LED per diversi DTC Pulsante I/M*
Pulsante di selezione
(Accesso rapido alla funzione
di disponibilità I / M.)
Pulsante HELP*
Nota: i pulsanti contrassegnati con *
indicano i tasti di scelta rapida funzione
e si applicano solo a Diagnostica.
Pulsante ESC
(
)
Per ritornare alla
schermata precedente
Cavo diagnostico
Schermo LCD
Pulsante OK
(
)
Collega il cavo USB al PC per
aggiornare il dispositivo.
Porto USB
230mm
120mm
制作要求:
原始文件大小: 360mm 220mm, 按 输出, 折
后尺寸为120mmx220mm,风琴折,正反两面
印刷要求: 黑白印刷, 80g内页纸
x 1:1
每种语言都有一个语言标签位于折叠处,折叠时请注意对齐。

Other Launch Diagnostic Equipment manuals

Launch Creader Professional 233 User manual

Launch

Launch Creader Professional 233 User manual

Launch X-431 PROS MINI 3.0 User manual

Launch

Launch X-431 PROS MINI 3.0 User manual

Launch CRT 7 Series User manual

Launch

Launch CRT 7 Series User manual

Launch X-431 PAD V User manual

Launch

Launch X-431 PAD V User manual

Launch X-431 Turbo III User manual

Launch

Launch X-431 Turbo III User manual

Launch X431 V User manual

Launch

Launch X431 V User manual

Launch X-431 PADII User manual

Launch

Launch X-431 PADII User manual

Launch X-431 PRO3S+ User manual

Launch

Launch X-431 PRO3S+ User manual

Launch X-431 IMMO ELITE User manual

Launch

Launch X-431 IMMO ELITE User manual

Launch X-431-IMMO Pad User manual

Launch

Launch X-431-IMMO Pad User manual

Launch X-431 PADII User manual

Launch

Launch X-431 PADII User manual

Launch Creader Professional CRP129E User manual

Launch

Launch Creader Professional CRP129E User manual

Launch TS971 User manual

Launch

Launch TS971 User manual

Launch CReader Professional CRP329 User manual

Launch

Launch CReader Professional CRP329 User manual

Launch CRT 511S User manual

Launch

Launch CRT 511S User manual

Launch X-431 PROS V4.0 User manual

Launch

Launch X-431 PROS V4.0 User manual

Launch J-Box 3 User manual

Launch

Launch J-Box 3 User manual

Launch X-431 PAD V ELITE User manual

Launch

Launch X-431 PAD V ELITE User manual

Launch X-431 PADII User manual

Launch

Launch X-431 PADII User manual

Launch X431 V User manual

Launch

Launch X431 V User manual

Launch X-431 V+ User manual

Launch

Launch X-431 V+ User manual

Launch X-431 GDS User manual

Launch

Launch X-431 GDS User manual

Launch X-431 PADII User manual

Launch

Launch X-431 PADII User manual

Launch CRP919E User manual

Launch

Launch CRP919E User manual

Popular Diagnostic Equipment manuals by other brands

Pro-tec PRS 500 C Instructions for use

Pro-tec

Pro-tec PRS 500 C Instructions for use

idi Aspect ISR Q-CARD Operator's manual

idi

idi Aspect ISR Q-CARD Operator's manual

Peak PCAN-Diag FD quick start guide

Peak

Peak PCAN-Diag FD quick start guide

Cognivue Thrive user manual

Cognivue

Cognivue Thrive user manual

SKF TMST 3 Instructions for use

SKF

SKF TMST 3 Instructions for use

Foxwell VS300 quick start guide

Foxwell

Foxwell VS300 quick start guide

Drew Technologies opus IMclean DAD4 manual

Drew Technologies

Drew Technologies opus IMclean DAD4 manual

A.E.B. AEB214 PLUS instruction manual

A.E.B.

A.E.B. AEB214 PLUS instruction manual

Xtool D1 Pro manual

Xtool

Xtool D1 Pro manual

Innova 7111 Smart user manual

Innova

Innova 7111 Smart user manual

Ohlins FCX 0301 Mounting instructions

Ohlins

Ohlins FCX 0301 Mounting instructions

ChestPal LungPass Pro quick start guide

ChestPal

ChestPal LungPass Pro quick start guide

Mitchell Diagnostics MD-500 user manual

Mitchell Diagnostics

Mitchell Diagnostics MD-500 user manual

Fcar F9S Series user manual

Fcar

Fcar F9S Series user manual

KONEXIAL MY20 Driver manual

KONEXIAL

KONEXIAL MY20 Driver manual

Parker PL-8 quick start guide

Parker

Parker PL-8 quick start guide

Hella Gutmann mega macs 42 SE operating instructions

Hella Gutmann

Hella Gutmann mega macs 42 SE operating instructions

Primes FocusParameterMonitor FPM 60 Original instructions

Primes

Primes FocusParameterMonitor FPM 60 Original instructions

manuals.online logo
manuals.online logoBrands
  • About & Mission
  • Contact us
  • Privacy Policy
  • Terms and Conditions

Copyright 2025 Manuals.Online. All Rights Reserved.