Automatic Products Showcase 748 User manual

APi 748 V1.1 406 1.1 P/N 77500001
AUTOMATIC PRODUCTS international, ltd.
SERVICE MANUAL
OPERATING MANUAL
PARTS MANUAL
PLEASE DO NOT
REMOVE MANUAL
FROM MACHINE.
75 West Plato Boulevard ●St. Paul, Minnesota 55107-2095
R

APi 748 V1.1 406 1.2 P/N 77500001
Fast Track Links
Description
Troubleshooting
Service Modes
Maintenance
Parts Drawings

APi 748 V1.1 406 1.3 P/N 77500001
Section 1
Warranty 1.1
How to use manual 1.2
Installation 1.3 – 1.4
Section 2 - Description
Introduction 2.1 – 2.3
Major Components 2.4 – 2.5
Operation 2.6 – 2.7
Programmable Options 2.7 – 2.10
Section 3 – Service Mode
Introduction 3.1
Service Mode Map 3.2
Accessing Service Modes 3.3
Coin Mech Inventory 3.4 – 3.5
Options 3.6 – 3.8
Price – Shelves 3.9 – 3.11
History 3.12 – 3.15
Cash System Type 3.16 – 3.21
Set Up 3.22 – 3.25
Audit Data 3.26
Security Code 3.27 – 3.28
Diagnostics 3.29 – 3.33
Section 4 – Troubleshooting
Introduction 4.1
Control Systems 4.1 – 4.3
Boards 4.1
Serial Communications 4.1
Indicator LEDS 4.2 – 4.3
Printer Set Up 4.4
Error Messages 4.4
History Log 4.4
Turret Motor Errors 4.5
Power-Up Initialization 4.5
Refrigeration 4.6 – 4.9
Error Messages 4.10 – 4.11
History Events 4.12
Troubleshooting Charts 4.13 – 4.17
Section 5 – Maintenance
Introduction 5.1
Delivery Door Operation 5.1
Checking Refrigeration System 5.1
Turret Removal 5.2
Delivery Door Removal 5.2
Cleaning 5.3
Section 6 – Parts
Parts Drawings 6.1 -6.36

APi 748 V1.1 406 1.1 P/N 77500001 Back
WARRANTY
Automatic Products international ltd. (APi) expressly warrants these automatic merchandisers (the "Unit"),
manufactured by it, to be free under normal use and service from defects in material or workmanship for a
period of two (2) years from the date of delivery of this Unit to the original purchaser. This warranty extends
only to the original purchaser of the Unit. The exclusive remedy for this warranty is limited to the repair or
replacement, at APi's sole option, of any part or parts of the Unit that are returned to APi or to the authorized
dealer or distributor of APi from whom the unit was purchased with all transportation charges prepaid, and
which, on APi's examination, shall, conclusively appear to have been defective. This warranty does not:
a. extend to any Unit, or part thereof, that was subjected to misuse, neglect, or accident by other than APi
after its delivery to the original purchaser;
b. extend to any Unit, or part thereof, that was modified, altered, incorrectly wired or improperly installed by
anyone other than APi or used in violation of the instructions provided by APi;
c. extend to a Unit which has been repaired or altered by anyone other than APi or authorized dealer/
distributor;
d. extend to a Unit which has had the serial number removed, defaced or otherwise altered;
e. extend to plastic or glass windows, lamps, fluorescent tubes and water contact parts;
f. extend to any unit used outdoors
g. extend to accessories used with the Unit that were manufactured by some person or entity other than
APi.
APi DISCLAIMS ALL OTHER WARRANTIES OF ANY KIND AS TO THE UNIT AND ALL WARRANTIES
OF ANY KIND AS TO ANY ACCESSORIES. THIS DISCLAIMER OF WARRANTIES INCLUDES ANY
EXPRESS WARRANTIES OTHER THAN THE LIMITED WARRANTY PROVIDED ABOVE AS TO THE
UNIT AND ALL IMPLIED WARRANTIES OF MERCHANTABILITY AND FITNESS FOR A PARTICULAR
PURPOSE AS TO THE UNIT AND ANY ACCESSORIES. UNDER NO CIRCUMSTANCES SHALL APi BE
RESPONSIBLE FOR ANY INCIDENTAL, CONSEQUENTIAL OR SPECIAL DAMAGES, LOSSES OR
EXPENSES ARISING FROM OR IN CONNECTION WITH THE USE OF, OR THE INABILITY TO USE, THE
GOODS FOR ANY PURPOSE WHATSOEVER. No representative of APi or any other person is authorized
to assume for APi, or agree to on the behalf of APi, any other liability or warranty in connection with the sale
of this Unit.
APi reserves the right to make any changes or improvements in its products without notice and without
obligation, and without being required to make corresponding changes or improvements in Unit theretofore
manufactured or sold.
Should you have any questions pertaining to this manual or the vendor, please contact your APi distributor or
write directly to:
Technical Services Dept.
Automatic Products int’l
75 W. Plato Blvd
St Paul Minnesota 55107 USA
© 2003 Automatic Products international, ltd

APi 748 V1.1 406 1.2 P/N 77500001 Back
This manual provides detailed information regarding the unpacking, setup, installation, and programming and
operation of the Automatic Products international 748 Showcase cold food merchandiser. Please read and
understand the contents of this manual before attempting to setup and install the machine.
HOW TO USE THIS MANUAL
This manual is divided into four basic parts:
1. Unpacking and installation.
2. Components.
3. Optional Equipment
4. Quick Set up Guide.
5. Troubleshooting.
CAUTION: Certain procedures in both the operating section and the service
section require that voltage be on in the machine. Only trained personnel
should perform this function. Exercise extreme caution while performing these
procedures. These procedures will be marked with the lightening bolt symbol
as it appears at left.
CAUTION: Certain procedures in both the operating section and the service
section requires a qualified trained technician to perform the particular task at
hand. These procedures will be marked with the exclamation symbol as it
appears at left.
Explanation of Serial Number
7 4 8 0 3 3 6 5 0 0 1
ÏÏ
Sequential build number
Starts at 001 every day.
Ï
Numerical day of the year – Jan 1st = 001, Dec 31 = 365.
Ï
Year 03 – Last two digits of the year.
First digits indicates model, example shown is a 748 Showcase Merchandiser – The machine identification may
contain up to six characters dependent upon the model.
Prefixes
E – Indicates a machine built specifically for export outside of North America.
CAUTION: This machine is designed for indoor usage only. Any
other usage may void the Manufacturers Warranty.

APi 748 V1.1 406 1.3 P/N 77500001 Back
Section 1: Installation
INTRODUCTION
This section contains instructions for unpacking
the APi 748 Showcase® Merchandiser and
installing it on location. It is important for ease of
service, reliability, and safety that you install the
machine properly.
UNPACKING INSTRUCTIONS
The APi 748 is shipped in one carton with all
major assemblies in place, ready for installation.
The shipping carton should be opened carefully to
prevent the 748 from being scratched or
damaged. Inspect the exterior and interior of the
cabinet for evidence of damage. If evidence of
damage exists, notify the delivering carrier at once
to examine the 748 regardless of the external
condition of the carton. Under U.S. regulations,
damage claims must be collected from the
consignee. Do not return shipping-damaged
merchandise until after your claim has been
established. Once your claim has been
established, damaged merchandise may be
returned to an authorized distributor for repair.
The invoice for repair charges may then be
collected from the carrier. Do not destroy packing
material or boxes until the carrier’s agent has
examined them.
SETUP INSTRUCTIONS
1. Place the unit in a well-ventilated location with
a minimum of SIX INCHES between the 748
and a back wall.
2. Remove all tape and packing material from the
cabinet.
3. The 748 must be leveled. Perform level
adjustment by using the following illustration:
Place level in the (A) position and adjust the
bottom leg levelers. Perform same on position
(B) then (C).
Figure 1-1. Level Adjustment
4. Ensure that circuit breakers are firmly in place
and the fluorescent lamps are secure in their
sockets.
5. Ensure that the Main Power Switch is in the
OFF position.
6. Plug the line cord into a dedicated, properly
grounded receptacle capable of delivering the
required power.
7. Install a supported coin changer (see chart
below).
a) Check coin chute alignment
b) Check coin return lever operation
c) Adjust if necessary
8. Install a bill acceptor if desired. Note: If you use
a MDB coin mech, you must use a MDB bill
acceptor or card reader. (See chart below).
9. If using FIFO mode, insert the selection
number labels in the corresponding Delivery
Doors. From top to bottom, the door
numbering convention is: 01, 02, 03, 04, 11,
12, 13, 14, 21, 22, 23. You only need to label
those shelves you intend to operate in the
FIFO mode.
10.Check and ensure that all electrical
connections are seated properly, especially at
the circuit boards.
CAUTION! Pushing or
sliding the 748 (by hand) on
the floor can result in
considerable damage to the
machine and/or personal
injury. Always use
appropriate material
handling equipment and
adequate protective
padding to protect the 748.
DOOR
Place level in position A, and adjust the bottom
leg levelers, and repeat in positions B & C
BC
A
CAUTION – DO NOT
DEFEAT THE SAFETY
GROUND
CAUTION! If the 748 is not
leveled correctly the
refrigerator evaporator may
ice up, causing the unit to
shut down.

APi 748 V1.1 406 1.4 P/N 77500001 Back
11. Turn the Main Power Switch ON (leaving Coin
Compartment and Main Doors open).
12. At power-up the following sequence of
displays should occur:
a) The Column Price Displays will show from
top to bottom:
“11111” “99.95”
“22222” “99.95”
“33333” “99.95”
“44444” “99.95”
“55555” “99.95”
“66666” “99.95”
“77777” “99.95”
“88888” “99.95”
“99999” “99.95”
“AAAAA” “99.95”
“bbbbb” “99.95”
Note: After you’ve set the prices, the actual
prices will be displayed.
b) The Message Center should display:
1) “748 DISPLAY Vx.xx” (x.xx=version of
Message Center software), then
2) “API INTERNATIONAL”, then
3) “SHOWCASE MERCHANDISER”
4) “748 VERSION x.xx” (x.xx=version of 748
Machine Controller) then
5) “ONE MOMENT”, then
6) “- - - TURN TILL ZERO - - -”, Press
[RESET] key on Message Center.
Display should change to
“- - - MACHINE OK - - -”.
*If other messages appear than those listed
above, refer to page 3-2 to process those
messages, then proceed to the next step.
13. Check that all fluorescent lamps are
illuminated.
14. Check the Service Switch operation by
rotating the turret one full rotation.
15. Close the main door.
16. Ensure that both the LEDs on the 748
Machine Controller are lit.
17. Perform a full initialization to reset the
machine to factory default settings.
a) Press MODE switch if Display does not read
“- - - SERVICE MENU - - -”.
b) In the Service menu, press [0], [0], [1], [0].
c) After each key press the display will show:
“- - - DIAGNOSTICS - - -”
“FULL INITIALIZATION NO”
“FULL INITIALIZATION YES”
“- - - - - - - - - - - - - - - - - - - -”
NOTE: The main door must be closed to prevent
an error message from occurring.
18. Program the Cash System Type for the type of
coin changer and/or bill validator you will be
using (see page 3-7 of Section 3).
19. Power the 748 OFF then back ON.
20. Finish setting up the Cash System options
(see Section 3).
21. Ensure the RL Tx LED on the Credit Module is
flashing. Ensure the STATUS LED on the
Credit Module is operating correctly (refer to
Credit Module Indicators in Section 4).
22. Set up prices and options (see Section 3).
Micro Mech
24V 15 pin2
Pulse Validator 24 V Executive3MDB Coin Mechanism 1MDB Bill
Validator
Mars TRC-6010XV
VN4010XV
VN2502-U5E
VN2512-U5E
VFM1-L2-U4C
VFM3-L2-U4C
540
560
TRC-6510
TRC-6512
VN-4510
VN2502-U5M
VN2512-U5M
CoinCo 9302 LF
USD-L701
USQ-L701
BA32SA
BA32R
9302-GX,
USQ-G701
USO-G703
USQ-L701
BA32SA
BA32R
Conlux USLX-001-01F
USLZ-004-01F
CCM 5 G
USLZ-004-01F
Notes:
1. MDB Protocol - Use Harness R-28203401
2. Logic Protocol (“Dumb”)
3. Executive Protocol - Use Harness R-28203301

APi 748 V1.1 406 2.1 77500001 Back
Section 2: Description
INTRODUCTION
The 748 Showcase® Merchandiser has a maximum capacity of 154 items. It is capable of 3-level pricing and
3-level discounts controlled through Event scheduling. Individual selections can be reserved and sold on
specific or multiple shifts. The 748 Machine Controller permits individual programming to vend either FIFO
(First In/First Out) mode or Shopper mode by shelf. See the sections on Options and Service Mode for
instructions on setting prices and various options.
The Message Center uses point-of-sale messages to help customers make purchases while the 748
Machine Controller collects and accumulates audit information.
In the event of a system malfunction the 748 Machine Controller saves a history of specific events,
temperatures, and error messages which will help to quickly isolate the problem and return the vendor to
service.
Hot Keys
Several hot keys are used to display specific information from the outside of the while the machine is
running. A hot key sequence is performed by first pushing and holding the [RESET] key then pushing a
number key. Hot keys are defined as:
Hot Keys
Reset + Display Shows
0 Display machine ID number MACHINE ID 12345678
1 Display food compartment temperature TEMP = xxF xxC C
2 Display health control status HEALTH CONTROL ON
3 Display error time and date (if shutdown) OFF hh.mm AM mm-dd-yyyy
4 Not used
5 Display time and day hh.mm AM DAY
6 Display date mm-dd-yyyy
7 Not used
8 Display 748 software version number CONTROL MODULE xx.xx
9 Display serial number SERIAL # 12345678

APi 748 V1.1 406 2.2 77500001 Back
Figure 2-1:
Front View
Figure 2-2:
Coin Mech Compartment Door
Shown in Open Position

APi 748 V1.1 406 2.3 77500001 Back
Figure 2-3:
Main Door
Open View
Figure 2-4:
Power Supply Panel
Shown in Open Position

APi 748 V1.1 406 2.4 77500001 Back
MAJOR COMPONENTS
748 Machine Controller
The 748 Machine Controller controls and monitors
the 748’s performance. It also:
keeps track of real time
controls the vend process
monitors food compartment temperatures
stores prices, option settings, and scheduled
events
records specific events and error messages
accumulates cash and sales data
controls the other four major components:
Message Center
Credit Module
Column Price Displays
Refrigeration/Turret Module
Message Center
The Message Center contains a 20-character
vacuum fluorescent display for customer
messages and prompts, turret rotation keys, and
selection number keys. The selection number
keys are also used in Service Mode to perform
service mode functions.
Credit Module
The Credit Module will interface the 748 Machine
Controller to various credit devices including coin
changers, bill validators, and card readers. It can
support several different credit device interfaces
including pulse, serial, MDB, and Protocol A.
Column Price Displays
The Column Price Displays are the five-digit
vacuum fluorescent displays down the center
column of the machine. These displays will show
pricing and status of selection compartments.
Refrigeration/Turret Module
The Refrigeration/Turret Module controls the
modular refrigeration unit in the 748 and reports
the temperature to the 748 Machine Controller. It
also drives and monitors the turret motor and half
cycle switch as commanded by the Machine
Controller.
Main Power Switch Assembly
This assembly is located in the bottom left corner
of the cabinet. It houses the Main Power ON/OFF
switch along with the Refrigeration Interlock
Power Switch, a switch which opens the
refrigeration circuit to prevent frost buildup
whenever the main door is open. It also contains
two circuit breakers to protect the machine from
an overload.
Service Switch
This switch is located along the inside edge, on
the hinge side of the Main Door. It is a momentary
rocker switch that can be used to rotate the turret
when cleaning or filling the machine with product.
Main Door Interlock Switch
This switch is located on the inside of the main
door near the cash box. It will open when the main
door is open or ajar. This switch must be closed
when the coin mech compartment door is closed
to prevent an error.
Storage Shelf Assemblies
A four-shelf storage rack is located along the right
wall of the cabinet. This rack is intended to store
nonperishable pre-cooled products to be used at
the next servicing.
Turret
The turret can be rotated in both directions using
the turret rotate keys on the Message Center. At
each subsequent power up, the turret
automatically rotates until the 748 Machine
Controller senses that the turret is at the “home”
position. If the turret is already “home” or any door
is open (delivery, main or coin mech
compartment), it will not rotate on power up.
Electronic Digital Thermometer
The electronic temperature sensor is located in
the return air compartment of the evaporator
under the evaporator screen. The temperature
sensor is used to monitor the temperature of the
cabinet interior (food compartment) by the
Refrigeration/Turret Module, which in turn,
controls the refrigeration unit and reports the
temperature to the 748 Machine Controller. The
Machine Controller uses the reported temperature
to run the Health Control feature. Should the
Refrigeration/Turret Board fail, the temperature is
controlled by manual thermostat located on the air
return plenum of the refrigeration unit.
To read the interior cabinet temperature while the
machine is running in the vend mode, push HOT
KEY 1 (push and hold the [RESET] button then
push the [1] button).
See page 2.1 for a description of all Hot Keys.

APi 748 V1.1 406 2.5 77500001 Back
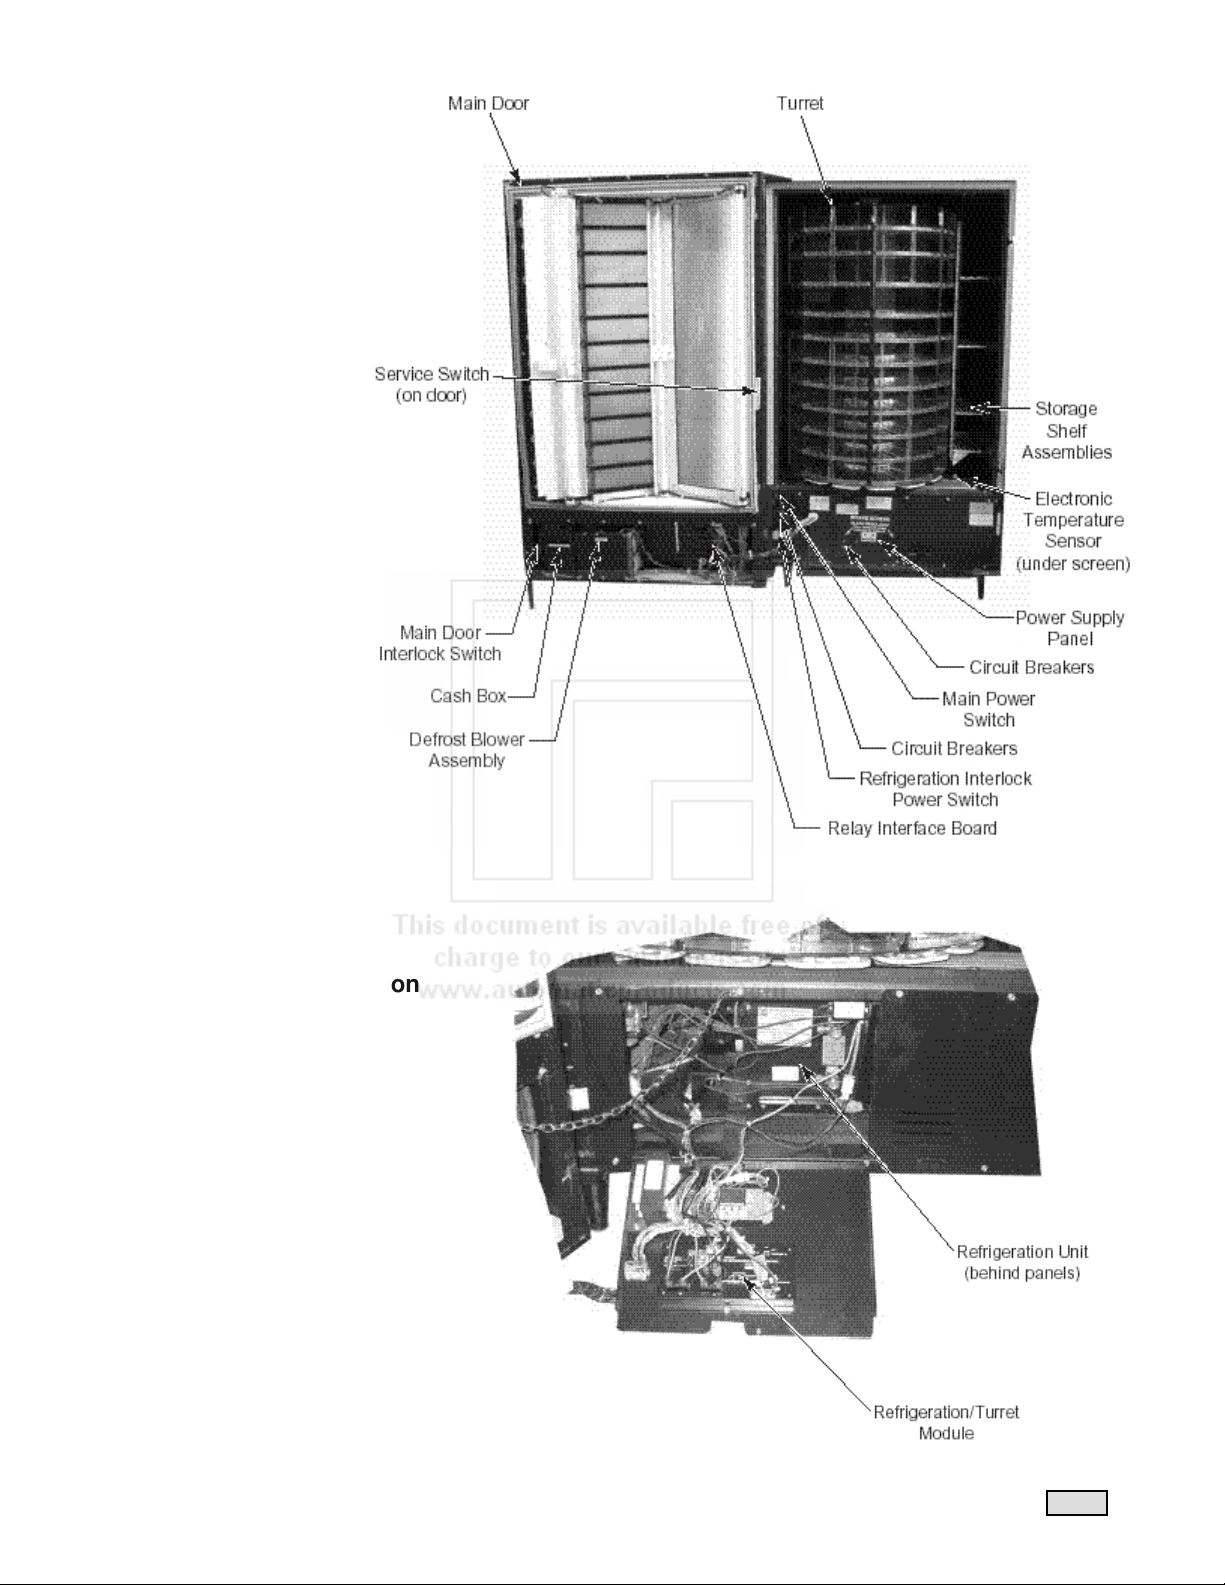
Relay Interface Board
Located on the inner front door near the lower hinge,
this board contains the energy control relay for the
door heaters, the turret motor interlock relay, and the
lights relay. It also provides rectified 24VDC for coin
mechanisms and rectified and filtered 24VDC used
to power all of the logic boards.
Delivery Door Defrost Blower
To prevent fogging in high humidity environments, a
defrost blower and heater system is provided (see
Figure 2-3). This blower can be switched off in low
humidity environments to save on energy
consumption.
Energy Control
The heating element in the Defrost Blower unit is
controlled by the Energy Control Relay and is
switched off whenever the refrigeration compressor
is on. The electric heater for the frame of the heated
glass window is also controlled in the same manner.
This system provides adequate protection against
window/delivery door fogging, and at the same time
reduces energy consumption.
REFRIGERATION
Electrical
The self-contained refrigeration system is designed
to slide in and out of the 748 as one complete
assembly. A normal 3-pin AC power cord supplies
power to the refrigeration system. The evaporator
blower runs continuously while AC power is applied,
regardless of the temperature in the food
compartment. The condenser fan runs only when the
compressor is running. The compressor and
condenser fan are controlled by a relay on the
Refrigeration/Turret Module.
When the main door is opened, the Refrigeration
Interlock Power Switch opens, turning off power to
the refrigeration system. When the main door is
closed, the evaporator blower starts immediately, but
there is a one-minute time delay before the
condenser fan and compressor will be turned on.
This delay reduces high torque starting of the
compressor due to rapid ON/OFF cycling.
Electronic Temperature Sensor
As described above, the temperature sensor is
located in the return air compartment of the
evaporator under the evaporator screen.
NOTE: The compressor control processing is
controlled by the Refrigeration/Turret Module and is
independent of the health control processing which
the 748 Machine Controller handles. If the 748 goes
out of service, the compressor control processing will
continue to operate.
The temperature sensor is a solid-state temperature
transducer. This temperature sensor converts
temperature to voltage, which is monitored by the
Refrigeration/Turret Module. The temperature is
transferred to the 748 Machine Controller where it is
used for Health Control processing.
Compressor Algorithm
The compressor will turn on one minute after closing
the main door and will stay on for 20 minutes or until
the food compartment temperature falls below the
low temperature range setting. If the temperature
does not reach the low setting within 20 minutes, the
compressor will turn off for two minutes then turn
back on for another 20-minute period. This 20-
minute on, two-minute off cycle will continue until the
food compartment temperature falls below the low
temperature range setting.
Once the temperature in the food compartment falls
below the low temperature range setting, the
compressor will turn off for at least three minutes.
After three minutes, if the temperature rises above
the high temperature range setting, the compressor
will turn on for no more than 30 minutes.
Health Control
After opening and closing the main door, the
machine has 30 minutes in which to bring the
cabinet interior (food compartment) temperature
below the maximum temperature range setting. If
the temperature is still above the maximum
temperature setting, a 15-minute grace period
begins. If this grace period finishes and the
temperature is still above the maximum temperature
range, the machine will go out of service.
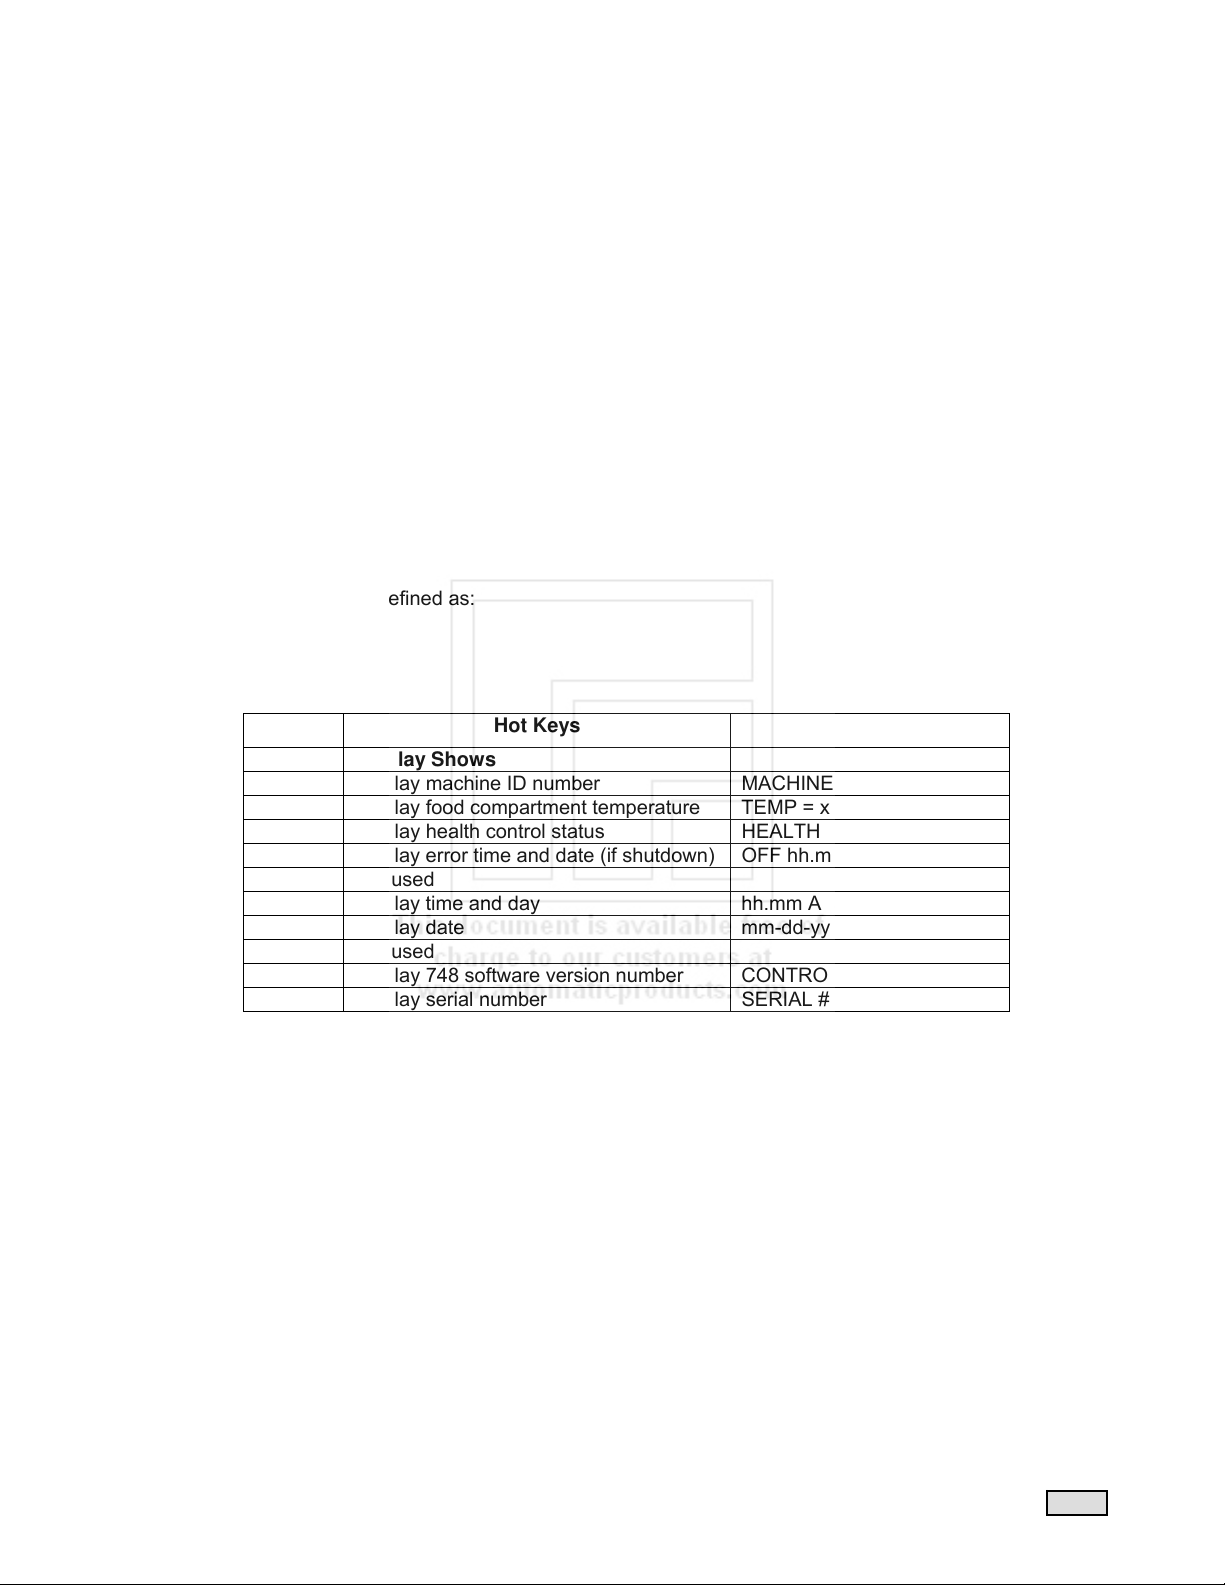
To display the amount of time remaining in the pull
down period, press hot key 2. “HEALTH DELAY XX
MIN” will appear on the display, where XX is the
number of minutes remaining from the original 30-
minute limit.
After the 30-minute pull down period expires or the
food compartment temperature reaches 41°F,
pressing hot key 2 will display “HEALTH CONTROL
ON”. This indicates that the food compartment
temperature is being monitored per Section 700 of
the NAMA Construction Standard for Refrigerated
Food Vending Machines.
If the machine should exceed the NAMA food
compartment temperature requirements, it will
shut down with a “HEALTH TIME OUT” error. To
reset a “HEALTH TIME OUT” error, you must first
clear the error then open and close the main door.

APi 748 V1.1 406 2.6 77500001 Back
OPERATION
Normal 748 machine operation will find the 748
food compartment within the storage temperature
range, fluorescent lamps lit, all delivery doors
locked, column price displays showing the prices
of each adjacent compartment, and the Message
Center scrolling the point-of-sale message.
Point-of-Sale Messages
The Message Center will display several
messages to the customer during the vend
process. Each possible message is described
below.
INSERT MONEY - MAKE SELECTION - This is
the default point-of-sale message. This message
will scroll across the Message Center display
while waiting for a customer to insert money. This
message may be changed in the service mode.
USE COINS ONLY - This message will appear
when the coin changer is too low on coin tube
coins to make change for bills but there is
sufficient change to give change for coins.
USE EXACT COINS ONLY - This message will
appear when the coin changer is low on the
smallest-valued coin tube coin.
MAKE FREE SELECTION - The 748 is set to free
vend. No money is required or token vend is
made with token option set to “FREE ANY” (see
Token Options in Section 3).
MACHINE SHUTDOWN UNTIL hh.mm – This
message is displayed whenever the machine has
been shutdown due to event scheduling (the
Timed-Lockout feature). hh.mm is the time the
machine will return to normal operation.
SORRY OUT OF SERVICE - This message will
appear when there is an error condition detected
in the 748. Money acceptance is inhibited and the
fluorescent lamps are turned off.
CREDIT x.xx - This message shows the customer
how much credit has been established on the
machine.
CHANGE x.xx - This message shows the amount
of change that is being returned to the customer.
THANK YOU - Displayed after a customer makes
a selection.
NOT ENOUGH CREDIT - This message is
displayed when a customer tries to make a
purchase but has not inserted enough money.
ITEM ALREADY SOLD - This message is
displayed when a customer tries to purchase a
selection that has already been sold.
ITEM IS NOT AT DOOR - This message is
displayed when a customer attempts to purchase
a selection on a full width compartment and the
turret is in a half compartment position.
CLOSE ALL DOORS - This message will be
displayed when more than one delivery door is
opened at the same time.
CLOSE DOOR xx - This message is displayed
when a customer tries to rotate the turret when
one delivery door is not closed.
SELECTIONS SOLD OUT - This message is
displayed when the token option is set to
“PRODUCT CODE” and a token is inserted with
no selections available within the programmed
product code range.
WINNER - This message is displayed when the
free vend odds option is turned on and a customer
makes a selection and wins a free vend.
RESERVED SELECTION - This message is
displayed when the Sell By Shift option is active
and a customer attempts to buy an item that is
reserved for another shift or purchase an item that
is reserved for token purchase only.
VALIDATING CARD - This message will appear
when a customer attempts to purchase a selection
using a card in a card reader.
MAKE SELECTION - This message will be seen
when a token vend is made with the token option
set to “PRODUCT CODE” (see Token Options in
Section 3).
NO CHANGE - This message will be displayed
when a large bill is inserted into the bill validator
and there is not enough change in the coin
changer to make change. The bill will be returned
to the customer.
PRESS SELECTION xx - This message is
displayed when a customer attempts to make a
selection on a shelf set to FIFO (first-in-first-out)

APi 748 V1.1 406 2.7 77500001 Back
mode and the turret is not positioned at the first in
product. The customer must select xx using the
keypad.
SELECTING SHELF xx - This message is
displayed after the first digit of a FIFO selection
has been make.
ONE MOMENT - This message is displayed while
the turret is rotating into position after a FIFO
selection has been made. This message will also
be displayed after closing the coin changer
compartment door while leaving the Service
Mode.
SHELF NOW READY - This message is displayed
during a FIFO purchase after the turret has moved
into the vend position.
Price Column Displays
The price column displays will show the status of
each compartment as the turret is rotated and
during purchases. The different status messages
that can be seen on the price column displays are
discussed below.
nn.nn - This indicates the price of the item in a
compartment. (n = any digit 0 - 9)
SoLd - This indicates the item in a compartment
has already been sold.
OPEn - This indicates the door to this
compartment is unlocked and the item can be
removed.
- - - - - This indicates that the turret is not lined up
with the delivery door or that this item is reserved
for another shift.
[ ] This is displayed on each compartment that has
been sold during the Sold Out Check
operation.
] - - - [ This is displayed on each sold
compartment that has been cleared during Sold
Out Check operation.
AVAIL - This indicates which items are available
for purchase when a token is inserted into the bill
acceptor and tokens are not set up as a cash
value.
(See Token Options in Section 3.)
PROGRAMMABLE OPTIONS
The 748 has several programmable options.
Some options can simply be turned on or off,
where other options can be scheduled to turn on
or off at programmed times. Below is a summary
list of the options available in the 748. Settings
listed in bold are the default settings. Further in
this section are descriptions of each option, what
it does, and how to set it up. See Section 3 for
specific key commands to set specific option
parameters.
OPTIONS POSSIBLE SETTINGS
• Free Vend On or Off
• Sold Out Check On or Off
• Force Vend On or Off
• Random Free Vend xxx:1 or Off
• Shutdown On, Off or PER SCH
• Multiview On, Off or PER SCH
• Discount Off or PER SCH
• Sell by Shift Off or PER SCH
• Pricing Normal or PER SCH
• Show Sold Off or On
OPTIONS EXPLAINED:
Free Vend
The Free Vend option will simply show all prices
at 0.00 and allow items to be vended without
credit. Normally, communication with a coin mech
is required or the 748 will shutdown; however,
with Free Vend turned on, the coin mech is
ignored.
Sold Out Check
This option is used to help determine whether a
compartment has been refilled with possibly
tampered food. This option may be bypassed by
pushing the [RESET] key.
Force Vend
This option is designed to force a purchase after
bills and/or coins are deposited into the 748. Any
attempt to return credit using the coin return will
be refused. Change will be returned only after a
purchase is made.
Random Free Vend
Random Free Vend is intended to free vend a
selection on a random basis using a pre-selected
occurrence level. The FREE VND ODDS item in
the service mode can be programmed OFF or any
range of odds from 50:1 to 3000:1 in steps of 50.
This option sets the odds of winning, so setting
50:1 odds does not guarantee one winner every
50 vends. However, after several thousand vends,
the average number of free vends will be 50:1.

APi 748 V1.1 406 2.8 77500001 Back
Shutdown and Timed Lockout
The Shutdown option can also be set to ON. This
will cause the 748 to immediately go into
shutdown when the coin door is closed. To restore
the machine to vend mode, the coin door must be
opened and the Shutdown option must be turned
OFF. This can be used to prevent sales or turret
activity when service activities are in process.
The 748 supports a TIMED LOCKOUT feature
which may be programmed to prohibit sales at
specified times during the week using a scheduled
event.
When the 748 is shutdown due to such a
scheduled event, the machine lights will be off and
a message will be displayed on the message
center showing “MACHINE SHUTDOWN UNTIL
xx.yy”, where xx.yy is the time when the machine
will go back into service. During programmed
shutdown, the refrigeration and health control
systems continue to work normally.
The shutdown option must be set to “PER SCH”
and a shutdown event must be programmed in the
event schedule.
Multiview
When Multiview is turned on, the turret is rotated
three positions every three minutes of idle time.
Multiview is used to draw attention to the 748 and
to periodically move the food in the refrigerated
compartment to provide more uniform
temperature control.
Multiview can be turned on or off or can be
scheduled to turn on and off at specified times of
the day using a scheduled event.
EXCEPTION: If the operating temperature range
is set for 1°C - 3°C, the multiview option cannot be
disabled or turned off.
Discount
Three different discounts may be programmed.
Discount amounts will be subtracted from the
regular price whenever that discount becomes
active. The prices on the price display will reflect
any active discount. If the discount amount is
greater than the price of a selection, the price of
that selection will be 0.00. To use discounts, the
Discount option must be set to “PER SCH”, a
discount amount must be set, and a discount
event for that discount must be programmed in
the event schedule.
For example: Discount 1 is set to $0.10 and a
scheduled event turns on Discount 1 on Friday at
17:00 then off on Saturday at 22:00. All displayed
on the price display between those times will have
$0.10 subtracted from them.
Sell By Shift
Sell By Shift allows reserving selections for sale at
a specific time. Each compartment can be
individually reserved for sale on specific days of
the week and hours of the day.
When someone tries to open the door to a
selection that is reserved for a nonactive shift, the
display will show “RESERVED SELECTION”.
Pricing
Three different prices (price schedules) may be
set for each selection compartment. If the pricing
option is set to “NORMAL”, only price schedule 1
is used. If the pricing option is set to “PER SCH”,
then the pricing schedule can be programmed
using scheduled events. Any time not defined by a
specific schedule will default to price schedule 1.
Show Sold
With this option ON, when a “sold” compartment is
in the vend position, its corresponding price
display will show “SoLD” instead of the item’s
price. With the option set to OFF, prices will be
shown for all compartments in the vend position
even if the item has been sold.

APi 748 V1.1 406 2.9 77500001 Back
SCHEDULED EVENTS
Up to 25 scheduled events may be programmed
into the 748. A scheduled event is an option that
is turned on and off based on time of day and the
day of the week. The options that may be
programmed as events are:
• SHUTDOWN
• MULTIVIEW
• SHIFT 1
• SHIFT 2
• SHIFT 3
• PRICE 1
• PRICE 2
• PRICE 3
• DISCOUNT 1
• DISCOUNT 2
• DISCOUNT 3
Day of the week selections include:
MON - Monday
TUE - Tuesday
WED - Wednesday
THU - Thursday
FRI - Friday
SAT - Saturday
SUN - Sunday
WKD - Week days (Monday - Friday)
ALL - Everyday
An event is any scheduled change in an option.
For example, Multiview may be scheduled to turn
on at 17:00 and turn off at 8:00 Monday through
Friday. This would be considered one event, even
though Multiview will be turned on and off each
day, Monday through Friday.
To get an option to turn on and off based on a
schedule; two things must be set up. First, set the
option to “PER SCH”. Second, program the event
in the event schedule.
When programming an event in the schedule, the
event type, on time, and off time must be set. On
times and off times can be set to occur on the
same day (on at 8:00 Monday, off at 16:00
Monday), on subsequent days (on at 8:00
Monday, off at 17:00 Friday), on every day of the
week, or on just Monday through Friday.
FIFO Vend Mode
The 748 can be set up to vend items on a shelf in
a First-In-First-Out (FIFO) mode. This is a way to
ensure the oldest product on a shelf is purchased
first. Each shelf can be individually set to operate
in the FIFO mode. If not in the FIFO mode, a shelf
will be in the normal shopper (SHOP) mode.
Each shelf is assigned a two-digit shelf number.
This number is used when making a purchase on
a FIFO shelf. Normally, the customer just opens
the delivery door of the selection they want. FIFO
requires the sale of the oldest product first so the
customer cannot just open any door. If the oldest
product happens to be in the right place, the door
will open. Otherwise, a message on the display
will read “PRESS SELECTION xx” where xx is the
shelf number. When the customer enters shelf
number xx on the keypad, the 748 will rotate to
present the oldest product on that shelf and allow
the customer to make the purchase.
As the customer is entering the shelf number, the
display will show “SELECTING SHELF x” when
the 1st digit is pressed. Then, the display will show
“ONE MOMENT” as the turret rotates into
position. Then finally the display will show
“SHELF NOW
READY”, indicating the product is in position to be
purchased.
Be sure to insert the shelf number labels into the
label holder on the back of the Delivery Doors so
customers know the shelf number to select.
To reset the FIFO index for a shelf, use Service
Mode function [3][3] and re-configure the shelf as
a FIFO shelf. This will reset the index for that shelf
to the first vend position (home position on the
turret).

APi 748 V1.1 406 2.10 77500001 Back
FIFO MODE OPERATION
Start Point, Full Shelf
After initialization, items are sold in sequential
order as shown here. On subsequent refills, the
actual position of the item to be sold next depends
solely on the last item sold. The next item sold is
always immediately to the left of the previously
sold item.
After items are sold and you return to refill the
machine, a typical FIFO shelf might look like this.
If not, use Service Switch to rotate the turret until
the remaining products are positioned as shown.
The next product to load here is at Position 1. The
rule to follow is use the Service Switch to rotate
the turret until the last remaining product is on
your right, and then reload the shelf from right to
left.
The selling sequence after loading this shelf
would be 12, 13, 14, 1, 2, etc.
Special Situations
The first special situation is when you find one or
more completely sold out FIFO shelves. If you can
fill every selection, there is no problem. If you do
not have enough product to fill every location, you
won’t know where to begin loading.
If you have the “CHECK SOLD OUT” option ON
(Options Menu), you will be prompted to do so
when the coin door is opened. If so, check all the
SOLD compartments (or press [RESET] to skip
this check). Once the Display shows “- - -
MACHINE OK - - -”, turn the turret to the zero
position. Pressing the MODE switch will change
the display to “- - - SERVICE MENU - - -”. Then
pressing [3][3] will cause the display to read
“- - - PRICES – SHELVES - - -”, then “SHELF
MODE xxx”, where xxx is FIFO or SHOP. If
necessary, use [1] to toggle to FIFO, then actuate
the delivery door of each of the completely sold
out shelves. This will reset the shelf so that the
first item sold will be that at Position 1. Begin
filling the empty FIFO shelves in sequence – 1, 2,
3, 4, etc. as the arrow to the left describes.
If for any reason you cannot completely fill a FIFO
shelf, you can eliminate the possibility that a
customer will open an empty selection (“buy air”)
by using the “SET FIRST EMPTIES” feature.
To use this feature, the “CHECK SOLD OUT”
option must be ON.
When the “CHECK SOLD OUT” option is ON and
the Main Door is closed after filling the machine,
the Display will show “SET FIRST EMPTIES”. For
every partially filled FIFO shelf, rotate the turret
until the last available product is just to the right of
the Vend position. With the first empty
compartment at the vend position, actuate the
corresponding delivery door. The computer will
then mark the compartments from there to the
next-to-sell product as being Previously Sold. In
the example at the left, compartments 9 through
14 would be marked as Sold.
Filling the Machine
In order to prevent the sale of an item replaced in
the machine by a customer, the 748 keeps track
of the compartments that have been sold and
prevents those doors from being opened again
before you open the machine and fill it. Because
of this, the machine must be aware that you’ve
filled the machine.
If you open the coin compartment door and then
open the Main Door and press the Service Switch
without first pressing the MODE switch on the
Main Controller, the 748 will assume that the
machine is being filled and as such will reset all
compartments
to the unsold state.
Pressing the MODE switch on the Main Controller
before operating the Service Switch will cause the
748 to assume that there is a service call in
process, and it will allow turret rotation without
affecting the sold state of any of the
compartments.
This process is the same for all shelves whether
in Shopper Mode or FIFO mode. Shelves that are
in FIFO mode will resume sales from the previous
point, so you still have true FIFO operation even
after filling.

APi 748 V1.1 406 3.1 P/N 77500001
Back
Section 3: Service Mode
Introduction
The 748 uses a menu driven interface to set up
the machine, retrieve audit information, and
troubleshooting assistance.
Opening the Outer Door (Monetary Door)
Opening the Coin Compartment Door will put the
machine is service mode. This will prompt the
display to change to one of the following
messages:
“- - - MACHINE OK - - -”
“- - - ERRORS EXIST - - -”
“CHECK HISTORY LOG”
“TURN TILL ZERO POSITION”
“CHECK SOLD OUT DOORS”
“- - - MACHINE OK - - -”
The machine is operating normally, Press
MODE switch on the Machine Control Board, the
Display will change to “- - - SERVICE MENU - - -
”. In this mode you can set up the machine
options and retrieve sales information (see page
3.X).
“- - - ERRORS EXIST - - -”
If the machine is out of service, the Display will
prompt “- - - ERRORS EXIST - - -”. Pressing
the MODE switch on the Main Control Board will
cause the Display to change to the error
description. Pressing the “RESET” key will
cause the Display to change to “CLEAR
ERRORS NO” unless a Health Timeout Error
occurred after the original error. If this
happened, the Display will show “HEALTH TIME
OUT” and you must press the [RESET] button a
second time to reach the “CLEAR ERRORS NO”
message. To clear the error(s) press the [1] key
to change from “NO” to “YES” and then press
the [0] key (the Display will show “ERRORS
CLEARED” and then proceed to the next
applicable message). You may proceed to the
next applicable message without clearing the
errors if desired by pressing the [RESET] key.
Note: Errors are not cleared until the Service
Mode has been exited by closing the Coin
Compartment Door. Errors will not be cleared if
the power is lost before re-entering Vend Mode.
A Health Timeout Error will not be cleared
unless you open the Main Door. This action lets
the computer system “know” that you have
examined the food and taken any necessary
steps to insure that it is safe for consumption.
Since the Control Board continues to monitor all
systems even while it is out of service, other
errors may have occurred during the downtime.
To be certain that there are no other problems in
the machine, always check the Error History before
putting the machine back into service.
Refer to Section 4: Troubleshooting to help resolve
any reported errors. There is an error log that will
retain the last 20 errors that occurred. Refer to
“History” in the Section 4: Troubleshooting to view
and/or print the error history.
CHECK HISTORY LOG
If a non-shutdown event (such as a bill jam)
occurred since the last servicing, “CHECK
HISTORY LOG” will be displayed. If from a
preceding error condition, press [RESET] to
continue. Otherwise, press the MODE Switch to
continue. It is recommended that the History Log be
checked for non-shutdown events upon entering the
service menu. See KEY [4] - History in this section.
TURN TILL ZERO
This message is displayed when the Turret Position
has not been initiated. To initiate the
Turret Position, rotate the turret using the Turret
Keys until “ZERO POS FOUND” is displayed on
Message Center. At this time the Center Price
Display will be updated to reflect current pricing and
the Sold display is updated. Turn Till Zero function
may be aborted by pressing the [RESET] key. In
this case, some functions in service mode, including
pricing can not be accessed until the Zero Pos has
been found.
CHECK SOLD OUT DOORS
The Check Sold Out Doors feature is used to verify
that a compartment has not been refilled with
potentially tampered food or other objects.
When this option is ON, the display will show
“CHECK SOLD OUT DOORS”. The price display at
each delivery door will show “[ ]” if that
compartment should be empty. Open each
compartment door and remove anything that might
be in the compartment (tampered food, trash, etc.):
the display will change to “] --- [”. Rotate the turret
and check all compartments that show “[ ]”. Once all
compartments have been checked, dashes will
flash on all price displays and the display will go to
the next applicable message.
As an alternate method, you may visually check all
of the sold compartments, and then press the
[RESET] key or open the Main Door to exit this
function.

APi 748 V1.1 406 3.2 P/N 77500001
Back
AP 748 Showcase Operating Modes
HOT KEYS
Reset +
0MACHINE ID NUMBER
1INTERIOR TEMPERATURE
----DIAGNOSTICS--- 2HEALTH CONTROL STATUS ----HISTORY---
00 FULL INITIALIZE 3ERROR TIME AND DATE 40
01 TEMPERATURE STATUS 4NOT USED 41 VIEW HISTORY LOG
02 TIME OVER HEALTH 5TIME AND DAY 42 VIEW ERROR LOG
03 HEALTH TEST 6DATE 43 VIEW TEMP LOG
04 SOFTWARE VERSIONS 7NOT USED 44
05 LOG TO PRINTER OFF 8SOFTWARE VERSION 45 CLEAR HISTORY LOG
06 DRIVER TEST 9SERIAL NUMBER 46 CLEAR ERROR LOG
07 INPUT TEST 47 CLEAR TEMP LOG
08 COIN COMPARTMENT OPEN 48
09 PRESS MODE SWITCH TO ACCESS 49 PRINT LOGS
----OPTIONS--- Menu # --- ----SERVICE MENU---
5 - PAYMENT SYSTEMS
20 FREE VEND 0----DIAGNOSTICS---
MDB ,DUMB or Executive Devices
21 PRICING 1.xx COIN yy z.zz
See Manual for set up details.
22 DISCOUNT 2---OPTIONS--- NOTE:
23 MULTIVIEW 3---PRICES - SHELVES---
After changing any setting, you
24 SELL BY SHIFT 4---HISTORY---
MUST power machine OFF
25 SHUTDOWN 5CASH SYS TYP
OFF, then ON to properly initialize
26 SOLD OUT CHECK 6
the payment periherals!
27 7---SET UP---
DO NOT MIX MDB, DUMB or
28 FORCE VEND 8DISPLAY AUDIT DATA
Protocol A Devices
29 FREE VEND ODDS 9SECURITY CODE
--PRICES - SHELVES-- DISPLAY AUDIT DATA ----SET UP---
30 Press [0] key to step through 70 SET SCHEDULED EVENTS
31 SCH PRICE Display Audit Data. When you 71 P.O.S. MESSAGE
32 SHELF SIZE reach the end of the data, 72 SERIAL#
33 SHELF MODE display will show: 73 MACHINE ID
34 DISCOUNT = CLEAR AUDIT DATA N 74 SET DATE
35 PRODUCT CODE Press [1] key to toggle between 75 SET TIME
36 SELL ON SHIFT Y and N, Press [0] to clear 76 TEMP RANGE
37 SHOW SOLD interval data. 77 DATE FORMAT
38 78 BAUD RATE
39 79 LANGUAGE ENGLISH
P/N 746000xxx Rev 1 Sept 03

APi 748 V1.1 406 3.3 P/N 77500001
Back
ACCESSING SERVICE MENUS
Access to all service menus starts with the
Message Center showing “- - - SERVICE MENU
- - -”. If the display shows something different,
push the [RESET] key to return to the top of the
service mode.
Generally, service mode functions have been
grouped together based on their function and
assigned to a common key. Most service mode
functions require two key strokes. The first key
selects the group, and the second key selects
the specific function.
After entering the one or two keys to display the
desired service mode function, the keys are
again used to make changes to that function.
The service mode function groups and the keys
they are assigned to are:
[1] Load and calibrate coin tubes
[2] Set up 748 options
[3] Set prices and shelf parameters
[4] View and/or print history logs
[5] Set cash system type and options
[6] Not used
[7] Set up 748 machine parameters
[8] Display/print/download audit data (DEX)
[9] Security
[0] Diagnostics
The remainder of this section describes how the
keys are used in each service mode function with a
quick summary of the function itself. For a more
complete description of a specific function, refer to
the section where that function’s operation is
described.
Other Automatic Products Vending Machine manuals

Automatic Products
Automatic Products SNACKSHOP 111 Series User manual

Automatic Products
Automatic Products SNACKSHOP LCM1 Series User manual

Automatic Products
Automatic Products PREMIER 937 SATELLITE Operating and safety instructions

Automatic Products
Automatic Products SNACKSHOP 113 User manual

Automatic Products
Automatic Products SNACKSHOP LCM5 Series User manual

Automatic Products
Automatic Products snackshop 7000 User manual

Automatic Products
Automatic Products SNACKSHOP LCM3 Series User manual