manuals.online logo
Brands
  1. Home
  2. •
  3. Brands
  4. •
  5. Jofemar
  6. •
  7. Vending Machine
  8. •
  9. Jofemar vision multiseller Product manual

Jofemar vision multiseller Product manual

Page 1 of 20
Installation and
Maintenance Guide
Contents
:
Machine Layout
Characteristics
Installation
Programming mode
Programming options
Configuration and reloading
First load of the coin changer
Reloading of the products
Checking and resetting of the faults
Preventive maintenance and cleaning
Adjusting channel to new products
Tel. +34 948 75 12 12
Fax +34 948 75 04 20




Ctra, Marcilla, Km.2. 31350 PERALTA, Navarra SPAIN

Ctra, Marcilla, Km.2. 31350 PERALTA, Navarra SPAIN


Ctra, Marcilla, Km.2. 31350 PERALTA, Navarra SPAIN


Ctra, Marcilla, Km.2. 31350 PERALTA, Navarra SPAIN


Ctra, Marcilla, Km.2. 31350 PERALTA, Navarra SPAIN


Ctra, Marcilla, Km.2. 31350 PERALTA, Navarra SPAIN


Ctra, Marcilla, Km.2. 31350 PERALTA, Navarra SPAIN


Ctra, Marcilla, Km.2. 31350 PERALTA, Navarra SPAIN


Ctra, Marcilla, Km.2. 31350 PERALTA, Navarra SPAIN

www.Jofemar.com

www.Jofemar.com


www.Jofemar.com


www.Jofemar.com

MNP86M01ENV03R09
multi plus
multi plus
Read the safety instructions at page 3 of this manual before
starting working on the machine.
Page 2 of 20
Page 3 of 20
Layout of the machine:
Exterior of the machine
1.-
Display glass (or front picture on Multi-
plus machines)
2.-
Credit display
3.-
Coin entry
4.-
Bill validator entry
5.-
Refund button
6.-
Selection buttons
7.-
Door lock
8.-
Coin return cup
9.-
Delivery door
10.-
Ventilation grille
1.-
Fluorescent light
2.-
Bill validator
3.-
Credit display
4.-
Display glass
5.-
Selection buttons
6.-
Programming button
7.-
Door latch
8.-
Product delivery door
9.-
Coin return cup
Interior of the machine- cabinet
1.-
Product trays
2.-
Control board
3.-
Door open switch
4.-
Coin changer
5.-
Product delivery box
6.-
Main power switch
7.-
Elevator
8.-
Cooling condenser
1
2
3
4
5
6
7
8
10
2
1
3
5
7
9
4
8
6
9
1
3
3
5
5
7
7
2
2
4
4
6
6
8
8
Page 2 of 20
Page 3 of 20
Characteristics:
Sizes:
72” / 1830 mm
high
31,62” / 803mm
wide
36,81” / 930mm
deep
Weight
: 705 Lb / 315 Kg
Electrics:
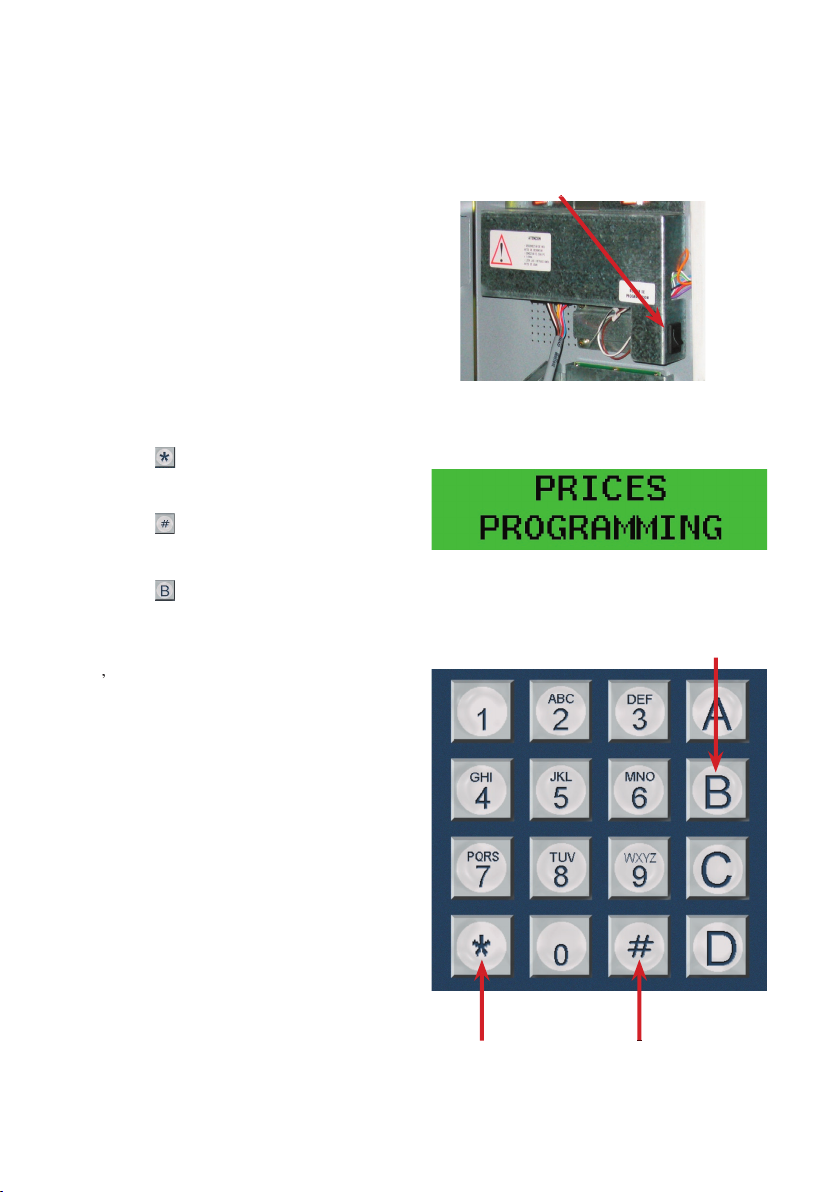
Power supply: 220-240 VAC. 0r 110 VAC
Verify the ground connection is proper before
turning on the machine
Capacity:
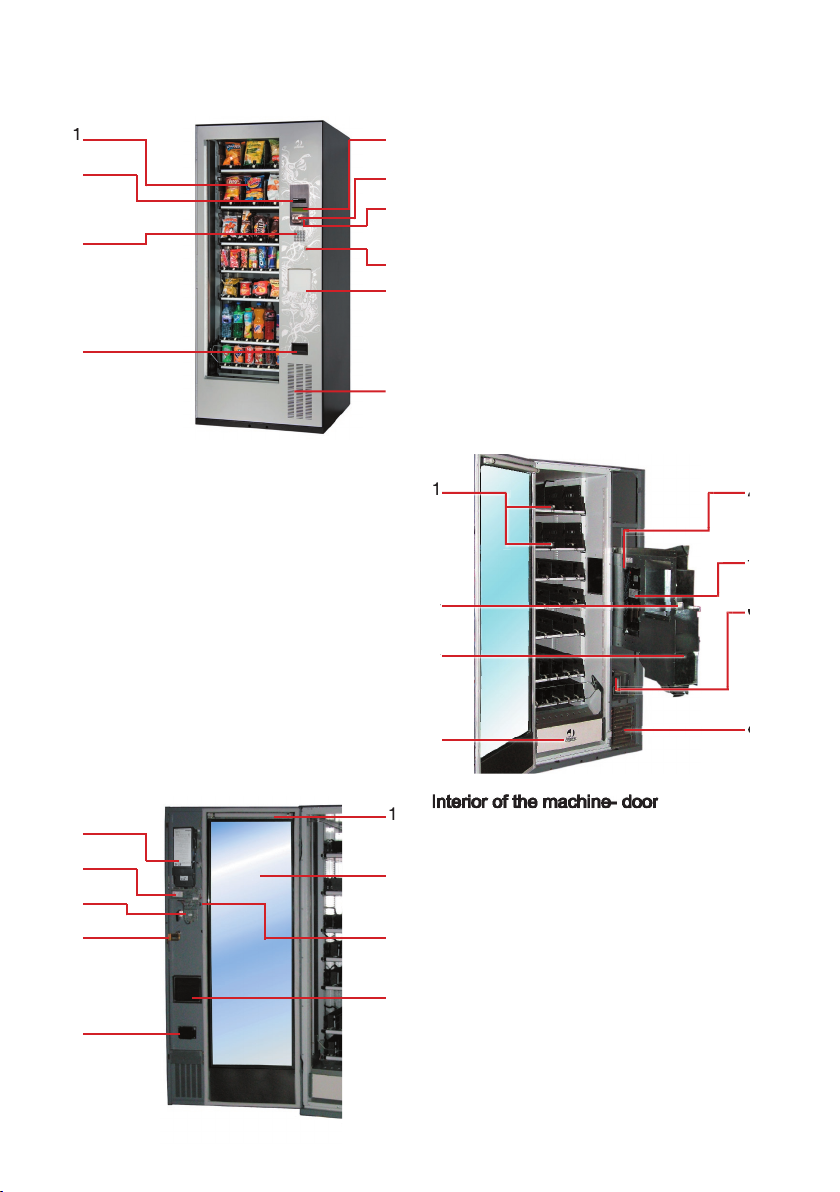
Up to 8 trays with 7 motors each.
Cooling Unit
(Only ComboPlus Machine
and in Multiplus if requested):
R-134A Ecological gas
To  nd out the amount of gas, read it on
the compressor’s sticker.
If the machine has cooling unit leave
a space between the wall and the
back of the machineof
7” / 20cm
Coin changer
J-2000 with 5 tubes
Currency validator
, Jofemar BT10
If you need more capacity or diversity on
your sales point chech with you Jofemar
agent about the possibilitie of an Extra
Selections Unit
72”
1830 mm
36,81”
935 mm
935 mm
31,62”
803 mm
WARNING! safety instructions
Read the following instructions carefully before installing the unit:
◊
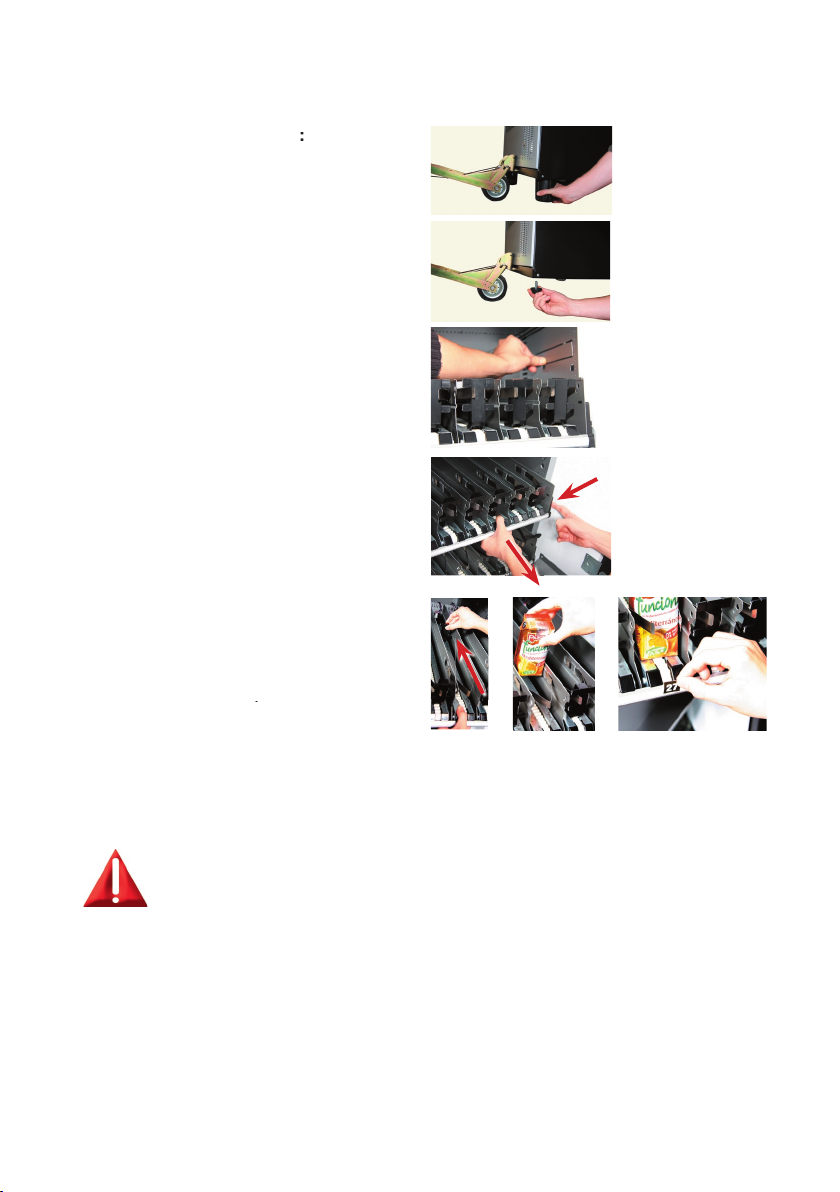
Take the machine down from the pallet and remove the metal chucks to place it on the  oor before opening and removing
the packaging.
◊ When discarding packaging material or an old machine, please consult about recycling.
◊
Before connecting to mains, make sure that the power supply characteristics coincide with those of the machine.
◊ The power cable plug should be installed so the machine can be easily disconnected from mains.
◊ If the power cable is damaged, it should be replaced by the manufacturer or after sales service or similar
quali ed personnel to prevent hazards.
◊ Place a rubber protection around the power cable in the slot of the lid of the cable winding recess.
◊ Do not burn or throw away the battery. Batteries should be disposed of in accordance with local laws and
regulations and can be recycled.
◊ Protect the machine against humidity, dust, dirt, etc. You should particularly avoid any obstruction of the
ventilation grilles.
◊ Do not clean the machine with concentrated products as they may attack the paint and alter the colour.
◊ Frequent cleaning, can prevent breakdowns and extend the machine’s life.
◊ The machine should be installed in a vertical position, both laterally and back to front, with a maximum
inclination of 5% (~2°).
◊ If you need to replace the power supply cable, please replace it with the appropriate one for your country:
Argentina, Jofemar code 5500014. Australia, Jofemar code 5500006. Spain (STANDARD), Jofemar code
5500000. UK, Jofemar code 5500011. Switzerland, Jofemar code 5500004. USA, Jofemar code 5500010.
Page 4 of 20
Page 5 of 20
Installation:
To pull the tray
out, push the tray
latch from the
right handside and
pull it towards you
Slide the pusher all the way to the back of the
channel, stock the product on the channel and
place the selection number on the label holder
There are three
louvres to set the
cooling at three
di󰘯 erent heights
on the machine.
To remove the trans-
port paws Jofemar
optionally provide
with a jack specially
designed to perform
this task.
Installation of the machine
:
1.- Level the machine, the machine
transport paws can be replaced by
the adjustable paws by which the
machine can be properly levelled.
2.- Open the door and o
pen the
refrigeration louvre to the desire
height, the products below this
level will be refrigerated. Only on
EasyCombo machines, the SnackPlus
model doesn’t include cooling unit.
3.-
Stock the products on the channels
and place the selection number on
label holder
4.-
Turn the machine on to start the
cooling of the cabinet
Programming:
5.-
Assign the selection numbers to its
motors (*).
6.-
Price the selections
.
7.-
Set the clock.
8.-
Load the coin changer.
(*) THE MACHINE HAS A SELECTION NUMBER
CONFIGURATION SET UP SO IT’LL BE NECESSARY TO
GO THROUGH THIS OPTION IN ORDER TO CHANGE IT.
SEE ANNEXED CONFIGURATION.
The machine must be levelled to ensure ease of opening and
closing of the door
Use the machine adjustments on its base if necessary
Page 4 of 20
Page 5 of 20
Elements of the programming system:
1.- Programming button
Press this button to get into the
programming mode.
It’s recommended to close the door
once it’s on the programming mode in
order to avoid any loss of
temperature
inside of the machine.
2.- Display
This element allows you to visualise
the programming option that the ma-
chine is in and its status
3.-
Button
the programming options
forward
4.-
Button
t
he programming options in
reverse order
5.-
Button
gets out of the programming
mode and into vending mode
On each of the programming options
you
’
ll be able to visualize and change
them with the numbered buttons.
On the union of the channels and the
assignation of the selection numbers, you
can use the selection buttons to program
the numbers on them
Programming mode:
To go THROUGH
THE OPTIONS
FORWARD
To go THROUGH THE
To go THROUGH THE
To go THROUGH THE
OPTIONS IN THE
REVERSE ORDER
To get out of
programming AND
RETURN TO THE
VEND MODE
Detail of the programming button
on the interior of the door
In the programming mode, the display will
display the different options
Page 6 of 20
Page 7 of 20
Map of the programming addresses:
In order to put into service:
Programming Options:
First step if
necessary
Second Step
Third step
(Only change
the con gura-
tion if neces-
sary)
Fourth step
Fifth step
To return
to the vend
mode
Communication via modem (MDB)
00
Prices programming
01
Product accountings
02
Reloading of change tubes (MDB)
03
Unloading of change tubes (MDB)
04
Money accountings (MDB)
05
Setting of the clock
06
Fault checking
07
Clearing all faults
08
Manual operation
09
Machine composition
10
Coin inhibitions (MDB)
11
Refund option (MDB)
15
Sales options
16
Maximum refund (MDB)
17
Lights programming
18
Temperature options
19
Expiration options
20
Codes programming
21
RS232 communication
22
Banknote acceptance check and
programming of banknote inhibitions
and escrow possibility (MDB)
23
Isolation tray (temperature separation
tray)
24
Token options (MDB)
25
Slides motors voltage
26
Prices for card sales (MDB)
27
Selling hours lock out (H.V.I.)
30
Program version
31
Monetary unit programming (currency
characters)
32
Language programming
33
“Beep” (buzzer) programming
35
Publicity panel options
37
Products to push over
40
Phone times programming (calling
schedule) (MDB)
41
Phone number programming (MDB)
42
Password programming (MDB)
43
GSM PIN programming (MDB)
44
Checking alarms (MDB)
Page 6 of 20
Page 7 of 20
Numeration of the trays and channels:
The trays are numbered from bottom # 11
to the top #18
The channel connectors are numbered
from left to the right #1 through #7
Language selection:
Scroll through the programming options
until you reach option “32” “Language
Programming”
Press
to visualize the program
language
Press
to change to the desired
language
Scroll through the programming options
until you reach option “05” “Setting of the
clock” and press
-Set the time:
Buttons
and
:
They scroll
through the hours, minutes, numbers
of the day, year, day of the week and
type of time as AM-PM or 24 hours
Buttons
and
:
To change the
data .
Set the clock:
181-187
171-177
161-167
151-157
141-147
131-137
121-127
111-117
1234567
Page 8 of 20
Page 9 of 20
Assigning the channels to the selection numbers:
(Only change the con guration if necessary)
Scroll through the programming options
until you reach option
“
09
”
“
Machine
Composition
”
and press
At that moment, the machine will ask you
for a selection number.
Once you enter the selection number for
that product, the machine will ask you for
the channel number for that product.
You can set the channel numbers with the
buttons, or with the buttons
and
go
through the di󰘯 erent channels that there
are connected.
Every time you’ve selected the right
channel for that selection number, press
button
and on the display will display
a message saying “Saved” and then you
to enter another channel number for that
same selection number if you choose to.
Once you’re done, press
and continue
to the next selection number
(Repeat it until
(Repeat it until
you complete the
con guration)
Page 8 of 20
Page 9 of 20
Pricing the selections:
Scroll through the programming options
until you reach programming option
“
00
”
“
Prices Programming
”
and press
The display will read price $ 0.00
Depending on the machine program we
can 󰘰 nd two di󰘯 erent modes to program
the price:
Mode A:
Button
increases the price in 5 cent
increments
Button
increases the price in 25
cent increments
Button
decreases the price 5 cents
Button
decreases the price to zero
Button
con󰘰 rms the price
Mode B:
Use the buttosn as numeric pad
to introduct de price
Button
erases the latest introduced
number
Button
con󰘰 rms price
When you con󰘰 rm the price, the display
will ask you to enter the selection
numbers that correspond to that price
Once you enter all the selection numbers
to that price, press
Once you enter all the selection numbers
and go to the next
price
( Repeat it until
you complete the
pricing)
+1
+5
-1
=0
OK
OK
Mode A
Mode B
Page 10 of 20
Page 11 of 20
Load of the coin changer:
First load of the coin changer J-2000:
If the tubes of the coin changer are totally
empty, do the  rst initial load:
Press once button 1 of the coin changer
to get to option 25 and insert coins in this
order(*)
Three coins for tube 2
Three coins for tube 3
Three coins for tube 4
Three coins for tube 1
Three coins for tube 5
Important notes:
-
Every time you introduce three coins
for one tube, the slide will move: Wait
until it stops and then proceed with the
next tube.
-
The coin changer will get out of
programming mode after the last coin
is inserted. If this happens without
completing the  rst initial reload, go
back to option 25 and  nish the reload.
Once you’ve done the  rst load, you may
reload the tubes in any order.
After reloads through the machine
(recommended):
Scroll to option “2” of the machine
programming “Reload of Change Tubes”
and insert coins in any order
Pressing buttons 1 to 5 will show you the
value of the coin and how many coins
there are in that tube.
(*) The combination of change of the coin changer and
order of the  rst load you may consulted in the manual
of the coin changer J-2000.
Insert three coins in the
correct order to each tube
Page 10 of 20
Page 11 of 20
Checking and resetting faults:
Functioning of the coin changer
programming:
Button 1:
To go into programming mode and
scrow through the options
Button 2:
To get into a speci c option and go
through its different  elds.
Button 3:
To consult that option or modify the
data of that option.
Button 4:
To get out of the programming
Checking and resetting faults:
1.-
Press button 1 until you get to option
27
2.-
Press button 2 to see all the  elds of
option 27
3.-
On each  eld press button 3
4.-
In case another number different than
0 appears on the display of the coin
changer, it will be necessary to press
button 2 to reset the faults
5.-
To get back into the  eld that you
were in before press button 3, press
button 1 and continue with the check-
ing
2.-
TO CHECK THE
OPTION
3.-
TO MODIFY
THE OPTION
1.-
ACCESS TO THE
PROGRAMMING
OPTIONS
4.-
TO GET
OUT OF
PROGRAMMING
Page 12 of 20
Page 13 of 20
Review and resetting faults of the machine:
In case a malfunction has been detected
follow the next steps:
Go through the programming options until
you reach option
“
06
”
“
Fault Checking
”
Press button
to display all the general
faults of the machine
Press button
to display all the tray
photosensors short-circuited
Scroll to option “07” “Clearing All Faults”
Press button
to reset all the faults
Page 12 of 20
Page 13 of 20
Cleaning and maintenance
For a proper function of the machine,
it’s recommended to do a periodically
The glass front should to be cleaned
periodically with a cloth or a damp sponge
The ventilation grille on the bottom of the
machine
Clean this area with a dry brush
.
Remove all obstructions to the air 󰘱 ow
path
.
Product delivery box
:
It should be cleaned of spillage of
products
.
In case of product spillage in a tray:
Take the tray out of the machine and
clean with a damp cloth
Make sure that the belt slides correctly
Make sure it’s completely dry before
you reinstall it
.
In case that a product’s spilled on the
elevator:
Turn the machine O󰘯
Clean the elevator with a damp cloth
.
Make sure that the belt slides
correctly
.
Make sure it’s completely dry before
you turn the machine On
.
The interior of the machine:
In general if all the visible areas of the
machine are cleaned, it increases
sales and it improves the image of
your machines
Clean the interior and exterior of
the glass with a damp cloth by
using a suitable glass cleaning
product
Keep the air
entrance free from
dirt and objects
from the outside
and the inside
Periodically clean the
product delivery bin and
make sure the moving parts
are not obstructed
If something has spilled, make
sure to check the bottom trays
Take the channels out of its
rails and you’ll be able to clean
the whole surface of the tray
easier
Turn the machine O󰘯
and disconnect it from
the main power
Page 14 of 20
Page 15 of 20
Product delivery system
Each of the machine channels has a
back pusher to move the whole line of
products.
We will di󰘯 erentiate between two channel
models:
recommended for uniform shape products recommended for uniform shape products
recommended for uniform shape products
This channel type o󰘯 ers higher capacity
as there is not space between products
.
Channel with safe-holders, recommended
This channel type o󰘯 ers more reliability
on the delivery as the safe-holders avoids
two products being given on the single
purchase.
Both channel types can have additional
slides for wide or thinner products to be
delivered on a equilibrate way.
These additional slides are assembled
without tools just by a clip.
Its symmetrical shape allows to place the
same additional slides at both sides of the
channel.
Once the elevator photocells have
detected the presence of a product it will
take it to the height of the product delivery
box and by a belt with a pusher will pace
it reachable for the customer.
Additional slides help
to deliver products
correctly
Channel without safe-holders diagram
Channel with safe-holders diagram
Page 14 of 20
Page 15 of 20
General reloading of the products:
Close the door once
you stock the product
so you won’t loss any
cool air
If some of the channels
have the same products and
the same selection number
stock up the same amount of
products on them
This is the space that could be
use as ambient product storage
(It’s not refrigerated)
1.-
When you stock products in the
machine put the “new” products
behind the remaining product by
placing the pusher to the back of the
channel.
2.-
To minimize any loos of the cool air,
stock the product quickly and close
the door as soon as possible.
3.-
Never store products out of the trays
except on the space located on the
right hand side of the cabinet which
it
’
s not refrigerated
.
4.-
When there are some channels with
the same product, it
’
s advisable to
stock the same number of products
each of the channels because
the delivery of the products is
sequentially.
5.-
For tall products, the normal dividers
would be substituted for higher
ones, these dividers separate the
tops of very tall products to prevent
interference from products in the
adjacent channel.
6.-
In the refrigerated area of the
machine there may be an increase of
temperature in 2,5ºC/4F increments
for every two trays above the open
louvre (*)
The high dividers can
be placed on any of the
channels on the tray
When you stock products in the
machine put the “new” products
behind the remaining product by
placing the pusher to the back of
the channel
Below the zone that
you have opened the
ventilation louvre,
maximum cooling will
occur
Above these trays,
the temperature will
rise 2,5ºC/4ºF per
every two trays
(*) This increase of the temperature is not exact data,
depending on the environmental conditions; it could be
more or less
Page 16 of 20
Page 17 of 20
General reloading of the products:
7.1.-
Place products standing up with the
brand facing the customers.
7.2.-
Products pushers come with a
precut break o󰘯 point that allow you
to adjust the width per any channel
width.
7.3.-
On thin products you must use
crowders on one side or both sides of
the channel. There are two models,
one narrowing the channel up to
1,37
”
/
35mm
and the second one up
8.- Special settings for channels without 8.- Special settings for channels without
8.- Special settings for channels without
8.1.-
The channel must be wider than the
product, this way we will avoid the
bags hanging on the dividers.
8.2.-
The distance between the safe-
holders must be longer than the
product thickness.
8.3.-
The products must be placed on
the channel laying back, never laying
forward, this way the delivery will be
made correctly.
8.4.-
On thin products you must use
crowders on one side or both sides
of the channel. There is one model
which narrowes the channel up to
1,37
”
/
35mm
.
In order to adjust the pusher
to the width of the channel,
break off the excess by
pulling forward
Put
products
in vertical
position
Product with crowders on
each side of the channel
The channel wide
bust be bigger
than the product
on the safe-hoders
channel.
Safe-holders distan-
ce must be longer
than the product
thicknes.
The poducts line must be on the channel laying
bacward for a correct dispensing.
Page 16 of 20
Page 17 of 20
Adjusting channels to new products:
On case we want to change the product
a motor is selling and the new product
is thicker or thinner than the current one
follow the next steps:
1.- Empty the channel with the old product.
2.- Disconnect the motor of the channel,
lift the motor from its back and take it
out of the tray.
3.- Take the channel divider pressing the
back part of the tray and pulling up the
divider.
4.-
Place the new product on the empty space.
5.- Place at each side of the product the
channel dividers, leaving a security
space for the product to run free when
it moves on the channel and clipping
them on the same front and back slots
of the trays.
6.- Take out the product and place on the
middle of the free space the motor.
First place the top part of the motor
placing the 󰘱 ap into a slot and then
place the back part on the slots.
7.- Connect the motor.
8.- Give the selection a new price if
necessary.
9.- The change on a channel can a󰘯 ect
the space on the channels situated
next to it, it may be necessary to
redistribute the channels or just
place channel dividers leaving empty
spaces between them.
Empty the channel
of the products we
want to replace
Disconect the motor and
lift it from the back to
take it out of its slots
Press the back part of
the tray and pull up the
divider to unclip and
release it
Place the new products
place the channel divider
adjusting it with the
necessary space not to
touch the products
Place the motor on the
middle of the channel
Fill the channel with the
new products
Change selection numbers, prices, and the
motors voltage if necessary
Page 18 of 20
Page 19 of 20
Setting the voltage of the motors
It increases the
voltage 0.5 volts
increments
OK
(Repeat until you
complete the entire
voltage programming)
Scroll through the programming options
until you reach option “25” “Voltage for
channel motors” and press
A message saying “Voltage programming”
will appear, press
The display will read 5.0 volts. To change
this voltage
:
Button
increases in 0.5 volts
increments
Button
decreases 0.5 volts
increments
Once you’ve selected the desire voltage
press
.
The display will ask you to enter
the selection number for that voltage.
After that a message will show “saved”
and you’ll be able to enter another
selection numbers.
Once you have entered all the selection
numbers for that voltage press
Repeat
these steps to assign other voltage to
another selections
It decreases the
voltage 0.5 volts
increments
Torque and speed of the channel motors
depend on the product to be vended:
Thin and light products like chocolates
5-6 volts
Standard Large bags
7,5 Volts
Big and heavy products
9 Volts
These speeds are orientative, depending on the
shape and weight of the product
Page 18 of 20
Page 19 of 20
Products to lie down (Very tall products)
The product will
lie down
(Repeat it until
you complete the
entire push over
programming)
In order for the tall products not to
interfere with the movement of the
elevator, you must use the
“
products to
push over
”
option. This will move the
elevator band and cause the product to
lie 󰘱 at prior to elevator movement. Option
N. 37
Scroll through the programming options
until you reach the programming option
“37” “ Products to push over” and press
A message “Products to push over
programming” will appear, press
The machine will ask you to enter a
selection number
.
Once you’ve entered it, it’ll ask you to
press button
Once you’ve entered it, it’ll ask you to
to con rm that the product
has to lie down before the elevator starts
its movement or button
to con rm that
the elevator can move without the product
being laid down
Once you’ve programmed this option,
you’ll be asked to enter another selection
number
By default, the selection numbers not
programmed into the machine will not
have this option
The product
won‛t lie down
Page 20 of 20
Tel. +34 948 75 12 12
Fax +34 948 75 04 20




Ctra, Marcilla, Km.2. 31350 PERALTA, Navarra SPAIN

Ctra, Marcilla, Km.2. 31350 PERALTA, Navarra SPAIN


Ctra, Marcilla, Km.2. 31350 PERALTA, Navarra SPAIN


Ctra, Marcilla, Km.2. 31350 PERALTA, Navarra SPAIN


Ctra, Marcilla, Km.2. 31350 PERALTA, Navarra SPAIN


Ctra, Marcilla, Km.2. 31350 PERALTA, Navarra SPAIN


Ctra, Marcilla, Km.2. 31350 PERALTA, Navarra SPAIN


Ctra, Marcilla, Km.2. 31350 PERALTA, Navarra SPAIN


Ctra, Marcilla, Km.2. 31350 PERALTA, Navarra SPAIN

www.Jofemar.com

www.Jofemar.com


www.Jofemar.com


www.Jofemar.com

Communication via modem (MDB)
00
Prices programming
01
Product accountings
02
Reloading of change tubes (MDB)
03
Unloading of change tubes (MDB)
04
Money accountings (MDB)
05
Setting of the clock
06
Fault checking
07
Clearing all faults
08
Manual operation
09
Machine composition
10
Coin inhibitions (MDB)
11
Refund option (MDB)
15
Sales options
16
Maximum refund (MDB)
17
Lights programming
18
Temperature options
19
Expiration options
20
Codes programming
21
RS232 communication
22
Banknote acceptance check and
programming of banknote inhibitions
and escrow possibility (MDB)
23
Isolation tray (temperature separation
tray)
24
Token options (MDB)
25
Slides motors voltage
26
Prices for card sales (MDB)
27
Selling hours lock out (H.V.I.)
30
Program version
31
Monetary unit programming (currency
characters)
32
Language programming
33
“Beep” (buzzer) programming
35
Publicity panel options
37
Products to push over
40
Phone times programming (calling
schedule) (MDB)
41
Phone number programming (MDB)
42
Password programming (MDB)
43
GSM PIN programming (MDB)
44
Checking alarms (MDB)
See page 9
See page 8
See page 7
See page 7
See page12
See page 18
See page 19
Back to
vend Mode
Programming options developed on this guide
Button detail for
access to pro-
gramming, see
page 2, picture
3, position 6.

This manual suits for next models

2

Other Jofemar Vending Machine manuals

Jofemar Vision Snack Plus User manual

Jofemar

Jofemar Vision Snack Plus User manual

Jofemar Vision ES-PLUS User manual

Jofemar

Jofemar Vision ES-PLUS User manual

Jofemar COFFEEMAR G-500 V2 User manual

Jofemar

Jofemar COFFEEMAR G-500 V2 User manual

Jofemar Vision Easy Combo Operating manual

Jofemar

Jofemar Vision Easy Combo Operating manual

Jofemar TAOS Series User manual

Jofemar

Jofemar TAOS Series User manual

Jofemar Coffeemar G-250 Product manual

Jofemar

Jofemar Coffeemar G-250 Product manual

Jofemar Coffeemar G-250 User manual

Jofemar

Jofemar Coffeemar G-250 User manual

Popular Vending Machine manuals by other brands

Vendo G-DRINK GF9 Programming manual

Vendo

Vendo G-DRINK GF9 Programming manual

ELAUT BIG ONE XTREME II OPERATOR (USER) & SERVICE MANUAL

ELAUT

ELAUT BIG ONE XTREME II OPERATOR (USER) & SERVICE MANUAL

NCR 7800 user guide

NCR

NCR 7800 user guide

Necta Snakky manual

Necta

Necta Snakky manual

Rheavendors Group SAGOMA Installation and maintenance manual

Rheavendors Group

Rheavendors Group SAGOMA Installation and maintenance manual

Rowe 4900JR SERIES Field service manual

Rowe

Rowe 4900JR SERIES Field service manual

Unicum NERO user manual

Unicum

Unicum NERO user manual

Westomatic Sigma Touch Operator's & installation manual

Westomatic

Westomatic Sigma Touch Operator's & installation manual

Seaga Quick Break Combo QB2000 Service and parts manual

Seaga

Seaga Quick Break Combo QB2000 Service and parts manual

Vendo VUE 30 user manual

Vendo

Vendo VUE 30 user manual

Bianchi Lei500 M Series Use and maintenance manual

Bianchi

Bianchi Lei500 M Series Use and maintenance manual

Voce Freshbrew Operator's manual

Voce

Voce Freshbrew Operator's manual

Pyramid APEX 5000 Series Installation & operation manual

Pyramid

Pyramid APEX 5000 Series Installation & operation manual

manuals.online logo
manuals.online logoBrands
  • About & Mission
  • Contact us
  • Privacy Policy
  • Terms and Conditions

Copyright 2025 Manuals.Online. All Rights Reserved.