Avalon SteriTech GAMBIT User manual

Quick
Start
Guide

Machine Overview 03
Charging Instructions 04 - 05
Solution Filling & Draining 06 - 07
Machine Setup with Whiz 08 - 09
Operation Modes 10
Maintenance 11

3
Filler port filter
Solution filler door
Housing enclosure
Solution tank
Swivel casters (x4)
Solution drainage tube
Solution drainage door Bottom latch hold
down knob
Motion sensor
assembly
Motion
sensor light
Motion
sensor lens
Drainage valve
Bottom latch
Gambit system
power button
Solution level
indicator LED light
Charging port cover
Power Charging Part
Side latch (Left)
Spraying nozzle manual
activation button
Spraying nozzle
Battery level
indicator LED light
Side latch (Right)
Machine Overview

4
1. Attach the power cord to the power charger
2. Check to ensure the voltage selector on the power
charger is properly set to 110V or 230V and power
button on the power charger is in the off position
3. Attach the power cord to the wall outlet
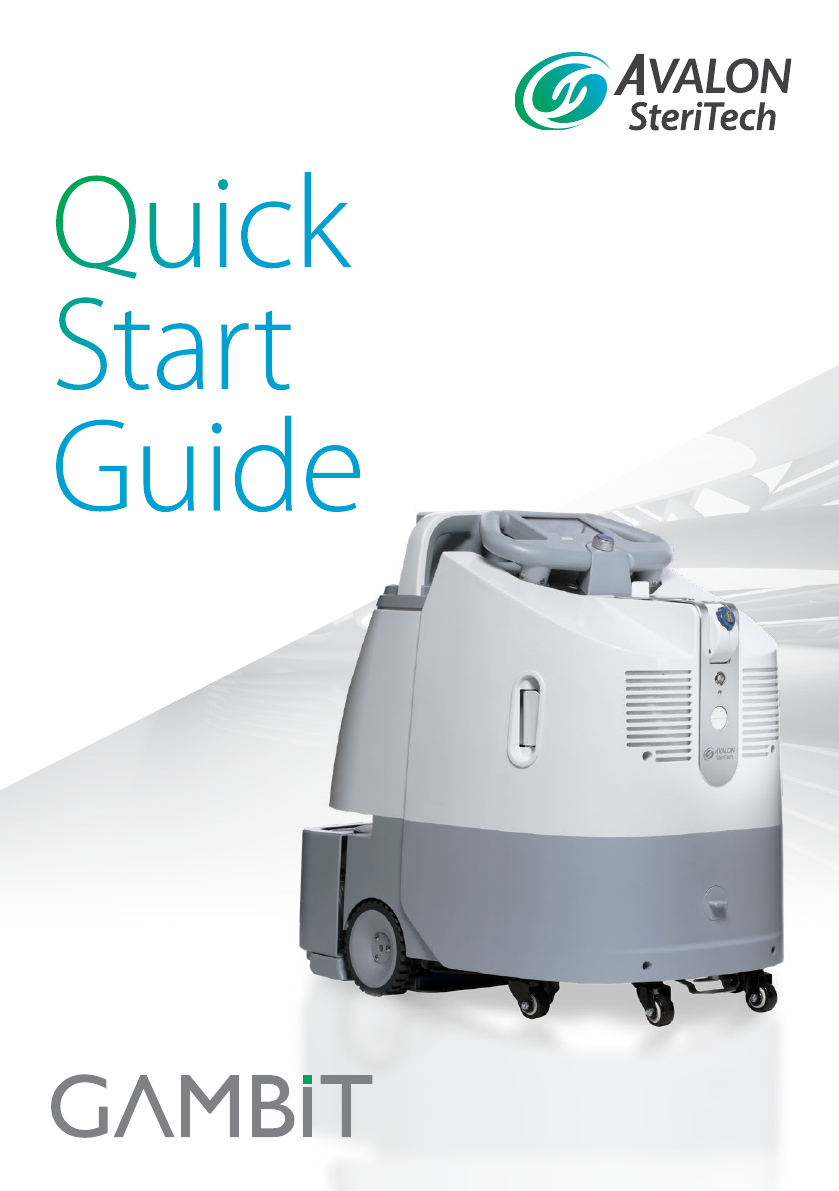
4. Detach the charger port cover from the Gambit
system, then align and insert the charger
connector into the Gambit system
5. Check the connection between the Gambit
system and the charging connector by pulling
the connector lightly. It should stay connected
6. Switch on the power button on the power
charger. The power charger LED indicator light
should be on
On/O
Voltage
Selector
Charging Instructions

5
7. To stop charging, switch off the power charger
by pressing the power button to the off position
8. Press and hold the eject button on the Gambit
system. Gently pull on the power cord connector
to remove the charging connector
9. Unplug the power charger from the wall outlet
Eject Button

6
1. The Gambit system should be switched off and
detached from Whiz
2. Ensure the Gambit system is not connected
to the power charger
3. Drain the solution tank until it is empty. Then
turn the drainage valve to its closed position
4. Flip open the solution filler door
5. Slowly fill the Gambit system with approved chemicals /
disinfectants through the filler port filter
(Maximum capacity : 3 L)
6. Close the solution filler door firmly after filling
Solution Filling & Draining
Filling Instructions
Closed
Drain

7
1. The Gambit system should be switched off
and detached from Whiz
2. It is not connected to the power charger
3. Open the magnetic solution drainage door
4. Take out the solution drainage tube and insert
into an appropriate container. Rotate the drainage
valve anticlockwise by 90 degrees to drain
5. After drainage is completed, rotate the drainage
valve clockwise by 90 degrees to close. Tuck away
the solution drainage tube
6. Close the magnetic solution drainage door
Solution Filling & Draining
Draining Instructions

8
1. Check that the bottom latch hold-down knob
is in the unlocked position
2. Ensure Whiz is switched on
3. Align the Gambit with Whiz, hold the top part
of Whiz with one hand and hold Gambit with
another hand, and push the two units together
4. Lift the Whiz handle slightly to let the top housing
of Gambit pass under handle and then release
the handle to its resting position
5. An audible “click”Should be heard when the two
appliances are assembled
6. Gently push & pull the Whiz & Gambit to test
whether they are assembled securely
Machine Setup with Whiz
Assembly Instructions

9
Machine Setup with Whiz
1. Ensure the Whiz handle is down
(with auto brake engaged)
2. Lift bottom latch up and rotate the bottom latch
hold-down knob in a counter-clockwise fashion
3. Press and hold both side latches
4. Pull the Gambit system backwards to decouple
from the Whiz
5. Reset the Gambit system’s bottom latch
by rotating the bottom latch hold-down knob
in a clockwise fashion
Disassembly Instructions

10
1. Set the nozzle angle via the handle before operation
2. Ensure the Whiz is switched on and couple
the Gambit system to Whiz
3. Turn on the Gambit system by pressing
the power button
4. Wait 50 seconds for the Gambit system’s automatic
boot up sequence to initiate. A white light will be
seen when boot up sequence is completed
6. If you want to manually override the automatic
system, press the spraying nozzle manual button
5. The preset mode is the automatic mode
>10s of movement: start spraying
>10s of stationary idle: stop spraying
Power
Spray
Operation Modes

11
1. The Gambit system should be switched off
and detached from Whiz
2. Ensure Gambit is not connected to the power
charger
3. Inspect the casters and clean off debris with damp
cloth
4. Inspect the solution filler for solids and debris
build up
6. Drain all chemicals from the solution tank. Rinse
and drain the solution tank with 500 mL of distilled
water
5. Wipe the entire Gambit system housing with
a damp cloth
Maintenance (Daily)
Closed
Drain

12
Maintenance (Periodic)
1. The Gambit system should be switched off
and detached from Whiz
2. Ensure Gambit is not connected to the power
charger
3. Inspect the casters and clean off debris with damp
cloth
4. Drain the solution tank until it is empty. Then turn
the drainage valve to closed position
6. If there are debris or dirt on the optical motion
sensor unit, use damp cotton swabs to clean
the optical motion sensor gently. Clean off excess
water with a dry cotton swab
5. Lay the Gambit system on a soft and cushioned
surface, take extra care of the control panel and
nozzle

13
7. Fill the solution tank with 500 mL of distilled water
8. Power on the Gambit system and press
the manual spray button to activate spraying.
9. Once the distilled water is completely depleted,
press the manual spray activation button to stop
the Gambit system
10. Power off the Gambit system
11. Fully charge the Gambit system before storage
Power
Spray
Power
Spray
Table of contents
Popular Cleaning Equipment manuals by other brands

Clayton
Clayton Warthog 603-202GN Safety, Operation & Maintenance

Dolphin
Dolphin DS800 Installation, operation and maintenance guide

Lucci LEDlux
Lucci LEDlux MODA installation instructions

Stark
Stark RSW_S Operating and maintenance manual

Streamline
Streamline OVA8 instruction manual

WAXIE
WAXIE VERSA KV1750W Operator and parts manual