Thermax AF2 User manual

For a Healthier Indoor Environment
www.thermaxaf.com
1-888-764-3700
Thermax AF2
Home Environment Cleaning System
OWNER’S MANUAL

Table of Contents
A Message from the Corporate Office............................................1
Safety Instructions.........................................................................2
Identifying Features.......................................................................3
Use as an Air Purification System ..................................................4
Vacuuming Instructions ................................................................5
Vacuuming Tips ............................................................................6
Steam Cleaning Instructions-Set up...............................................7
Steam Cleaning Operational Instructions......................................8
Steam Cleaning Tips .....................................................................9
Picking Up Liquids/Wet Pickup..................................................10
Carpet Maintenance Program......................................................11
Secondary Filtration System, Instructions & Information ...........12
Motorized Power Nozzle Service..................................................13
Parts List – Canister & Recovery Tank Assembly.........................14
Parts List – Wand, Floor Tool & Vacuum Hose...........................15
Parts List – Steam Cleaning Accessory.........................................16
Optional Dry and Wet Accessories ..............................................17
Cleaning Solutions ......................................................................18
Commercial Product Line Selection ............................................19
Trouble Shooting Tips.................................................................20
Specifications...............................................................................21
Warranty .....................................................................................22

A Message from the Corporate Office
Dear ermax Owner:
Congratulations on the purchase of your new ermax AF2 Home
Environment Cleaning System! In 1971, Carl Parise developed the world’s
first UL approved carpet steam cleaner for the U.S. market, and has since
produced over 500,000 units sold worldwide. You have seen many of our
commercial machines for rent in grocery and hardware stores across the
country. We have adopted our own brand name, ermax, which is rapidly
becoming a household name, synonymous with the industry.
rough our experience as the pioneers of the do-it-yourself carpet cleaner
rentals, along with years of field research and development, we have created
what we believe to be the most advanced, complete and versatile home
environment cleaning system ever developed. Designed for the rigorous
cleaning demands of today’s modern household environment, the ermax
AF is the solution to help attain a healthier indoor environment by keeping
the carpets, floors and upholstered furniture clean and free of allergens and
unhealthy contaminants!
AF’s insignia has a three-fold punch! It is defined as 1) Aqua Filter for our
patented hydropneumatic (water and air interaction) water filtration system,
2) Allergy Filter for either our standard high-efficiency reusable secondary
urethane foam filter or our electrostatically charged 100% efficient
disposable allergy filter, and 3) Allergy Free. All this high efficiency leads to
a dust-free, allergy-free operation, trapping the contaminants and allergens
within the system for easy disposal.
ank you for joining the ever-growing family of ermax owners. Here’s
to many years of use and, most importantly, here’s to a healthier indoor
environment for you and your family.
Sincerely,
Jason Davis
Todd Walker, CFO,
Jason Davis, CEO,
and Mark Rodie, COO

2For more information or to place an order visit www.thermaxaf.com
Important Safety Instructions
Read before operating this system.
WARNING
To Reduce The RIsk of fIRe, elecTRIc shock oR INjuRy:
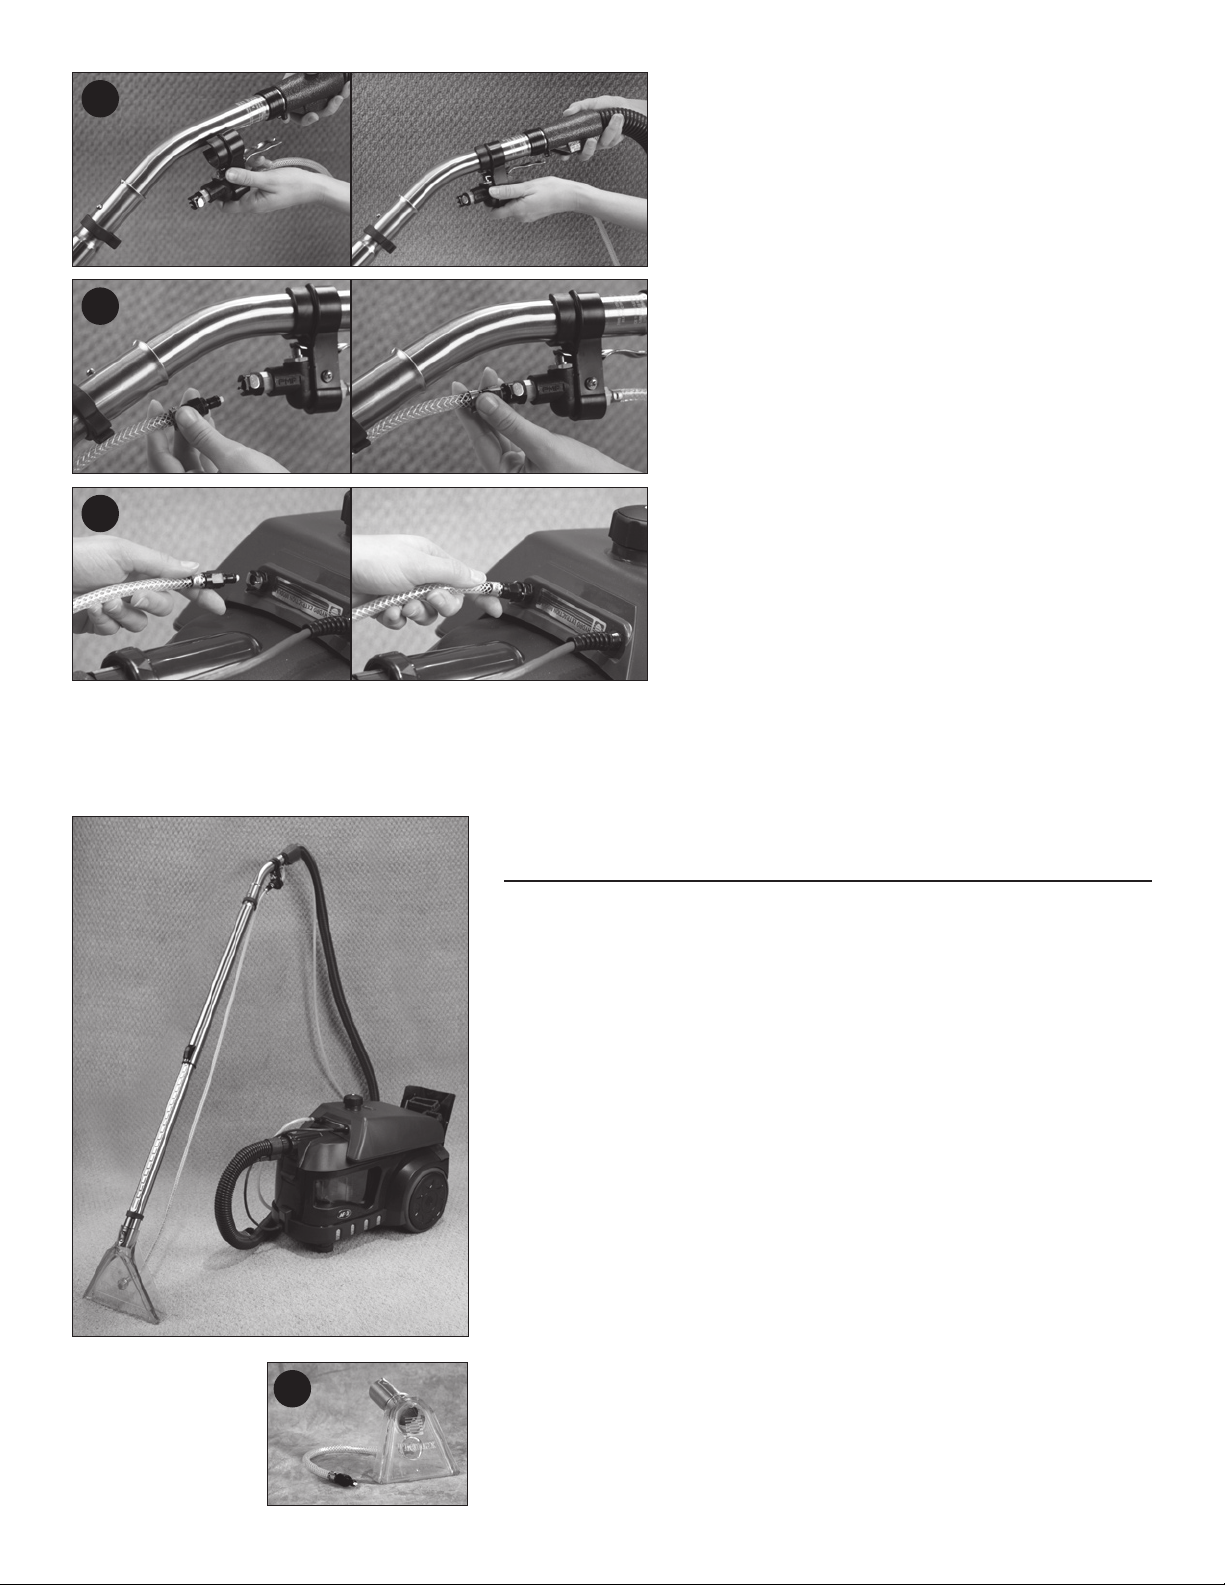
1. Always disconnect the canister and optional steam cleaning solution
tank accessory from the power source BEFORE servicing.
2. Never leave the appliance plugged into power source unattended.
3. Never use the motorized dry vacuum head on wet surfaces.
4. Do not allow this product to be operated by children, it is not a toy.
5. Only use this product as described in this manual.
6. Only use factory recommended attachments and cleaning solutions.
Failure to do so will void the warranty.
7. Never use with a damaged power cord, plug, or electrified vacuum hose.
Have it replaced immediately.
8. Do not leave the power cord or canister near a heat source.
9. Do not pull the canister by the power cord.
10. Hold power cord by the plug when retracting into canister, do not allow
to whip back into canister.
11. Grasp plug when un-plugging from power source, DO NOT pull by
the cord itself.
12. Do not handle the canister, plug or power cord with wet hands.
13. Never use this machine to suck up hot objects, such as cigarette butts,
smoldering ashes or matches.
14. Never suck up flammable or combustible substances. Never use this
product in areas that contain such.
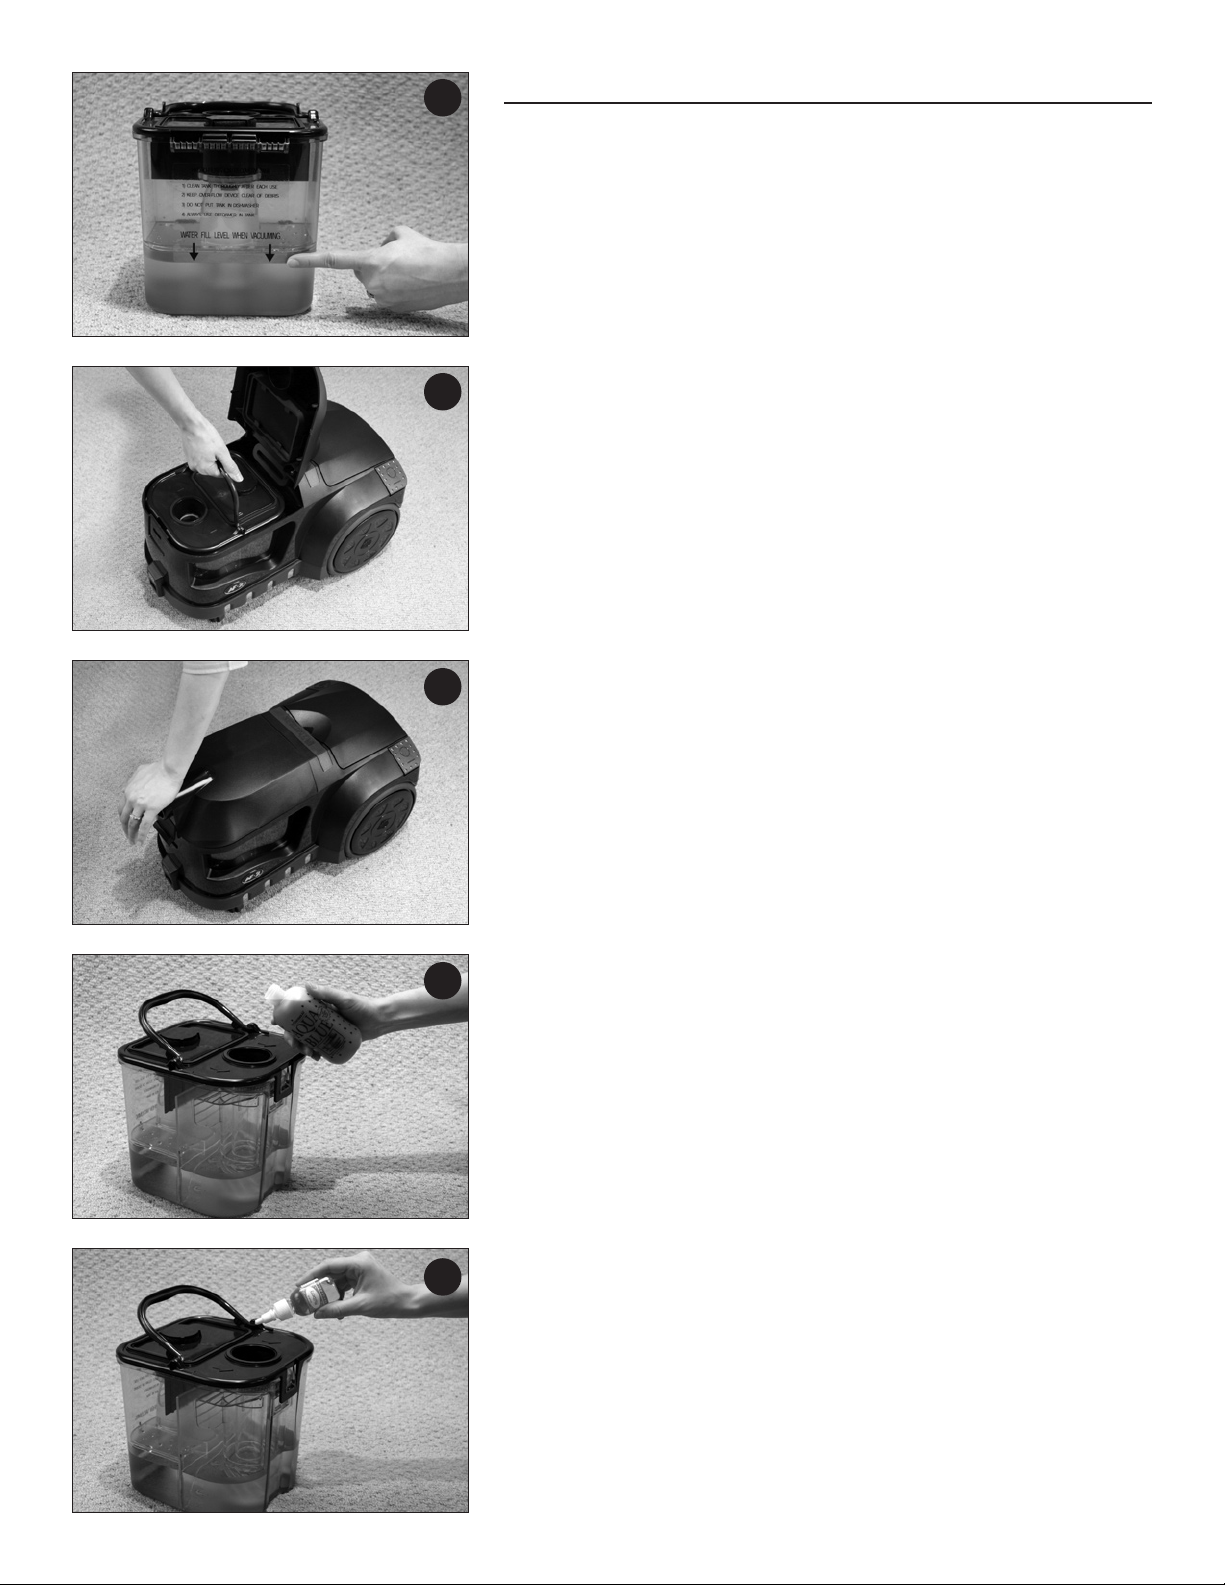
15. Do not use this product without the recommended water level in the
recovery tank.
16. Use extra care when cleaning stairs. e canister should not be left to sit
on stairs.
17. e components used in this product may be sensitive to oil, grease
and other petroleum-based products. Avoid contact by these types of
products with the canister components.
18. Keep canister on floor when in use.
19. Store canister and optional steam cleaning solution tank in a dry, clean
place. Do not expose to sunlight, directly or indirectly.
20. is appliance is for normal household use only. Any indication of
negligence of this appliance will void the warranty.
21. Clean the appliance with a mild dish soap solution and soft cloth.
Never use abrasive or caustic cleaning agents.
22. e recovery tank lid (green) should never be placed in the dishwasher
for cleaning.
23. All other clear plastic recovery tank parts are dishwasher safe.
24. Keep steam cleaning solution tank with built in pump (optional) on
canister when in use.
Save these instructions!
To find your nearest authorized service center:
For more information or to place an order visit www.thermaxaf.com

3
For more information or to place an order call 1-888-764-3700
Identifying Features
STANDARD THERMAX AF2
1. Rear lid with on-board tool holder
2. Carry Handle
3. Power Switch
(Cord reel actuator, opposite side)
4. Main Canister
5. Electrified Vacuum Hose
6. Hose Connector
7. Cord Outlet
8. AQUA BLUE
Air Freshener/Deodorizer (8oz.)
9. Mulberry
10. Eucalyptus/Menthol
11. Telescopic Stainless Steel Wand
12. Motorized Dry Vacuum Head
13. Water Filtration Recovery Tank
14. Front Lid with filter retainer
15. Electrostatic Allergy Filter, 2 pack
16. Foam Core Filter
17. Urethane Foam Filter
18. Hard Floor Tool
19. Instructional Manual
20. Instructional DVD
21. Upholstery Tool with slide on Brush
22. Dusting Tool
23. Crevice Tool
The OPTIONAL STeAM CLeANING
ACCeSSORY KIT (32-030-121)
does not come standard with your AF2. Contact
your local Distributor or the corporate office to
receive details on purchasing or receiving it free
through our referral program (see page 17 for
other accessories that complete this kit):
1. Steam Cleaning Solution Tank with Built in Pump
2. Steam Head
3. Valve and Hose Assembly
4. Liquid Carpet & Upholstery Cleaner (16oz.)
1
3
2
4
6
5
7
8
9
10
11
12
13
14
16
17
15
1
4
3
2
19
20
18
21 22 23

4For more information or to place an order visit www.thermaxaf.com
To Use as an Air Purification System
Your ermax AF2 Home Environment Cleaning System filters the air
around you with its patented hydropneumatic filtration system, washing the
impurities from your indoor environment. Airborne dust particles are a big
source of allergy and respiratory related problems. A dust-free environment
is a healthier environment.
TO USE AS AN AIR PURIFIER:
1. Remove the Water Filtration Recovery Tank and fill with clean water to
the required level indicated on the tank.
2. Be sure the two secondary filters are in place.
3. Install recovery tank, making sure the 2 arrows are pointing towards the
front.
4. Close and latch the front lid.
5. Place machine as close to the center of the room as possible.
6. Plug into the proper wall outlet and turn on the power switch.
e ermax AF2 is now washing the air of impurities. Run for
approximately ten (10) minutes per room, or 1 hour centrally located in
your home, preferably by the central A/C intake. Run your AF2 this way
about twice a week, depending on the severity of your allergies.
TO USE AS A DEODORIZING & SANITIZING SYSTEM:
7. Set the canister up in the air purification system mode (see above).
8. After filling the recovery tank with water to the proper level, add Aqua
Blue Deodorizer Air Freshener or Valley Fresh as indicated on its label
to deodorize & sanitize the air, removing any smoke, cooking odors,
and pet odors, leaving the air clean, fresh & sanitized.
9. Run the canister until the room has reached the desired level of air
freshness or when air wash process is complete.
TO USE AS AN AROMATIC/INHALATION SYSTEM:
10. Set the canister up in the air purification system mode (see above).
11. After filling the recovery tank with water to the proper level, add a 10
drops of our eucalyptus w/menthol inhalant for therapeutic inhalation
purposes, or a 10 drops of one of our aromatic fragrances, depending
on what purpose you wish to accomplish.
12. Run the canister until the room has reached the desired level of inhalant
or fragrant scent or when air wash process is complete.
e ermax AF2 virtually creates an invisible rainstorm within the
surrounding environment, washing the air and leaving it pure and fresh.
Any of the fragrances or Aqua Blue can be added to the filtration water
during vacuuming for the desired effect.
2-3
1
4
8
11

5
For more information or to place an order call 1-888-764-3700
Vacuuming Instructions
1. Fill Water Filtration Recovery Tank to the fill line as noted on the label
and make sure the filter tube, filter chamber & baffle shut off assembly
are all in place.
2. Add Aqua Blue or fragrance to water as indicated on its label if desired.
3. Replace the recovery tank into the canister, making sure the 2 arrows
are pointing towards the front.
4. Close and latch the front lid.
5. Connect the vacuum hose: insert hose connector into front lid by
aligning the gold stripe on the hose end with the gold arrow on the hose
lock (located on the front lid). Hose lock must be on top as shown.
After inserting, twist the hose lock 1/4 turn clockwise to secure into
place.
6. To connect vacuum hose power cord into canister, plug into receptacle
cord outlet as shown. NOTE: is plug is polarized and will only go in
one way.
7. To connect the vacuum hose to the sliding wand, insert handle end into
the wand and gently twist until the button snaps into place.
8. To connect your motorized dry vacuum head (or the floor tool), insert
the sliding wand into the wand connector (located on the motorized
power nozzle) and push until button snaps into place.
9. Snap power cord from the motorized power nozzle into the two cord
guides located on the wand, leaving excess cord slack looped at the
motorized dry vacuum head.
10. Plug in the cord from the motorized dry vacuum head into the vac hose
handle as shown. NOTE: is plug is polarized and will only go in one
way.
3
5-6
7
8
9
10
1

6For more information or to place an order visit www.thermaxaf.com
VACuuMING INSTRuCTIONS CONTINued…
11. Pull out the main power cord and plug into electrical outlet. e cord
will stop at any location you desire when pulling it out. To retract,
depress the cord reel actuator and cord will start to retract. Hold the
power cord by the plug when retracting into the canister. DO NOT
allow the cord to rapidly whip back into the canister.
ON bOARd ATTAChMeNTS
12. e upholstery tool with slide on brush, the dusting tool with brush
and crevice tool are stored on board on the rear lid and can fit on either
the end of the hose handle or the sliding wand.
13. e hard floor tool can easily fit on the end of the sliding wand, finally
taking the place of traditional brooms, mops and dustpans.
14. Depress the power switch actuator to turn on the vacuum, and begin
vacuuming.
11
14
Vacuuming Tips
• When vacuuming, periodically check the Water Filtration Recovery
Tank to see that the tubes are not blocked with debris. is may happen
with the first several vacuumings, with new carpet or if you have a pet
that sheds often. If this occurs, stop and empty the Water Filtration
Recovery Tank. Refill the tank and continue vacuuming. NOTE: If
water stops flowing on side of recovery tank during vacuuming, clean
out filtration tubes and empty recovery tank.
• Be sure both filtration tubes are in place for proper filtration.
• Periodically you will need to check the black urethane foam or
electrostatic filter located in the front lid of the machine. If it becomes
clogged with debris, it needs to be cleaned with warm soapy water or
replaced. How often it needs to be cleaned depends on use and how
dirty the areas are that you are cleaning (see page 12 for more details).
• It is recommended that you replace both foam filters once a year to
maintain its 99.99% filtration efficiency.
• oroughly clean filter tubes and tank after each use. is will prevent
odor and mildew. e recovery tank lid (green) should never be placed
in the dishwasher for cleaning. All other clear plastic recovery tank parts
are dishwasher safe.
• Once you remove the initial build up (6-8 weeks of cleaning), you
should be able to clean your entire home with one filling of water.
13
12

7
For more information or to place an order call 1-888-764-3700
Steam Cleaning
Instructions-Set Up
1. Be sure switch is off and canister is unplugged.
2. Remove the recovery tank from the canister and
remove the inner tube. is is accomplished by
twisting the tube slightly and lifting. e larger
outer tube must remain in the tank. When steam
cleaning you DO NOT put water in the recovery
tank.
3. Replace recovery tank, close and latch front lid.
4. Remove twist cap from the Steam Cleaning
Solution Tank. Add two ounces of ermax Liquid
Carpet & Upholstery Cleaner and then fill with
hot tap water. Replace the cap and shake the
solution tank to thoroughly mix the cleaner.
5. Open the rear lid of the canister and place the
solution tank on the top of the canister.
6. Plug the power cord from the solution tank into
the cord outlet.
7. Connect the vacuum hose end to the hose lock
and connect the vacuum hose handle to the sliding
wand by inserting the handle end into the wand
and gently twist until the button snaps into place.
8. Attach the steam head to the end of the telescopic
stainless steel wand.
2
4
7
8
5
6

8For more information or to place an order visit www.thermaxaf.com
Steam Cleaning
Operational Instructions
1. With the power switch on, place the steam head about three feet in
front of you.
2. Depress the trigger to spray solution and slowly pull the steam head
toward you, while applying slight down pressure.
3. At the end of each backward stroke, release the trigger and push the
wand and the recovery head assembly back and forth over the same
area several times, using moderate pressure to remove as much solution
from the carpet as possible. Use the clear view recovery head as a visual
indicator to let you know when the carpet is clean and when as much
solution as possible has been removed from the carpet.
4. Overlap ½ and move on to the next section of carpet and repeat steps
1-3 until cleaning is complete.
5. When the spray from the solution hose gets weak and/or the pump
starts making a loud noise, it is an indication the solution tank is out of
solution. Turn off the machine and refill the solution tank as directed.
It is also recommended the recovery tank be emptied at the same time.
Replace both tanks and continue cleaning.
6. It is recommended that carpet be cleaned at least twice a year and more
often in high traffic areas.
7. To use the optional Hand Wand, simply attach it to the end of the vac
hose and connect the hose to the trigger valve. Fill tanks as described
above and proceed.
11
10
9
9. Snap trigger valve bracket onto handle as shown.
10. Connect the hose from the steam head into the spray
valve.
11. Connect the end of the trigger solution hose into the
solution tank fitting.
STEAM CLEANING
INSTRUCTIONS-SET UP CONTINUED
7

9
For more information or to place an order call 1-888-764-3700
MAINTENANCE AND CLEANUP INSTRUCTIONS
1. When the steam cleaning process is complete, disconnect trigger
solution hose from solution tank. e solution tank should then be
unplugged and emptied of the remaining solution and the exterior
wiped off. It can then be stored until the next use.
2. To drain the solution hoses, turn on the power switch, hold the
trigger solution hose above your head and press the trigger. All of the
remaining solution will drain out and is extracted through the steam
cleaning recovery head into the recovery tank.
3. Remove the trigger valve and steam head.
4. To flush out wand and vac hose, fill a container with hot water and
extract. Send 2 paper towels through to properly clean and dry out
wand and hose.
5. e recovery tank should be emptied and cleaned with water. Replace
the inner tube.
Steam Cleaning Tips
• When operating canister as a hot-water extraction system, be sure
filtration tube is removed from dome.
• In this function, always use the urethane foam filter in the secondary
filter holder.
• Generally, a back and forth scrubbing action, cleaning small sections of
carpet at a time, is the best method of hot water extraction. e proper
amount of solution to spray into the carpet depends upon the degree to
which the carpet is soiled. e more soiled the carpet, the more solution
and scrubbing action is required, even to the point of going over the
area being cleaned several times. Always clean your carpet before it
becomes noticeably soiled. See Carpet Maintenance Program on page
11.
• IMPORTANT: It is important to empty the filtration recovery tank
each time before re-filling the solution tank. To prevent overflow, your
AF2 employs an automatic flotation ball shut-off system. Always be sure
that the flotation ball is in its holder when operating your AF2.
2
4
3

10 For more information or to place an order visit www.thermaxaf.com
Picking Up Liquids/Wet Pick-up
1. Be sure switch is off and canister is unplugged.
2. Before inserting the recovery tank, remove the filtration tube from the
filtration chamber inlet. (Filtration tube must be removed during wet
pick-up or steam cleaning function.)
3. Be sure that the secondary urethane foam filter (black) is in place in the
front lid.
4. Attach electrified vac hose (EVH) into hose lock (page 5 #5). NoTe:
DO NOT insert the male plug end of the EVH cord into the auxiliary
outlet when operating your AF2 as a wet pickup vacuum.
5. If attached, remove motorized vacuum head and power cord from
sliding wand and replace with the spray and recovery head, hard floor
tool, any on board tool, or optional squeegee.
6. Plug canister into proper wall outlet, turn power switch on and
commence operation.
Tips for Picking Up Liquids,
and Wet Pick-up:
• Never use the motorized dry vacuum head for wet pick-up.
• When using the canister to pick up water or other liquids, be sure the
filtration tube is removed from the filtration chamber.
• After vacuuming up a sticky or messy substance, flush clean the EVH
and wand by vacuuming clean, warm solution through the wand end as
described on page 9.
• Your AF2 system employs an automatic flotation ball shut-off system
to prevent overflow. When recovering solution during the wet pick-up
or hot water extraction functions, be sure that the flotation ball is in its
holder.
5
2

11
For more information or to place an order call 1-888-764-3700
Carpet Maintenance Program
With the extremely high cost of carpet today, it is important to develop and
implement a planned carpet maintenance program. is is the best way to
prolong carpet life, as well as protect your investment.
For everyday maintenance of your carpets, vacuuming with the ermax
AF2 is important. However, keep in mind, vacuuming alone will not totally
remove all soils and oily substances from the carpet fibers no matter how
powerful the vacuum may be. Periodically, depending on the degree of
traffic over the carpet, a deep cleaning of the carpet fibers is imperative. is
is where the hot water extraction (steam cleaning) function of the ermax
AF2 is needed. e AF2 has this capability. (If yours is not so equipped,
contact your local distributor for information.) Hot water extraction is a
flushing action of hot water and cleaning solutions sprayed into the carpet
fibers or upholstery. is process releases the soils and grease and the now
dirty solution is extracted. is process can be compared to washing your
carpet or upholstery the same as you would your clothes.
Listed below are a few tips for proper carpet maintenance:
• Vacuum carpets on a regular basis depending on traffic frequency.
• Use area mats where traffic enters a carpeted area from a hard surface.
• Schedule hot water extraction of your carpets at least twice a year, and
more frequently in high-traffic areas.
• Don’t wait until carpets are noticeably dirty before hot water extracting.
It may be too late to get out all dirt and stains.
Service of Double-
Insulated Appliances
In a double-insulated appliance, such as your ermax AF2, two (2)
systems of insulation are provided instead of grounding. No grounding
means is provided on a double-insulated appliance, nor should a means for
grounding be added to the appliance. Servicing a double-insulated appliance
requires extreme care and knowledge of the system, and should be done
only by qualified service personnel. Replacement parts for double-insulated
appliances must be identical to the parts they replace. is double-insulated
appliance is marked with the words “DOUBLE INSULATED” on the
inside top case assembly.

12 For more information or to place an order visit www.thermaxaf.com
Triple Filtration
e ermax AF2 has a unique triple filtration system. e water in your
Water Filtration Recovery Tank is the primary filter. It strips away the dirt
and all particles that the water can saturate. As the air leaves the tank, it
travels through a second filter in the tank lid. is filter captures larger
stray particles. Immediately following this high density foam filter, the air
moves to the final filter. Either the black urethane foam filter or the white
electrostatic allergy filter traps the smallest of particles, which include
allergens and any other particulates not captured in the two previous filter
systems. is leaves the air that is re-entering the room the cleanest possible.
All three filters are washable or replaceable:
• e water is simply poured out after each use and refilled when you’re
ready to clean again.
• e secondary foam filter in the tank lid and the urethane foam filter in
the front lid are washable in warm soapy water, rinse, dry and replace.
• e white electrostatic filter in the front lid must be replaced when it
becomes completely covered with dust, or when dirt appears on the
back side. Snap it out of its the filter holder and install a new one.
Thermax AF2 Secondary
Filtration System Instructions
1. Place either the reusable urethane foam filter or the disposable
Electrostatic Allergy Filter in the filter holder base.
2. Place the filter retainer over the filter holder base with filter in place.
Press down on all 4 sides until the filter retainer snaps firmly in place.
3. Place the assembled filter base side down into the Front lid. Your
secondary filtration system is now in place. NoTe: e foam core filter
should always be in place during any operation.
When to Use the Black
Urethane Filter
• e black urethane foam filter is for general overall use and can be used
during all phases of operation. It is a washable and reusable filter.
• Always during the hot water extraction function.
• During normal vacuuming.
NOTE: It is highly recommended to replace your two foam filters a
minimum of once per year.
3

13
For more information or to place an order call 1-888-764-3700
When to Replace the
White AF2 Filter
• Replace only when filter is visually covered and overloaded with dust
particles.
• Every 4 to 6 weeks depending on local soil conditions and frequency of
vacuuming or about a dozen vacuumings.
• Since soil type varies from state to state, city to city, and even home to
home, the type of soil contained in your carpets will have an effect on
filter replacement frequency.
• e AF2 Electrostatic filter can appear to be completely soiled and
still remain 100% effective in filter and airflow efficiency. erefore,
as a general rule, we recommend usage for at least 4 weeks between
replacement.
• e “dirt” you see on the surface of the AF2 filter represents millions
of non water soluable and microscopic sized particulates that would
normally escape undetected into the surrounding environment with any
other standard type vacuum.
• During hot water extraction if urethane foam filter is not available.
Motorized Power Head Service
QUARTERLY CLEANING
• To keep your power head operating at its peak, we recommend the
following:
A) Remove the case top from your power head by first removing the
single screw from the underside of the unit. It is clearly marked with
engraving. B) At the rear of the unit are two tabs. Press tabs in and lift.
Case will now lift off. c) Remove the brush roll by simply lifting it
out of its cradle. e ends of the brush roll where the locating tabs are
should be cleaned throughly. Any carpet strings, hair or other debris
around the brush roll should be removed. d) Any dust build up around
the motor or air vents should be removed. Any dust build up around
the air passage should also be cleared.
• To reinstall the belt and brush roll put belt around the brush roll and
slip the belt over the motor shaft. en insert the end of the brush roll
furthest from the motor. (Note: the orientation tab is in the shape of
a half circle). Once this end is in place, roll the opposite end in place
until it pushes all the way in. It also has an orientation tab in the shape
of a rectangle. Spin brush roll until belt is on track.
• Replace the case top by inserting the front of the case nearest the brush
roll and then snap the back in place over the tabs. Replace the screw in
the underside of the unit.
• Periodically remove debris that may wrap around brush roll.
ANNUALLY
• Over a period of time the belt will stretch out and the brush roll will
wear. It is recommended that on an annual basis the belt and brush roll
be replaced. is will ensure the power head is operating at its peak
performance.
PARTS LIST:
1. Agitator Brush 05-342-00
2. Drive Belt 05-349-00
A
B
C

14 For more information or to place an order visit www.thermaxaf.com
Parts Diagrams Canister Only
1. Front Lid Assembly Complete 24-105-000
2. Hose Lock Assembly 37-025-000
3. Rear Lid Assembly 24-050-001
4. Crevice Tool 01-242-01
5. Hinge Kit with Screws 32-905-000
6. Latch Kit with Screws 32-902-000
7. Upholstery Tool with slide on brush 35-300-000
8. Dusting Tool with brush 35-301-00
9. Electrostatic Allergy Filter, 2 pk 05-315-00
10. Primary Filter Base 01-045-00
11. Filter Retainer 04-041-00
12. Primary Foam Filter 05-316-00
Parts Recovery Tank Assembly
1. Recovery Tank Assembly with lid (English) 22-050-000
2. Recovery Tank 01-280-00
3. Recovery Tank Lid Assembly 24-260-000
4. Baffle/Ball/Cage Assembly 32-910-000
5. Foam Core Filter 05-329-00
6. Foam Core Holder 01-224-00
7. Inner Filtration Tube 32-913-000
8. Outer Filtration Tube Chamber 01-220-00
1
3
2
7
8
4
6
5
10
3
4 7 8
5
11
12 9
6
1
2

15
For more information or to place an order call 1-888-764-3700
Hard Floor Tool
MAINTENANCE/CLEANING INSTRUCTIONS: Remove Debris in
neck of tool and brush as required.
1. Hard Floor Tool 10" 35-310-001
Telescopic Stainless Steel Wand
MAINTENANCE/CLEANING INSTRUCTIONS: Periodically flush
with hot water to remove dust and debris.
1. Sliding Wand 32-075-000
Electrified Vacuum Hose
Assembly (120V)*
1. Hose Connector 01-064-00
2. Complete 120v 10' Assembly 21-120-001
3. Complete 120v 14' Assembly (optional) 21-314-214
4. Complete 120v 20' Assembly (optional) 21-314-220
*Electric version only applies where accepted by electrical approval
authorities.
Vacuum Hose Assembly
Non-Electric Version (230v)*
1. Hose Connector 01-064-00
2. Complete Assembly 7' 21-015-000
3. Complete Assembly 10' 21-000-001
10 ft.
14 ft.
20 ft.
2
3 4
7 ft.
2
10 ft.
3

16 For more information or to place an order visit www.thermaxaf.com
Steam Cleaning Solution Tank with
Built-in Pump Parts Diagram
1. Pump Housing 01-500-00
2. Vented Cap 24-302-001
3. Pump Housing Screw 05-054-00
4. Pump, 55 PSI 02-180-00 (120v)
5. Pump, 55 PSI 02-180-01 (230v)
6. Solution Hose Assembly 20-019-012
7. Power Cord Assembly 27-005-000
8. Panel Disconnect 03-400-00
Steam Head Assembly
MAINTENANCE/CLEANING INSTRUCTIONS: Periodically flush
with hot water to remove dirt and debris.
1. Steam Head Assembly 35-400-000
(with plastic disconnect)
Trigger Spray Valve Assembly
MAINTENANCE/CLEANING INSTRUCTIONS: Flush hose with
warm water after each use. Make sure water has completely drained from
valve and hose prior to storage.
1. 10” Solution Hose & Spray Valve Assembly 29-567-209
2. 14” Solution Hose & Spray Valve Assembly 29-562-214
3. 20” Solution Hose & Spray Valve Assembly 29-562-220
(All include plastic disconnect)
2 3
1
1
2
3
7
8
6
4

17
For more information or to place an order call 1-888-764-3700
Optional Accessories: Dry
1. Turbine Powered Hand Wand 35-018-00
e mini-turbo brush is driven by non-electric air turbine technology,
working off the powerful airflow of the AF2. It’s the perfect
complement to the AF2 system for stairs, upholstery and any other
small, tight area where a compact, hand-held head is required.
2. Deluxe Hard Floor Tool 35-515-000
e Deluxe Floor Tool is to complement the cleaning ability of the AF2
on bare floors. ere is an optional pad which attaches to the bottom of
this tool to help safeguard hard wood floors.
3. Surface Sweeper A-2101
Great for quick pick-ups on hard floors, carpets & area rugs
4. Cushion Cleaning Bag 06-630-00
Removes stale air trapped in cushions and pillows.
Optional Accessories: Wet
1. Steam Cleaning Accessory Kit (A, B, C & D) 32-030-121
Includes everything needed for steam cleaning with your AF2: A) Aqua
Spray & Recovery Head, B) Water Valve & Solution Hose, C) Carpet
Cleaner Solution Tank (1-Gal.) with built-in pump, and D) 16oz.
erminator 100 Carpet & Upholstery Cleaning Solution.
2. Squeegee Brush Complete with Spray Assembly 35-410-000-P
Ideal for cleaning windows & hard floors.
3. Squeegee Brush Assembly 35-268-000
4. Squeegee Spray Assembly 29-580-002
5. Upholstery Hand Wand 35-271-000
For steam cleaning hard to reach areas, carpeted stairs & car interiors.
(all include plastic disconnect)
2
4
3
1
C
D
4
3
A
5
B
2
Wet and Dry optional accessories on this page do not come standard with
your AF2. Contact your local Distributor or the corporate office to receive
details on purchasing or receiving then free through our referral program.

18 For more information or to place an order visit www.thermaxaf.com
Thermax
Steam Cleaning Solutions
Nearly thirty-five years of extensive field use and refinement
have proven our safe and effective cleaning solution formulas.
ermax has a product for just about every carpet cleaning
application. Formulated specifically to be used in conjunction
with ermax AF2 carpet cleaning systems the products and
their application are further defined below.
LIQUID CARPET & UPHOLSTERY
CLEANER (6060-I): (16 or 32oz.) Designed
to lift oils, stains, and deeply embedded soils
from carpet & upholstery for easy extraction.
Professionally formulated to dispense a perfect
blend of gentle yet effective cleansing agents for
cleaning carpets. Cleans and brightens leaving
carpets soft to the touch with no “soapy” residue.
CARPET & UPHOLSTERY
DEODORIZER (5080-I): (32oz.) While
steam cleaning, it neutralizes and removes
offensive odors from carpet & upholstery at their
source, especially pet urine, smoke and other
organic matters. Leaves a fresh, pleasant scent.
BIOZYME STAIN & PET ODOR
ELIMINATOR (5150-I): (32oz.) Liquifies
and digests organic waste, through beneficial
bacterial enzyme action. Eliminates old and new
odors at their source. Product is safe to use
around pets, humans, and environment. No
harsh chemicals. Cleanses and deodorizes.
PRE-SPOTTER (6030-I): (32oz.) Great for
pre-treating heavily stained carpets & upholstery
before steam cleaning. Loosens stubborn stains,
oils, and dirt from the fibers for easy removal
with any ermax system. e use of Pre-Spotter
is an important step in obtaining the best
cleaning results.
DEFOAMER (6070-I): Defoamer is used in
the solution recovery tank to control potentially
damaging foam build-up within the tank. Every
carpet being cleaned contains foreign matter
within its fibers. Often times, this foreign matter
has a tendency to excessively foam when
extracted into the recovery tank of the cleaning
system. Using Defoamer while cleaning
minimizes the potential for the foam to overflow
into the vacuum motor.
Thermax
Air Purification Solutions
AQUA BLUE (19-310-00-I) /
VALLEY FRESH (940-I):
ese are a concentrated blend of
proprietary elements that
therapeutically clean and freshen
your indoor environment when used
as directed. Just add the required
amount into the water of the
recovery/filtration tank before and
during vacuuming to achieve the
desired result. Your home will permeate with a fresh, clean,
healthy aroma!
AROMATIC FRAGRANCES:
Visit www.thermaxaf.com or call 1-888-764-3700 to order the
fragrance of your choice: Spring Rain, Summer Sorbet , Fresh
Apple, Orange, Apple Cinnamon, Eucalyptus & Menthol,
Cinnamon & Spice, Lemon, Sea Mist, Plumeria, Eucalyptus,
Vanilla, Strawberry, Fresh Linen, or Mulberry. Each bottle is
sold separately or by the case (12 per case), and contains 1.6
oz. oil-based solution used for leaving an aromatizing scent
behind while vacuuming or purifying the air.
MINIMAX AIR FRESHENERS:
ese miniature water based air fresheners work off the same
concept as the AF2. e Minimax uses the same deodorizers
& aromatizers listed above. e large model is designed to
freshen the air in your home, while the smaller model comes
equipped with a power cord suited for your vehicle.
Table of contents