Award PPS863BS SI User manual

Instructions Manual
PPS863BS SI - PPS862/3 SI

2
2
INDEX
SAFETY INFORMATION ......................................................................................................................................................... 3
CHARACTERISTICS ............................................................................................................................................................. 6
INSTALLATION ...................................................................................................................................................................... 7
USE ........................................................................................................................................................................................ 9
MAINTENANCE ................................................................................................................................................................... 10
EN

EN
3
3
SAFETY INFORMATION
For your safe y and correc opera ion of he appliance, read his manual
carefully before ins alla ion and use. Always keep hese ins ruc ions
wi h he appliance even if you move or sell i . Users mus fully know he
opera ion and safe y fea ures of he appliance.
The wire connec ion has o be done by specialized echnician.
•The manufac urer will no be held liable for any damages resul ing from
incorrec or improper ins alla ion.
•The minimum safe y dis ance be ween he cooker op and he ex rac or
hood is 650 mm (some models can be ins alled a a lower heigh ,
please refer o he paragraphs on working dimensions and ins alla ion).
•If he ins ruc ions for ins alla ion of he gas hob specify a grea er
dis ance, his mus be respec ed.
•Check ha he mains vol age corresponds o ha indica ed on he
ra ing pla e fixed o he inside of he hood.
•Means for disconnec ion mus be incorpora ed in he fixed wiring in
accordance wi h he wiring rules.
•For Class I appliances, check ha he domes ic power supply
guaran ees adequa e ear hing.
•Connec he ex rac or o he exhaus flue hrough a pipe of minimum
diame er 120 mm. The rou e of he flue mus be as shor as possible.
•Regula ions concerning he discharge of air have o be fulfilled.
•Do no connec he ex rac or hood o exhaus duc s carrying
combus ion fumes (boilers, fireplaces, e c.).

EN
4
4
•If he ex rac or is used in conjunc ion wi h non-elec rical appliances (e.g.
gas burning appliances), a sufficien degree of aera ion mus be
guaran eed in he room in order o preven he backflow of exhaus gas.
When he cooker hood is used in conjunc ion wi h appliances supplied
wi h energy o her han elec ric, he nega ive pressure in he room mus
no exceed 0,04 mbar o preven fumes being drawn back in o he room
by he cooker hood.
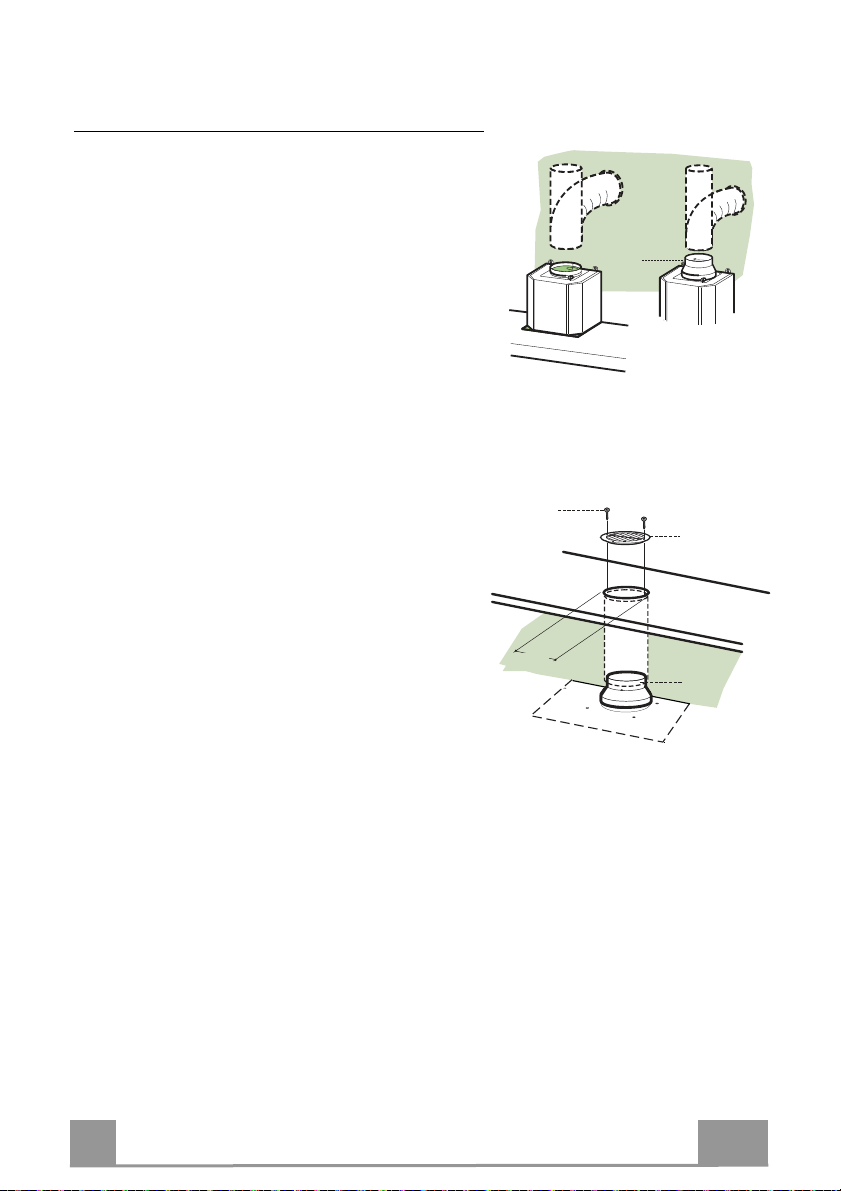
•The air mus no be discharged in o a flue ha is used for exhaus ing
fumes from appliances burning gas or o her fuels.
•If he supply cord is damaged, i mus be replaced from he manufac-
urer or i s service agen .
•Connec he plug o a socke complying wi h curren regula ions, loca -
ed in an accessible place.
•Wi h regards o he echnical and safe y measures o be adop ed for
fume discharging i is impor an o closely follow he regula ions provid-
ed by he local au hori ies.
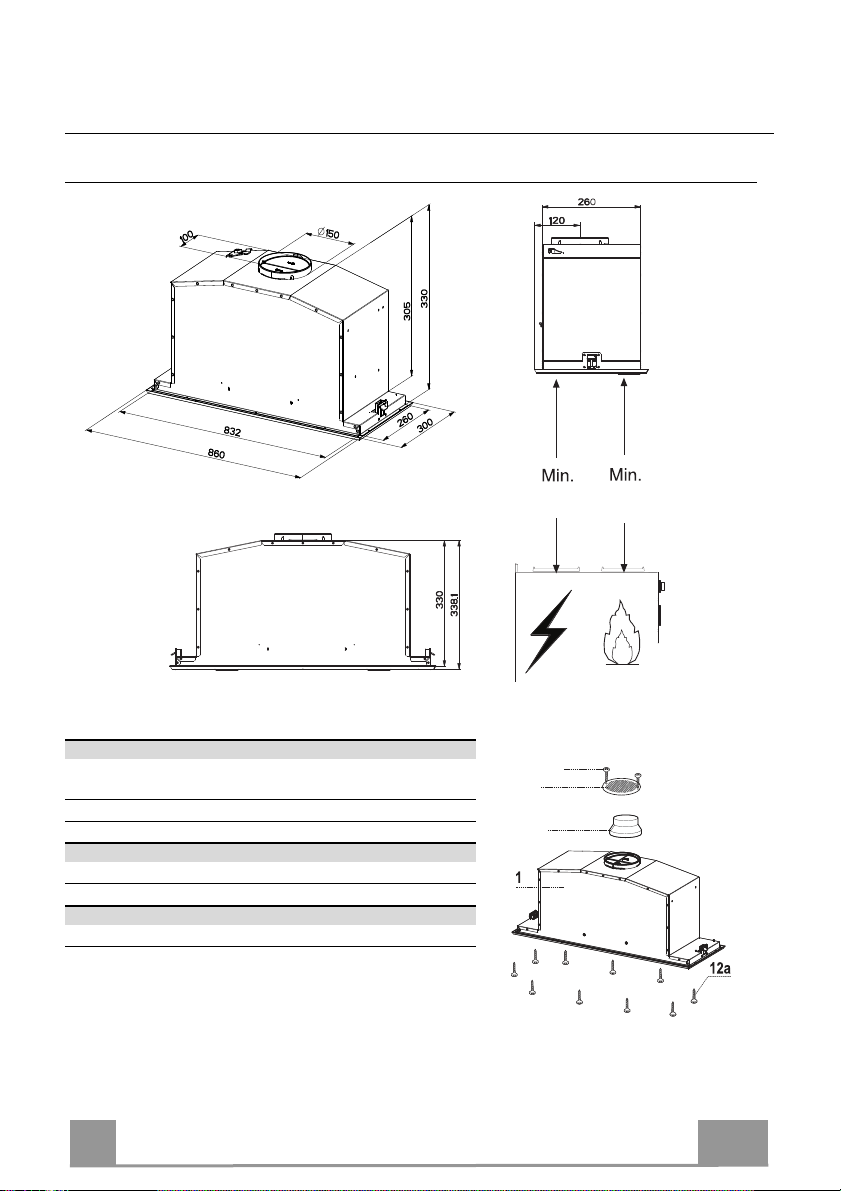
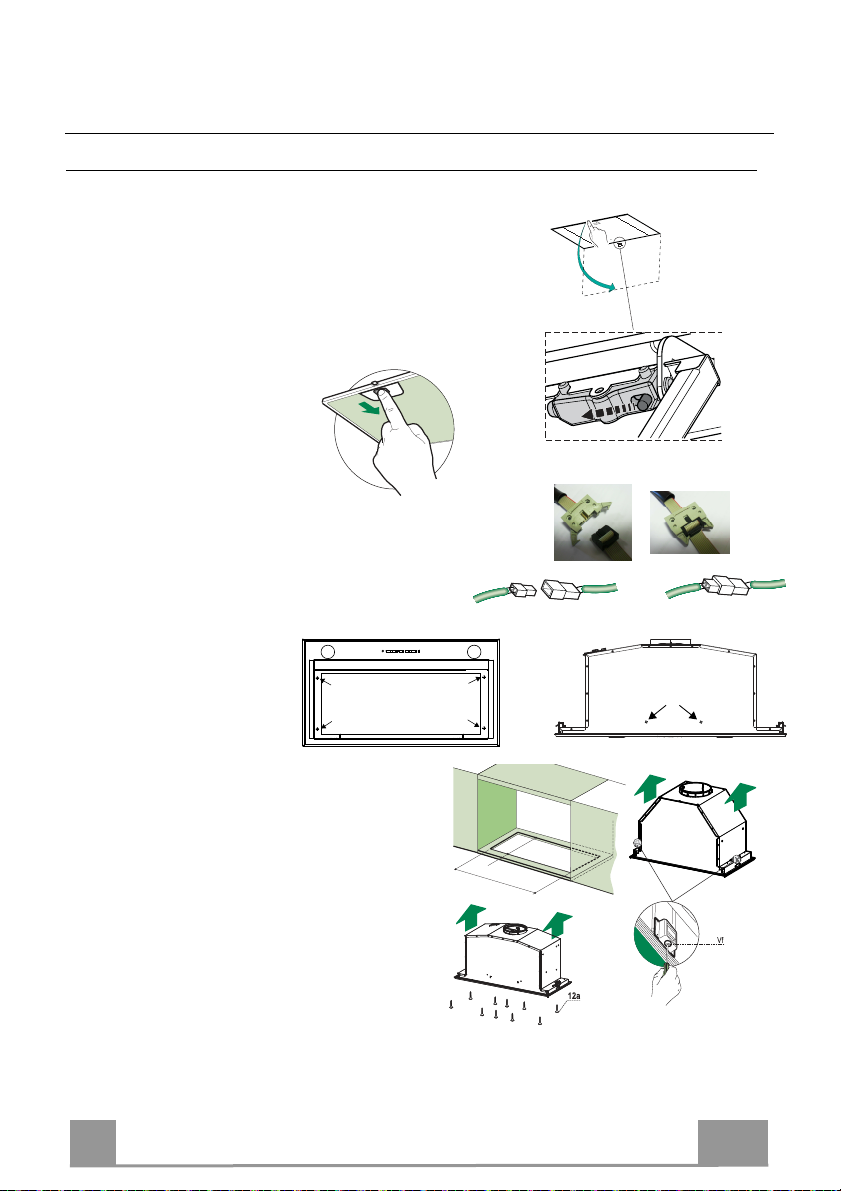
WARNING: Before ins alling he Hood, remove he pro ec ive films.
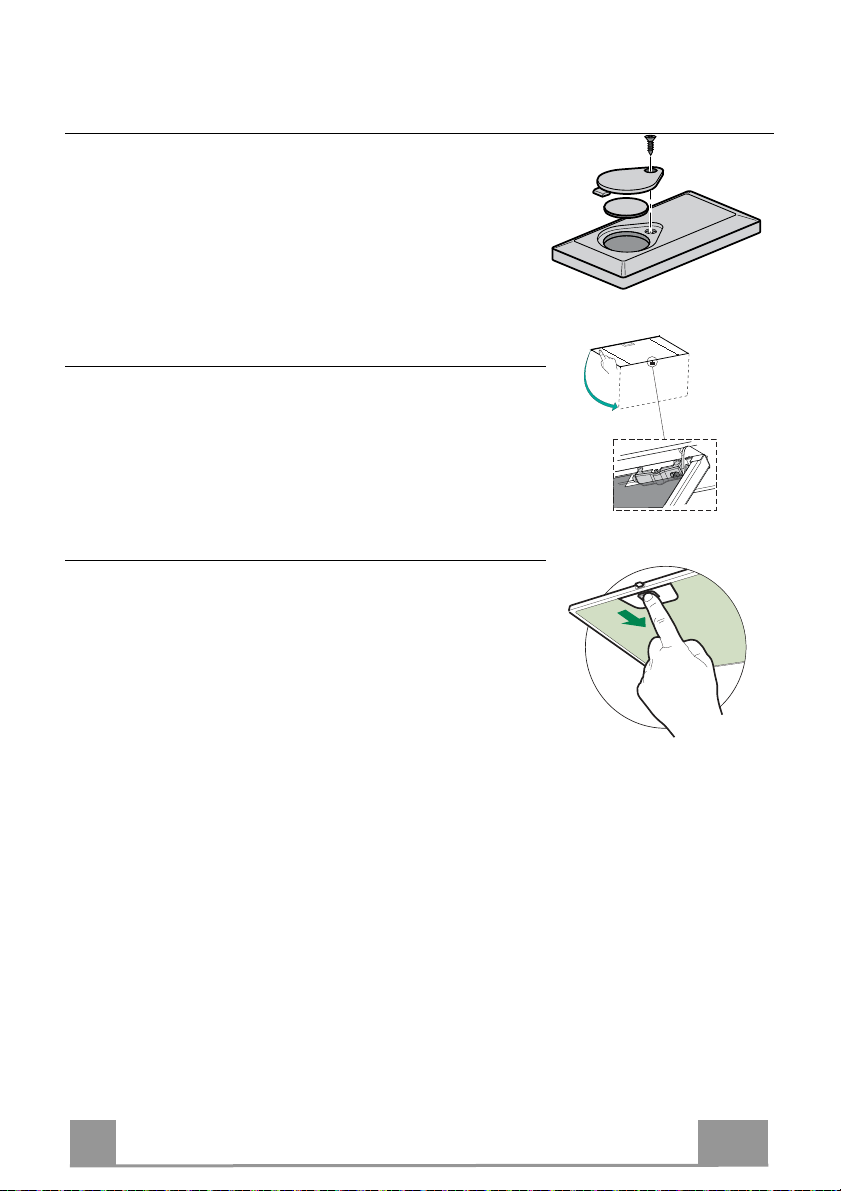
•Use only screws and small par s supplied with the hood.
WARNING: Failure o ins all he screws or fixing device in accordance
wi h hese ins ruc ions may resul in elec rical hazards.
•Do no look direc ly a he ligh hrough op ical devices (binoculars,
magnifying glasses…).
•Do no flambè under he range hood; risk of fire.
•This appliance can be used by children aged from 8 years and above
and persons wi h reduced physical, sensory or men al capabili ies or
lack of experience and knowledge if hey have been given supervision
or ins ruc ion concerning use of he appliance in a safe way and under-
s and he hazards involved. Children shall no play wi h he appliance.
Cleaning and user main enance shall no be made by children wi hou
supervision.
•Children should be supervised o ensure ha hey do no play wi h he
appliance.

EN
5
5
•
The appliance is no o be used by persons (including children) wi h re-
duced physical, sensory or men al capabili ies, or lack of experience
and knowledge, unless hey have been given supervision or ins ruc ion.
Accessible par s may become ho when used wi h cooking appliances.
•Clean and/or replace he Fil ers af er he specified ime period (Fire
hazard). See paragraph Care and Cleaning.
•There shall be adequa e ven ila ion of he room when he range hood is
used a he same ime as appliances burning gas or o her fuels (no
applicable o appliances ha only discharge he air back in o he room).
•The symbol on he produc or on i s packaging indica es ha his
produc may no be rea ed as household was e. Ins ead i shall be
handed over o he applicable collec ion poin for he recycling of elec-
rical and elec ronic equipmen . By ensuring his produc is disposed of
correc ly, you will help preven po en ial nega ive consequences for he
environmen and human heal h, which could o herwise be caused by
inappropria e was e handling of his produc . For more de ailed infor-
ma ion abou recycling of his produc , please con ac your local ci y of-
fice, your household was e disposal service or he shop where you pur-
chased he produc .

EN
6
6
CHARACTERISTICS
Dimensions
Com onents
Ref. Q.ty Product Com onents
1 1 Hood Body, comple e wi h :Con rols, Ligh , Blower,
Fil ers
8 1 Direc ioned grid
9 1 Reducer Flange ø 150-120 mm
Ref. Q.ty Installation Com onents
12a 10 Screws
12e 2 Screws 2,9 x 9,5
Q.ty Documentation
1 Ins ruc ion Manual
9
8
12e
650 mm 750 mm

EN
7
7
INSTALLATION
Fitting the Hood cano y
BEFORE FITTING THE HOOD TO THE WALL UNIT, PROCEED AS FOLLOWS:
• Open the suction panel by turning the specific knob.
• Disconnect the panel from the hood canopy by sliding the
fixing pin lever.
• Remove grease filters.
• Disconnect the wires to the Commands at the connectors.
• Disconnect the wires to the Light at the connectors.
• Remove the frame by un-
fastening the 6 screws.
• The Hood can be installed directly on the
underside of the wall unit.
• Create an opening in the bottom of the wall
unit, as shown.
• Insert the hood until the side supports snap into
place.
• Fasten using the 10 screws 12a provided.
• Lock in position by tightening the screws Vf
from underneath the hood.
• Screw the Frame back into place using the 6 screws removed as described above, re-connect
the wires to the Commands and Light, replace the metal grease filter and the Panel.
500 - 680
260
13
495 - 675 -835

EN
8
8
Connections
DUCTED VERSION AIR EXHAUST SYSTEM When
installing the ducted version, connect the hood to the
chimney using either a flexible or rigid pipe ø 150 or
120 mm, the choice of which is left to the installer
(ø 150 mm is recommended for optimum performance).
• To install a ø 120 mm air exhaust connection, insert
the reducer flange 9on the hood body outlet.
• Fix the pipe in position using sufficient pipe clamps
(not supplied).
• Remove possible charcoal filters.
9
ø 120ø 150
RECIRCULATION VERSIO
N AIR OUTLET
• Cut a hole ø 125 mm in any shelf that may be posi-
tioned over the hood.
• Insert the reducer flange 9on the hood body outlet.
• Connect the flange to the outlet on the shelf over the
hood by using a flexible or rigid pipe ø120 mm.
• Fix the pipe in position using sufficient pipe clamps
(not supplied).
• Fix the air outlet grid 8on the recirculation air outlet
by using the 2 screws 12e (2,9 x 9,5) provided.
• Ensure that the activated charcoal filters have been
inserted.
9
ø 125
8
12e
ELECTRICAL CONNECTION
• Connect the hood to the mains through a two-pole switch having a contact gap of at least 3
mm..

EN
9
9
L
T1
T2
T3
T4
S1
L
S1
T1 T2 T3 T4
LT3
S1
T2
T1 T4
USE
Control anel
Button Led Function
L- Turns the lights on/off at maximum strength.
T1 Fixed Turns the motor on/off at speed one.
T2 Fixed Turns the Motor on at speed two.
Press and hold the button for approximately 3 seconds, with all the loads turned
off (Motor and Lights), to turn the Activated Charcoal Filter alarm on. The
relevant LED flashes twice to confirm.
To turn the alarm off, press the button again and hold for at least 3 seconds. The
relevant LED flashes once.
T3 Fixed Turns the Motor on at speed three.
Press and hold the button for approximately 3 seconds, with all the loads turned
off (Motor and Lights), to perform a reset of Filter saturation alarm. The LED S1
flashes three times.
T4 Fixed Turns the Motor on at INTENSIVE Speed.
This speed is timed to run for 6 minutes. At the end of this time, the system
returns automatically to the speed that was set before. If it is activated with the
motor turned off, the hood will switch to OFF at the end of the time.
Press and hold for 3 seconds to enable the remote control, indicated by the LED
flashing twice.
Press and hold for 3 seconds to disable the remote control, indicated by the LED
flashing just once.
S1 Fixed Signals the Metal Grease Filter saturation alarm, indicating that it is necessary to
wash the filters. The alarm is triggered after the Hood has been in operation for
100 working hours. (Reset see the parag. Maintenance)
Flashing When this is activated, it signals the Activated Charcoal Filter saturation alarm,
indicating that the filter must be changed; the Metal Grease Filters must also be
washed. The Activated Charcoal Filter saturation alarm comes
into operation after the Hood has been working for 200 hours. (Activation and
Reset see the parag. Maintenance)

EN
1
0
10
MAINTENANCE
REMOTE CONTROL (OPTIONAL)
This appliance can be commanded using a remo e con rol, powered by
a CR2032 ype 3 V ba ery (no supplied).
• Do no place he remo e con rol near hea sources.
• Do no discard he ba eries wi h normal was e, hey mus be pu in o
he specific con ainers.
O ening Panel
• Open the Panel by pulling it.
• Clean the outside with a damp cloth and neutral detergent.
• Clean the inside using a damp cloth and neutral detergent; do
not use wet cloths or sponges, or jets of water; do not use
abrasive substances.
Metal grease filters
These can be washed in the dishwasher, and need to be cleaned
whenever the S1 Led comes on or at least once every 2 months
use, or more frequently if use is particularly intensive.
CLEANING THE FILTERS
Resetting the alarm signal
• Turn the Lights and the Suction Motor off.
• Press T3 and hold for at least 3 seconds, until LED flashes
three times in confirmation.
Cleaning the Filters
• Open the doors.
• Remove the Filter, pushing it towards the back of the unit and
at the same time pulling downward.
• Wash the filter without bending it, and leave it to dry thorough-
ly before replacing (if the surface of the filter changes colour
over time, this will have absolutely no effect on its efficiency).
• Replace, taking care to ensure that the handle faces forwards.
• Close the doors again.

EN
1
1
11
Activated Charcoal Filter (Recirculation Version)
This cannot be washed or regenerated, and must be changed when led S1 starts to flash, or at
least once every 4 months. The Alarm signal, if it has been activated, only appears when the
Suction motor is turned on.
Activating the alarm signal
• In Recirculation Version Hoods, the Filter Saturation Alarm must be activated on installa-
tion or at a later date.
• Turn the Lights and the Suction Motor off.
• Press button T2 and hold it for 5 seconds until the LED flashes twice in confirmation:
CHANGING
Resetting the alarm signal
• Turn the Lights and the Suction Motor off.
• Press T3 and hold for at least 3 seconds, until LED
flashes three times in confirmation.
Changing the Filter
• Open the doors.
• Remove the Metal Grease Filter.
• Remove the saturated Activated Charcoal Filters, as
indicated (A).
• Fit the new Filters, as indicated (B).
• Replace the Metal grease filters.
• Close the doors.
A
B
Lighting unit
• For replacement contact technical support ("To purchase
contact technical support").

991.0607.634_05 - 200917
D00004901_04
This manual suits for next models
1
Table of contents
Other Award Ventilation Hood manuals

Award
Award CS1-903S User manual

Award
Award E-231 Operating manual

Award
Award CH082-60 SI User manual

Award
Award CHO83-901 User manual

Award
Award E-295 User manual

Award
Award PPS602 User manual

Award
Award PPS6031 User manual

Award
Award PPS902SI User manual

Award
Award Downdraft DD602S User manual

Award
Award PPS1202 User manual
Popular Ventilation Hood manuals by other brands

Faber
Faber Tratto Isola installation instructions

Security Chimneys
Security Chimneys Secure Temp S2100 manual

controlair
controlair SH600X Manual for the installation, use and maintenance

Xo
Xo XOCYL16B User instructions

Schweigen
Schweigen IS4110S installation guide

EVERKITCH
EVERKITCH ATLAN instruction manual