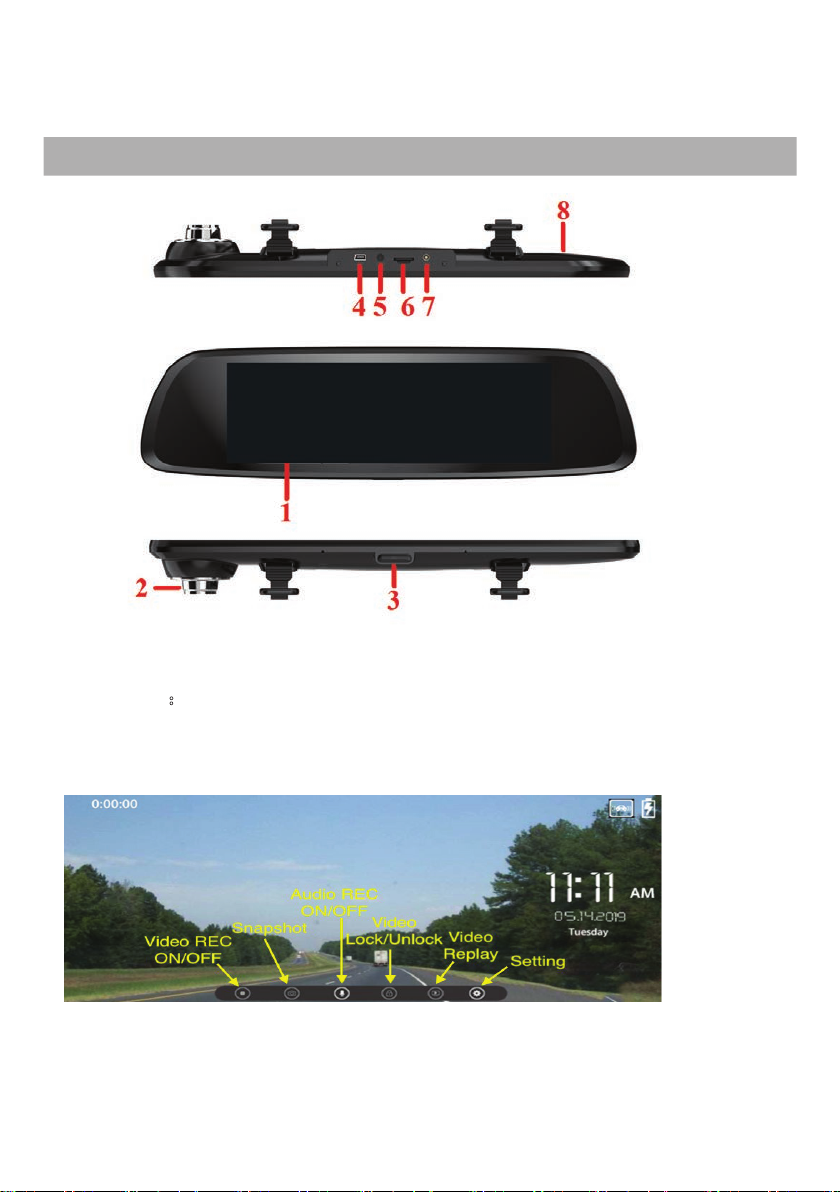
Axis DVR1905K User manual

1
INSTRUCTION MANUAL
DVR1905K
6.86” Touchscreen Rearview Mirror Kit with DVR
2YEAR WARRANTY
SPECIFICATIONS
GENERAL
- Vertical Viewing Angle Adjustable via Touchscreen
- Built-In Lane Departure Warning System
- Bulit-In Microphone / Speaker
- Operating Temperature: -10°C to +60°C
- Built-In Battery: 500mAh
- Working Voltage: DC +5V
- Working Current: 2A Max
- Power: 10W Max
MONITOR
- 6.86” Touchscreen LCD Screen
- Highly Reflective Mirror Finish
- Anti-Glare Glass
- Front or Rear View
- Adjustable Rubber Straps
- 12/24V via Cig Lead
FRONT CAMERA
- Full HD: 1920 x 1080P 30FPS
- Swivel Adjustable
- 6 Layer Full Glass Lens
- 148° Wide View Angle
REAR CAMERA
- HD: 1280 x 720P 25FPS
- 120° Wide View Angle
- Runs off Mirror Power
- 12V Reverse Trigger
- 8m Camera to Mirror Lead
DVR
- G-Sensor
- Parking Monitor / G-Sensor / Loop Recording
- Supports up to 64GB SD Card Class 10 (not included)
INCLUDES:
Touchscreen Rearview Miirror, Rear Camera,
12/24V Cig Lead Car USB Charger,
Adjustable Rubber Straps, Installation Hardware
DUAL FRONT & REAR RECORDING

2
Thank you for choosing the DVR1905K FHD Rearview Mirror Two-way Dash Cam, this
dash cam adopts the high-performance MSTAR/AIT8336 Chipset, supporting 1080P
Full HD video. Please read this manual carefully before use and keep it for future
reference. We hope that this product will meet your needs and serve you for a long time.
Power Key:
Press for 3 seconds to power the device on/off. Short press to sleep or wake the TFT screen display.
Shortcut Buttons:
1.
5.
6.86” Touch Screen TFT-LCD 2. Front Camera Lens 3.Power Key 4. Mini USB Port
Rear Camera Interface 6. SD Card Slot 7. N/A 8. Loud Speaker
Press these Shortcut Buttons for quick operating:
Video REC. on/off; Snapshot;Audio REC. on/off; Video Lock/Unlock;
Function buttons: To Replay Video and enter System Settings:
Stop video recording first and then press these buttons to enter Video Replay or Settings Menu.
1) APPEARANCE and FUNCTION KEYS
(Below figure is for reference and is subject to thereal item)

3
2. INSTALLATION GUIDE
Please refer to the diagram below for Installation.
1. Turn the car engine off.
2. Insert a Class10 TF card (8GB-64GB) into the SD card slot of the Mirror Dash CAM.
3. Use the straps to fix the Mirror Dash CAM onto the car rearview mirror in a proper position.
4. Plug the car charger into the car cigarette lighter socket.
5. Connect the car charger extension cable to the Mirror Dash CAM USB interface.
[NOTE] Charging extension cable can be laid along the edge of the windshield.
6. The rear camera wiring can be run through the vehicle roof lining.After finishing thewiring
installation, plug the rear camera jack into the rear camera interface.
7. Adjust the lens position and ensure that the camera is aligned with the ground.
8. Start the car engine. Check if the DVR is working and installed properly.
Stop the recording, open the settings and format the SD Card.
[ATTENTION]: If the DVR is correctly installed, it will start recording automatically.
Please check ifthe image on the screen is normal.

4
3. FUNCTIONS
1. Automatic Recording Feature
Start the car engine, the DVR turns on automatically and starts to record video. Turn off
the car engine, the DVR saves the recording file and shuts down automatically. The recorded
videosare saved on the SD card and when the SD card is full the oldest recorded video will be
deleted and overwritten by new videos.
[ATTENTION]:
a. Class 10 (8GB-64GB) High Speed MLC SD card is strongly recommended for use in this
device.
b. Loop Recording time can be set in the menu setting in 1/3/5 minute intervals.
c. Front/Rear camera normal videos are saved in “F” or“R” folders of the “Video” folder in
the SD card.
d. Parking monitor locked videos/ crash locked videos/ manual locked videos are saved
in the “Lock” folder on the SD card.
e. Snapshot Photos are saved in the “Photo” folder onthe SD card.
2. Manual Recording Feature
Press “Video REC On/Off” icon from the touch screen.
3. Manual Power On/Off
Long press Power Button for 3 seconds to turn on the Rear View Mirror DVR and start the
video recording. If the device needs to be turned off, long press the Power Button for 3 seconds
to shut down and it will automatically save the video file.
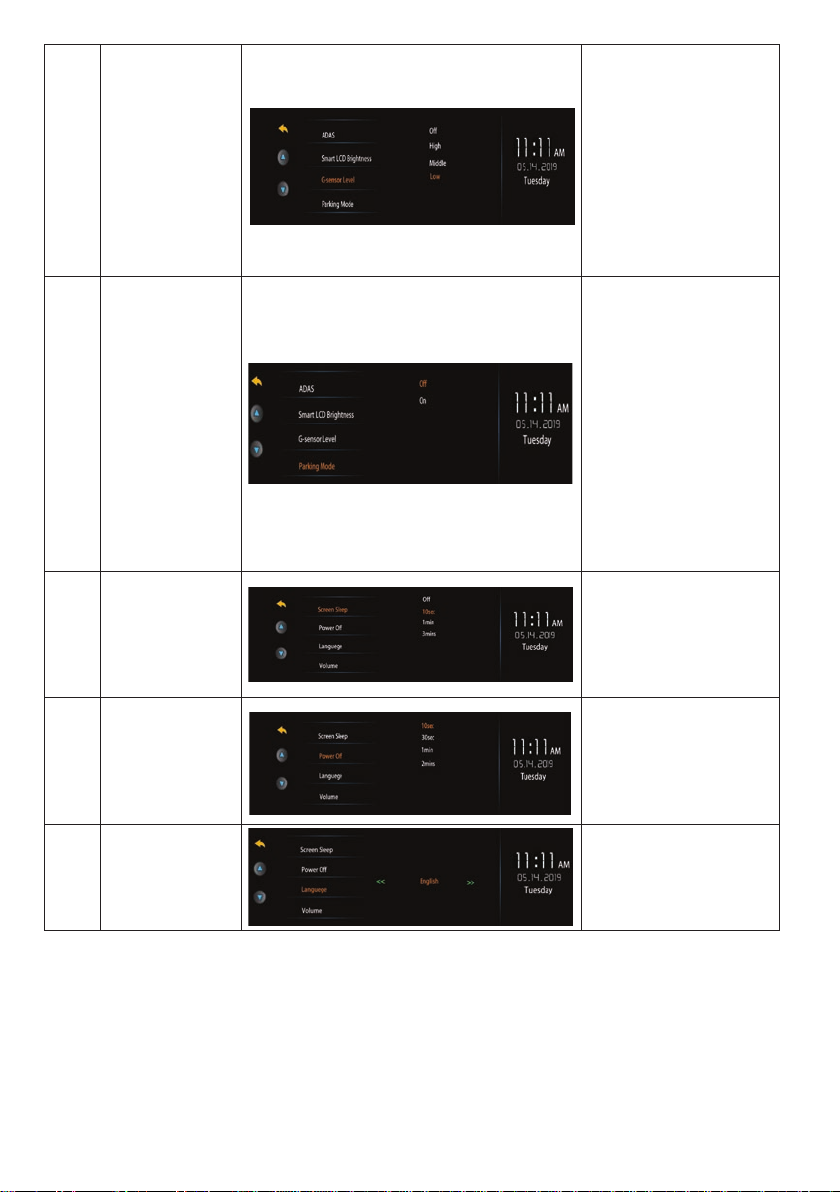
4. Advanced DrivingAssistant System (ADAS)
When the ADAS function is on, the screen will display two green lines overlapping with
car lanes on the road and automatically calibrate. When the car deviates from the lane
markings onthe road, the system will activate and show “RED” blinking lines on the screen.
An audible warning alarm will also sound from the speaker.
5. G-Sensor Feature
The Mirror Dash CAM has built-in crash sensors (G-sensor). If there is a serious vehicle
collision, the recorder will lock the videos after the accident happens. The locked videos are
saved in a special file, which will not be overwritten byloop recording.
[ATTENTION]
a. Locked video file names begin with "EMER". Normal video file names begin with "FILE".
Parking monitor file names begin with "PARK".
b. G-sensor sensitivity can adjusted in the menu settings.
6. Manual Lock Feature
This Mirror Dash CAM has an easy, manual lock function. Press the lock icon on the touch
screen to lock the current video file and prevent deletion by loop recording.
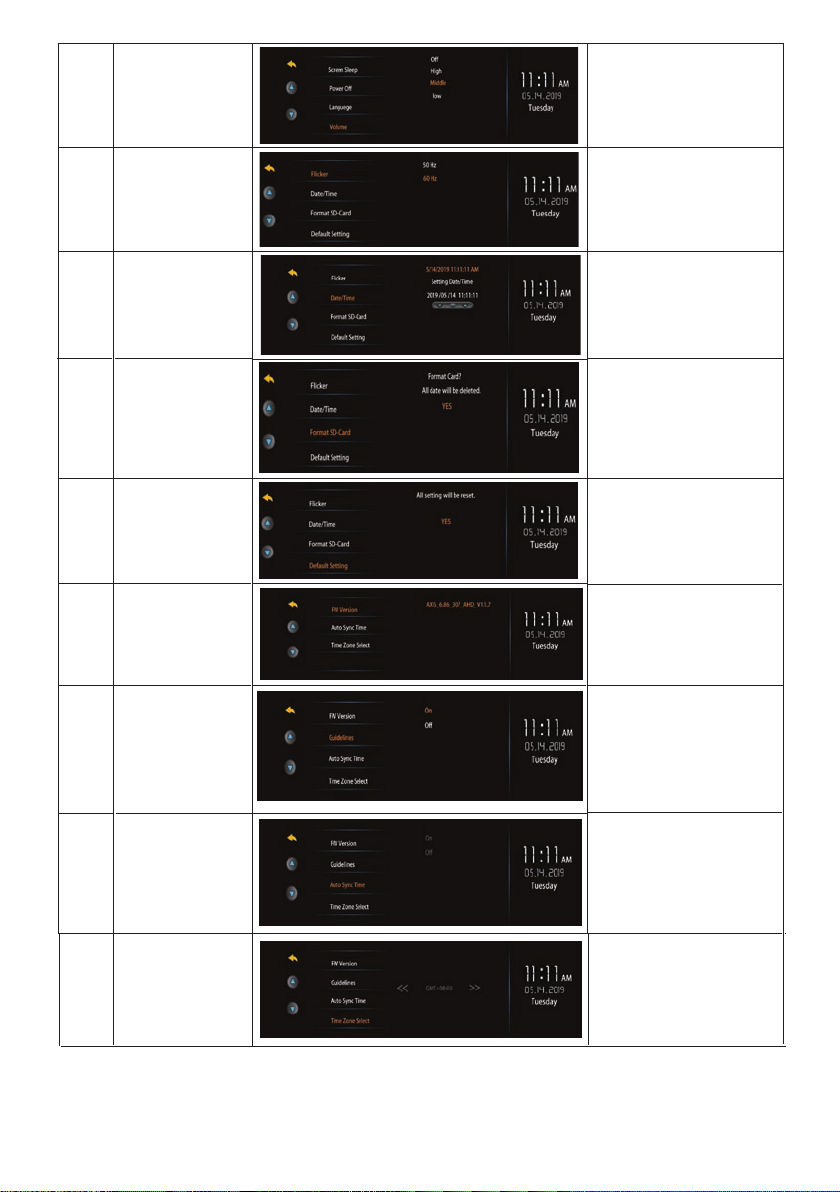
7. Date and Time Setting
Enter into menu setting and choose“Date/Time”. Short press “up button”/“down button” to
move the cursor to set date&time options. Short press“OK” to confirm and move the cursor
to the next item.
[ATTENTION]:
Before using the DVR1905K, please set the correct date and time.

5
7. Video Replay Feature
Enter into Video replay mode and choose from the S icons on the left: Front Normal/Rear
Normal/Front Lock/Rear Lock Files for videos, and Image Files for pictures. Press the right
side preview window to display the video. The shortcut buttons can operate: Lock or
unlock/Play or Pause/Previous or Next/Fast Forward orRewind/Delete.Press the top left
corner “Return” icon to escape and exit the playback mode. Swipe up or down to view the
Next/Previous list of S recordings/photos.
8. Car Reversing Video Display
The Car charger must be connected to the recorder and the rear camera red wire must be
connected to the reversing light of the car.
Under video mode, when the car is in reverse, the screen will display the reversing camera
image automatically. When car reversingis finished, the screen will return to the front video
display.
9. Parking Mode
When turned on in the settings, if the G-Sensor activates due to impact, the DVR will turn on
and record for 25 seconds and also lock that file.
10. Switch Front Camera /Rear Camera Display
In video recording mode, slide the touch screen sideways to switch the Front or Rear camera
display on the screen.
11. Front Camera /Rear Camera DisplayAngle Adjustment
In video recording mode, slide the touch screen vertically to adjust the Front or Rear
camera display angle.
[NOTE]:After the ADAS function is turned on, the front camera display angle
adjustment is disabled.

6
6
4. TOUCH SCREEN CONTROL - QUICK GUIDE
Menu UI Description
Page1 Video Resolution
Set the record video resolution
to 1080P or 720P
Default set as “1080P” (For
front Camera only, rear
camera is fixed on 720P).
Page1 Loop Recording
Set the length of each loop
video recording to 1min,
3mins, 5mins.
Default set as “3mins”.
Page1 Night Mode
Optimise DVR for night-time
recording.
Default set as “Off”.
Page1 Exposure
Adjust the exposure of the
video recording.
You canincrease or decrease
the exposure to get a brighter
or darker video.
Default set as “0”.
Page2 ADAS
Set ADAS (lane departure
warning system) ON/OFF;
Default set as “Off”
NOTE: Requires lane
markings on the road
for LDWS to function.
Page2 Smart LCD
Brightness
Adjust the LCD brightness.
Default set as “Off”.

7
7
Page2 G-Sensor Level
Set G-Sensor level to High,
Middle, Low and Off. High
means more sensitive, Low
means less sensitive. This
G-Sensor function activates
during accidentsor collisions
to lock the recording video
files for future use. Loop
recording will not erase these
locked files.
Default set as “LOW”.
Page2 Parking Mode
Set the parking monitor
function "ON". The Dash Cam
will automatically turn on and
shoot a 25s length locked
video if there is a collision with
the vehicle while parked.
The DVR will then turn off.
NOTE: If the built-in battery is
flat, this function will be
disabled.
Default set as “Off”.
Page3 Screen Sleep
Set screen saver to 10sec,1min,
3mins orOff.
After the set time, the display
deactivates automatically.
Default set as “10sec”.
Page3 Power Off
Set Power off delay time to
10sec,30sec, 1min, 2mins .
The DVR will stay on and record
for the set period of time after
the vehicle is turned off. Default
set as “10sec”.
Page3 Language
Set system language to English,
Simplified Chinese, Traditional
Chinese, Japanese.
Default set as “English”.

8
8
Page3 Volume Set volume of built-
in speaker
to High, Middle, Low, or Off.
Default set as “Middle”
Page4 Flicker Set Flicker Frequency to 50Hz
or 60Hz.
Default set as “60Hz”
Page4 Date/Time
Touch "Setting Date/Time" to
display the Date/Time settings.
Touch Up/Down to adjust and
OK to save andexit.
Page4 Format SD-Card
Format the SD Card.
New SD Cards should
be formatted before use. All
videos on the SD Card will be
deleted.
Page4 Default Setting
Load the default setting. All the
settingswill revert back to
the default settings.
Page5 FW Version Displaysthe Firmware Version
Page5 Auto Sync Time
Not applicable for this model
Page5 Time Zone Select Not applicable for this model
5. TROUBLESHOOTING
Not Recording/System Malfunction
- Format the SD Card in the settings.
- Replace the SD Card.
Not Holding Charge
- Connect to a charger or computer to charge for a few hours.
Page5 Guidelines Set Guidelines ON/OFF;
Default set as “Off”

9
Page5 Time Zone Select Not applicable for this model
5. TROUBLESHOOTING
Not Recording/System Malfunction
- Format the SD Card in the settings.
- Replace the SD Card.
Not Holding Charge
- Connect to a charger or computer to charge for a few hours.

10
NOTES

11
NOTES

12
RRANTY
NORMAL USE TWENTY FOUR MONTHS
WITHIN 30 DAYS OF PURCHASE DATE:
must
AFTER30 DAYS OF PURCHASE DATE:
SIX MONTH
National Service Centre:
DVR1905K
Table of contents
Other Axis Automobile Accessories manuals
Popular Automobile Accessories manuals by other brands

injen technology
injen technology SP1230 quick start guide

Directed
Directed Directechs DB3 installation guide

Thule
Thule 1091 Fitting instructions

CTS Turbo
CTS Turbo CTS-IT-105 installation guide

Pride Mobility
Pride Mobility SilverStar SilverBoom 300 owner's manual

Car-Interface
Car-Interface CI-RL3-MIB-TT manual