Axis D2110-VE User manual

AXISD2110-VESecurityRadar
UserManual

AXISD2110-VESecurityRadar
TableofContents
Solutionoverview...........................................3
Wheretoinstalltheproduct......................................3
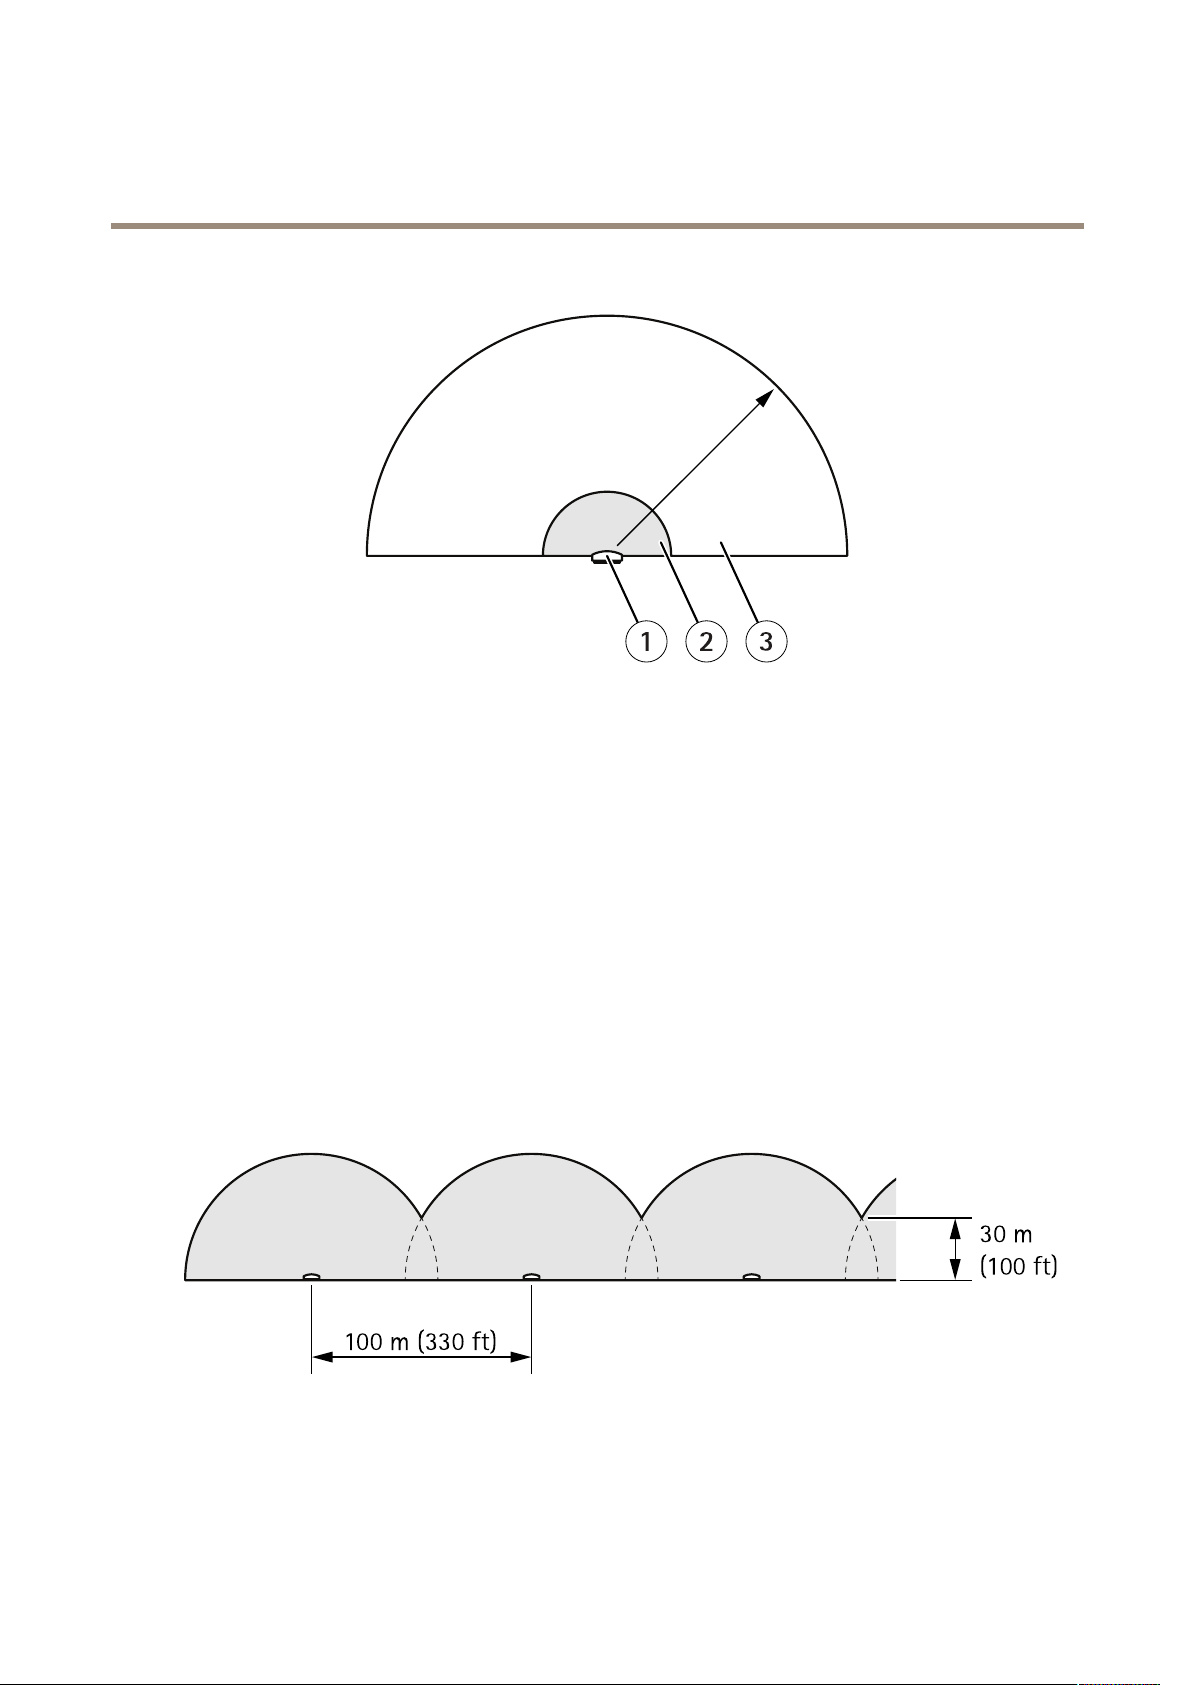
Detectionrange.................................................3
Installmultipleradars............................................4
Installationexamples............................................5
Getstarted................................................7
Findthedeviceonthenetwork....................................7
Accessthedevice...............................................7
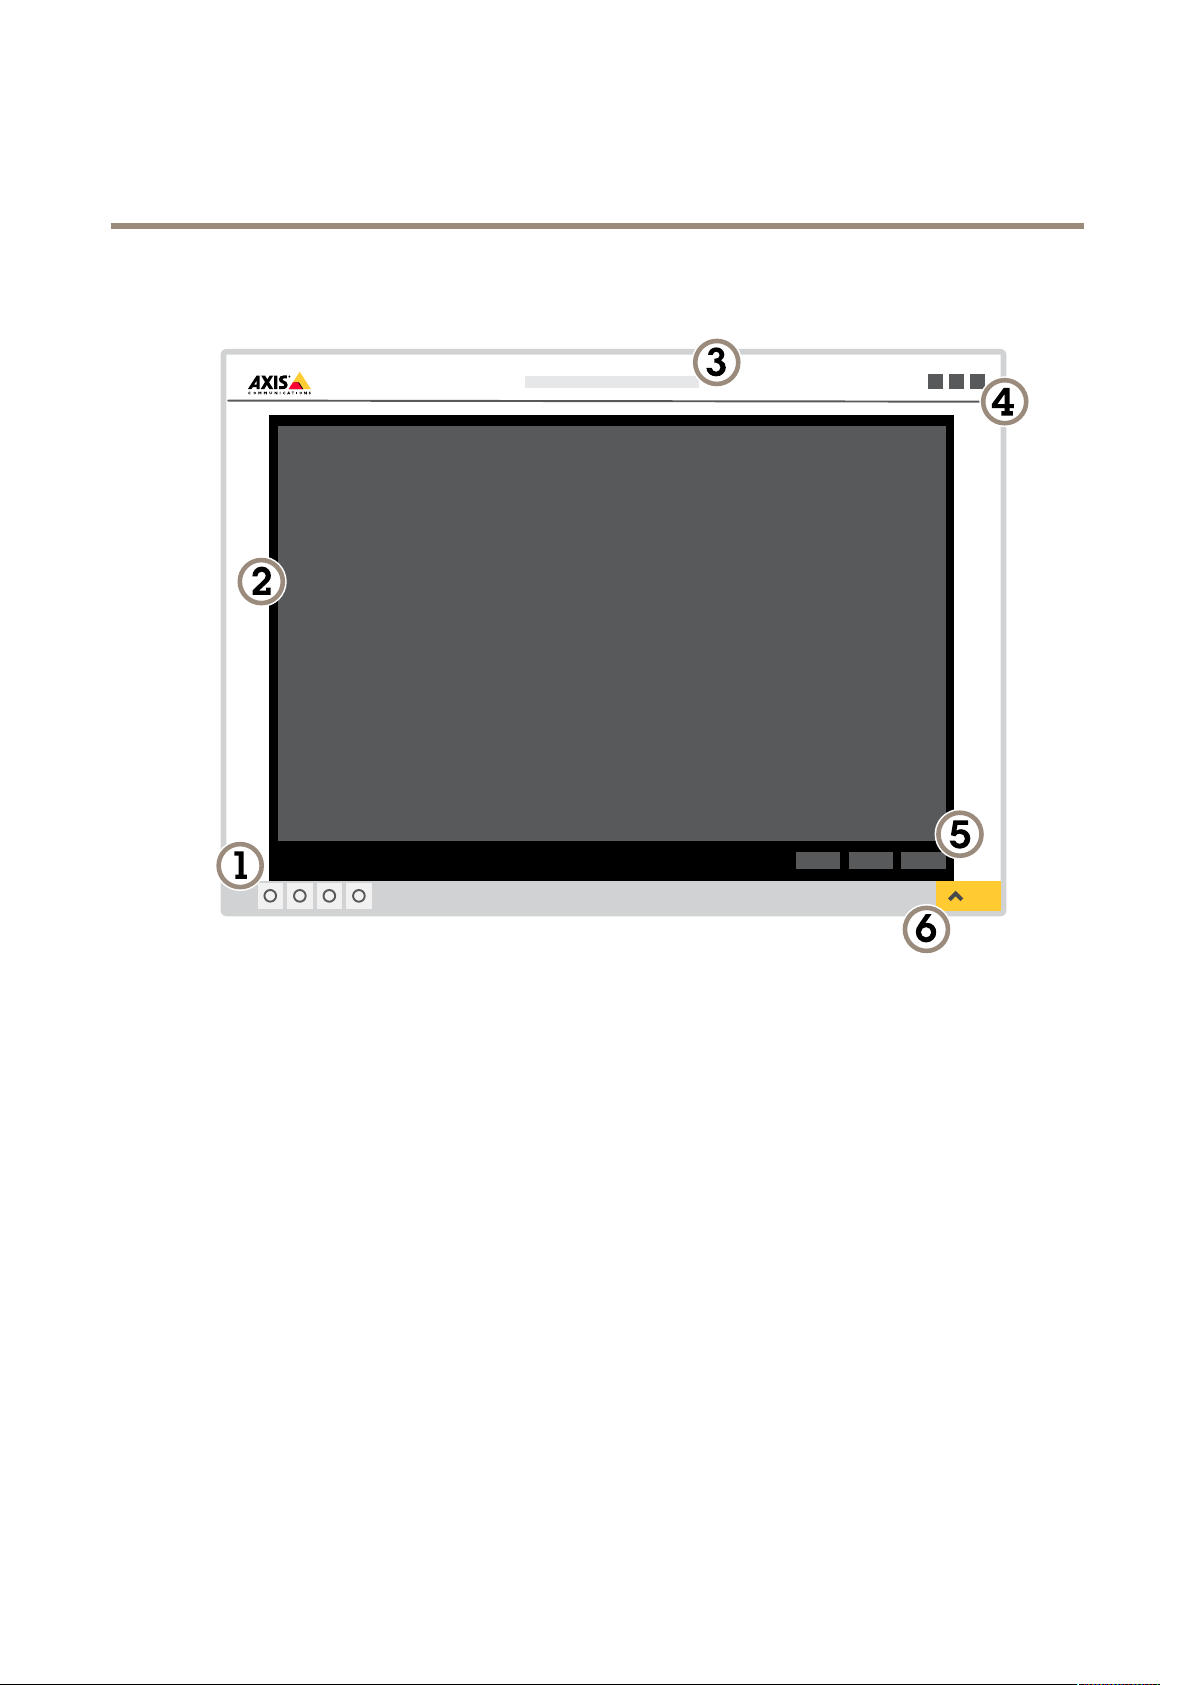
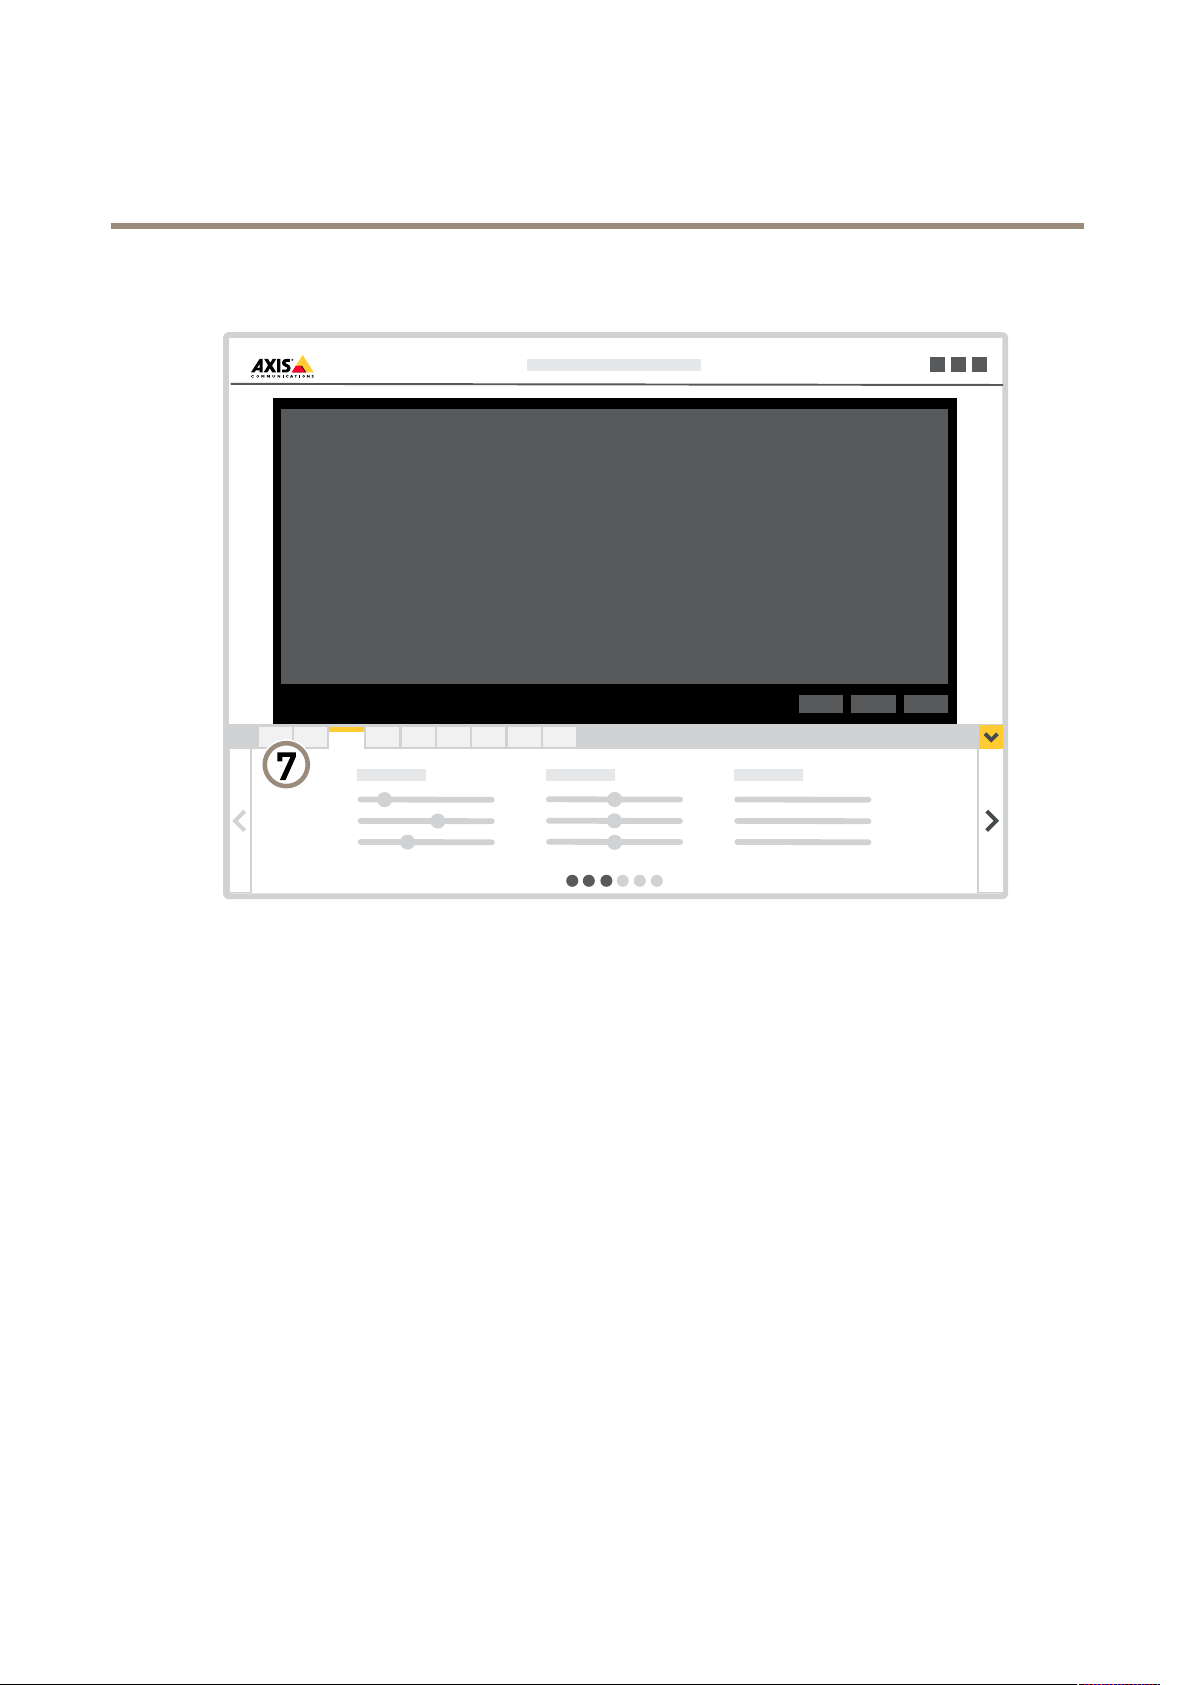
Webpageoverview..............................................
Additionalsettings..........................................10
Calibratetheradar..............................................10
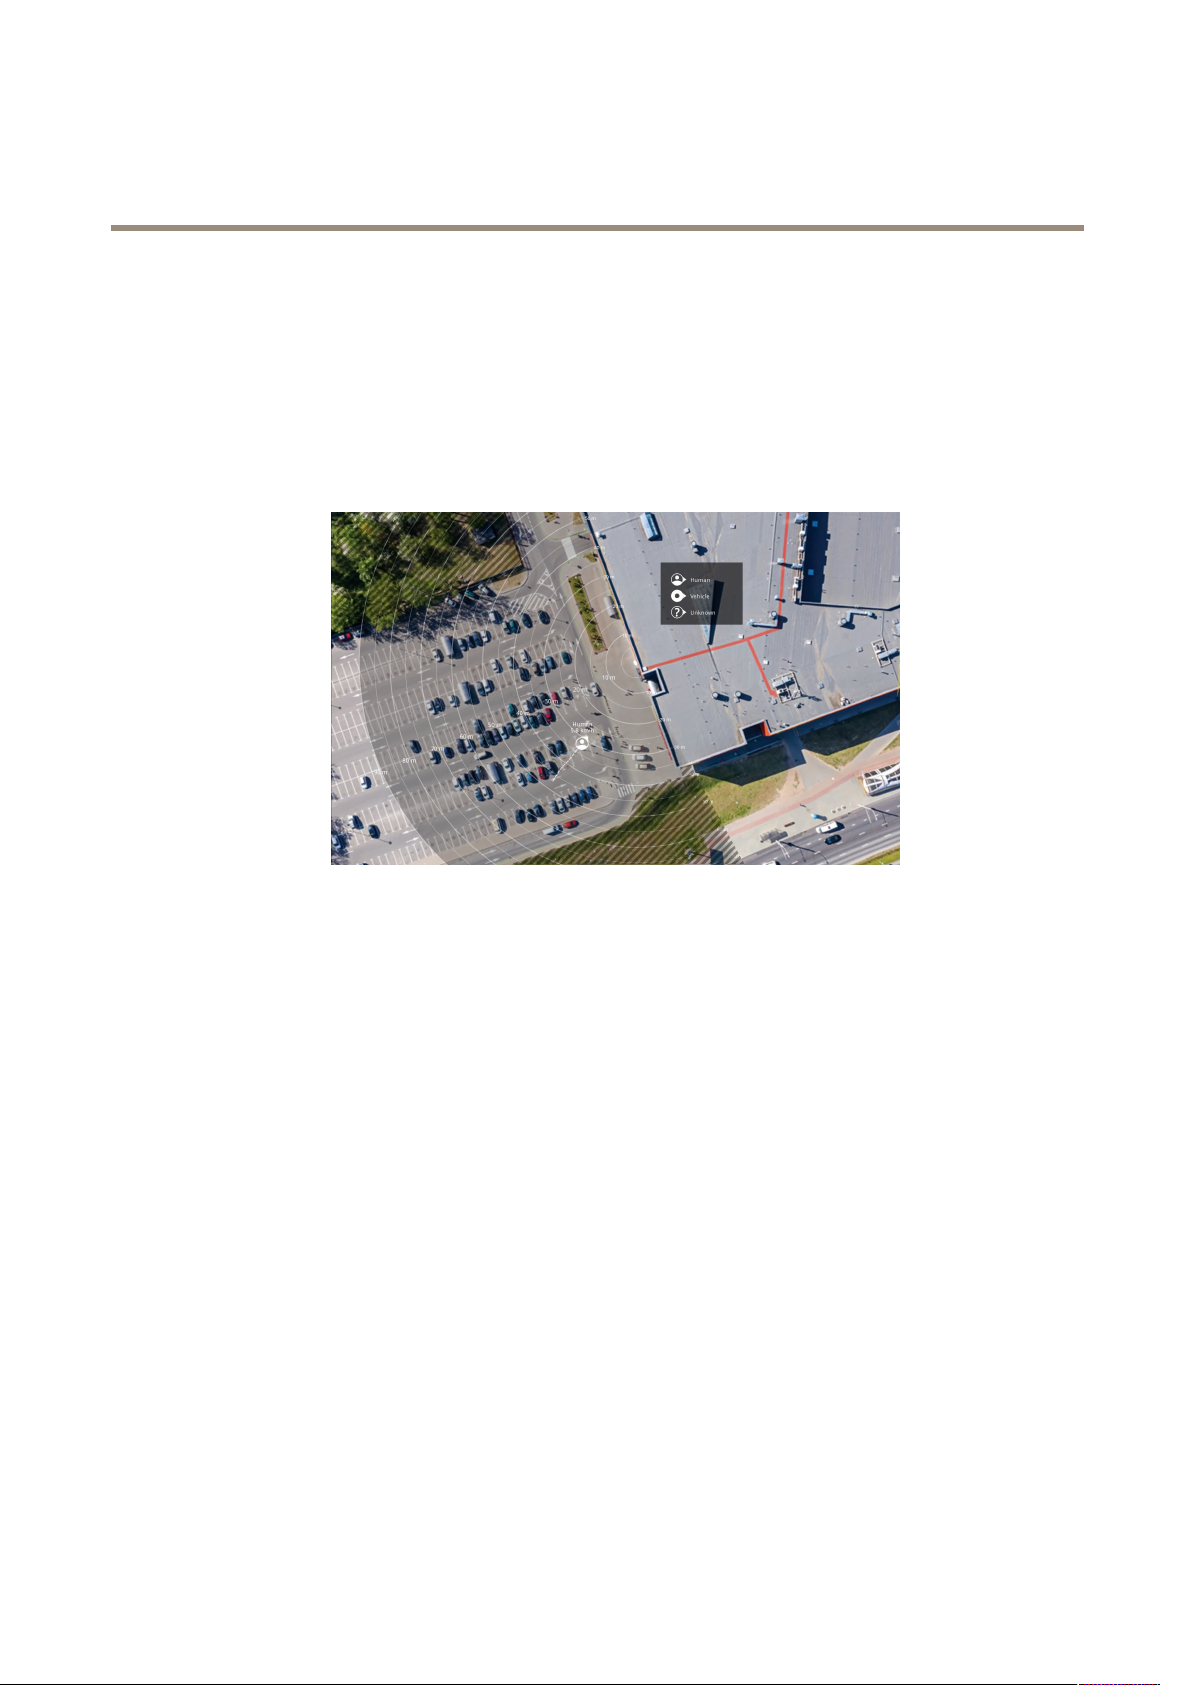
Aboutdetectionzones...........................................1 1
Viewandrecordvideo............................................1 1
Setuprulesandalerts...........................................12
Howtorecordvideofromacamerawhenmotionisdetected............13
Howtorecordradardatawhenmotionisdetected....................14
Howtoturnonalightwhenmotionisdetected......................14
HowtocontrolaPTZcamerawiththeradar..........................14
Howtominimizefalsealarms.....................................15
Cleaningrecommendations...................................16
Troubleshooting............................................17
Resettofactorydefaultsettings...................................17
Checkthecurrentrmware.......................................17
Upgradethermware............................................17
Technicalissues,cluesandsolutions................................1
Performanceconsiderations.......................................1
Specications..............................................19
Productoverview................................................19
SDcardslot....................................................20
Buttons.......................................................20
Connectors....................................................20
2

AXISD2110-VESecurityRadar
Solutionoeriew
Solutionoeriew
1AXISD2110-VE
2Fixeddomecamera
3PTZcameraandilluminator
4Doorcontroller
5Sureillancecenter
Wheretoinstalltheproduct
Theradarisintendedformonitoringopenareas.Anysolidobject(suchasatreeorabush)inthecoverageareawillcreatea
blindspot(radarshadow)behindit.
Installtheradaronapole,oronaspotonawallwheretherearenootherobjectsorinstallationsnexttoit.Objectsthatreectradio
wavesclosetotheradaraffectstheperformance.
Tobeabletocorrectlyidentifymovementinthecoveragearea,theradarneedstobeinstalledonastablemount.Donotinstall
theradaronaswayingpole.
Metalobjectsintheeldofviewcausesreectionsthataffectstheperformance.
Avoidaimingtheradartowardsanotherradar.
Ifmorethantworadarsaremountedclosetogethertheymayinterferewitheachother.ToavoidinterferencefromotherAXIS
D2110-VESecurityRadars,seeInstallmultipleradarsonpage4.
Detectionrange
Foroptimalperformance,installtheradar3.5m(1 1ft)aboveground.
3

AXISD2110-VESecurityRadar
Solutionoeriew
Note
•Ifyouinstalltheradaratadifferentheight,entertheactualmountingheightintheproduct’swebpageswhenyou
calibratetheradar.
•Thedetectionrangeisaffectedbythescene.
•Thedetectionrangeisaffectedbyneighboringradars.
•Thedetectionrangeisaffectedbytheobjecttype.
Thedetectionrangewasmeasuredundertheseconditions:
•Therangewasmeasuredalongtheground.
•Theobjectwasa170cm(5ft7in)tallperson.
•Thepersonwaswalkingstraightinfrontoftheradar.
•Thevaluesaremeasuredwhenthepersonentersthedetectionzone.
•TheradarsensitivitywassettoMedium.
Mountingheight0°tilt10°tilt20°tilt
2.5m
(.2ft)
3.0–60m
(9.–197ft)
NotrecommendedNotrecommended
3.5m
(11ft)
3.0–60m
(9.–197ft)
NotrecommendedNotrecommended
4.5m
(15ft)
4.0–60m
(13–197ft)
NotrecommendedNotrecommended
5.5m
(1ft)
7.5–60m
(25–197ft)
NotrecommendedNotrecommended
6.5m
(21ft)
7.5–60m
(25–197ft)
5.5–60m
(1–197ft)
Notrecommended
m
(26ft)
Notrecommended9–60m
(30–197ft)
7.5–30m
(25–9ft)
10m
(33ft)
Notrecommended15–60m
(49–197ft)
9–35m
(30–115ft)
12m
(39ft)
Notrecommended23–60m
(75–197ft)
13–3m
(43–125ft)
14m
(36ft)
Notrecommended27–60m
(9–197ft)
17–35m
(56–115ft)
16m
(52ft)
NotrecommendedNotrecommended25–50m
(2–164ft)
Installmultipleradars
Theradiowavescontinuebeyondthedetectionarea,andcaninterferewithotherradarsupto350m(30yd)away.

AXISD2110-VESecurityRadar
Solutionoeriew
1Radar
2Detectionarea
3Coexistencearea
1.Toavoidinterferencewhenmorethantworadarsofaremountedclosetogether,gotoSettingsRadarGeneraland
selectNumberofneighboringradarsunderCoexistence.
Iftheradarhasmorethantwoneighboringradarswithinitscoexistenceareatheperformancedecreases.Thedetectionrange
becomesshorter,theradardoesn’tclassifyobjectscorrectly,andfalsealarmsoccurduetointerferencebetweentheradars.
Theprobabilityandseverityoftheseissuesincreaseswiththenumberofradarswithinthesamecoexistencearea.Italsodependson
theenvironmentandtheradar’sdirectiontowardsfences,buildings,orneighboringradars.
Ifmorethanthreeradarsarecrucialinaninstallation,seeInstallationexamplesonpage5.
Installationexamples
Coveraperimeter
Tocreateavirtualfenceyoucanplacemultipleradarssidebyside.Werecommendplacingthemwith100m(330ft)spacing.
Coveraeldaroundabuilding
Tocovertheareaaroundabuilding,placetheradarsonthewallsofthebuilding.Theradarscanbeclosetoeachotherwithout
interferingsincetheyareaimedawayfromeachother.
5

AXISD2110-VESecurityRadar
Solutionoeriew
Ifyouplacetheradarsaimedtowardsthebuilding,theradarswilltransmitradiowavesintoeachother,whichdecreasesperformance.
Coveranarea
Tocoveralargeopenarea,usetwopolemountstoplacetworadarsbacktoback.
Note
Whentworadarsaremountedthisclosetogether,theyareinthesamecoexistencezone.
YoucanusethePoEoutputfromoneradartopowerthesecondradar,butitisnotpossibletoconnectathirdradarthisway.
Note
ThePoEoutputontheradarisenabledwhentheradarispoweredbya60Wmidspan.
6

AXISD2110-VESecurityRadar
Getstarted
Getstarted
Findthedeviceonthenetwork
TondAxisdevicesonthenetworkandassignthemIPaddressesinWindows®,useAXISIPUtilityorAXISDeviceManager.Both
applicationsarefreeandcanbedownloadedfromaxis.com/support.
FormoreinformationabouthowtondandassignIPaddresses,seethedocumentHowtoassignanIPaddressandaccessyour
deiceonthedevicepageataxis.com.
Browsersupport
Youcanusethedevicewiththefollowingbrowsers:
ChromeTMFirefox®Edge®Safari®
Windows®recommendedxx
OSX®recommendedx
Otheroperatingsystemsxx
Accessthedevice
1.OpenabrowserandentertheIPaddressorhostnameoftheAxisdevice.
Setanewpasswordfortherootaccount
Important
Thedefaultadministratorusernameisroot.Ifthepasswordforrootislost,resetthedevicetofactorydefaultsettings.
1.Typeapassword.Followtheinstructionsaboutsecurepasswords.SeeSecurepasswordsonpage7.
2.Retypethepasswordtoconrmthespelling.
Securepasswords
Important
Axisdevicessendtheinitiallysetpasswordincleartextoverthenetwork.Toprotectyourdeviceaftertherstlogin,set
upasecureandencryptedHTTPSconnectionandthenchangethepassword.
Thedevicepasswordistheprimaryprotectionforyourdataandservices.Axisdevicesdonotimposeapasswordpolicyasthey
maybeusedinvarioustypesofinstallations.
Toprotectyourdatawestronglyrecommendthatyou:
•Useapasswordwithatleastcharacters,preferablycreatedbyapasswordgenerator.
•Don’texposethepassword.
•Changethepasswordatarecurringinterval,atleastonceayear.
7

AXISD2110-VESecurityRadar
Getstarted
Webpageoverview
1Lieiewcontrolbar
2Lieiew
3Productname
4Userinformation,colorthemes,andhelp
5Videocontrolbar
6Settingstoggle
8

AXISD2110-VESecurityRadar
Getstarted
7Settingstabs
9

AXISD2110-VESecurityRadar
Additionalsettings
Additionalsettings
Calibratetheradar
Theradarisreadytouseassoonasitisinstalled.Thedefaultliveviewwillshowtheradarcoverageandanydetectedmovement,and
youcanadddetectionzonesandrulesrightaway.
Iftheradarismounted3.5m(1 1ft)aboveground,thereisnoneedtodoanythingelse.Iftheradarismountedonadifferentheight
youneedtocalibratetheradartocompensateforthemountingheight.
Tomakeiteasiertoseewhereobjectsaremoving,youcanuploadareferencemap,forexampleagroundplanoranaerialphoto,
thatshowstheareacoveredbytheradar.
Imagerequirements:
•Supportedleformatsarejpegandpng.
•Theimagecanbecroppedintheradar.
•Theimagecanberotated±35°intheradar.
•Theorientationisnotimportant,sincetheradarcoverageshapewillmovetoadapttotheimageduringcalibration.
Afteruploadingthereferencemapyouneedtocalibratethereferencemapsothattheactualradarcoveragetstheposition,
directionandscaleofthereferencemap.
Therearetwomethodsforcalibratingthereferencemap:
•Pins(easy):Thiscalibrationisperformedinthewebinterfacebyclickinginthereferencemap.Thisistheeasiestwayto
calibratethereferencemap,andyoucanuseitifyoudonothavephysicalaccesstothesite.
•Tracks(accurate):Thiscalibrationmethodrequiresapersontomoveinfrontoftheradar.Thisisthemostaccuratewayto
calibratethereferencemap,butyoucan’tuseitifthereisalotofothermovementinthescene.
Youcandothisyourselfwhileaccessingthewebinterfacefromamobiledevice,orhavesomeoneelsemoveand
followyourinstructions.
Whenmovingaroundinthedifferentsteps,movetoplacesthatareeasytondinthereferencemap.
Howtoconguretheradar
1.Toconguretheradar,gotoSettingsRadarCalibration,clickStartandfollowtheinstructions.
10

AXISD2110-VESecurityRadar
Additionalsettings
Aboutdetectionzones
Todeterminewheretodetectmotion,youcanaddmultiplezones.Differentzonescanbeusedtotriggerdifferentactions.
Therearetwotypesofzones:
•Anincludezoneisanareainwhichmovingobjectswilltriggerrules.Thedefaultincludezonematchestheentire
areacoveredbytheradar.
•Anexcludezoneisanareainwhichmovingobjectswillbeignored.Useexcludezonesifthereareareasinsideaninclude
zonethattriggeralotofunwantedalarms.
Addanincludezone
1.GotoSettingsRMDzonesandclick.
2.SelectIncludezone.
3.Selecttomodifythesettingsofthezone.Formoreinformation,seetheproduct’sbuiltinhelp.
4.Modifytheshapeoftheincludezone,seeModifyadetectionzoneonpage11.
Addanexcludezone
1.GotoSettingsRMDzonesandclick.
2.SelectExcludezone.
3.Modifytheshapeoftheexcludezone,seeModifyadetectionzoneonpage11.
Modifyadetectionzone
Usethemousetomoveandshapethezonesothatitcoversthedesiredpartofthereferencemap.
•Toaddanewcorner,clickonthezoneborder.Dragthecornertothedesiredposition.
•Toremoveacorner,right-clickonthecorner.
•Tomoveacorner,clickanddragthecornertothenewposition.
•Tomovethezone,placethepointerinsidethezoneanddragthezonetothenewposition.
Viewandrecordvideo
Tolearnmoreaboutsettingsforviewingandrecordingvideo,see.
Reducebandwidthandstorage
Important
Ifyoureducethebandwidthitcanresultinlossofdetailsinthepicture.
1.GotoliveviewandselectH.264.
2.GotoSettingsStream.
3.Dooneormoreofthefollowing:
-TurnontheZipstreamfunctionalityandselectthedesiredlevel.
-TurnondynamicGOPandsetahighGOPlengthvalue.
11

AXISD2110-VESecurityRadar
Additionalsettings
-Increasethecompression.
-TurnondynamicFPS.
Setupnetworkstorage
Tostorerecordingsonthenetwork,youneedtosetupnetworkstorage:
1.GotoSettingsSystem>Storage.
2.ClickSetupunderNetworkstorage.
3.EntertheIPaddressofthehostserver.
4.Enterthenameofthesharedlocationonthehostserver.
5.Movetheswitchifthesharerequiresalogin,andenterusernameandpassword.
6.ClickConnect.
Recordandwatchvideo
Torecordvideoyoumustrstsetupnetworkstorage,seeSetupnetworkstorageonpage12,orhaveanSDcardinstalled.
Recordvideo
1.Gototheliveview.
2.Tostartarecording,clickRecord.Clickagaintostoptherecording.
Watchvideo
1.ClickStorageGotorecordings.
2.Selectyourrecordinginthelistanditwillplayautomatically.
Setuprulesandalerts
Triggeranaction
1.GotoSettingsSystemEventstosetuparule.Theruledeneswhenthedevicewillperformcertainactions.Rules
canbesetupasscheduled,recurring,orforexample,triggeredbymotiondetection.
2.SelecttheConditionthatmustbemettotriggertheaction.Ifyouspecifymorethanoneconditionfortherule,allofthe
conditionsmustbemettotriggertheaction.
3.SelectwhichActionthedeviceshouldperformwhentheconditionsaremet.
Note
Ifyoumakechangestoanactiverule,thentheruleneedstoberestartedforthechangestotakeeffect.
Triggeranalarmifsomeoneopensthehousing
Thisexampleexplainshowtotriggeranalarmifsomeoneopensthehousing.
Createarule:
1.GotoSettingsSystemEventsandaddarule.
2.Typeanamefortherule.
3.Inthelistofconditions,selectCasingopen.
12

AXISD2110-VESecurityRadar
Additionalsettings
4.Inthelistofactions,selectSendnoticationtoemail.
5.SelectarecipientfromthelistorgotoRecipientstocreateanewrecipient.
Tocreateanewrecipient,click.Tocopyanexistingrecipient,click.
6.Typeasubjectandamessagefortheemail.
7.ClickSave.
Howtorecordvideofromacamerawhenmotionisdetected
ThisexampleexplainshowtosetuptheradarandacamerasothatthecamerastartsrecordingtotheSDcardveseconds
beforetheradardetectsmotionandtostoponeminuteafter.
Connectthedevices:
1.ConnectacablefromanI/OoutputontheradartoanI/Oinputonthecamera.
ConguretheI/Oportoftheradar:
2.GotoSettingsSystemI/OportsandconguretheI/Oportasanoutputandselectthenormalstate.
Createaruleintheradar:
3.GotoSettingsSystemEventsandaddarule.
4.Typeanamefortherule.
5.Fromthelistofconditions,selectanincludezoneunderRadarmotion.Tosetupanincludezone,seeAddanincludezone
onpage1 1.
6.Fromthelistofactions,selectToggleI/Owhiletheruleisactiveandthenselecttheportthatisconnectedtothecamera.
7.ClickSave.
ConguretheI/Oportofthecamera:
.GotoSettingsSystemI/OportsandconguretheI/Oportasaninputandselectthenormalstate.
Createaruleinthecamera:
9.GotoSettingsSystemEventsandaddarule.
10.Typeanamefortherule.
11.Fromthelistofconditions,selectDigitalInputandthenselecttheportthatshouldtriggertherule.
12.Fromthelistofactions,selectRecordvideo.
13.Selectanexistingstreamproleorcreateanewone.
14.Settheprebufferto5seconds.
15.Setthepostbufferto60seconds.
16.SelectSDcardfromthelistofstorageoptions.
17.ClickSave.
13

AXISD2110-VESecurityRadar
Additionalsettings
Howtorecordradardatawhenmotionisdetected
ThisexampleexplainshowtosetuptheradartostartrecordingtotheSDcardvesecondsbeforeitdetectsmotionandto
stoponeminuteafter.
Therecordingwillshowthereferencemapwiththetrailofthemovingobject.
Createarule:
1.GotoSettingsSystemEventsandaddarule.
2.Typeanamefortherule.
3.Fromthelistofconditions,selectanincludezoneunderRadarmotion.Tosetupanincludezone,seeAddanincludezone
onpage1 1.
4.Fromthelistofactions,selectRecordvideo.
5.Settheprebufferto5seconds.
6.Setthepostbufferto60seconds.
7.SelectSDcardfromthelistofstorageoptions.
.ClickSave.
Howtoturnonalightwhenmotionisdetected
Turningonalightwhenanintruderentersthedetectionzonecanhaveadeterringeffect,andwillalsoimprovetheimagequalityof
avisualcamerarecordingtheintrusion.
Thisexampleexplainshowtosetuptheradarandanilluminatorsothattheilluminatorturnsonwhentheradardetectsmotionand
turnsoffafteroneminute.
Connectthedevices:
1.Connectoneoftheilluminatorcablestothepowersupplyviatherelayportontheradar.Connecttheothercable
directlybetweenthepowersupplyandtheilluminator.
Conguretherelayportoftheradar:
2.GotoSettingsSystemI/OportsandselectOpencircuitasthenormalstate.
Createaruleintheradar:
3.GotoSettingsSystemEventsandaddarule.
4.Typeanamefortherule.
5.Fromthelistoftriggers,selectanincludezoneunderRadarmotion.Tosetupanincludezone,seeAddanincludezone
onpage1 1.
6.Fromthelistofconditions,selectToggleI/Oonceandthenselecttherelayport.
7.SelectActive.
.SettheDuration.
9.ClickSave.
HowtocontrolaPTZcamerawiththeradar
Itispossibletousetheinformationaboutobjects’positionsfromtheradartomakeaPTZcameratrackobjects.
1

AXISD2110-VESecurityRadar
Additionalsettings
Todothis,installtheapplicationAXISRadarAutotrackingforPTZonyourVMSserver(oranothercomputerwithaccesstoboththe
cameraandtheradar),andfollowtheinstructionsintheapplication.
TodownloadAXISRadarAutotrackingforPTZ,gotoaxis.com.
Howtominimizefalsealarms
Ifyounoticethatyougettoomanyfalsealarms,youcanlteroutcertaintypesofmovementorobjects,orchangethecoverage.
Testwhichsettingworksbestforyourenvironment.
•Modifytheincludeandexcludezones:
Iftheincludezoneincludeshardsurfaces,suchasametalwall,theremaybereectionsthatcausesmultipledetectionsfor
asinglephysicalobject.Inthiscase,modifytheincludezone,seeModifyadetectionzoneonpage11,oraddanexclude
zonethatmaskseverythingbehindthesurface,seeAddanexcludezoneonpage11.
•Filteronmovement:
GotoSettingsRadarDetectionandselectIgnoreswayingobjects.Thissettingwillminimizefalsealarmsfromtrees,
bushes,andagpolesinthecoveragezone.
•Filterontime:
GotoSettingsRMDzonesandselectazonetomodifyit’ssettings.
EnableShort-livedobjectandsetadelaytimefromwhentheradarstartstrackinganobjectuntilitcantriggerandalarm.
Thetimerstartswhentheradarrstdetectstheobject,notwhentheobjectenterstheincludezone.
•Filteronobjecttype:
Theradarwillclassifyobjectsdependingontheradarechothattheyproduce.Ifitcan’tdeterminetheobjecttype,
theobjectwillbeclassiedasUnidentied.
GotoSettingsRMDzonesandselectazonetomodifyit’ssettings.
Toavoidtriggeringonspecicobjecttypes,enablethelteranddeselecttheobjecttypesthatshouldnottriggerevents
inthiszone.
15

AXISD2110-VESecurityRadar
Cleaningrecommendations
Ifthedevicegetsgreasestainsorbecomesheavilysoiled,youcancleanitwithmild,solvent-freesoapordetergent.
NO NO
NOTICE TICE
TICE
Neveruseharshdetergent,forexamplegasoline,benzene,oracetone.
1.Useacanofcompressedairtoremoveanydustorloosedirtfromthedevice.
2.Cleanthedevicewithasoftclothdampenedwithmilddetergentandlukewarmwater.
3.Wipecarefullywithadrycloth.
Note
Avoidcleaningindirectsunlightoratelevatedtemperatures,asthismaycausestainswhenthewaterdropletsdry.
16

AXISD2110-VESecurityRadar
Troubleshooting
Troubleshooting
Ifyoucan’tndwhatyou’relookingforhere,trythetroubleshootingsectionataxis.com/support.
Resettofactorydefaultsettings
Important
Resettofactorydefaultshouldbeusedwithcaution.Aresettofactorydefaultresetsallsettings,includingtheIPaddress,to
thefactorydefaultvalues.
Toresettheproducttothefactorydefaultsettings:
1.Disconnectpowerfromtheproduct.
2.Pressandholdthecontrolbuttonwhilereconnectingpower.SeeProductoeriewonpage19.
3.Keepthecontrolbuttonpressedfor15–30secondsuntilthestatusLEDindicatorashesamber.
4.Releasethecontrolbutton.TheprocessiscompletewhenthestatusLEDindicatorturnsgreen.Theproducthasbeenreset
tothefactorydefaultsettings.IfnoDHCPserverisavailableonthenetwork,thedefaultIPaddressis192.168.0.90.
5.UsetheinstallationandmanagementsoftwaretoolstoassignanIPaddress,setthepassword,andaccessthevideostream.
Theinstallationandmanagementsoftwaretoolsareavailablefromthesupportpagesonaxis.com/support.
Itisalsopossibletoresetparameterstofactorydefaultthroughthewebinterface.GotoSettingsSystemMaintenanceand
clickDefault.
Checkthecurrentrmware
Firmwareisthesoftwarethatdeterminesthefunctionalityofnetworkdevices.Oneofyourrstactionswhentroubleshootinga
problemshouldbetocheckthecurrentrmwareversion.Thelatestversionmaycontainacorrectionthatxesyourparticular
problem.
Tocheckthecurrentrmware:
Upgradethermware
Important
Preconguredandcustomizedsettingsaresavedwhenthermwareisupgraded(providedthatthefeaturesareavailablein
thenewrmware)althoughthisisnotguaranteedbyAxisCommunicationsAB.
Important
Makesuretheproductremainsconnectedtothepowersourcethroughouttheupgradeprocess.
Note
Whenyouupgradetheproductwiththelatestrmwareintheactivetrack,theproductreceivesthelatestfunctionality
available.Alwaysreadtheupgradeinstructionsandreleasenotesavailablewitheachnewreleasebeforeupgradingthe
rmware.Tondthelatestrmwareandthereleasenotes,gotoaxis.com/support/rmware.
1.Downloadthermwareletoyourcomputer,availablefreeofchargeataxis.com/support/rmware.
2.Logintotheproductasanadministrator.
17

AXISD2110-VESecurityRadar
Troubleshooting
Technicalissues,cluesandsolutions
Ifyoucan’tndwhatyou’relookingforhere,trythetroubleshootingsectionataxis.com/support.
Problemsupgradingthermware
FirmwareupgradefailureIfthermwareupgradefails,thedevicereloadsthepreviousrmware.Themostcommonreason
isthatthewrongrmwarelehasbeenuploaded.Checkthatthenameofthermwarele
correspondstoyourdeviceandtryagain.
ProblemssettingtheIPaddress
Thedeviceislocatedona
differentsubnet
IftheIPaddressintendedforthedeviceandtheIPaddressofthecomputerusedtoaccessthe
devicearelocatedondifferentsubnets,youcannotsettheIPaddress.Contactyournetwork
administratortoobtainanIPaddress.
TheIPaddressisbeingused
byanotherdevice
DisconnecttheAxisdevicefromthenetwork.Runthepingcommand(inaCommand/DOSwindow,
typepingandtheIPaddressofthedevice):
•Ifyoureceive:Replyfrom<IPaddress>:bytes=32;time=10...
thismeansthattheIPaddressmayalreadybeinusebyanotherdeviceonthenetwork.
ObtainanewIPaddressfromthenetworkadministratorandreinstallthedevice.
•Ifyoureceive:Requesttimedout,thismeansthattheIPaddressisavailable
forusewiththeAxisdevice.Checkallcablingandreinstallthedevice.
PossibleIPaddressconict
withanotherdeviceonthe
samesubnet
ThestaticIPaddressintheAxisdeviceisusedbeforetheDHCPserversetsadynamicaddress.
ThismeansthatifthesamedefaultstaticIPaddressisalsousedbyanotherdevice,theremay
beproblemsaccessingthedevice.
Thedevicecannotbeaccessedfromabrowser
CannotloginWhenHTTPSisenabled,ensurethatthecorrectprotocol(HTTPorHTTPS)isusedwhenattempting
tologin.Youmayneedtomanuallytypehttporhttpsinthebrowser’saddresseld.
TheIPaddresshasbeen
changedbyDHCP
Thedeviceisaccessiblelocallybutnotexternally
Toaccessthedeviceexternally,werecommendusingoneofthefollowingapplicationsforWindows®:
•AXISCameraStation:30-daytrialversionfreeofcharge,idealforsmalltomid-sizesystems.
Forinstructionsanddownload,gotoaxis.com/ms.
Performanceconsiderations
Thefollowingfactorsarethemostimportanttoconsider:
•Heavynetworkutilizationduetopoorinfrastructureaffectsthebandwidth.
18

AXISD2110-VESecurityRadar
Specifications
Specifications
Tondthelatestversionoftheproduct’sdatasheet,gototheproductpageataxis.comandlocateSupport&Documentation.
Productoverview
1Controlbutton
2NetworkLED
3StatusLED
4PowerLED
5PoEoutLED
6microSDcardslot
7Powerconnector(DC)
8I/Oconnector
9Relayconnector
10Groundingscrew
11Networkconnector(PoEin)
12Networkconnector(PoEout)
13Intrusionalarmsensor
Fortechnicalspecications,seeSpecicationsonpage19.
LEDIndicators
StatusLEDIndication
GreenSteadygreenfornormaloperation.
19

AXISD2110-VESecurityRadar
Specifications
NetworkLEDIndication
GreenSteadyforconnectiontoa100Mbit/snetwork.Flashesfornetworkactivity.
AmberSteadyforconnectiontoa10Mbit/snetwork.Flashesfornetworkactivity.
UnlitNonetworkconnection.
PowerLEDIndication
GreenNormaloperation.
PoEoutLEDIndication
UnlitPoEoutturnedoff
GreenPoEoutturnedon
SDcardslot
ForSDcardrecommendations,seeaxis.com.
microSD,microSDHC,andmicroSDXCLogosaretrademarksofSD-3CLLC.microSD,microSDHC,microSDXCare
trademarksorregisteredtrademarksofSD-3C,LLCintheUnitedStates,othercountriesorboth.
Buttons
Controlbutton
Forlocationofthecontrolbutton,seeProductoeriewonpage19.
Thecontrolbuttonisusedfor:
•Resettingtheproducttofactorydefaultsettings.Seepage17.
•ConnectingtoanAXISVideoHostingSystemservice.See.Toconnect,pressandholdthebuttonforabout3seconds
untiltheStatusLEDashesgreen.
Connectors
Networkconnector
RJ45EthernetconnectorwithPoweroverEthernetPlus(PoE+).
CAUTION
Riskofdamagetothedevice.DonotpowerthedevicewithbothPoEandDC.
Networkconnector(PoEout)
PoweroverEthernetIEEE02.3attype2,max30W
UsethisconnectortosupplypowertoanotherPoEdevice,forexampleacamera,ahornspeaker,orasecondsecurityradar.
Note
ThePoEoutputisenabledwhentheradarispoweredbya60Wmidspan(PoweroverEthernetIEEE02.3bt,type3)
20
Other manuals for D2110-VE
6
Table of contents
Other Axis Radar manuals