Axis TNS-2 series User manual

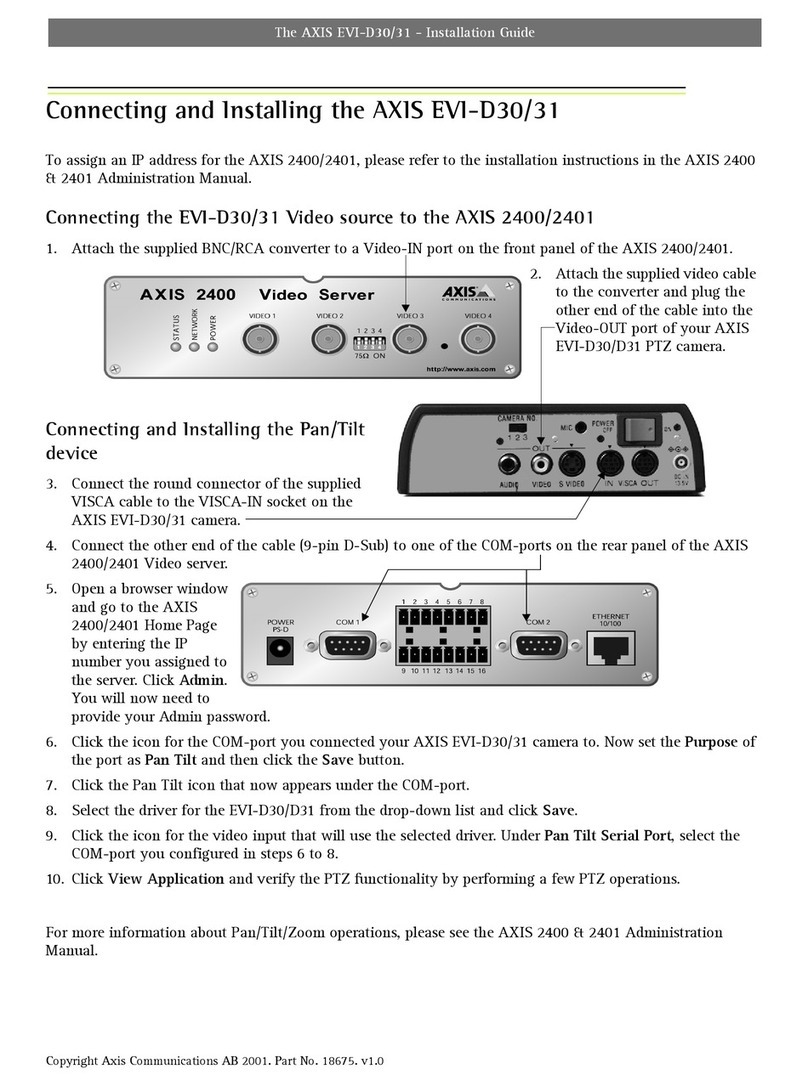
0.009º DOME SYSTEM ACCURACY / 220 PRESET POSITION /
EXTRNAL FIRMWARE UPGRADE (RS-485) / HOME POSITION & RECOVER /
SLIP RING FOR LONG LIFE TIME / PROPORTION PTZ CONTROL
Ver. 1.0
PTZ CAMERA
WE DO FUTURE User Manual

Contents
PTZ CAMERA PTZ CAMERA
003
Components
CONTENTS ···················································································································································································· 2
COMPONENTS ············································································································································································· 3
WARNINGS & CAUTIONS ························································································································································· 4
GENERAL FEATURES ·································································································································································· 5
PART NAMES ················································································································································································ 7
A. Basic Parts ··········································································································································································· 7
B. Additional Accessorries ················································································································································· 7
INSTALLATION ············································································································································································· 8
QUICK OPERATING KEYS ························································································································································· 11
DIAGNOSTIC ················································································································································································ 13
OSD MENU SETTING ································································································································································· 14
A. Main Menu ········································································································································································· 15
B. Dome Setup ······································································································································································· 15
C. Dome Setup #2 [Next Page] ········································································································································· 17
D. Camera Set ········································································································································································· 19
E. Preset ··················································································································································································· 24
F. Autoscan ············································································································································································· 25
G. Tour ······················································································································································································ 27
H. Privacy ················································································································································································ 28
I. Pattern ················································································································································································· 29
J. Alarm ··················································································································································································· 30
K. Sector ·················································································································································································· 32
DIP SWITCHING SETTING ······················································································································································· 33
A. ID Setting ·········································································································································································· 33
B. 485 Termination ······························································································································································ 39
C. Function ············································································································································································· 39
TROUBLESHOOTING ······························································································································································· 40
SPECIFICATION ········································································································································································· 41
DIMENSIONS ············································································································································································· 42
002
Accessaries
PTZ Camera
L-WRENCH - 1EA
SCREW M4×18 - 4EA
BOTTOM CASE
TOP CASE
WALL MOUNT BRAKET - 1EA
SET ANCHOR BOLT W5/16 - 4EA

PTZ CAMERA PTZ CAMERA
004 005
General FeaturesWarnings & Cautions
CAUTION : TO REDUCE THE RISK OF ELECTRIC SHOCK,
DO NOT REMOVE COVER (OR BACK)
NO USER SERVICEABLE PARTS INSIDE. REFER SERVICING
TO QUALIFIED SERVICE PERSONNEL.
RISK OF ELECTRIC SHOCK
DO NOT OPEN
CAUTION
This symbol indicates that dangerous voltage consisting a
risk of electric shock is present within this unit.
This symbol indicates that there are important operating
and maintenance instructions in the literature accompanying
this unit.
• If you fail to read this information and handle the product incorrectly, death or
serious injury may occur.
• The unit should be installed by trained personnel.
• Switch o immediately if the product emits smoke or abnormal heat.
• Never install the product in an area with exposed oil or gas.
• Never install the product on a ceiling that cannot hold its weight.
• Never touch the power cord with wet hands. Clean only with dry cloth.
• Never install the product in extreme high or low temperature.
• Never drop, hit strongly or cause the product to vibrate.
• Never expose the product to direct sunlight or severe ray.
INDOOR / OUTDOOR APPLICATIONS
• The domes small size and construction to IP 66 ingress protection rating make it ideal for internal or
external applications.
0.009º DOME SYSTEM ACCURACY WITH 1/16 MICRO STEP
• With 0.009º technical accuracy, camera provides excellent sensitive and delicate controlling on
preset mode by adapting 1/16 micro step and twin gear system.
RELIABLE RAM-MATERIAL
• The mechanical stabilization improves the durability and long life time of the camera by using
reliable materials especially, stepping motor, slip ring, timing belt and power condenser. This
camera case is made of re resisting material that approved UL grade 94 V-0. It is useful for indoor
environment concerning about the re accident.
COMPENSATION FUNCTION: PRESET POSITION
• The function provides absolute preset position even in dicult applications where vibration and
strong winds may otherwise aect dome performance.
SLIP RING FOR LONG LIFE TIME (20MILION ROTATE RING TESTED)
• Equipped with slip ring is passed by up to 20 millions rotate ring test within 6 months.
POWER MISCONNECTION PROTECTION ON 485 TERMINALS
• This protection function prevents the communication terminal from being out and trouble when
power source falsely connects to the RS-485 terminals. Hi speed dome got a patent for power
misconnection protection on RS-485 terminal.
FILTER CHANGEABLE TRUE DAY/NIGHT
• Top quality images are assured under day and night conditions due to the true day / night camera
with IR cut lter. Low light sensitivity is further increased by the cameras digital slow shutter.
QUICK OPERATION KEYS
• This camera provides quick function keys to allow control by most keyboards and DVRs that have
Pelco protocol support.
PTZ CAMERA PTZ CAMERA
006 007
Part NamesGeneral Features
VARIOUS SURVEILLANCE FUNCTIONS
• Auto Scan repeats pan and tilt between two preset positions with dierent speed and dwell time.
• 8 Group Tour up to 8 Programmable Group tours available and each group is consisting up to 60
presets step with dierent speed and dwell time with 16 characters.
• 220 Preset positions up to 220 programmable preset positions are available with 16 characters.
• 8 Patterns up to 8 programmable user-dened patters are available with 16 characters and each
one is consisting 50 seconds, total 400.
• 8 Sectors up to 8 programmable user-dened sectors are available with 16 characters.
• 8 Privacy Masking Zones up to 8 programmable user-dened privacy masking zones are available
with 16 characters.(18X, 26X only)
• 4 Alarm input and 2 relay out up to 4 alarms and 2 relay out available to match with preset, tours,
patterns.
400º/S, 350º/S ON PRESET SPEED
• The 360º full pan function moves through a maximum of 400º /sec., enabling you to quickly
pinpoint the spot you want to watch. Tilt speed provides through a maximum 350º /sec on preset.
On preset mode, the camera is set up to 400º /sec.
MULTIPLE LANGUAGES AND PROTOCOLS
• To convenience for the customers, this camera provides several languages and protocols including
English, Italian, Polish and Pelco D, Pelco P and Ultrak protocol.
INTELLIGENT PAN/TILT CONTROLLING
• Pan and tilt speed compensation function linked to zoom position.
A. Basic Parts
B. Additional Accessaries
Wall Mount Bracket
DIP Switch
DIP Switch Cover
Bottom Case
Camera
Top Case
Bubble
Pipe Mount Bracket
Pole Mount Adaptor
Gooseneck Mount Bracket
Wall Mount Bracket Kits
Corner Mount Adaptor
Ceiling Mount Bracket Kits

Installation Installation
PTZ CAMERA PTZ CAMERA
008 009
Remove the protection of cover attached each component after picking the
product out from box.
Remove the protection of lm from Top
case.
Unite both Top Case and Bottom Case
using + driver.
(Screw Locking Torque : 8.0 kgf.cm)
Take the protection of film of Camera
Lens out from Bottom Case.
Set up the bracket which is packed
with product as option on the wall.
Make a decision the place for Camera
angle in order not to be bothered.
Just double-check the wiring hole
whether it is size enough or not and
then set it up horizontally.
Remove the protection of cushion from
Bottom Case
Unite with the product if setting for
bracket is done. Connect both Safety
Wire and product rst because product
is heavy.

Installation
PTZ CAMERA PTZ CAMERA
010 011
Get wiring through to the back side of
wall pushing to hole inside of bracket.
Unite with product using screw M4×18
from top of bracket.
(Screw Locking Torque : 10.0 kgf.cm)
Make the setting over after double-
check both horizon and position of
product.
Quick Operating Keys
The dome supports Pelco-D/P, SAMSUNG and VICON i3DVR(SAE) protocols.
The dome may be used with any controller or DVR etc that supports the Pelco D
and Pelco P protocols.
The default setting of the dome is Pelco D / P (auto detection) with 2400 bps
(baud rate).
[PELCO D/P PROTOCOLS]
The comprehensive feature set of the dome is available from Pelco compatible
controllers via quick operation keys as dened below.
1~64 + preset and 100~255 + preset are used for normal user presets.
Presets 65-99 + are reserved for special functions.
For example, to enter OSD MENU, press the button 95 + PRESET
Number Note Function
1~64,100~255 +Preset Preset Executing Preset 1 ~ 64, 100~255
65 +Preset Preset Status Display Preset Status
66 +Preset Auto Scan Executing Auto Scan
67 +Preset Auto Flip Selectable On/O in Auto Flip mode
70 + Preset VIB CORR Selectable On/O in Picture Stabilization function
71~78 + Preset Group Tour Executing Group Tour #1 ~ #8
81~88 + Preset Pattern Executing Pattern #1 ~ #8
91 + Preset Zero Position Searching Pan / Tilt Zero Position
92 + Preset Freeze Select Freeze image when camera is working
93 + Preset BLC Selectable On/O in BLC function
94 + Preset Day / Night Selectable Day / Night / Auto Mode
95 + Preset OSD Entering OSD Main Menu
96 + Preset Focus Adjust Focus adjust
97 +Preset Alarm Selectable Enable/Disable all Alarms
98 +Preset AUX 1 Selectable On/O in Aux1
99 +Preset AUX 2 Selectable On/O in Aux2
Menu Function
Tilt Up / Down Sub menu cursor moves up / down
Pan Left / Right Enter to the sub menu or status change or decrement
Focus Near Using for Enter key when user select YES or NO
Focus Far Using for function changing keys when set coordinate
Zoom Tele Status cursor to the right
Zoom Wide Status cursor to the left
<Quick Operation Key Table 1>
<Quick Operation Keys Table 2: Use these function keys if controller has these keys>

PTZ CAMERA PTZ CAMERA
012 013
Quick Operating Keys
• 65 + preset : "Preset Status" is displayed, to remove this screen, press Focus Near
button.
• 70 + preset : This feature provides picture stabilization image.
• 92 + preset : This feature freezes the current live image during tour, auto scan
or pattern operation. When you press 92 + preset button, the image freezes but
the camera is still working as per operation such as tour, pattern or auto scan.
To return to normal images, press 92 + preset button again.
• Due to Zoom camera module, OSD Menu not provides every feature.
In this case, "Not available" is displayed on the monitor.
This feature is operated by preset number but not included in OSD main menu.
Diagnostic
A. Pan Origin Test
Zero point of Pan is located during the Panning test.
B. Tilt Origin Test
Zero point of Tilt is located during the Tilt test.
C. TX connection Test
Wait for 60 seconds for TX Connection Test,
During 60 seconds, the camera is must received a signal by any control
equipment
as DVR or controller.
Then Ok is displayed then automatically verifying TX Connection Test.
D. Camera Comm. Test
Camera communication is also checked.
OK should be displayed in these four tests before installation.
If all the above Tests are OK, “NOW EEPROM CHECKING” and “ALL DATA
INITIALIZING” is displayed and the camera is ready to operate.
Whenever the dome is powered on, a standard diagnostic is operated.
* If "Not Tested" is displayed in the test,
- The result which is not received any signal from DVR or controller
- Wrong connecting way such as the protocol, baud rate or RS-485
connection.
The use may check the install way carefully.
CAMERA ID : 001
BAUD RATE : 2400BPS
WAITING............
PAN ORIGIN TEST OK
TILT ORIGIN TEST OK
TX CONNECTION TEST OK
CAMERA COMM TEST OK

OSD Menu Setting OSD Menu Setting
PTZ CAMERA PTZ CAMERA
014 015
B. DOME SET
A. MAIN MENU
To enter OSD Menu, press the button 95+Preset [Maxpro 90+Preset] than OSD
Main Menu is displayed.
It can be possible to enter into Main Menu by using Menu Key or 95+Preset of
controller.
You can enter into Dome Set by using Controller Joystick of Left/Right after
choice Dome setup from MAIN MENU OSD.
B-1. CAMERA ID
This is for set up the ID String and Possibly exchange to other word as users
want, 16Bytes in total.
Exchange into other word by using Left/Right of controller joystick and move
Left/Right by using Zoom in/Zoom Out.
The word changed should be signed top of the left on ON/OFF Setting from
"OSD DISPLAY" MENU
DOME SET
CAMERA ID : CAM1
□□□□□□□□□□□□
HOME POS : OFF
MANUAL SPEED : 150º/S
AUTO FLIP : OFF
ZOOM SPEED : FAST
ALARM : DISABLE
LANGUAGE : ENGLISH
[NEXT PAGE]
SAVE AND EXIT
EXIT
MAIN MENU
DOME SETUP
CAMERA SET
PRESET
AUTO SCAN
TOUR
PRIVACY
PATTERN
ALARM
SECTOR
EXIT
To enter OSD Menu, press the button 95+Preset than OSD Main Menu is
displayed
SECTOR NO. : 01
SECTOR ID : SECTOR1
□□□□□□□□□
SECTOR START : 334.7 -1.6
SETCOR END : 000.4 08.8
SAVE
EXIT
CAMERA ID : CAM1
□□□□□□□□□□□□
HOME POS : OFF
MANUAL SPEED : 150º/S
AUTO FLIP : OFF
ZOOM SPEED : FAST
ALARM : DISABLE
LANGUAGE : ENGLISH
[NEXT PAGE]
SAVE AND EXIT
EXIT
DOME SETUP
MAIN MENU
[NEXT PAGE]
SENSE UP : X2
AGC MODE : MIDDLE
SSNR MODE : MIDDLE
COLOR : 050
DIS MODE : OFF
IRIS SET : AUTO
[PREVIOUS PAGE]
CAMERA SET
PRESET NO : 001
PRESET ID : PRESET001
□□□□□□□□
PAN : 123.2 TILT : 89.2
FREEZE MODE : OFF
FREEZE ALL : OFF
SAVE
EXIT
PRESET
AUTOSCAN
TOUR NO. : 01
TOUR TITLE : TOUR01
□□□□□□□□□□
TOUR STEP : 01
PRESET NO. : 001
DWELL TIME : 03
SPEED : 300º/S
SAVE
EXIT
TOUR
PRIVACY
[NEXT PAGE]
SYSTEM LOCK : OFF
[PASS WORD]
[OSD DISPLAY]
[SYSTEM STATUS]
[INITIALIZATION]
[PREVIOUS PAGE]
SHUTTER : FULL AUTO
MIRROR : OFF
APERTURE : 16
D ZOOM : OFF
WB MODE : ATW MODE
BLC : OFF[BLC]
D/N MODE :AUTO MODE [SLOW]
[NEXT PAGE]
EXIT
START ANGLE : 250.5 35.0
END ANGLE : 320.0 35.0
DIRECTION : CW
ENDLESS : OFF
SPEED : 10º/S
DWELL TIME : 01
SAVE AND EXIT
EXIT
PRIVACY NUMBER : 01
DISPLAY : OFF
ACTION : MOVE
SAVE
EXIT
ALARM NO. : 0.1
ALARM INPUT : OFF
ALARM ACT : 001
AUX ACT : BLC
SAVE
EXIT
ALARM
PATT NO : 01
PATT TITLE : PATTERN01
□□□□□□□
DATA FILL : 012%
SAVE
EXIT
PATTERN
SECTOR SET
EXIT

OSD Menu Setting OSD Menu Setting
PTZ CAMERA PTZ CAMERA
016 017
B-7. LANGUAGE
This is for setting the language of OSD MENU and basically include ENGLISH
/ ITALIAN / POLISH. Change into Left / Right of Joystick.
B-8. NEXT PAGE
You can get into the Next Page by using Left / Right of Joystick.
B-9. SAVE AND EXIT
It can be used to save and taking out in the DOME SET, it wouldn't work out
to save the data in case getting out of Menu using EXIT.
B-10. EXIT
It's used to get out of Menu not to save the set value.
SAVE AND EXIT must surely be used in case of save.
DOME SETUP
SYSTEM LOCK OFF
[PASS WORD]
[OSD DISPLY]
[SYSTEM STATUS]
[INITIALIZATION]
[PREVIOUS PAGE]
DOME SETUP
ENTER PASSWORD
BY ENTERING PRESET CODE !
PASSWORD ***
CONFIRM ***
C. DOME SET #2 [NEXT PAGE]
C-1. SYSTEM LOCK
Possibly set up the ON / OFF, in case of ON, when getting in the OSD MENU,
set the function using password to prohibit from others except for manager.
C-2. PASS WORD
It is feasible to use that function when SYSTEM LOCK is ON, instruction is
below.
B-2. HOME POS
This is ability of HOME POSITION, basically include RECOVER. If you have it
ON, Number and relevant ability would be showed up. Time is for Number,
relevant ability is for operation.
Possible to set up the time by using Left/Right of Joystick, if you press the
Focus Far Key, ■would be showed up on the left side of Menu, and "[ ]"
can be changed into other ability by using Left/Right as users want. If you
press the Focus Far Key after nish setting of "[ ]", ■ should be taken o and
escaped from "[ ]".
B-3. MANUAL SPEED
You can set it up by 100º~250º/sec with maximum speed when user control
PAN/TILT.
B-4. AUTO FLIP
Possible setting up the ON/OFF, on ON, angle of the tilt should be
approached to 90º while PAN/TILT. In case of controlling automatically, Tilt
would be located by -2º after circuit 180º. That means, possible to check the
area of 184º.
B-5. ZOOM SPEED
Possibly set up the Fast/Slow and it decides speed of approaching of zoom
position by adjusting speed of ZOOM MOTOR.
B-6. ALARM
Alarm can set up the 4 input line and 1 COMMON wiring on perception of
the designed input change to SPEED DOME.
• Disable : Clear ALARM movement.
• ENABLE : Performance the designed movement about ALARM occurrence.
• Possible time of setting: 15~90(Possibly setting as 5unit.)
• Possible list of setting: [AUTO] - RECOVER function performance.
(Performed ability movement last time.)
[PRST1] ~ [PRST8] - PRESET1 ~ PRESET8 movement
[TOUR1] ~ [TOUR8] - TOUR1 ~ TOUR8 movement
[PATT1] ~ [PATT8] - PATTERN1 ~ PATTERN8 movement
[SCAN] - AUTOSCAN movement

OSD Menu Setting OSD Menu Setting
PTZ CAMERA PTZ CAMERA
018 019
C-5. INITIALIZATION
This is for removing the informations of PRESET/TOUR/SECTOR/PRIVACY/
PATTERN saved in Memory, on choice for LOAD OPTIMIZED DEFAULT, all of
value should be initialized to FACTORY DEFAULT.
C-6. PREVIOUS PAGE
THis is for moving on former page.
MAIN MENU
DOME SETUP
CAMERA SET
PRESET
AUTO SCAN
TOUR
PRIVACY
PATTERN
ALARM
SECTOR
EXIT
INITIALIZATION
[TOUR CLEAR]
[PRESET CLEAR]
[SECTOR CLEAR]
[PRIVACY CLEAR]
[PATTERN CLEAR]
[LOAD OPTIMIZED DEFAULT]
[PREVIOUS PAGE]
D. CAMERA SET
• You can set it up on module operating in the CAMERA SET MENU.
• Possible to enter using Left/Right of Joystick after choose CAMERA SETUP
from MAIN MENU OSD.
C-3. OSD DISPLAY
Each part can be set up into ON/OFF, on On, remark operating sign in the
designed place.
C-4. SYSTEM STATUS
This is for checking the information of IR SPEED DOME, instruction is below.
• PROTOCOL : Communication Protocol information between Controller and
SPEED DOME.
• RAUD RATE : Communication Speed information between Controller and
SPEED DOME.
• FIRMWARE VER : Version information of Firmware used in product.
• UPGRADED DATE : Information on nal writing day of the rmware.
• CAMERA MODULE : Module information used in product.
• R/B UPGRADED DATE : Information of nal writing day on rmware of the
REAR BOARD.
OSD DISPLAY
CAMERA ID ON
PRESET ID ON
SECTOR ID ON
TOUR ID ON
PATT ID ON
SCAN ID ON
COORDINATE ON
[PREVIOUS PAGE]
• Password should be inputted 2 times using number, preset key.
• In case of same thing with PASSWORD input of 2 times, "CONFIRMED"
will be showed up and back to the Menu after 4 second.
• Basic value of PASSWORD : 99
SYSTEM STATUS
PROTOCOL PELCO-D, P
BAUD RATE 2400 BPS
FIRMWARE VER 1.00a
UPGRADED DATE 09.02.11
CAMERA MODULE SCM3270
R/B UPGRADED DATE 01.K.10
[PREVIOUS PAGE]

OSD Menu Setting OSD Menu Setting
PTZ CAMERA PTZ CAMERA
020 021
D-2. MIRROR
Possible to set up ON/OFF, image should be left side to right.
D-3. APERTURE
Sharpness can be controlled.
- The value for Default is 16, possible to adjust 00~31, higher the number,
clear the Sharpness.
D-4. D ZOOM
Digital Zoom can be set ON/OFF.
D-5. WB MODE
Possible to set up the White Balance, number of Mode are 3 in total.
- Default value is ATW, which can be changed into INDOOR/OUTDOOR/ATW
MODE.
D-6. BLC
It can be set up into 3 Mode by Back Light Compensation.
- Basically on OFF, possible to set up the ON/OFF using Left/Right of Joystick.
-
■would be showed up on the left if pressed Focus Far Key on ON, and
then possible to insert to the Menu of BLC/HLC/SSDR.
D-6-1. BLC MODE (Back Light Compensation)
• LEVEL SET : It can be set up into HIGH/MIDDLE/LOW
• AREA SET : This is for setting the area, □sign would be showed up when
getting in the BLC Menu.
- LEFT/TOP : The sign of LEFT/TOP can be changed by Joystick.
- RIGHT/BOTTOM : The size of RIGHT/BOTTOM can be changed
by Joystick.
BLC SET
BLC MODE BLC
LEVEL SET HIGH
AREA SET LEFT / TOP
EXIT
D-1.SHUTTER
This is menu for set up the Shutter Speed of Camera.
• The value for Default is FULL AUTO, and possible to change it using Left/
Right of Joystick
- Change Procedure : FULL AUTO →MANUAL →A.FLICKER
- FULL AUTO : Changing the Shutter Speed automatically according to
lights.
- A.FLICKER : Set FLICKER as ON
- MANUAL : It can be changed by Focus Far Key of Controller, showing up
■mark if you press it.
In this time, possible to set up from X512 (Digital Slow Shutter) to
1/120000 using Left/Right of Joystick and setting value would be saving
vanishing ■if pressed Focus Far Key.
CAMERA SET
SHUTTER FULL AUTO
MIRROR OFF
APERTURE 16
D ZOOM OFF
WB MODE ATW MODE
BLC OFF[BLC]
D/N MODE AUTO MODE [SLOW]
[NEXT PAGE]
EXIT
• CAMERA SET MENU #1
• CAMERA SET MENU #2 [NEXT PAGE]
CAMERA SET
SENSE UP X2
AGC MODE MIDDLE
SSNR MODE MIDDLE
COLOR 050
DIS MODE OFF
IRIS SET AUTO
[PREVIOUS PAGE]

OSD Menu Setting OSD Menu Setting
PTZ CAMERA PTZ CAMERA
022 023
D-8. SENSE UP
You can set up the Digital Slow Shutter, not doing anything directly. In case
on ON sense up, Shutter Speed should be adjusted according to amount
of lights. Then Slow Shutter is not working that the section set to Sense up
would be Limited.
- Possible to set it up using Left/Right of Joystick , maximum is x2~x512
* SENSE UP is not applied in case controlling Shutter Speed with manual.
D-9. AGC MODE : Auto Gain Control
Possible to set up 4 mode of OFF/LOW/MIDDLE using Left/Right of Joystick.
D-10. SSNR : Samsung Super Noise Reduction
Possible to set up 4 mode of OFF/LOW/MIDDLE using Left/Right of Joystick.
D-11. COLOR
Set up the Color of display and control every 5 out of 0~100. Lower the
number, closer to black and white, higher the number , color would be
stronger.
The value of Default is 50
D-12. DIS
This is for Digital Image Stabilizer, control the ON/OFF using Joystick.
D-13. IRIS SET
Set up the Iris (AUTO,MANUAL)
- AUTO : IRIS is operating automatically.
- MANUAL : On Manual Mode, F1.6 would be signed and if you press Focus
Far Key, ■should be showed up and then can be changed using Joystick
Left/Right.
If you press Focus Far Key after completing setting,■should be
disappeared and setting value would be saved.
The Range for change is CLOSE, F1.6~F28
D-6-2. HLC MODE (High Light Compensation)
• LEVEL SET : Possible to set up into HIGH/LOW.
• MASK COLOR : Higher the number, closer to black and feasible to set up
01~16
D-6-3. SSDR MODE (Samsung Super Dynamic Range)
• RANGE SET : Possible to set up into WIDE/NARROW
• LEVEL SET : Setup 00~16
D-7. D/N MODE
Setting up the DAY&NIGHT.
- It can be set up 3Mode of DAY/NIGHT/AUTO in total using Left/Right of
Joystick, in case with IR_LED, should be on ON when NIGHT MODE, be
Controlled LED brightness by ZOOM.
- In case of AUTO, it would be changed automatically using amount of lights
and No IR LED, possible to set up the changed speed [SLOW/FAST] using
Focus Far Key.
- In case with IR LED, possible to change it 0~10 stage using Focus Near Key.
BLC SET
BLC MODE HLC
LEVEL SET HIGH
MASK COLOR 07
EXIT
BLC SET
BLC MODE SSDR
LEVEL SET WIDE
MASK COLOR 008
EXIT

OSD Menu Setting OSD Menu Setting
PTZ CAMERA PTZ CAMERA
024 025
F. AUTO SCAN
E-3. PAN/TILT
If you press the Focus Far Key after place Cursor to Menu, ■sign would be
showed up on the left and can set up the position, zoom you want.
And then get out of there pressing the Focus Far Key after completing
setting. That time, ■should be taken out.
E-4. FREEZE MODE
On moving on relevant preset when Preset set, it can be set up whether
display move to Freeze, on On, Freeze Preset can be vitalized.
E-5. FREEZE ALL
Set up the ON/OFF, on ON, Freeze Preset can be vitalized to all of Preset.
E-6. SAVE
It's used to save the value set after setting is completed and can be saved
anything using Left/Right of Joystick
AUTO SCAN SET
START ANGLE : 250.5 35.0
END ANGLE : 320.0 35.0
DIRECTION : CW
ENDLESS : OFF
SPEED : 10º/S
DWELL TIME : 01
SAVE AND EXIT
EXIT
You can get in the AUTO SCAN using Left/Right of Joystick after decision AUTO
SCAN from Main Menu.
E. PRESET SET
E-1. PRESET NO.
Possible to set up the number of PRESET to save using LEFT/RIGHT of
Joystick.
- PRESET NUMBER is impressed with 3 word
- The number for setting of [1~64],[100~255] 165 in total can be picked out.
- On control of LEFT/RIGHT of Joystick can be changed automatically, with
this.[64→100],[100→64]
- If you press the Focus Far Key, It could be moving to relevant preset in case
of enrolled when Cursor locate on PRESET NO
E-2. PRESET ID
ID of PRESET can be enrolled by user randomly in range of 16 words.
- Default is kind of ""PRESET***"".( * meaning is PRESET NUMBER)
- Changing the words as LEFT/RIGHT of Joystick, and position can be
changed by ZOOM IN/OUT.
- End of Changing ID should be moved on OSD MENU of up or down by
controlling TILT.
In this time, in case of pressing the FOCUS FAR, getting in the PAN/TILT/
ZOOM setting mode and it would be changed original ID setting mode if
pressed one more time.
PRESET SET
PRESET NO : 001
PRESET ID : PRESET001
□□□□□□□□
PAN : 123.2 TILT : 89.2
FREEZE MODE : OFF
FREEZE ALL : OFF
SAVE
EXIT
You can insert to PRESET menu using Left/Right of Joystick after choice
PRESET SET.

OSD Menu Setting OSD Menu Setting
PTZ CAMERA PTZ CAMERA
026 027
G-1. TOUR NO.
This is for Menu for choice the GROUP NUMBER of TOUR that you'll set it up
into GROUP out of 8 of TOUR. Possibly choice 1~8.
G-2. TOUR TITLE
ID for tour can be registered as option by user within range of 16words.
- Default is for ""TOUR**"". (* is for TOUR NUMBER)
- You can change the character with PAN LEFT/RIGHT and position with
ZOOM IN/OUT.
- For make ID changing over, move to OSD MENU by controlling TILT.
G-3. TOUR STEP
This is for turn of playback of PRESET you'll design the GROUP. Possibly it
could be registered 60 in maximum and PRESET will working as turn.
G-4. PRESET NO.
This is for registration the PRESET to TOUR STEP.
- Choose the PRESET number using LEFT/RIGHT of Joystick.
- You can input it directly using [1..64],[100,255]+ Preset.
- The color for PRESET should be changed in case that PRESET isregistered.
G-5. DWELL TIME
This is for setting the holding time after moving is finished to relevant
PRESET.
- The value for setting is 1~99, you can input it directly using [1-99]+Preset.
G. TOUR
You can use this function using Left/Right of Joystick after choice the TOUR in
the Main Menu.
AUTO SCAN SET
TOUR NO. : 01
TOUR TITLE : TOUR01
□□□□□□□□□□
TOUR STEP : 01
PRESET NO. : 001
DWELL TIME : 03
SPEED : 300º/S
SAVE
EXIT
F-1. START / END ANGLE
Possible to set up the position of beginning and end of Auto Scan.
- You can control the only position of PAN from each menu of START ANGLE/
END ANGLE in basic screen.
- In case you change the position of TILT or ZOOM, it'd be possible only with
status changed mode by pressing FOCUS FAR.
(In this time, PAN/TILT/ZOOM Possible.)
-The position of PAN should be decided into each position of START/END
and position of TILT or ZOOM would be decided into last day controlled
without relationship of START/END.
(Control of TILT and ZOOM should be applied to same position of START/
END.)
- The coordinate of PAN/TILT signed in START ANGLE would be marked into
coordinate in case of entering MENU, when position of cursor moved on
START/END ANGLE, it would be changed to current position .So there is no
way to check the position saved.
F-2. DIRECTION
Feasible to set up the direction of rotation of PAN.
- You can set it up into CW/CCW.
F-3. ENDLESS
On ON, Endless keeps rotating into direction set from DIRECTION regardless
of position of START/END.
F-4. SPEED
You can set up the speed of revolution of PAN from 01º/S to 35º/S. Possibly
input into Direct using [1-35]+Preset after place the Cursor on the SPEED
Menu.
F-5. DWELL TIME
On OFF of ENDELSS, you can set up the time stopped when approaching
each position of START/END. The value for setting is 1~99, input directly
using [1-99]+Preset.
F-6. SAVE AND EXIT
It's used to save and take o the Menu after setting completed.
F-7. EXIT
It's used to take o the Menu not saving setting value.

OSD Menu Setting OSD Menu Setting
PTZ CAMERA PTZ CAMERA
028 029
H-3. ACTION
This is for set up the position, size of PRIVACY MASK, you can control with 2
ADJUST MODE in order to set the MOVE MODE and size for set the position.
- Possible for setting MOVE/ADJUST using Left/Right of Joystick in ACTION
MENU.
»MOVE : You can adjust the position of PAN/TILT/ZOOM and move as you
want.
» ADJUST : YOU CAN ADJUST THE SIZE OF PRIVACY MASK.
H-4. SAVE
It's used to save the set value and if saved it, Cursor should be moved on to
PRIVACY SET MENU automatically.
H-5. EXIT
It's used to take o the PRIVACY SET MENU.
I. PATTERN
You can get in using Left/Right of Joystick after decision the Pattern in Main
Menu.
PATTERN SET
PATT NO. : 01
PATT TITLE : PATTERN01
□□□□□□□
DATA FILLL : 120%
SAVE
EXIT
I-1. PATT NO.
This is for choice of number of pattern, and 8 in total you can register.
G-6. SPEED
Possible to set up the time moving to relevant PRESET.
- The value for setting is 10º/S~400º/S, can input it directly using
[1-40]+Preset.
(On inserting Direct, you should input the value of shared into 10 from
relevant Speed value.) F-3. TOUR STEP
This is for turn of playback of PRESET you'll design the GROUP. Possibly it
could be registered 60 in maximum and PRESET will working as turn.
G-7. SAVE
This is for saving the setting value, save it suing Left/Right of Joystick. If value
saved, Cursor for TOUR STEP would be placed automatically and raising up 1
of TOUR STEP.
G-5. EXIT
It's used to take o the TOUR SET Menu.
H-1. PRIVACY NUMBER
You can set it up 8 in total, it should be used to choose the relevant number.
H-2. DISPLAY
You can set it up both ON/OFF, on ON, BLUE BOX of square would be
indicated on center of screen.
H. PRIVACY
You can use this function using Left/Right of Joystick after choice PRIVACY in
Main Menu. This is for MASKING in order to protect the private life on special
position of security area.
PRIVACY SET
PRIVACY NUMBER : 01
DISPLAY : OFF
ACTION : MOVE
SAVE
EXIT

OSD Menu Setting OSD Menu Setting
PTZ CAMERA PTZ CAMERA
030 031
J-2. ALARM INPUT
Set up the sensing way of ALARM or Using ARARM.
- [OFF/NO/NC] can be set up.
- NO's meaning is Normal Open and handle the CLOSE to NORMAL of OPEN.
- NC's meaning is Normal Close and handle the OPEN to NORMAL of CLOSE.
- It should be controlled by using LEFT/RIGHT of Joystick.
J-3. ALARM ACT
This is for registration the operating when occur ALARM.
- The number of registration for PRESET is [1..64, 100..200]/TOUR[01..08]/
PATTERN[01..08]
- PRESET is marked with 3words and changed to ([001..064], [100..200])
automatically.
- TOUR is marked with 3words of [P01...P08]. Each PATTERN is YOUR[1...8].
- PATTERN is marked with 3wordsof [T01...T08]. Each is TOUR[1..8].
- In case of PRESET, ACTION is over after completion of moving for PRESET
position.
- In case of TOUR/PATTERN, ACTION is over after completion each 1 time.
J-4. AUX ACT
On occurrence ALARM, it's function for controlling the outdoor PORT.
- You can choice between BLK/AUX1/AUX2
- When setting to BLK, on occurrence the ALARM, There's no changing AUX
terminal.
- On setting AUX1, it should handle the terminal into on when occurrence
ALARM.
- On setting AUX2, it should handle the terminal into on when occurrence
ALARM.
- The holding time for ON of each AUX terminal is fasten 5sec.
J-5. SAVE
This is for saving the set value, NO is raised up 1, when Cursor places to
ALARM NO.
J-6. EXIT
This is used to take o the ALARM MENU.
I-2. PATT TITLE
On working PATTERN, the function for inputting the characters for title if
showed up on the screen.
- Default os for "PATTERN01
□□□□□□□
"
- The changing of character can be set up using the Left/Right/Up or Zoom
In/Out of joystick.
I-3. DATA FILL
This is for marking when saving or status of PATTERN DATA.
- If you press the Focus Far Key, "DATA FILL" would be blinked and get started
saving of Manual value. In this time, if data saved by 99%, Cursor could be
placed on the save automatically after stop the operation.
- Blinking of DATA FILL would be stopped and DATA saved on the right
would be signed to "%" if you press the Focus Far Key after Manual
adjustment is nished.
I-4. SAVE
This is for saving the data set and in case saving the value, Cursor would be
moving on PATT NO and the value of NO grows up each 1.
I-5. EXIT
It is used to take o the PATTERN SET MENU.
J-1. ALARM NO.
It can be chosen the ALARM number that you'll set .
ALARM SET
ALARM NO. : 01
ALARM INPUT : OFF
ALARM ACT : 001
AUX ACT : BLK
SAVE
EXIT
J. ALARM
You can get the function in using Left/Right of Joystick after ALARM in Main
Menu and it makes it operating special when it senses the changing the 4ports
inside.

DIP Switch Setting
PTZ CAMERA
033
OSD Menu Setting
PTZ CAMERA
032
A. ID SETTING
The camera has camera ID to be controlled by Controller or DVR.
After opening, set ID using DIP SW1.
• Factory default : Camera ID = 1
ID SW1-#1 SW1-#2 SW1-#3 SW1-#4 SW1-#5 SW1-#6 SW1-#7 SW1-#8
1 ON OFF OFF OFF OFF OFF OFF OFF
2 OFF ON OFF OFF OFF OFF OFF OFF
3 ON ON OFF OFF OFF OFF OFF OFF
4 OFF OFF ON OFF OFF OFF OFF OFF
5 ON OFF ON OFF OFF OFF OFF OFF
6 OFF ON ON OFF OFF OFF OFF OFF
7 ON ON ON OFF OFF OFF OFF OFF
8 OFF OFF OFF ON OFF OFF OFF OFF
9 ON OFF OFF ON OFF OFF OFF OFF
10 OFF ON OFF ON OFF OFF OFF OFF
11 ON ON OFF ON OFF OFF OFF OFF
12 OFF OFF ON ON OFF OFF OFF OFF
13 ON OFF ON ON OFF OFF OFF OFF
14 OFF ON ON ON OFF OFF OFF OFF
15 ON ON ON ON OFF OFF OFF OFF
16 OFF OFF OFF OFF ON OFF OFF OFF
17 ON OFF OFF OFF ON OFF OFF OFF
18 OFF ON OFF OFF ON OFF OFF OFF
19 ON ON OFF OFF ON OFF OFF OFF
20 OFF OFF ON OFF ON OFF OFF OFF
21 ON OFF ON OFF ON OFF OFF OFF
22 OFF ON ON OFF ON OFF OFF OFF
23 ON ON ON OFF ON OFF OFF OFF
24 OFF OFF OFF ON ON OFF OFF OFF
25 ON OFF OFF ON ON OFF OFF OFF
26 OFF ON OFF ON ON OFF OFF OFF
27 ON ON OFF ON ON OFF OFF OFF
28 OFF OFF ON ON ON OFF OFF OFF
29 ON OFF ON ON ON OFF OFF OFF
30 OFF ON ON ON ON OFF OFF OFF
31 ON ON ON ON ON OFF OFF OFF
32 OFF OFF OFF OFF OFF ON OFF OFF
33 ON OFF OFF OFF OFF ON OFF OFF
34 OFF ON OFF OFF OFF ON OFF OFF
K-1. SECTOR NO.
You can design the SECTOR 8 in total using Left/Right of Joystick.
K-2. SECTOR ID
This is for inputting words for TITLE and will be marked on the screen on
SECTOR.
-Default is "SECTOR1
□□□□□□
".(
□
is blank)
- You can set up the changing of character using Left/Right/Up/Down or
Zoom in/Out of Joystick.
K-3. SECTOR START
Design the START position of SECTOR section to work.
- Enter it as designed MODE by pressing FOCUS FAR.
- Move on position as you want to go using PAN/TILT/ZOOM.
- The designed MODE should be over by pressing the FOCUS FAR Key after
design of position is completed.
K-4. SECTOR END
Design the END position of SECTOR section.
- Enter the place as designed MODE by pressing the FOCUS FAR key.
- Move on the position as you want to go using the PAN/TIRL/ZOOM.
K-5. SAVE
It's used to save the set SECTOR value.
K-6. EXIT
It's used to take o the SECTOR SET Menu.
K. SECTOR
This is for sign the TITLE on the screen on sprecial section to get in using LEFT/
RUGHT of JOYSTICK after choose the SECTOR in the Main Menu.
SECTOR SET
SECTOR NO. : 01
SECTOR ID : SECTOR1
□□□□□□□□□
SECTOR START : 334.7 -1.6
SECTPR EMD : 000.4 08.8
SAVE
EXIT

DIP Switch Setting DIP Switch Setting
PTZ CAMERA PTZ CAMERA
034 035
ID SW1-#1 SW1-#2 SW1-#3 SW1-#4 SW1-#5 SW1-#6 SW1-#7 SW1-#8
35 ON ON OFF OFF OFF ON OFF OFF
36 OFF OFF ON OFF OFF ON OFF OFF
37 ON OFF ON OFF OFF ON OFF OFF
38 OFF ON ON OFF OFF ON OFF OFF
39 ON ON ON OFF OFF ON OFF OFF
40 OFF OFF OFF ON OFF ON OFF OFF
41 ON OFF OFF ON OFF ON OFF OFF
42 OFF ON OFF ON OFF ON OFF OFF
43 ON ON OFF ON OFF ON OFF OFF
44 OFF OFF ON ON OFF ON OFF OFF
45 ON OFF ON ON OFF ON OFF OFF
46 OFF ON ON ON OFF ON OFF OFF
47 ON ON ON ON OFF ON OFF OFF
48 OFF OFF OFF OFF ON ON OFF OFF
49 ON OFF OFF OFF ON ON OFF OFF
50 OFF ON OFF OFF ON ON OFF OFF
51 ON ON OFF OFF ON ON OFF OFF
52 OFF OFF ON OFF ON ON OFF OFF
53 ON OFF ON OFF ON ON OFF OFF
54 OFF ON ON OFF ON ON OFF OFF
55 ON ON ON OFF ON ON OFF OFF
56 OFF OFF OFF ON ON ON OFF OFF
57 ON OFF OFF ON ON ON OFF OFF
58 OFF ON OFF ON ON ON OFF OFF
59 ON ON OFF ON ON ON OFF OFF
60 OFF OFF ON ON ON ON OFF OFF
61 ON OFF ON ON ON ON OFF OFF
62 OFF ON ON ON ON ON OFF OFF
63 ON ON ON ON ON ON OFF OFF
64 OFF OFF OFF OFF OFF OFF ON OFF
65 ON OFF OFF OFF OFF OFF ON OFF
66 OFF ON OFF OFF OFF OFF ON OFF
67 ON ON OFF OFF OFF OFF ON OFF
68 OFF OFF ON OFF OFF OFF ON OFF
69 ON OFF ON OFF OFF OFF ON OFF
70 OFF ON ON OFF OFF OFF ON OFF
71 ON ON ON OFF OFF OFF ON OFF
72 OFF OFF OFF ON OFF OFF ON OFF
73 ON OFF OFF ON OFF OFF ON OFF
74 OFF ON OFF ON OFF OFF ON OFF
75 ON ON OFF ON OFF OFF ON OFF
76 OFF OFF ON ON OFF OFF ON OFF
77 ON OFF ON ON OFF OFF ON OFF
78 OFF ON ON ON OFF OFF ON OFF
79 ON ON ON ON OFF OFF ON OFF
80 OFF OFF OFF OFF ON OFF ON OFF
ID SW1-#1 SW1-#2 SW1-#3 SW1-#4 SW1-#5 SW1-#6 SW1-#7 SW1-#8
81 ON OFF OFF OFF ON OFF ON OFF
82 OFF ON OFF OFF ON OFF ON OFF
83 ON ON OFF OFF ON OFF ON OFF
84 OFF OFF ON OFF ON OFF ON OFF
85 ON OFF ON OFF ON OFF ON OFF
86 OFF ON ON OFF ON OFF ON OFF
87 ON ON ON OFF ON OFF ON OFF
88 OFF OFF OFF ON ON OFF ON OFF
89 ON OFF OFF ON ON OFF ON OFF
90 OFF ON OFF ON ON OFF ON OFF
91 ON ON OFF ON ON OFF ON OFF
92 OFF OFF ON ON ON OFF ON OFF
93 ON OFF ON ON ON OFF ON OFF
94 OFF ON ON ON ON OFF ON OFF
95 ON ON ON ON ON OFF ON OFF
96 OFF OFF OFF OFF OFF ON ON OFF
97 ON OFF OFF OFF OFF ON ON OFF
98 OFF ON OFF OFF OFF ON ON OFF
99 ON ON OFF OFF OFF ON ON OFF
100 OFF OFF ON OFF OFF ON ON OFF
101 ON OFF ON OFF OFF ON ON OFF
102 OFF ON ON OFF OFF ON ON OFF
103 ON ON ON OFF OFF ON ON OFF
104 OFF OFF OFF ON OFF ON ON OFF
105 ON OFF OFF ON OFF ON ON OFF
106 OFF ON OFF ON OFF ON ON OFF
107 ON ON OFF ON OFF ON ON OFF
108 OFF OFF ON ON OFF ON ON OFF
109 ON OFF ON ON OFF ON ON OFF
110 OFF ON ON ON OFF ON ON OFF
111 ON ON ON ON OFF ON ON OFF
112 OFF OFF OFF OFF ON ON ON OFF
113 ON OFF OFF OFF ON ON ON OFF
114 OFF ON OFF OFF ON ON ON OFF
115 ON ON OFF OFF ON ON ON OFF
116 OFF OFF ON OFF ON ON ON OFF
117 ON OFF ON OFF ON ON ON OFF
118 OFF ON ON OFF ON ON ON OFF
119 ON ON ON OFF ON ON ON OFF
120 OFF OFF OFF ON ON ON ON OFF
121 ON OFF OFF ON ON ON ON OFF
122 OFF ON OFF ON ON ON ON OFF
123 ON ON OFF ON ON ON ON OFF
124 OFF OFF ON ON ON ON ON OFF
125 ON OFF ON ON ON ON ON OFF
126 OFF ON ON ON ON ON ON OFF

DIP Switch Setting DIP Switch Setting
PTZ CAMERA PTZ CAMERA
036 037
ID SW1-#1 SW1-#2 SW1-#3 SW1-#4 SW1-#5 SW1-#6 SW1-#7 SW1-#8
127 ON ON ON ON ON ON ON OFF
128 OFF OFF OFF OFF OFF OFF OFF ON
129 ON OFF OFF OFF OFF OFF OFF ON
130 OFF ON OFF OFF OFF OFF OFF ON
131 ON ON OFF OFF OFF OFF OFF ON
132 OFF OFF ON OFF OFF OFF OFF ON
133 ON OFF ON OFF OFF OFF OFF ON
134 OFF ON ON OFF OFF OFF OFF ON
135 ON ON ON OFF OFF OFF OFF ON
136 OFF OFF OFF ON OFF OFF OFF ON
137 ON OFF OFF ON OFF OFF OFF ON
138 OFF ON OFF ON OFF OFF OFF ON
139 ON ON OFF ON OFF OFF OFF ON
140 OFF OFF ON ON OFF OFF OFF ON
141 ON OFF ON ON OFF OFF OFF ON
142 OFF ON ON ON OFF OFF OFF ON
143 ON ON ON ON OFF OFF OFF ON
144 OFF OFF OFF OFF ON OFF OFF ON
145 ON OFF OFF OFF ON OFF OFF ON
146 OFF ON OFF OFF ON OFF OFF ON
147 ON ON OFF OFF ON OFF OFF ON
148 OFF OFF ON OFF ON OFF OFF ON
149 ON OFF ON OFF ON OFF OFF ON
150 OFF ON ON OFF ON OFF OFF ON
151 ON ON ON OFF ON OFF OFF ON
152 OFF OFF OFF ON ON OFF OFF ON
153 ON OFF OFF ON ON OFF OFF ON
154 OFF ON OFF ON ON OFF OFF ON
155 ON ON OFF ON ON OFF OFF ON
156 OFF OFF ON ON ON OFF OFF ON
157 ON OFF ON ON ON OFF OFF ON
158 OFF ON ON ON ON OFF OFF ON
159 ON ON ON ON ON OFF OFF ON
160 OFF OFF OFF OFF OFF ON OFF ON
161 ON OFF OFF OFF OFF ON OFF ON
162 OFF ON OFF OFF OFF ON OFF ON
163 ON ON OFF OFF OFF ON OFF ON
164 OFF OFF ON OFF OFF ON OFF ON
165 ON OFF ON OFF OFF ON OFF ON
166 OFF ON ON OFF OFF ON OFF ON
167 ON ON ON OFF OFF ON OFF ON
168 OFF OFF OFF ON OFF ON OFF ON
169 ON OFF OFF ON OFF ON OFF ON
170 OFF ON OFF ON OFF ON OFF ON
171 ON ON OFF ON OFF ON OFF ON
172 OFF OFF ON ON OFF ON OFF ON
ID SW1-#1 SW1-#2 SW1-#3 SW1-#4 SW1-#5 SW1-#6 SW1-#7 SW1-#8
173 ON OFF ON ON OFF ON OFF ON
174 OFF ON ON ON OFF ON OFF ON
175 ON ON ON ON OFF ON OFF ON
176 OFF OFF OFF OFF ON ON OFF ON
177 ON OFF OFF OFF ON ON OFF ON
178 OFF ON OFF OFF ON ON OFF ON
179 ON ON OFF OFF ON ON OFF ON
180 OFF OFF ON OFF ON ON OFF ON
181 ON OFF ON OFF ON ON OFF ON
182 OFF ON ON OFF ON ON OFF ON
183 ON ON ON OFF ON ON OFF ON
184 OFF OFF OFF ON ON ON OFF ON
185 ON OFF OFF ON ON ON OFF ON
186 OFF ON OFF ON ON ON OFF ON
187 ON ON OFF ON ON ON OFF ON
188 OFF OFF ON ON ON ON OFF ON
189 ON OFF ON ON ON ON OFF ON
190 OFF ON ON ON ON ON OFF ON
191 ON ON ON ON ON ON OFF ON
192 OFF OFF OFF OFF OFF OFF ON ON
193 ON OFF OFF OFF OFF OFF ON ON
194 OFF ON OFF OFF OFF OFF ON ON
195 ON ON OFF OFF OFF OFF ON ON
196 OFF OFF ON OFF OFF OFF ON ON
197 ON OFF ON OFF OFF OFF ON ON
198 OFF ON ON OFF OFF OFF ON ON
199 ON ON ON OFF OFF OFF ON ON
200 OFF OFF OFF ON OFF OFF ON ON
201 ON OFF OFF ON OFF OFF ON ON
202 OFF ON OFF ON OFF OFF ON ON
203 ON ON OFF ON OFF OFF ON ON
204 OFF OFF ON ON OFF OFF ON ON
205 ON OFF ON ON OFF OFF ON ON
206 OFF ON ON ON OFF OFF ON ON
207 ON ON ON ON OFF OFF ON ON
208 OFF OFF OFF OFF ON OFF ON ON
209 ON OFF OFF OFF ON OFF ON ON
210 OFF ON OFF OFF ON OFF ON ON
211 ON ON OFF OFF ON OFF ON ON
212 OFF OFF ON OFF ON OFF ON ON
213 ON OFF ON OFF ON OFF ON ON
214 OFF ON ON OFF ON OFF ON ON
215 ON ON ON OFF ON OFF ON ON
216 OFF OFF OFF ON ON OFF ON ON
217 ON OFF OFF ON ON OFF ON ON
218 OFF ON OFF ON ON OFF ON ON

DIP Switch Setting DIP Switch Setting
PTZ CAMERA PTZ CAMERA
038 039
B. 485 TERMINATION
C. FUNCTION
The 1st of DIP SW2 is used for 100Ω termination.
Set ON DIP SW2 -1st of only the last looped camera from the controller.
Even in case of only one camera, set ON DIP SW2 -1st of the camera.
CAM 1 CAM 2C
TERMINATION
SW1-ON
CAM nAM n-1
DIP S/W NO. DEFINITION DETAIL
1 Binary Number Protocol #1 321 : Dip S/W Number
000 : PELCO-D/P 001 : VICON
010 : SAMSUNG 011 : SAE
100 : x 101 : x
110 : x 111 : x
2 Binary Number Protocol #2
3 Binary Number Protocol #3
4 Binary Number Baud rate #1 54 : Dip S/W Number
00 : x 01 : 2400 bps
10 : 4800 bps 11 : 9600 bps
5 Binary Number Baud rate #2
6 Reserved Reserved
7 Reserved Reserved
8 Termination
RS-485 terminating resistance can be used
by user.
ON : Availble OFF : Not Available.
ID SW1-#1 SW1-#2 SW1-#3 SW1-#4 SW1-#5 SW1-#6 SW1-#7 SW1-#8
219 ON ON OFF ON ON OFF ON ON
220 OFF OFF ON ON ON OFF ON ON
221 ON OFF ON ON ON OFF ON ON
222 OFF ON ON ON ON OFF ON ON
223 ON ON ON ON ON OFF ON ON
224 OFF OFF OFF OFF OFF ON ON ON
225 ON OFF OFF OFF OFF ON ON ON
226 OFF ON OFF OFF OFF ON ON ON
227 ON ON OFF OFF OFF ON ON ON
228 OFF OFF ON OFF OFF ON ON ON
229 ON OFF ON OFF OFF ON ON ON
230 OFF ON ON OFF OFF ON ON ON
231 ON ON ON OFF OFF ON ON ON
232 OFF OFF OFF ON OFF ON ON ON
233 ON OFF OFF ON OFF ON ON ON
234 OFF ON OFF ON OFF ON ON ON
235 ON ON OFF ON OFF ON ON ON
236 OFF OFF ON ON OFF ON ON ON
237 ON OFF ON ON OFF ON ON ON
238 OFF ON ON ON OFF ON ON ON
239 ON ON ON ON OFF ON ON ON
240 OFF OFF OFF OFF ON ON ON ON
241 ON OFF OFF OFF ON ON ON ON
242 OFF ON OFF OFF ON ON ON ON
243 ON ON OFF OFF ON ON ON ON
244 OFF OFF ON OFF ON ON ON ON
245 ON OFF ON OFF ON ON ON ON
246 OFF ON ON OFF ON ON ON ON
247 ON ON ON OFF ON ON ON ON
248 OFF OFF OFF ON ON ON ON ON
249 ON OFF OFF ON ON ON ON ON
250 OFF ON OFF ON ON ON ON ON
251 ON ON OFF ON ON ON ON ON
252 OFF OFF ON ON ON ON ON ON
253 ON OFF ON ON ON ON ON ON
254 OFF ON ON ON ON ON ON ON
255 ON ON ON ON ON ON ON ON
This manual suits for next models
1
Table of contents
Other Axis Security Camera manuals