Baninni VEGA BNCS020 User manual

HANDLEIDING
MODE D’EMPLOI
MANUAL
GEBRAUCHSANLEITUNG
“FOR A SAFE RIDE”
ROADTRIP
CARSEAT
VEGA BNCS020

HANDLEIDING
NL CARSEAT VEGA BNCS020
HANDLEIDING
Groep 0+1+2
Geschikt tot 25kg
(0+ 0-13 kg) (1 - 9-18 kg) (2 - 15-25 kg)
ECE R44/04 met certicaat NO: 04301347
Voor de Veiligheid van je kind, lees this instructies Zorgvuldig for Het gebruik.
WAARSCHUWING: Niet gebruiken in zitplaatsen waar sprake is van een actieve airbag geïnstalleerd.
Alleen geschikt als de goedgekeurde voertuigen zijn uitgerust met een 3-punts veiligheidsgordel,
goedgekeurd door de UN / Regulation No.16 ECE of andere gelijkwaardige normen.
Voor de veiligheid van je kind, lees deze instructies voor het gebruik. Het niet opvolgen van deze
instructies kan leiden tot ernstig letsel. Deze autostoel kan alleen worden gebruikt met het harnas
voor de kinderen van minder dan 18 kg (groep 0+ 0-13kg / 9-18kg groep I / groep II 15-25kg). Deze
autostoel kan worden geïnstalleerd in naar achteren gericht en naar voren gericht gebruik met de
diagonale autogordel. Gebruik geen naar voren gerichte optie als het gewicht van uw kind 9 kg
overschrijdt. Het kinderzitje is niet ontworpen voor het thuisgebruik en mag alleen worden gebruikt
in uw voertuig. Laat uw kind nooit voor de veiligheid zonder toezicht in de autostoel.
Plaats de autostoel naar achteren gericht nooit op de voorbank met airbags in de buurt, er kan een
ernstig letsel ontstaan en het is gevaarlijk voor het kind. Zorg er altijd voor dat de banden van de
autostoel strak zijn vastgemaakt en aangepast aan het lichaam van het kind.
Om te de risico’s van het vallen te voorkomen, moet uw kind altijd goed in de autostoel worden
geplaatst. Het kinderzitje is geschikt voor kinderen vanaf de geboorte tot maximum 25 kg. De
autostoel mag nooit overbelast worden met meer dan één kind of met andere gewichten of
voorwerpen. Het kinderbeveiligingssysteem mag niet gebruikt worden zonder het deksel.
Voordat het vastmaken van verplaatsbare onderdelen of bevestigingen, moet uw baby uit het
kinderzitje worden verwijderd. Het kinderzitje moet uit de buurt van zonlicht worden gehouden. Als
de stoel niet wordt afgedekt, kan het te warm voor de huid van het kind zijn.

Rugleuning
Borstband
Comfortabel kussentje
Schouderriem
Verbinding gordel
Hoofdsteun positionering
Gordel verbinding
Verstelhendel
Gordel clip
Gordel

HANDLEIDING
Stap 1 De positie van het kinderzitje in de auto installeren
Stap 2 Controle van de hoogte van schouderriemen
Deze autostoel is geschikt voor
conventioneel gebruik in alle auto’s
en is uitgerust met driepunts veil-
igheidsgordels die overeenstemmen
met de Europese norm (ECE R16 of
een gelijkwaardige standaard).
Controleer altijd of de schouderbanden op de juiste hoogte zitten voor uw
kind. De schouders van uw kind moeten altijd comfortabel door de openingen
komen. Op de juiste afbeelding zitten de banden goed en stevig op de schoud-
ers van het kind.
De autostoel mag alleen worden
geïnstalleerd met behulp van ronde
en diagonale autogordels. Gebruik
het niet op zitplaatsen waar een ac-
tieve frontale airbag is geïnstalleerd.
Alleen te gebruiken als een ronde
en diagonale veiligheidsgordel zijn
aangebracht.
CORRECT NIET CORRECT

Stap 3 Het gebruik van de gordels
Stap 4 De gordels verstellen
Stap 5 De autostoel verstellen in verschillende posities
Ten eerste, stel de hoogte van de schouderbandjes in. Sluit de twee metale delen van de slu-
iting aan elkaar. Sluit de twee gesp-aansluitingen in de gleuf in de gordel totdat u een ‘klik’
hoort. Controleer of het harnas goed is vergrendeld door de schouderbandjes naar beneden
te trekken.
Druk op de regelaar terwijl u
de twee banden met de an-
dere hand vasthoudt. Trek de
schouderbanden naar u toe
om de gordel los te maken.
De gordels moeten zo strak
mogelijk worden aangepast,
zonder dat uw kind zich
ongemakkelijk voelt.
CORRECT NIET CORRECT
De autostoel kan worden
aangepast aan 4 verschillen-
de standen: stand 1, stand 2,
positie 3, positie 4. De positie
naar achteren gericht (groep
0+) komt overeen met het
standpunt 4. Trek de hendel
onder de voorkant van de zit-
ting omhoog, dan trek of duw
de zitting naar voren of naar
achteren. Laat de hendel in de
gewenste positie en druk tot u
een klik hoort.

HANDLEIDING
Stap 6 De hoofdsteun instellen
De hoofdsteun kan worden ingesteld in elke positie aange-
past naar de de lengte van het kind.
Zoals op de foto, trek aan de verstelbare knop van de hoofd-
steun na het losmaken van de gordel. Houd het omhoog en
omlaag om de hoofdsteun aan te passen naar de gewenste
positie. Controleer of de hoofdsteun in de juiste positie is
ingesteld voor het kind.
Maak de schoudergordel los, draai de
autostoel met de achterkant naar u toe.
Schuif de borstband en schouderbanden
van de gordel. Volg de 3 stappen op de
afbeelding rechts.
Stap 7 Schouderriemen verwijderen

Stap 8 De installatie van de autostoel
8.1 Installatie voor groep 0+ (0-13kg)
Stel de autostoel in , in positie 4. Plaats de autostoel in de positie zoals in de
afbeelding , naar achteren gericht. Zorg ervoor dat de voorkant van het kinderzitje
stevig tegen de rugleuning van de auto zit.
Klem de diagonale gordel in dezelfde kant van de riemclip en riemhaak van de
autostoel. Haal de gordel door beide haken van de autostoel base. Maak de diag-
onale riem samen met heupgordel vast, totdat u een klik hoort. Zorg ervoor dat
de gesp juist is vergrendeld door omhoog te trekken van de gordel.

HANDLEIDING
Plaats uw kind in de autostoel. Controleer of de
hoogte van de schouderbanden in de juiste positie
is en bevestig de gordels. Controleer of de gordels
niet verdraaid zijn geworden en ook controleren
dat het deksel van de pasvorm van de gordel niet
belemmert wordt.
BELANGRIJK: Gebruik deze positie niet (naar voren gerichte positie) alleen als uw
kind minder als 9 kg weegt.
Pas de hoogte van de hoofdsteun aan naar de gewenste positie die geschikt is
voor de hoogte van het kind. Plaats de autostoel in de auto, naar voren gericht en
zorg ervoor dat de rugleuning van de autostoel tegen de rugleuning in de auto
wordt gedrukt. Maak de diagonale gordel vast in de riemclip van de rugleuning
van de autostoel.
Stap 8 De installatie van de autostoel
8.2 Installatie voor groep I ( 9-18kg )

Plaats diagonale gordel in de clip van de autogordel totdat u een klik hoort.
Controleer of het correct is vergrendeld door omhoog te trekken van de gor-
del. Plaats uw kind in de autostoel en controleer of de hoogte van de schoud-
erbanden correct is. Controleer ook of de gordel niet verdraaid is geworden.
BELANGRIJK: Voor het vastmaken van de
autostoel, verwijder de schouderbanden
en kruisband.
Plaats de autostoel in de auto en
zorg ervoor dat deze stevig tegen de
rugleuning van de auto is aangedrukt.
Plaats dan uw kind in de autostoel.
Stap 8 De installatie van de autostoel
8.3 Installatie voor groep II ( 15-25kg )
Maak de veiligheidsgordel vast, zorg
ervoor dat de gordel door beide haken
gaat. Controleer of de gordel niet ver-
draaid is geworden en imaak deze goed
en stevig vast.

HANDLEIDING
WAARSCHUWING
DEZE INSTRUCTIES ZIJN BELANGRIJK. LEES ZE AANDACHTIG EN BEWAAR ZE VOOR LATERE
RAADPLEGING. LEES DEZE HANDLEIDING VOLLEDIG ALVORENS TE INSTALLEREN OMDAT EEN
ONJUISTE INSTALLATIE GEVAARLIJK KAN ZIJN.
GEBRUIK DEZE KINDERAUTOSTOEL NIET OP PASSAGIERSZETELS DIE UITGERUST ZIJN MET
AIRBAGS.
• Zorg ervoor dat de plastieken delen van de autostoel zo gericht en geplaatst zijn dat zij, bij gewoon
gebruik van het voertuig, niet kunnen klem geraken door een verplaatsbare zetel of door de deur van
het voertuig. Gebruik geen andere contactpunten dan deze die beschreven worden in de instructies en
gemarkeerd zijn in de autostoel.
• De kinderautostoel kan gebruikt worden met het harnas voor kinderen van 9 tot 18 kg (ongeveer 9
maanden tot 4 jaar)
• Deze kinderautostoel kan gebruikt worden zonder harnas voor kinderen van 15 tot 36 kg (ongeveer 3
jaar tot 11 jaar)
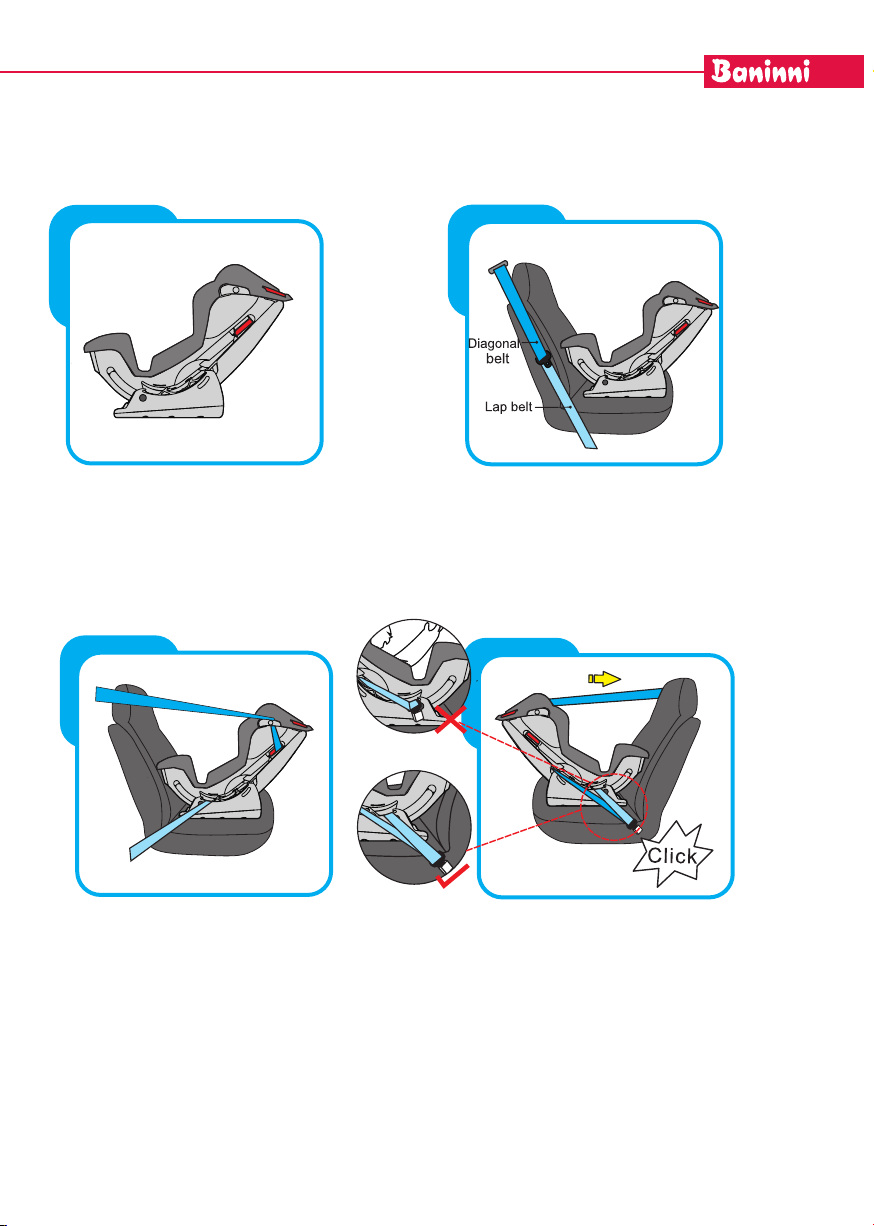
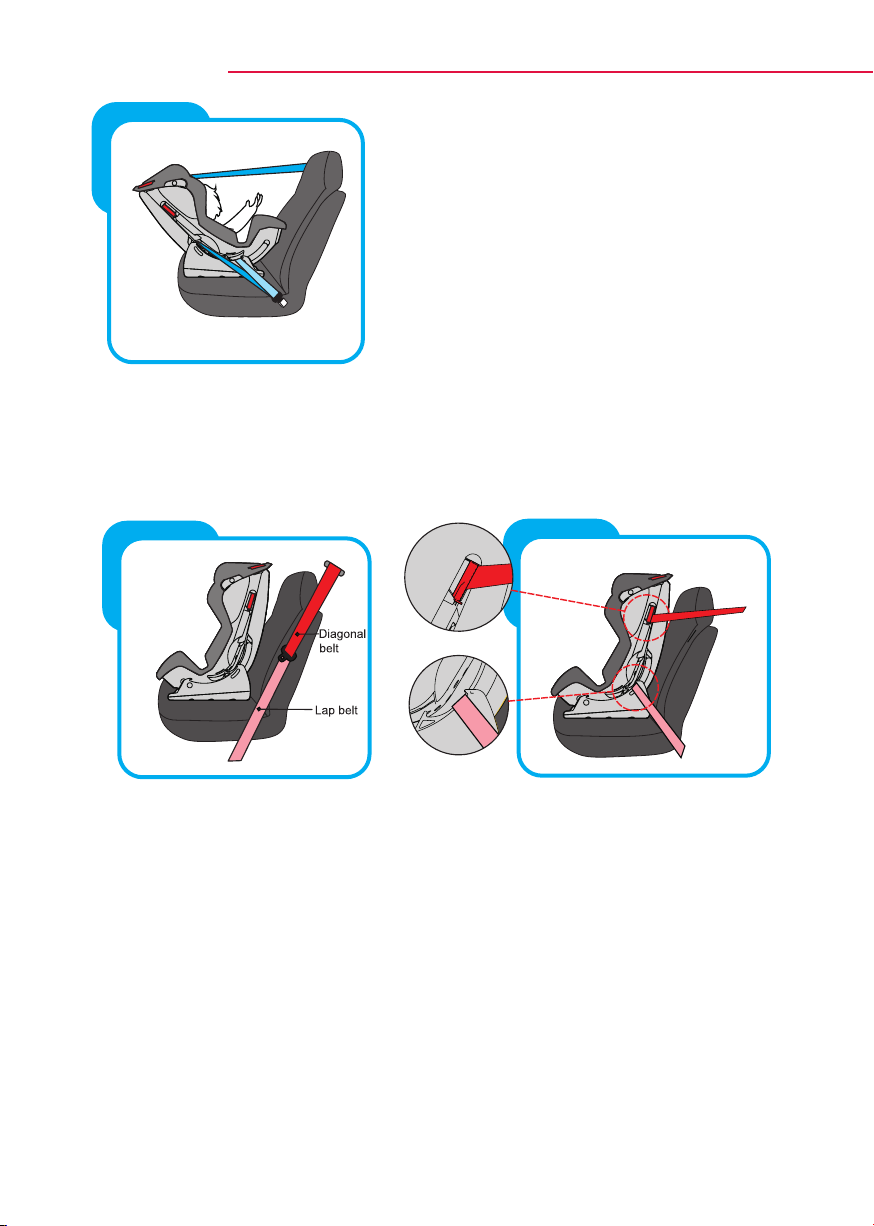
• Deze kinderautostoel kan enkel geplaatst worden in voorwaartse richting met een driepuntsgordel.
• Gebruik de kinderautostoel niet in huis. Hij werd niet ontworpen voor huiselijk gebruik en mag enkel
gebruikt worden in uw wagen.
• De veiligste plaats voor deze kinderautostoel is op de achterbank van een voertuig.
• Gebruik het kinderzitje nooit zonder het harnas correct te bevestigen en gebruik het zitje nooit
zonder het te bevestigen in de auto.
• Verander het zitje op geen enkele manier en voeg niets toe.
• Laat uw kind nooit onbewaakt achter in het zitje.
• Het interieur van de wagen kan zeer warm worden in direct zonlicht. Dek daarom de autostoel steeds
af als u hem niet gebruikt. Daardoor vermijdt u dat de onderdelen, vooral deze die in contact komen
met het kind, zeer warm worden en het kind verbranden.
• Het is belangrijk dat het kind, in geval van nood, snel uit het zitje gehaald kan worden. Dit betekent
dat de gesp niet volledig onbreekbaar is en zodoende moet u uw kind leren nooit met de gesp te
spelen.
• Bagage en andere zware of scherpe voorwerpen moeten worden vastgemaakt in de wagen. Losse
voorwerpen kunnen schade veroorzaken bij ongeval.
• Controleer regelmatig het harnas op slijtage, en besteed hierbij bijzondere aandacht aan de
bevestigingspunten, de naden en regeluitrustingen.
• Berg de autostoel op een veilige plaats op als hij niet gebruikt wordt. Vermijd dat er zware
voorwerpen op geplaatst worden. Zorg dat de autostoel niet in contact komt met bijtende middelen
zoals batterijzuur.
GB

GB
CARSEAT VEGA BNCS020
MANUAL
Group 0+1+2
Maximum 25kg
(0+ 0-13 kg) (1 - 9-18 kg) (2 - 15-25 kg)
ECE R44/04 with certicate NO: 04301347
For the safety of your child, please read these instructions carefully before use.
WARNING: Do not use in positions where there is an active airbag installed. Suitable only if the
approved vehicles are tted with three-point safety-belts, approved to UN / ECE Regulation No.16
or other equivalent standards.
For the safety of your child, please read these instructions before use. Not following these
instructions can result in serious injury. This car seat can be used only with harness for children less
than 18 kg (group 0+ 0-13kg / 9-18kg Group I / Group II 15-25kg). This car seat can be installed in
rear-facing and forward-facing use with the diagonal seatbelt. Do not use a forward-facing option if
your child’s weight exceeds 9 kg. The seat is not designed for home use and should only be used in
your vehicle. Never leave your child for safety unattended in the car seat.
Place the seat rearward facing never in the front seat with airbags in the area, there is a serious
injury can occur and it is dangerous for the child. Always ensure that the tires of the car seat are
fastened tightly and adapted to the body of the child.
To avoid the risks of falling, your child should always be placed in the car seat. The seat is suitable
for children from birth up to 25 kg. The car seat should never be overloaded with more than one
child or with other weights or objects. The child restraint must not be used without the cover.
Before the fastening of movable parts or mountings, your baby must be removed from the child
seat. The child should be kept away from sunlight. If the seat is not blocked, it may be too hot for
the child’s skin.

MANUAL

Step 1 Installation of the position of the car seat in the car
Step 2 Checking the height of shoulder straps
This car seat is suitable for conven-
tional use in all cars equipped with
three-point safety belts conforming
to the European standard (ECE R16
or equivalent standard).
Always check that the shoulder straps to the correct height for your child. Your
child’s shoulders should always comfortable coming through the openings in
the lid. On the right image the tires are properly and rmly on shoulders of the
child.
The car seat must be installed using a
lap and diagonal seat belt.
Do not use it on seats where an
active frontal airbag is installed. Can
only be used on this chair as a lap
and diagonal seat belts are tted.
CORRECT NOT CORRECT

MANUAL
Step 3 The use of the belts
Step 4 Adjusting the seat belts
Step 5 Adjusting the seat in different positions
Firstly, the height of the shoulder straps in set. Connect the two metal parts of the closure
together. Connect the two buckle connectors into the slot in the belt until you hear a ‘click’.
Make sure the harness is correctly locked by pulling the straps down.
Pressure on the controller
while the two bands hold
with the other hand. Pull the
shoulder straps towards you
to loosen the belt.
The belts should be adjusted
as tightly as possible without
causing your child feel un-
comfortable.
The car seat can be adjusted
to four different positions: po-
sition 1, position 2, position 3,
position 4 position to the rear
(group 0+) corresponds to the
position 4. Pull the lever under
the front of the seat up, then
pull or push the seat forwards
or backwards. Release the
lever to the desired position
and push until you hear a
click.

Step 6 Setting the headrest
The headrest may be set at any position adapted to the
length of the child.
Like the picture, pull the adjustable headrest knob after
loosening the belt. Keep it up and down to adjust the head
restraint to the appropriate position. Make sure the head
restraint into the correct position has been set for the child.
Loosen the shoulder belt, loosen the car
seat with the back facing you. Slide the
strap and shoulder straps of the harness.
Follow the three steps in the right gure.
Stap 7 Removing the shoulder straps

MANUAL
Step 8 The installation of the car seat
8.1 Installation for Group 0+ (0-13kg)
Set in the car seat, in position 4. Place the car seat in the position as shown,
rear-facing. Make sure the front of the child seat rmly against the back of the car.
Clamp the diagonal belt in the same side of the belt clip and belt hook on the car
seat. Tighten the belt by two hooks on the car seat base. Make the diagonal strap
with hip belt buckle until you hear a click. Make sure the buckle is correctly locked
by pulling up the belt.

Place your child in the car seat. Make sure the
height of the shoulder straps in the correct posi-
tion and fasten the seat belts. Make sure the straps
have not become twisted and also check that the
lid of the t of the belt is not stuck.
IMPORTANT Use this position not (forward position) if your child weighs less as 9kg.
Adjust the height of the headrest to the desired position which is suitable for the
height of the child. Place the car seat in the car facing forward and make sure that
the backrest of the seat against the back is pushed into the car. Take the diagonal
belt into the belt clip on the back of the car seat.
Step 8 The installation of the car seat
8.2 Installation for group I (9-18kg)

MANUAL
Place diagonal belt in the belt clip until you hear a click. Make sure it is cor-
rectly locked by pulling up the belt. Place your child in the car seat and check
the height of the shoulder belts is correct. Also check that the seat belt has
IMPORTANT: Before attaching the car
seat, remove the shoulder straps and
crotch strap.
Place the car seat in the car and make
sure it is rmly pressed against the back
of the car.
Place your child in the car seat.
Step 8 The installation of the car seat
8.3 Installation for Group II (15-25kg)
Take the seat belt, make sure the belt
passes through both hooks. Check that
the seat belt has not become twisted
and secure it rmly.
WARNING

THESE INSTRUCTIONS ARE INMPORTANT. PLEASE READ CAREFULLY AND RETAIN FOR FUTURE
REFERENCE.
DO NOT USE THE CHILD SEAT IN PASSENGER SEATS EQUIPPED WITH AIRBAGS.
• Please be careful of that the plastic parts of a child restraint must be so located and installed
that they ar not liable, during everyday use of the vehicle, to become rapped by a movable seat
or in a door of a vehicle. Do not use any load bearing contact points other than those described
in the instructions and marked in the chid restraint.
• This child seat be used with the harness for children of 9 to 18 kg in weight: ca. 9 months to 4
years.
• This child seat be used without the harness for children of 15 to 36 kg in weight: ca. 3 years to
11 years.
• This child seat can be only installed forward facing using a three point lap and diagonal seat
belt.
• Do not use this child seat in home. It has not been designed for home use and should only be
used in your car.
• This safest seating position for this child car seat is on the rear seat of a vehicle..
• Never use the child seat without fastening the child’s harness correctly and never attempt to
use it without fastening it into the car.
• Do not add or modify the seat in any way.
• Never leave your child unattended in the seat at any time.
• Car interiors can become very hot when in direct sunlight, it is therefore recommend that the
child seat should be covered when not in use. This prevents components, particularly those
attached to the child seat, becoming hot.
• It is important that the child can be released quickly. This means that the buckle is not fully
tamper proof and so your child must be taught never to play with the buckle.
• Luggage and other heavy or sharp objects should be secured in the car; Loose objects are
liable to cause injury in the event of an accident.
• Regularly check the harness for wear, paying attention to the attachment points, stitching and
adjusting devices.
• Store this child seat in a safe place when it’s not being used. avoid placing heavy objects on top
of it.
WARNING

MODE D’EMPLOI
FR
CARSEAT VEGA BNCS020
MODE D’EMPLOI
Groupe 0 + 1 + 2
Maximum 25kg
(0+ 0-13 kg) (1 - 9-18 kg) (2 - 15-25 kg)
ECE R44 / 04 satisfait à la certication NO: 04301347
Pour la sécurité de votre enfant, veuillez lire attentivement ces instructions avant utilisation.
AVERTISSEMENT: Ne pas utiliser dans les endroits où il ya un airbag actif installé. Ne convient
que si les véhicules homologués sont équipés de ceintures de sécurité à trois points, approuvés
conformément au Règlement No 16 de la CEE / ONU ou à d’autres normes équivalentes.
Pour la sécurité de votre enfant, veuillez lire ces instructions avant utilisation. Le non-respect de ces
instructions peut entraîner des blessures graves. Ce siège auto ne peut être utilisé qu’avec le harnais
pour les enfants de moins de 18 kg (groupe 0+ 0-13kg / 9-18kg Groupe I / Groupe II 15-25kg).
Ce siège auto peut être installé en face arrière et orienté vers l’avant avec la ceinture de sécurité
diagonale. N’utilisez pas d’option orientée vers l’avant si le poids de votre enfant dépasse 9 kg. Le
siège n’est pas conçu pour une utilisation domestique et ne doit être utilisé que dans votre véhicule.
Ne laissez jamais votre enfant sans surveillance dans le siège d’auto.
Placez le siège vers l’arrière, jamais dans le siège avant avec des airbags dans la zone, il ya une
blessure grave peut se produire et il est dangereux pour l’enfant. Assurez-vous toujours que les
pneus du siège d’auto sont bien serrés et adaptés au corps de l’enfant.
Pour éviter les risques de chute, votre enfant doit toujours être placé dans le siège d’auto. Le
siège est adapté pour les enfants de la naissance jusqu’à 25 kg. Le siège d’auto ne doit jamais être
surchargé avec plus d’un enfant ou avec d’autres poids ou objets. Le dispositif de retenue pour
enfants ne doit pas être utilisé sans la housse.
Avant de xer des pièces mobiles ou des xations, votre bébé doit être retiré du siège enfant.
L’enfant doit être gardé à l’abri de la lumière du soleil. Si le siège n’est pas bloqué, il peut être trop
chaud pour la peau de l’enfant.
Table of contents
Languages:
Other Baninni Car Seat manuals

Baninni
Baninni VENTURA BNCS008 User manual

Baninni
Baninni ROADTRIP BN513 User manual

Baninni
Baninni ROADTRIP FIERO User manual

Baninni
Baninni BN 517 User manual

Baninni
Baninni ARONA ISOFIX User manual

Baninni
Baninni IMPERO ISOFIX BN3501 User manual

Baninni
Baninni TWIRL 360 BNCS021 User manual

Baninni
Baninni Arona Isofix BN2001 User manual