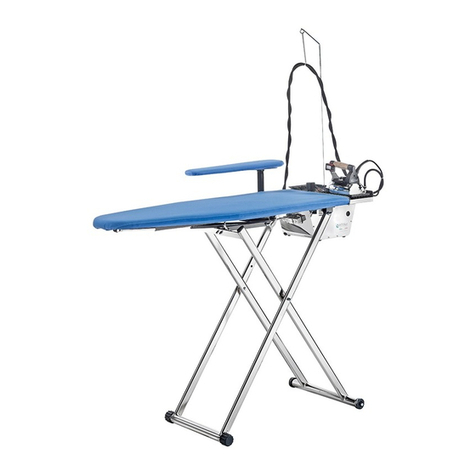
battistella ARGO Instructions for use

Argo 2011 ver.02 1 2011
INSTRUCTIONS AND MAINTENANCE
MOD. ARGO / ARGO BLOWING 2011
Read the directions carefull before operating.
Don’t use the machine differentl from following description.
1. SPECIFICATIONS
MODEL:
ARGO – VACUUM
(2011)
ARGO - VACUUM + BLOWING
(2011)
POWER
SUPPLY:
TOTAL INSTALLED POWER:
IRON POWER:
BOILER POWER:
BOARD POWER:
SUCTION POWER:
BLOWING POWER:
PUMP POWER:
ARM POWER:
BOILER CAPACITY:
IRONING ENDURANCE:
OPERATING STEAM PRESSURE:
WEIGHT:
OVERALL DIMENSIONS:
MADE IN ITALY
230
V
/ 50 Hz
417 W
00 W
2600 W
600 W
0,2 Hp=130 W
---
4 W
150 W (optional)
3 L.
CONTINUOUS
4 BAR
39 kg.
47x137x93 h. cm.
230
V
/ 50 Hz
430 W
00 W
2600 W
600 W
0,2 Hp=130 W
0,2 Hp=130 W
4 W
150 W (optional)
3 L.
CONTINUOUS
4 BAR
42 kg.
47x137x93 h. cm
A
AIR EXHAUST
FOR VACUUM
UNIT
IRON REST
CABLE SUPPORT
IRON
VACUUM PEDAL
FRONT PANEL
BLOWING PEDAL
TABLE COVER
IRON CONNECT
PLUG
SOLENOID
VALVE
IRONING ARM
EXHAUST
TAP
HOSE HOLDER
FOR WATER INLET
Fig. 1

Argo 2011 ver.02 2 2011
2. IMPORTANT
Before installing ARGO, it is necessary to set up the following facilities:
1. a water connection (tap with hose holder); ARGO will be connected to the hose
holder through the WATER INLET by means of a rubber tube which must have a
pressure capacity of at least 10 ATM. (diameter of water inlet /13 mm); it must
be fixed tightly with 2 hose clamps. N.B. before inserting the rubber tube into
ARGO hose holder, you must exhaust a few litres of water in order to clean the
conduit;
2. an electrical outlet protected and suitable to ARGO power.
3. OPENING OF PACKAGE
1. Open the box containing ARGO from the upper side marked as ALTO , take the
instructions manual and read it carefully.
2. Remove the ARGO from the box, fix the cable support to the ironing board,
connect the iron plugs to the steam tubes (fig. 1), fix the iron cables to the cable
support hook. ATTENTION the irons must be placed on their iron rests on the
board.
4. STANDARD MODE
SET
Reset
Key to enter the menu and reset the various warnings.
“Pistol/brush” on/off key (optional accessory)
Esc
“Electronic card” on/off key.
N.B.: the electronic board will continue to
receive power from the mains supply. At the end of each working day it
is
suggested to always turn the machine off by using the main switch
“Iron 1” on/off key –
at the same time of switching on/off the iron the
vacuum motor is switched on/off.
(same valid for the version vacuum + blowing)
“Iron 2” on/off key. (optional accessory)
Ok
“Boiler” on/off key – at the same time of switching on/off the boiler the
table top heating is switched on/off.

Argo 2011 ver.02 3 2011
5. STAND-BY MODE
SET/RESET
SET
Reset
Key which allows access to the menu. To exit the menu
wait for 5 seconds or press ESC. This k
ey is used also
to reset warnings
OK
Ok
Key to confirm the choice made within the menu
ESC
Esc
Key to exit the current function or the menu
UP/DOWN
Key to scroll up or down within the menu
6. MEANING OF ICONS
FIXED LIGHT: indicates that the boiler is on and its pressure is optimum
INTERMITTENT LIGHT: indicates
that the boiler is on and that the water is
being heated to obtain steam
Light :Indicates that iron 1 is functioning
Light :Indicates that iron 2 is functioning
Light : Indicates that the pump is pumping water into the boiler
Light :
Indicates
that the pump is blocked due to the fact that it has
worked without water for a long time.
Check that water comes out of the
pipe connected to the water supply. Turn off the main switch, wait fo
r 5
seconds and turn the machine on again.
If the problem reoccurs, contact
Authorized Service Centre
Light :
Indicates that the maximum number of hours set for the general
maintenance of the machine has been exceeded

Argo 2011 ver.02 4 2011
7. CONNECTION AND STARTING
1. Connect the rubber hose to the hose-holder indicated as WATER INLET placed on
the ARGO (fig. 1) and turn the water tap on. For ARGO equipped with water tank,
you just have to fill it and connect the machine to the mains supply. N.B. make
sure there is always water inside the water tank.
2. Connect the power supply cable to a protected outlet with earth protector switch ,
with observance of the law in force and a voltage suitable to ARGO.
3. Turn on the main switch (fig. 1) and select the functions which are to be
activated. N.B. the settings of the electronic card are memorized every time the
main switch is turned off. Once the machine is turned on again, it will start with the
settings memorized before the machine was turned off (e.g. if the boiler was on, it
will be on upon switching on the machine). WARNING the electronic card
automatically performs a check of the software installed. This is why it takes 2
seconds for the machine to turn on.
If an error or fault is found, the “safety” device blocks the electronic card and does
not allow normal functioning. “SOFTWARE ERROR” will be displayed. Contact the
Authorized Service Centre to update the software.
4. Wait until the boiler light is fixed (not intermittent). Seize the iron by the cork
handle and press the micro-switch 3 or 4 times (fig. 3), so that steam comes out:
this operation must be carried out in order to heat up the hoses which take steam
to the iron. This prevents also the falling of small drops of water on garments (iron
must always be held in such a way as not to harm operator, that is with iron
always pointed downwards).
5. To adjust the steam flux you must work on the steam adjustment tap (fig. 1
solenoid valve).
6. After this, ARGO is ready for use. During ironing the icon of the boiler may remain
intermittent (card is raising steam) or fixed (optimum pressure), indicating that
ARGO is working properly.
N.B. during ironing the warning light will switch on and “WATER PUMPING”
will be displayed. This means that the card is automatically pumping water into the
boiler.
N.B. in the event the pump should remain without water for a long time, the
“pump saving” device will be activated and the pump will not work. This is shown
by the icon and the warning “PUMP BLOCKED” will be displayed. An
intermittent acoustic alarm is also audible.
If this device is activated, check that there is enough pressure in the water system
or that there is water inside the water tank. If one of the previous is the cause of
the blockage, turn the card off and on by using the main switch. If the problem
remains, do not insist and contact the manufacturer or Authorized Service Centre.
FOR ARGO CONNECTED TO THE WATER SYSTEM
For ARGO connected to the water system, verify that the water pressure is not
more than 2,5 Bar. If so, the pump will be blocked and this will prevent the water
from entering the boiler.
FOR ARGO CONNECTED TO THE WATER BOTTLE SUPPLY
In case of missing water completely from the water bottle-refill the bottle.
Release all steam from the boiler-the pressure must be 0 bar.
The pump will restart.

Argo 2011 ver.02 5 2011
8. MENU
To gain access to the MENU, press the key shown on the left. To exit from the
MENU press ESC or wait for 5 seconds.
MENU:
HOURS OF WORK
Ok
TOTAL
HOURS:
Cannot be zeroed
To exit
Esc
PARTIAL
HOURS:
Zeroing
of hours
SET
Reset
Ok
TOTAL HOURS: computation of the total hours the machine has worked for. This data
cannot be zeroed.
PARTIAL HOURS: computation of the hours the machine has worked for since last
zeroing. This data can be zeroed (see table). To zero the data, follow instructions as
per table and press reset for 5 seconds.
RESET OF
WARNINGS
Ok
FILTER
Zeroing of hours
SET
Reset
Ok
To exit
Esc
PROBE
Reset is necessary in order to delete the warnings from the display once maintenance
has been done.
Example:
WARNING: PROBE CLEANING NEEDED
is displayed.
1. Gain access to MENU
2. Find
RESET WARNINGS
, press OK and find
PROBE
.
3. Press OK, then press RESET for 5 seconds.
4. ESC to exit the SET menu (or wait for 5 seconds).
Warnings are memorandums set by the manufacturer. According to the type of water
and the use of the machine, maintenance may be required even earlier.
KEY TONE
Ok
KEY TONE
ON
To confirm
Ok
To exit
Esc
KEY TONE
OFF
Used to activate or deactivate the acoustic signal when keys are pressed.
If you wish the acoustic signal to be activated, press
KEY TONE ON.
SET
Reset

Argo 2011 ver.02 6 2011
SERVICE
ENGINEER
Password needed. Service Centre authorized access only
MANUFACTURER
Password needed. Manufacturer authorized access only.
WARNING AFTER 10 ATTEMPTS TO ACCESS THE “
MAINTENANCE
” OR
“
MANUFACTURER
” MENU WITHOUT TYPING IN THE PASSWORD, OR EVERY TIME THE
WRONG PASSWORD IS TYPED, THE MENU WILL BE BLOCKED. “
PASSWORD BLOCKED
”
will be displayed. To unblock the menu, contact the Authorized Service Centre or the
manufacturer.
LANGUAGE
Ok
ITALIAN
To confirm language
Ok
To exit
Esc
ENGLISH
FRENCH
GERMAN
SPANISH
PORTUGU
ESE
This menu allows the setting of the language (see table). Languages may be different
according to the country of destination.
9. COMPULSORY
1. Use only tap water:
2. Never add additives to water.
3. Empty the boiler once a week, making sure the boiler pressure is not over 0 BAR
(fig.2H). For carrying out this operation, turn the exhaust tap slowly: we advise
you to wear gauntlets against possible burns.
4. Never leave hot iron on board.
5. Connect ARGO to suitable protected outlet.
6. After ironing is over, switch ARGO off and close the water; remember to open the
water before switching on the machine again (for ARGO connected to the water
system).
7. Always keep children away from ARGO, both when it is on and off.
. Make sure that during the cold season tubes connecting ARGO to water supply do
not freeze.
10. IRONING OPERATION
1. Run the iron on the garments, pressing both the red steam button (fig. 4) and the
suction pedal at regular intervals (fig. 1). In order to dry the garments, we advise
to keep the foot on the suction pedal a bit longer.
2. For delicate, black and blue garments, we advise you to use an anti-sheen shoe.
3. During the ironing operation, always put the iron on its iron rest and pay attention
to the position of the cables: if they twine or get in touch with ironing board, they
might cause short circuits.
4. For dry ironing it is possible to adjust the thermostat (fig. 3) on different positions
according to the type of fabric (look at garment label).
5. On the other hand, for steam ironing you should adjust the thermostat on “cotton”
position (this one is good for all kinds of fabric).

Argo 2011 ver.02 7 2011
6. ARGO is equipped also with a pedal for blowing device: it is used to blow air from
the board to garments.
11. ELECTRICAL RISKS
The following situations are considered dangerous for the operator:
1. damage of iron cables (fig. 3),
2. loss of water from iron (fig. 4),
3. loss of water from solenoid valve (fig. 1),
4. iron overheating,
5. earth protector switch is activated when turning on the switches,
6. using ARGO during thunderstorms,
7. using ARGO without proper protection for feet (without shoes) or with wet feet,
. cleaning or washing the iron using water (fig. 4),
9. loss of water from ARGO base (fig. 1),
10. loss of steam from inner part of ARGO.
12. MECHANICAL RISKS
The following situations are considered dangerous for the operator:
1. using ARGO for different purposes other than ironing,
2. using ARGO without turning the water tap or when aqueduct cannot supply water,
3. using ARGO while the pump is activated but no water enters the boiler because of
limestone obstruction,
4. using ARGO when the boiler pressure is too high and internal security valve is
activated. Pressure can be visibly controlled thanks to the manometer (fig. 2).
THERMOSTAT
Fig. 3
Fig. 4

Argo 2011 ver.02 8 2011
13. THERMIC RISKS
The following situations are considered dangerous for the operator:
1. touching the iron base when working,
2. emptying the boiler when under pressure,
3. leaving garments on the heated ironing board: they might be damaged or even
burnt.
•Do not iron garments directl on
persons.
•Do not leave hot iron on garments.
•After use, alwa s put iron on its
iron rest.
14. INTERVENTIONS AND SMALL REPAIRS
The following procedures MUST be carried out ONLY when the boiler is cold
and the plug is disconnected from the mains.
1. replace the padding (fig. 1 table cover) every 320 hrs. of operation or maximum
every 3 months. N.B. the padding can be washed.
2. replacement of the iron;
3. replacement of the coil: to be done when boiler is turned off and is cold (fig.1
solenoid valve);
4. replacement of the steam hose: to be done when iron and boiler are turned off and
are cold (fig. 2),
5. cleaning of the water inlet filter (fig. 4) and cleaning of the foot valve filter (ARGO
with water tank – fig. 1).
15. CLEANING OF WATER FILTER
The cleaning of the filter is to be done whenever the warning is displayed. If the water is full
of impurities, cleaning should be done more often.
To clean the water filter:
1. turn off the main water supply tap;
2. open the front panel
3. unscrew the filter plug by using a wrench as shown
in fig. 4;
4. take out the filter;
5. by using running water, clean the filter in order to
eliminate all impurities;
6. re-assemble the filter, fix with the wrench and turn
on the main water supply tap, checking at the same
time if there are any leakages.
7. close the front panel
(To reset warning, see chapter )
ATTENTION:
THERMIC DANGER
INCANDESCENT
IRON BASE
Fig. 4

Argo 2011 ver.02 9 2011
16. CLEANING OF THE BOILER PROBE
To clean the probe of the boiler, do as follows:
1. open the cover with the display and panel;
2. behind find the boiler and the probe;
3. unscrew the probe by using a wrench and take it out;
4. clean the probe with fine grain scrubbing paper in order to eliminate all
encrustation;
5. re-assemble the probe and check that there are no leakages when the boiler is
under pressure.
17. COMPULSORY PERIODICAL MAINTENANCE
(TO BE CARRIED OUT EXCLUSIVEL B AUTHORIZED SERVICE CENTRES, QUALIFIED
TECHNICIANS OR B THE MANUFACTURER.)
Compulsory maintenance is signalled by the icon -
GENERAL MAINTENANCE
will
be displayed. Contact only your reseller, Authorized Service Centres or the
manufacturer in order to carry out the necessary maintenance. Once the check has
been completed, the authorized personnel will reset the “general maintenance” icon
which is shown on the display.
This machine was designed to work maximum hrs. per day, 5 days a week. In these
conditions the machine is expected to function for 7 years.
18. PACKING, STORAGE AND TRANSPORT
ARGO can be packed with cellophane, on a pallet or in a cardboard box (never turn it
upside down!). It is not a stiff package, therefore it is not shock-resistant. We advise
you to handle the box with the maximum care. Do not use it as a stool or support.
ARGO cannot be piled one on the top of another (HANDLE WITH CARE).
19. WARRANTY
Warranty does not apply to damage resulting from:
•Tampering with the machine or repairs carried out by non-authorized personnel;
•Total or partial inobservance of the instructions contained in this manual;
PROBE
SAFETY
VALVE

Argo 2011 ver.02 10 2011
•Improper maintenance or wrong assembly/connection;
•Use of non original spare parts;
•Use of the machine for purposes other than those written in this manual.
20. DISPOSAL
Information for the correct disposal in accordance with EC
directive 2002/96/EC and 2003/108/EC.
ARGO is mainly made of iron material and must therefore not be disposed
of as urban waste but in proper waste collection centres. The crossed
dustbin symbol indicates that the product must be disposed of separately
from other refuse in order to avoid negative consequences for the
environment and health.
The correct disposal and recycling of the machine’s components assures protection of
the natural environment.
Every product manufactured by BATTISTELLA Co. is subject to the following
limitations
Battistella B.G. S.r.l. guarantees that this machine, correctly installed and used, works
accordingly to this manual of instructions. Each implicit guarantee is limited by law as from
purchase date.
Declination of responsibility for consequential damages Battistella B.G. S.r.l. will
never take the responsibility for any damage (included, without any limitation,
consequential damages due to loss or no profit, cutback or any other economical loss)
deriving from the use of a BATTISTELLA machine, even in case the Company had been
previously informed of such kind of possibility.
Should you need further information about this manual, please contact Battistella B.G.
S.r.l. or the person who sold you the machine.
This manual suits for next models
1
Table of contents
Other battistella Iron manuals

battistella
battistella SATURNINO DA TAVOLO Instructions for use

battistella
battistella VAPORINO INOX MAXI Instructions for use

battistella
battistella DIANA Instructions for use

battistella
battistella ATENA Instructions for use

battistella
battistella VAPORBABY ECO INOX Instructions for use

battistella
battistella SOLE M Instructions for use

battistella
battistella GIOVE Instructions for use

battistella
battistella ERA 2010 Instructions for use

battistella
battistella OPERA Instructions for use

battistella
battistella SOLE A 2013 Instructions for use