bauhaus SEATTLE SA1000D User manual
IMPORTANT - Advice and safety - Please read before installation
Tools & equipment needed: Drill, 8mm Suitable drill bit, Phillips screwdriver, Spirit level, Ruler/tape measure, Pencil,
Silicone sealant (clear).
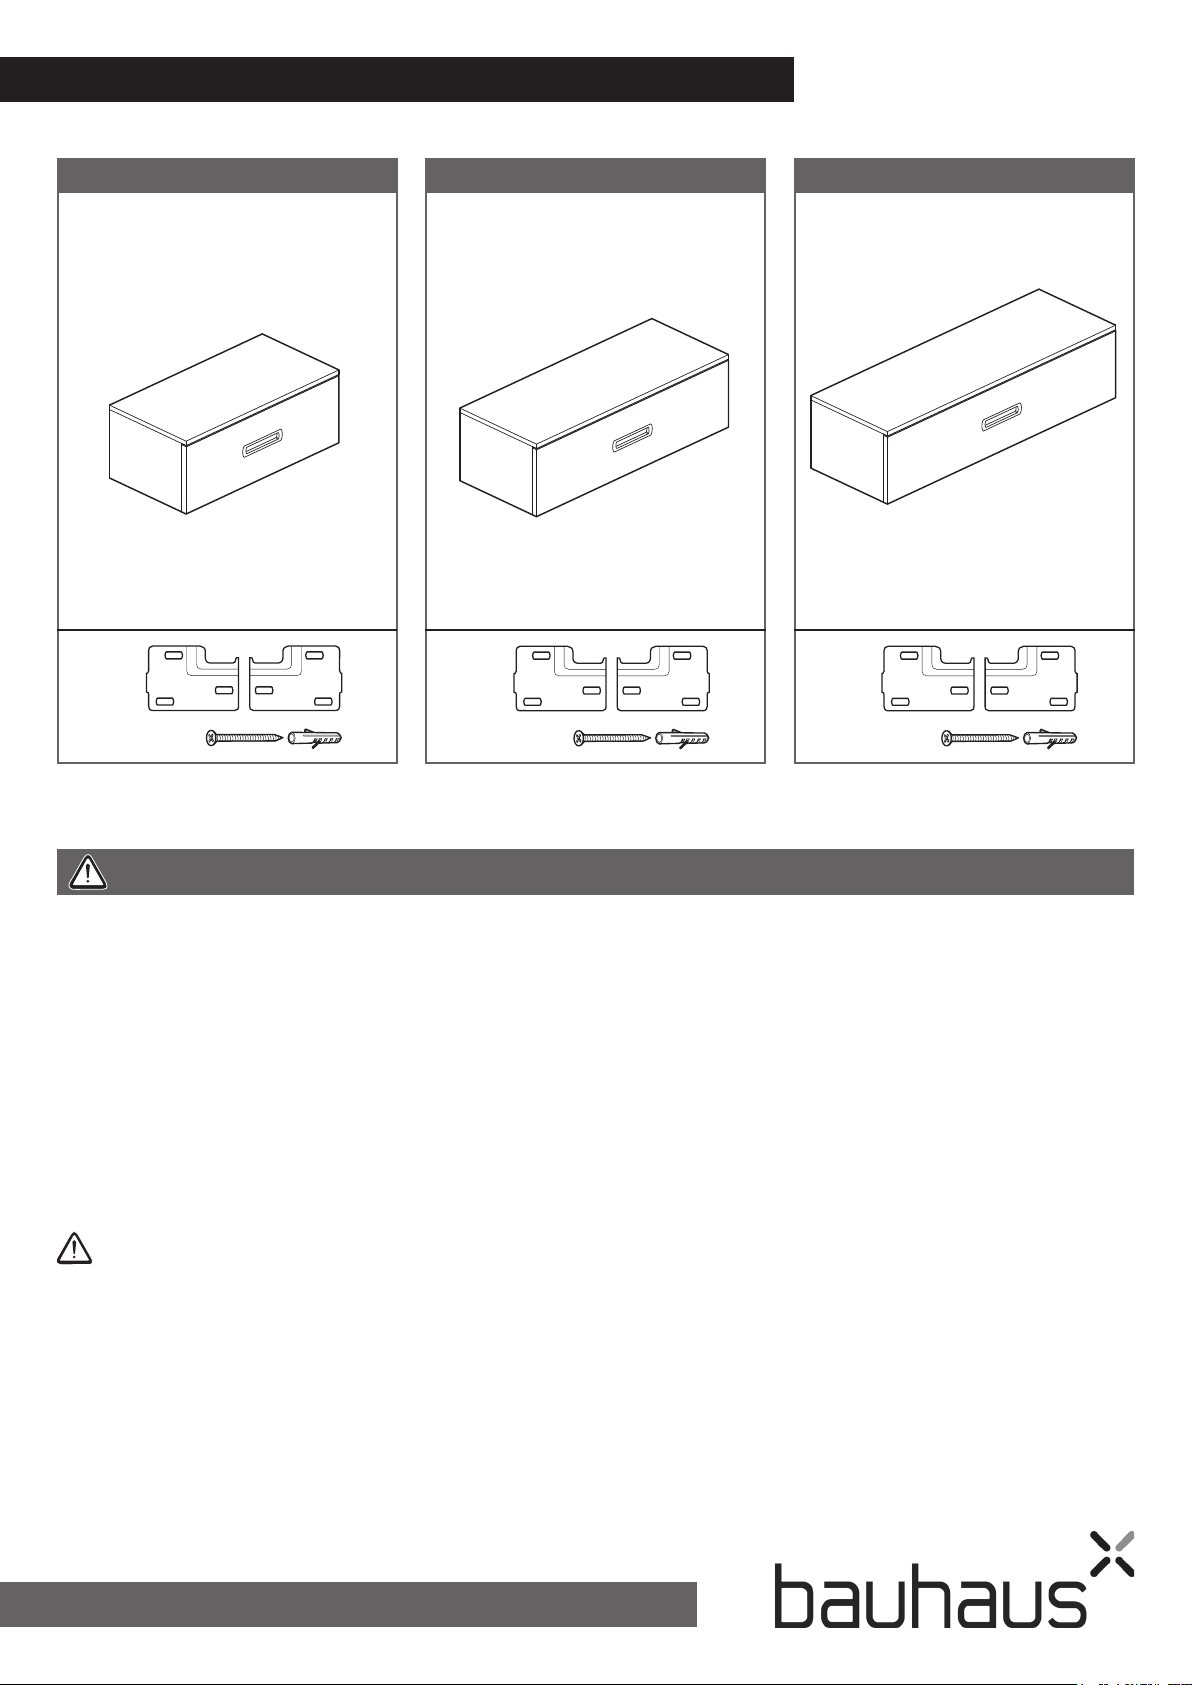
1200 Single Drawer Wall Console
800 Single Drawer Wall Console
BATHROOM FURNITURE RANGE SEATTLE
INSTALLATION INSTRUCTIONS
SA1200DSA8000D
1000 Single Drawer Wall Console
SA1000D
Please read these instructions carefully before starting
installation and keep in a safe place for future reference.
Check the contents of the pack carefully before installation.
Bauhaus will not be held responsible for any de-t / re-t costs
where faulty product has been tted.
If any fault is found with materials or workmanship, it must be
reported immediately to the manufacturer. Remedial action will be
taken, based on information received, on condition that:
1. Full details are supplied to the manufacturer; 2. The product
has not been modied or tampered with; 3. The manufacturer is
informed of any damage/shortages prior to installation.
We do not accept responsibility for any problems that may occur
through incorrect installation.
Advice & Safety
This product should only be installed by a suitably qualied
Plumber/installer. Should the installation be completed by a
non-qualied person any product guarantee maybe considered
invalid. For a claim made under our warranty written certication
of your installers qualications can be required.
It is advised that all doors and drawers are removed prior to tting
to avoid unnecessary damage occurring.
Ensure the room is well heated and ventilated.
It is recommended that walls are fully tiled before furniture and
accessory installation. This ensures that the product is installed
at to the tile face and allows product to be easily removed if
required in the future.
These instructions have been prepared for your guidance, you
must exercise due care at all times.
Please note that some units are heavy. Always take care when
lifting, and follow health and safety guidelines. It is recommended
that 2 people carry out the installation of larger basin/vanity units.
Important pre-installation notes
The Console Units are designed for use with wall mounted or
extended height mixer taps or countertop basins with a tap ledge.
We strongly recommend that twin basin settings are installed
on a sold wall only.
The console units CAN ONLY BE installed using the tting
brackets supplied.
Warning! Please check for any hidden pipes or electrical cables
before drilling holes in the oor or walls. When using power tools
always follow the manufacturer’s user instructions.
Care & Cleaning
Clean furniture with warm clean water and microbre cloth.
Normal domestic cleaners that have no bleach or abrasive
ingredients can be used to remove stubborn marks. Then wipe
with fresh water, removing all traces of the cleaning agent,
to prevent streaks forming and dry the surface with a clean
microbre cloth.
If any maintenance is required then it must be carried out by a
qualied Plumber.
x6
x1/1
x6
x1/1
x6
x1/1

2
1. Pull out the drawer as far as it will come.
Step 1
Step 2
Plan unit position
Decide on the position and
height of the unit.
The recommended basin
height is between 860mm
and 870mm.
The units are capable of taking
a variety of tap options, see
opposite.
Step 3
800 Single Basin Unit 1200 Single Basin Unit
Measure unit for the correct width
860mm -
870mm
84
mm
84
mm
84
mm
Measure unit for the correct width
1000 Single Basin Unit
2. Push in the two catches on the
underside of the drawer at the same time.
3. While pushing in the catches, fully
remove the drawer.
Remove the drawer before installation.
860mm -
870mm
860mm -
870mm
Use the measurement above and opposite to position the ‘wall
brackets’.
a: Important: Measure the
distance between the ‘circular
hanging tabs’ on the back of
the unit. This measurement will
be the maximum the brackets
can be spaced apart, the
brackets must t within that
measurement.
b: Mark the bracket xing holes
onto the wall. Drill Ø 8mm
holes, insert the wall plugs and
attach the brackets.
c: Important: The brackets
must be the correct way up, as
shown.
Position the unit on the wall, ensuring that the large circular ‘tabs’
on the back of the unit locate onto the brackets.
Measure unit for the correct width
Single Drawer Wall Console Installation - 800 unit is shown as a typical example
Drawer front
Underside
Push to
release
82mm
74mm
32mm
123mm
114mm
84mm

3
Step 5
a: Check the unit is level.
If leveling is required: inside the unit, remove both plastic covers
and use a screwdriver to adjust the hanging position.
b: To lift or lower the unit adjust the screw shown.
c: To move the unit closer or further from the wall adjust the
screw shown.
d: Once the unit is level, adjust the screw shown (both sides) to
pull the unit tight against the wall and to lock it in position.
e: Re-t both plastic covers.
a
Step 4
Prepare the unit top for tap/s
and basin/s.
Cut holes where required
using a suitable sized hole
cutter.
Important: ALL
cut edges MUST
be sealed with
water proof
sealant or exterior
wood varnish. Hole cutter
de
bc

For any further information please contact
Bauhaus on: 0845 873 8840
Or visit our web-site at:
www.bauhaus-bathrooms.co.uk
The manufacturer reserves the right to make technical
modications without prior notice.
Re-t drawer: Pull out both
runners.
Place the drawer onto the
runners and push in until the
drawer ‘clicks’ into position.
Step 7
Underside
Note: The use of the space
saving Bauhaus furniture
waste BTR0410W is strongly
recommended, saving space
under the work top.
Example
Step 6
Connect tap/s, basin/s and
waste/s.
Note: The use of a Bauhaus
extended thread basin waste is
recommended.
Carefully apply silicone all the
way around the join between
the Console and wall and
around the base of the basin.
Leave silicone, 24 hours to dry.
This manual suits for next models
2
Other bauhaus Indoor Furnishing manuals

bauhaus
bauhaus 300 Double Drawer Unit User manual

bauhaus
bauhaus ESSENCE 400 User manual

bauhaus
bauhaus ZION 50 User manual

bauhaus
bauhaus LINEA 750 User manual

bauhaus
bauhaus WB101 User manual

bauhaus
bauhaus ST0520SRW User manual

bauhaus
bauhaus EDGE User manual

bauhaus
bauhaus MEB8060A User manual

bauhaus
bauhaus AL5070AL User manual

bauhaus
bauhaus 600 Series User manual


Popular Indoor Furnishing manuals by other brands

Germania
Germania GW-Telde 0268 Assembly instruction

dobue MOVELARIA
dobue MOVELARIA Bruxelas 300890 Assembly instruction

modway
modway EEI-6281 Assembly instruction

Mocka
Mocka Georgia Entertainment Unit Assembly instructions

Merax
Merax MF285671 Assembly instructions

Pike & Main
Pike & Main 1288406 Assembly instructions


