Beam BLUE EVOLUTION XL+ User manual

© Copyright by 2
Foreword
Thank you for trusting beam GmbH.
This user manual contains safety instructions, relevant information and assistance in handling
the beam Blue Evolution XL+ Touch.
It offers support to familiarise with, maintain and care for the device.
Follow this user manual to ensure a long service life and reliable operation of the device.
This user manual is part of the device.
Make sure that this manual is always accessible.
Read this user manual in full before using the device for the first time and re-read it regularly.
Make sure that every user of this device knows and implements the user manual.
Some graphic representations may differ from your device.
For better representation, components have been removed or modified in some graphics.
The claim of the company beam GmbH is to always provide the best product for its customers.
It is therefore possible that changes and improvements made after this manual was published
are not included.
The latest version of your user manual is available online at https://www.dampfsauger-
beam.de/startseite/
If you need further information or help, the beam service centre is at your disposal.
Amendments and Copyright
Due to constantly new technical developments, beam GmbH reserves the right to make
changes without prior notice.
Copyright 2021
All content, in particular texts, photographs and graphics are protected by copyright. beam
GmbH reserves all rights including duplication, publication, processing and translation.
Please note
To make reading easier, the masculine form is used in this user manual for personal
designations and gender-related nouns. Corresponding terms generally apply to all genders in
terms of equal treatment. The shortened and consistent form of expression is solely for
editorial purposes and implies neither opinion nor judgement.

3© Copyright by
Feedback form
In order to guarantee you a high level of user-friendliness, we are always working on our
products and manuals. For this, we need your support.
We would be very happy to receive your feedback.
Simply copy or scan this page and send it to the contact details below.
Contact
beam GmbH
Illertalstraße 3
DE 89281 Altenstadt
Feedback
Assessment
In general, how would you rate this manual?
Excellent
Very good
Good
Decent
Poor
Your data
Company
Name
Address
Phone number
E-mail address
Thank you for your help.

© Copyright by 4
1Product description ___________________________________________________6
1.1 Complete overview of the basic device ______________________________________ 6
1.2 Technical Specifications___________________________________________________ 7
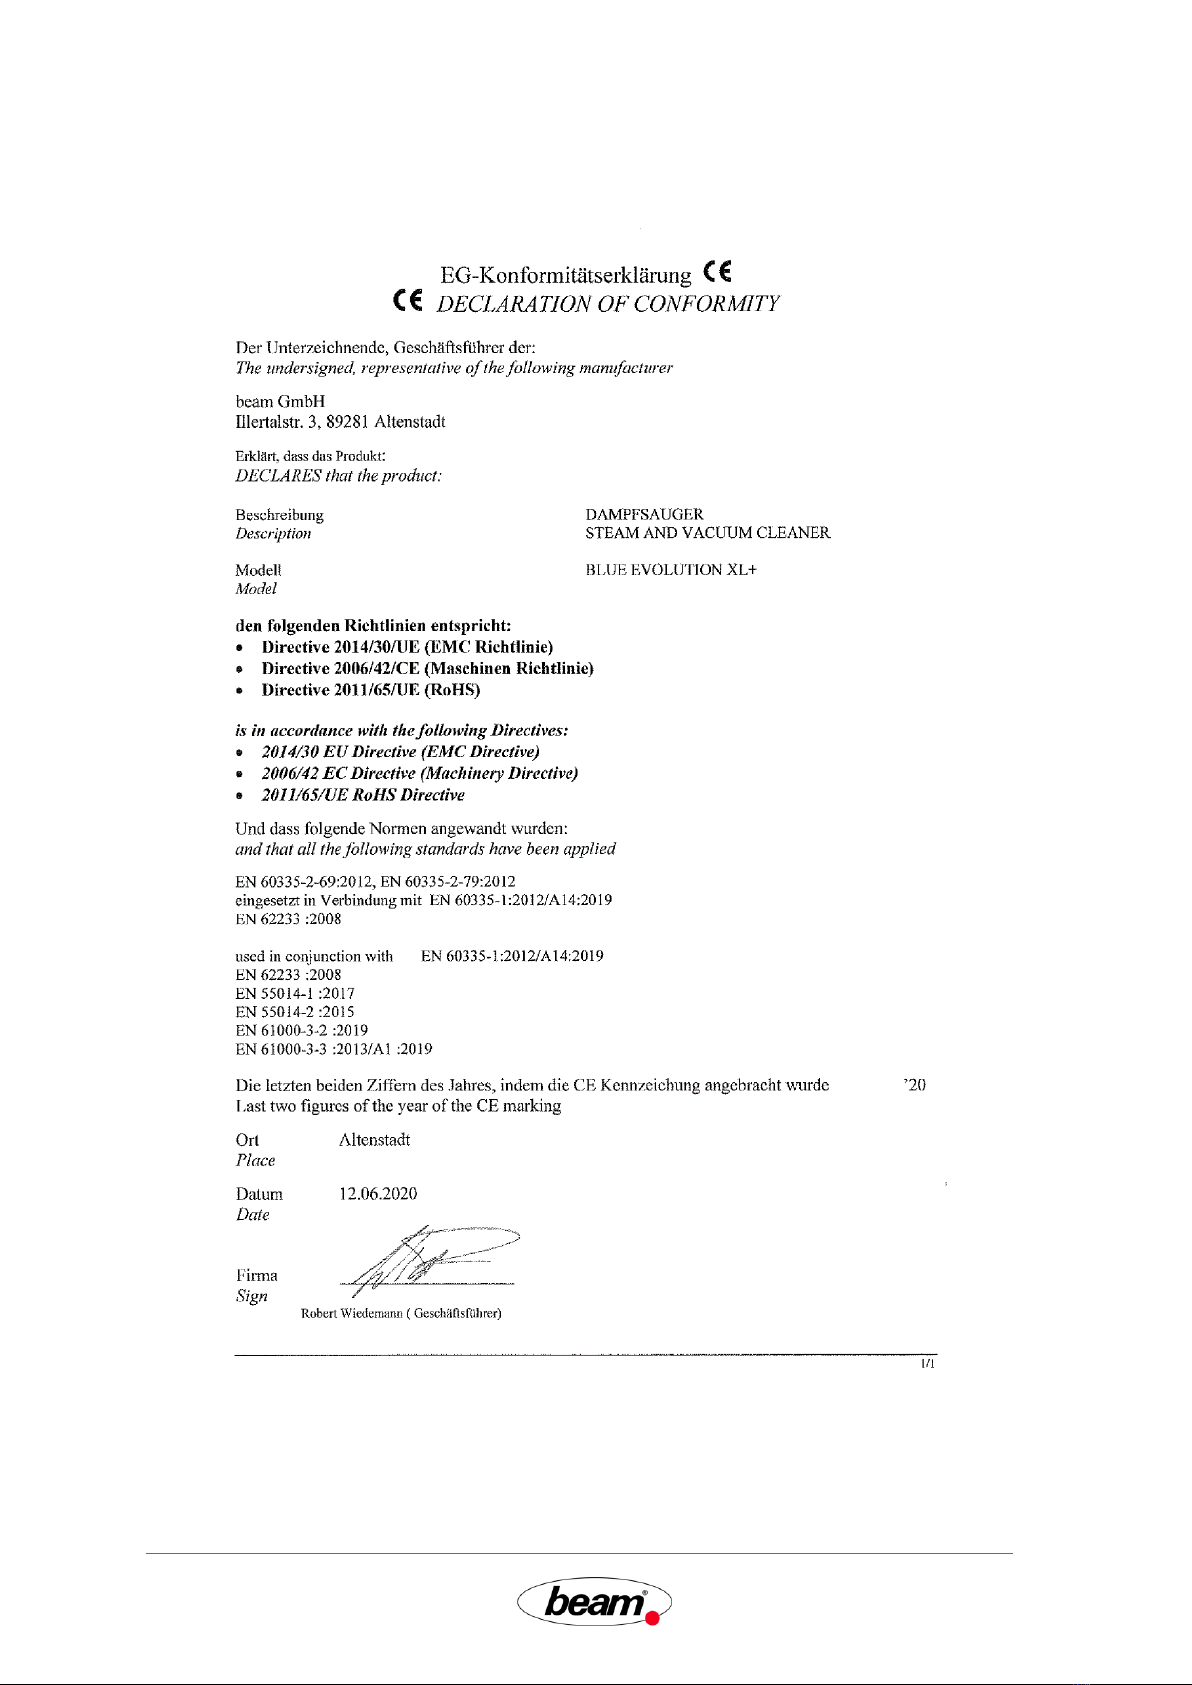
1.3 Declaration of Conformity_________________________________________________ 8
2Security_____________________________________________________________9
2.1 Legend of warnings ______________________________________________________ 9
2.2 Legend of symbols ______________________________________________________ 10
2.3Warnings______________________________________________________________ 10
2.4 Operating conditions ____________________________________________________ 11
2.5 Storage conditions ______________________________________________________ 11
2.6 Description of user and specialist __________________________________________ 11
2.6.1 Personal protective equipment ______________________________________________ 11
2.6.2 User ___________________________________________________________________ 12
2.6.3 Specialist________________________________________________________________ 12
2.6.4 Operator________________________________________________________________ 12
2.6.5 Intended use ____________________________________________________________ 12
2.6.6 Foreseeable Misuse _______________________________________________________ 12
2.6.7 Disposal ________________________________________________________________ 13
3Service and operation ________________________________________________13
3.1 Updates and Changes____________________________________________________ 13
3.2 Prepare device _________________________________________________________ 13
3.2.1 Install support arms with handle _____________________________________________ 14
3.2.2 Assemble the accessory box ________________________________________________ 15
3.3 Commissioning _________________________________________________________ 16
3.3.1 Establish power supply_____________________________________________________ 16
3.3.2 Fill the storage tank and hot water module ____________________________________ 17
3.3.2.1 Fill storage tank ________________________________________________________ 17
3.3.2.2 Fill hot water module ____________________________________________________ 17
3.3.3 Filter tank _______________________________________________________________ 18
3.3.3.1 Remove filter tank ______________________________________________________ 19
3.3.3.2 Remove filter cover _____________________________________________________ 19
3.3.3.3 Fill filter tank __________________________________________________________ 19
3.3.3.4 Insert filter tank ________________________________________________________ 20
3.3.4 Steam and suction hose ____________________________________________________ 20
3.3.4.1 Connect steam and suction hose___________________________________________ 21
3.3.4.2 Remove steam and suction hose ___________________________________________ 21
3.3.5 Accessories______________________________________________________________ 21
3.3.5.1 Accessories on hand control unit___________________________________________ 22
3.3.5.2 Accessories on extraction nozzle wide ______________________________________ 23
3.3.5.3 Accessory on extraction nozzle narrow ______________________________________ 24
3.3.5.4 Accessories on floor nozzle _______________________________________________ 25
3.3.5.5 Accessories on point jet nozzle ____________________________________________ 27
3.4 Operation _____________________________________________________________ 29
3.4.1 Turn on the device ________________________________________________________ 29
3.4.2 Display _________________________________________________________________ 30
3.4.2.1 Overview display _______________________________________________________ 30

5© Copyright by
3.4.3 Functions________________________________________________________________ 31
3.4.4 Activate the steam function _________________________________________________ 31
3.4.4.1 Deactivate the steam function _____________________________________________ 32
3.4.5 Activate the hot water function ______________________________________________ 33
3.4.5.1 Deactivate the hot water function __________________________________________ 34
3.4.6 Activate the suction function ________________________________________________ 34
3.4.6.1 Deactivate suction function _______________________________________________ 35
3.5 Decommissioning ______________________________________________________ 36
3.5.1 Prepare for decommissioning________________________________________________ 36
3.5.2 Clean attachments ________________________________________________________ 36
3.5.2.1 Clean steam and suction hose and accessories ________________________________ 36
3.5.2.2 Clean the filter tank _____________________________________________________ 37
3.5.3 Storage _________________________________________________________________ 37
3.6 Malfunctions __________________________________________________________ 38
3.6.1 Error codes on display______________________________________________________ 38
3.6.1.1 Error codes ____________________________________________________________ 38
3.6.2 Malfunctions _____________________________________________________________ 39
3.6.3 Safety precautions ________________________________________________________ 39
4Maintenance _______________________________________________________41
4.1 Document maintenance _________________________________________________ 41
4.2 Hot water module ______________________________________________________ 42
4.2.1 Prepare hot water module for maintenance ____________________________________ 42
4.2.1.1 Empty the hot water module ______________________________________________ 42
4.2.2 Rinse the hot water module _________________________________________________ 42
4.3 Boiler ________________________________________________________________ 44
4.3.1 Prepare boiler maintenance _________________________________________________ 44
4.3.1.1 Empty storage tank______________________________________________________ 44
4.3.2 Descale the boiler _________________________________________________________ 45
4.3.2.1 Start cleaning the boiler __________________________________________________ 46
4.3.2.2 Empty the boiler ________________________________________________________ 47
4.3.2.3 Rinse the boiler _________________________________________________________ 48
4.4 Filters and o-rings ______________________________________________________ 49
4.4.1 Maintenance of filters______________________________________________________ 49
4.4.2 Maintenance of O-rings ____________________________________________________ 49
4.4.2.1 Change O-rings on hand control unit ________________________________________ 50
4.4.2.2 Change the O-rings on the suction and steam hose_____________________________ 50
4.4.2.3 Change O-rings on the extension tube _______________________________________ 51

© Copyright by 6
1Product description
1.1 Complete overview of the basic device
Figure 1.1-1 Complete overview of the basic device
1
Handle
9
Filling openings cover
2
Accessory box
10
Star nut accessory box (both sides)
3
Display
11
Support arm (both sides)
4
Hose connection
12
Filter tank
5
Carrying handle (both sides)
13
Main switch
6
Star nuts carrier arm (both sides)
14
Directional lock rear wheel (both
sides)
7
Star nuts small (on both sides)
15
Parking brake front wheel (both
sides)
8
Filling level indicator

7© Copyright by
1.2 Technical Specifications
Name
Unit
Value (including tolerance)
Nominal voltage
V in AC
380-400
Hz
50/60
Overall performance
W
7200
Nominal consumption of
stainless steel boiler per
heating element
W
2000
Nominal input of engine
W
1200
Noise development
dB
71
Automatic refill system
(optional)
l
Approx 3.0
Maximal steam temperature
°C
180
Maximal pressure steam
bar
10
Unterdruck (Wassersäule)
mm H2O
2100
Maximal capacity of the
water filter
l
4
Water volume Water filter
between minimal and
maximal range
l
2
Steam and suction hose
m
3.2
Device length
mm
720
Device width
mm
390
Device height
mm
930
Device weight
kg
45
Table 1.2—1 Technical Specifications

© Copyright by 8
1.3 Declaration of Conformity
Figure 1.3-1 Declaration of Conformity

9© Copyright by
2Security
2.1 Legend of warnings
This warning sign warns of possible dangers.
To avoid death, injury and damage, follow all measures marked with
this warning sign without exception.
The level of danger differs as follows:
DANGER
Serious injuries or danger to life!
The keyword “Danger” indicates an imminent situation which, if not
avoided, will result in serious bodily injury or death.
WARNING
Serious injuries or danger to life possible!
Warning keyword indicates a situation which, if not avoided, could
result in death or serious injury.
CAUTION
Minor or medium bodily injuries!
The keyword “caution” indicates a situation that will result in minor or
moderate physical injury if not avoided.
ATTENTION
Damage!
The keyword “Attention” indicates a situation that will result in
property damage, if not avoided.

© Copyright by 10
2.2 Legend of symbols
Symbol
Function
◼
Prerequisite for action
Shows conditions for subsequent actions.
➔
Call to Action
Prompts the operator for an action
Action result
Shows the result of a previous action.
−
Count
Structures several points of a list.
Table 2.2—1 Legend of symbols
INFO
Displays useful and helpful information or tips and recommendations.
2.3 Warnings
WARNING
Power supply defect!
Risk of death.
➔Make sure that the power supply of the device is free of defects
before each start-up.
➔Touch the device and network connector with dry hands only.
WARNING
Improper handling of electronic devices!
Risk of death.
➔Ensure that electrical devices are voltage-free before cleaning.
➔Ensure that electrical devices to be cleaned are not damaged.
CAUTION
Improper handling of the UV-C lamp!
Eye and skin injuries.
➔Avoid looking directly into the UV-C lamp.
➔Only have the UV-C lamp replaced by authorised specialist
personnel.
When the UV-C lamp is removed:
➔Secure the device against switching on.

11 © Copyright by
CAUTION
Improper handling!
Burns, injuries and property damage.
➔Ensure that all unauthorised persons leave the work area.
➔Direct the steam jet exclusively at the surfaces to be cleaned.
➔Ensure that people and animals are protected from the steam jet.
➔Make sure that the device is switched on and is supervised.
➔Ensure that the device is secured against unauthorised use.
➔Ensure that repair work on the device is carried out by authorised
specialist personnel only.
➔Only perform maintenance activities described in this manual.
➔Ensure that the device remains technically unchanged.
CAUTION
Defective components!
Injuries.
➔Check the device for proper condition before each use.
If the device has defects:
➔Leave the status of the device unchanged.
➔Contact beam service centre.
2.4 Operating conditions
Operate the device under the following conditions:
−Below normal ambient temperature
−In an environment protected from rain and frost
−On flat and cool ground
−At a sufficient distance from heat sources
2.5 Storage conditions
Store the device under the following conditions:
−Freeze-proof environment
−Dry environment
−With separate power supply
2.6 Description of user and specialist
2.6.1 Personal protective equipment
The personal protective equipment consists of the following components:
−Appropriate clothing

© Copyright by 12
2.6.2 User
Definition and responsibilities of the user:
−Is of legal age.
−Follows this user guide.
−Works with the device.
−Fills and refills fluids for work.
−Cleans and maintains the device.
−Performs the maintenance activities described.
−Before use, ensures that the device is in working order.
−Reports defects to the operator or directly to beam GmbH.
2.6.3 Specialist
Definition and responsibilities of the specialist:
−Follows this user guide.
−Repairs the device.
−Repairs and documents defects.
−Has the necessary qualification to carry out repairs.
−Is authorised by beam GmbH.
2.6.4 Operator
Definition and responsibilities of the operator:
−Makes the device available for work.
−Ensures that this manual is always accessible.
−Ensures that the operator knows and implements the user manual.
−Provides additional protective equipment that may be required.
−Ensures that maintenance and care intervals are followed.
2.6.5 Intended use
The beam Blue Evolution XL+ Touch is used for the environmentally friendly cleaning of a wide
variety of materials and surfaces with clear water.
To ensure proper use, comply with the following points:
−Follow the user manual
−Carry out maintenance work
−Carry out servicing activities
2.6.6 Foreseeable Misuse
Use of the device is prohibited for the following purposes:
−to heat various objects or materials
−to clean skin, hair, people or animals
−to hit
−to leverage
−to scratch
−to pick up explosive or flammable substances
−to clean live components
−to clean moisture-sensitive electronic devices
−to clean materials containing asbestos
−to clean materials harmful to health

13 © Copyright by
2.6.7 Disposal
Dispose of the device and device components as follows:
−Ensure that individual components are properly disposed of at the end of their useful life.
−Ensure that the device is properly disposed of at the end of its useful life.
−Ensure that country-specific waste regulation guidelines are complied with.
−Ensure that all consumables are removed prior to disposal.
3Service and operation
3.1 Updates and Changes
Update and change
Chapter
Link
Table 3.1—1 Updates and Changes
3.2 Prepare device
CAUTION
Improper lifting of the device!
Injuries.
➔Make sure your back and spine are protected when lifting.
➔If necessary, get a second person to help.

© Copyright by 14
3.2.1 Install support arms with handle
Figure 3.2-1 Assemble the support arms and handle
6
Star nuts carrier arm (both sides)
16
Hanging grooves (on both sides)
7
Star nuts small (on both sides)
17
Washers (on both sides)
11
Carrier arm
Ensure that the following components are available:
−Star nuts support arm 6
−Small star nuts 7
−Support arm 11
−Washers 17
➔If necessary, get a second person to help.
➔Position support arm 11.
Hanging grooves 16 point in the direction of the display.
➔Attach small star nuts 7and washers 17 on both sides.
➔Ensure that the washers 17 are in direct contact with the small star nuts 7.
➔Tighten small star nuts 7.
➔Tighten support arm star nuts 6 on both sides.
➔Tighten star nuts 6and star nuts 7.
Support arm with handle is installed.

15 © Copyright by
3.2.2 Assemble the accessory box
Figure 3.2-2 Assemble the accessory box
2
Accessory box
18
Washers (on both sides)
10
Star nut accessory box (both sides)
20
Pegs
11
Carrier arm
Ensure that the following components are available:
−Accessory box 2
−Star nut accessory box 10
−Washers 18
➔Hang the accessory box 2 with pin 20 on the support arm 11.
➔Tilt accessory box 2up as far as it will go.
➔Screw on star nut accessory box 10 and washers 18 on both sides.
➔Ensure that washers 18 are in direct contact with star nuts in accessory box 10.
➔Tighten the star nuts in accessory box 10.
Accessory box 2is assembled.

© Copyright by 16
3.3 Commissioning
3.3.1 Establish power supply
Figure 3.3-1 Establish power supply
25
High voltage current plug
ATTENTION
Faulty power supply!
Damage.
➔Make sure that the mains voltage of the socket corresponds to
the nominal voltage of the device.
➔For detailed information see 1.2 Technical Specifications.
➔Plug the high voltage current plug 25 into the power socket.

17 © Copyright by
3.3.2 Fill the storage tank and hot water module
Figure 3.3-2 Filling the storage tank and hot water module
8
Filling level indicator
30
Hot water module
9
Filling openings cover
31
Storage tank
3.3.2.1 Fill storage tank
ATTENTION
Filling medium not allowed!
Damage to device!
➔Only use tap water.
➔Open the cover of the filling openings 9.
➔Remove the storage tank cap 31.
➔Fill with tap water.
➔Attach the storage tank cap 31.
➔Close the cover of the filling openings 9.
3.3.2.2 Fill hot water module
ATTENTION
Filling medium not allowed!
Damage to device!
➔Use tap water.
If tap water is very calcareous:
➔Use pre-filter for decarbonisation.

© Copyright by 18
beam GmbH recommends:
−Brita filter cartridge
➔Order a pre-filter at https://www.dampfsauger-
beam.de/startseite/.
➔Open the cover of the filling openings 9
➔Remove the cap for the hot water module 30.
➔Fill with water.
➔Attach the closure for the hot water module 30.
➔Close the cover of the filling openings 9.
3.3.3 Filter tank
Figure 3.3-3 Filter tank
12
Filter tank
36
Filter cover
34
Filter cover lock (both sides)
37
Level mark
35
Filter tank lock (both sides)
38
Siphon
Filter tank 12 contains water filtration system:
−Water filter binds sucked dirt.
−Water filter binds dirt from sucked air.
−Water filter requires about 2 litres of water.
The intake volume of the filter tank 12 is made up as follows:
Name
Unit
Value (including tolerance)
Total intake volume
Litre
4
Intake volume of the filter
area up to the filling level
mark 37
Litre
2
Dirt area intake volume
Litre
2
Table 3.3—1 Intake volume

19 © Copyright by
INFO
Monitoring of the filling level in the filter tank
Unit stops when level in filter tank exceeds allowable level.
Display shows error message.
3.3.3.1 Remove filter tank
Figure 3.3-4 Remove filter tank
12
Filter tank
36
Filter cover
34
Filter cover lock (both sides)
37
Level mark
35
Filter tank lock (both sides)
➔Release and unhook the filter tank locks 35 on both sides.
➔Remove filter tank 12 to the rear.
3.3.3.2 Remove filter cover
➔Release the filter cover locks 34 and unhook them.
➔Remove filter cover 36 upwards.
3.3.3.3 Fill filter tank
INFO
If only liquid is sucked up:
➔Use filter tank unfilled.
Intake volume increases to around 4 litres.
➔Make sure siphon 38 is properly installed.
➔Fill the filter tank 12 with water up to the level mark 37.
➔Install filter cover 36 on filter tank 12.
➔Close the locks of the filter cover 34.
Table of contents
Other Beam Cleaning Equipment manuals
Popular Cleaning Equipment manuals by other brands

Alfalaval
Alfalaval Toftejorg TZ-89 instruction manual

Motor Scrubber
Motor Scrubber STORM JET3 user manual

Alfalaval
Alfalaval Toftejorg TJ20G instruction manual

AU Tool
AU Tool CT160 user manual

Silvercrest
Silvercrest SRB 4 A1 Operating instructions and safety instructions

J.P. SELECTA
J.P. SELECTA ULTRASONS 0,24 L instruction manual