Beat-Sonic SLX-140L User manual

* Head unit must support steering wheel control input. Additional steering wheel control adapter may be required.
- Interface Adapter Module and Harness x 1
- 2-DIN Fascia Garnish (Left & Right) x 1 set
- Mounting Brackets (Left & Right) x 1 set
- Allows installation of a double-DIN (178mm x 100mm) head unit to replace OEM head unit.
-
Retains full function of OEM heater, air-conditioner and climate control systems.
- Compatible with both Mark Levinson sound systems and Lexus Premium sound systems.
- Plug and play adapter with no modifications required to factory vehicle electrical harness.
- Provides steering wheel audio controls to new head unit*.
■Features
■Important
■Contents
■Precautions
LEXUS IS 350/250
LEXUS IS F
LEXUS IS C SLX-140L
Installation Manual
- This installation kit is designed for automatic transmission models only. The fascia panel garnish will not suit the manual
transmission center console.
- Center Panel audio buttons related to the OEM CD player, radio, MP3 playback etc. will no longer function after
removing the OEM head unit. All audio adjustment settings except fader are fixed to neutral and cannot be adjusted.
- OEM Handsfree / Bluetooth Pairing, Voice Command and Phonebook will no longer function after removing the OEM
head unit. Delete any registered mobile phones prior to removing the OEM head unit (see Appendix B).
- Center console AUX input and Radio Data Service (RDS) will no longer function after removing the OEM head unit.
- This product is not compatible with connector type (20-pin) steering wheel control adapters. Please use wired type only.
- This product will not rectify any pre-existing faults with the electrical system, factory amplifier and/or speakers.
- This product should be installed by an experienced motor vehicle technician or automotive electrical professional.
- The user assumes all responsibility for any damages and/or injuries caused as a result of improper installation.
- M4 Nuts x 8
- Adhesive Padding Tape x 2
- Instruction Manual x 1
Thank you for purchasing the Beat-Sonic SLX-140L Audio Interface Adapter Kit. You have
purchased from Japan`s leading supplier of car audio interface adapters and accessories.
Designed and made in Japan, this product represents our commitment to quality and excellence.
Please read this manual carefully prior to installing this product to ensure correct operation.
OEM Nav
* Automatic transmission models only.
Lexus IS 350/250
Lexus IS F
Lexus IS C
Compatible Vehicles Year Chassis Code
2006 - 2013
2008 - 2014
2010 - 2015
GSE20/21/25
USE20
GSE20/21
No
No
No
- Perform installation with patience and due care to prevent damage to this product or any part of the vehicle.
- Ensure all connectors, cables and terminals are correctly secured and fully inserted. Loose and/or improperly secured
connectors will cause malfunction.
- Always grasp the connector plug when disconnecting the cable harness. Never disconnect connectors by pulling on the
harness wires as serious damage can occur.
- Do not attempt to install this product on any other vehicle other than the specified models.
- Do not disassemble, modify or attempt to repair this device.
- Beat-Sonic and its affiliates shall not be held responsible for any consequence, either directly or otherwise, as a result of
installing and/or using this product.
- Disconnect negative terminal of the vehicle battery prior to installation to prevent risk of short circuit.
Connection Diagram
1. Remove the Integration Control Panel Assembly
1.1 Remove the center vent assembly by carefully releasing the upper 4 internal vent
claws using a small flat blade screwdriver. Wrap the end of the screwdriver with
protective tape to prevent scratching the surface.
Disconnect the negative terminal of the vehicle battery and wait at least 90 seconds before
proceeding to prevent accidental airbag deployment.
1.2 Apply low tack painters tape around the edges of the vent assembly. Use a molding
removal tool to disengage the right side claw then disengage the remaing 3 claws by
pulling out the vent by hand. Do not use tool or attempt to pry the bottom section of the
vent where it joins the Integration Control Panel.
1.3 Remove the shift lever knob by unscrewing counter-clockwise.
1.4 Remove the console garnish trims by first releasing the endmost clip then pulling away
from the radio receiver.
1.5 Remove the console panel sub-assembly by pulling up to release the 8 clips.
1.6 Remove the 2 screws that hold the ashtray and remove. This panel and garnish trims
are not used for re-assembly with 2-DIN head unit.
1.7 Unclip and remove the radio lower finisher panel.
1.8 Remove the 4 bolts that secure the Integration Control Panel. Disconnect all connectors
to remove completely.
Installation
Dashboard deterioration common on this
model vehicle may result in damage to
the surface regardless of precautions taken.
Caution!
* See Appendix A. for steering wheel audio controls.
20-Pin
Connector
(Small)
20-Pin
Connector
(Large)
12-Pin
Connector
Vehicle Side
20-Pin
Connector
(Large)
Vehicle Side
20-Pin
Connector
(Small)
Vehicle Side
12-Pin
Connector
SW2
SW1
SWG
SW2
SW1
SWG
Aftermarket
Head Unit
No connection required for
rear speaker outputs.
REAR
FRONT
L
R
(ORANGE) Illumination
(BLUE) Antenna Remote
(YELLOW) +12V Battery
(RED) Accessories
Ground
SLX
Protective tape
Protective tape
1&2
8
7
4
4
3
5
6
INTEGRATION CONTROL PANEL
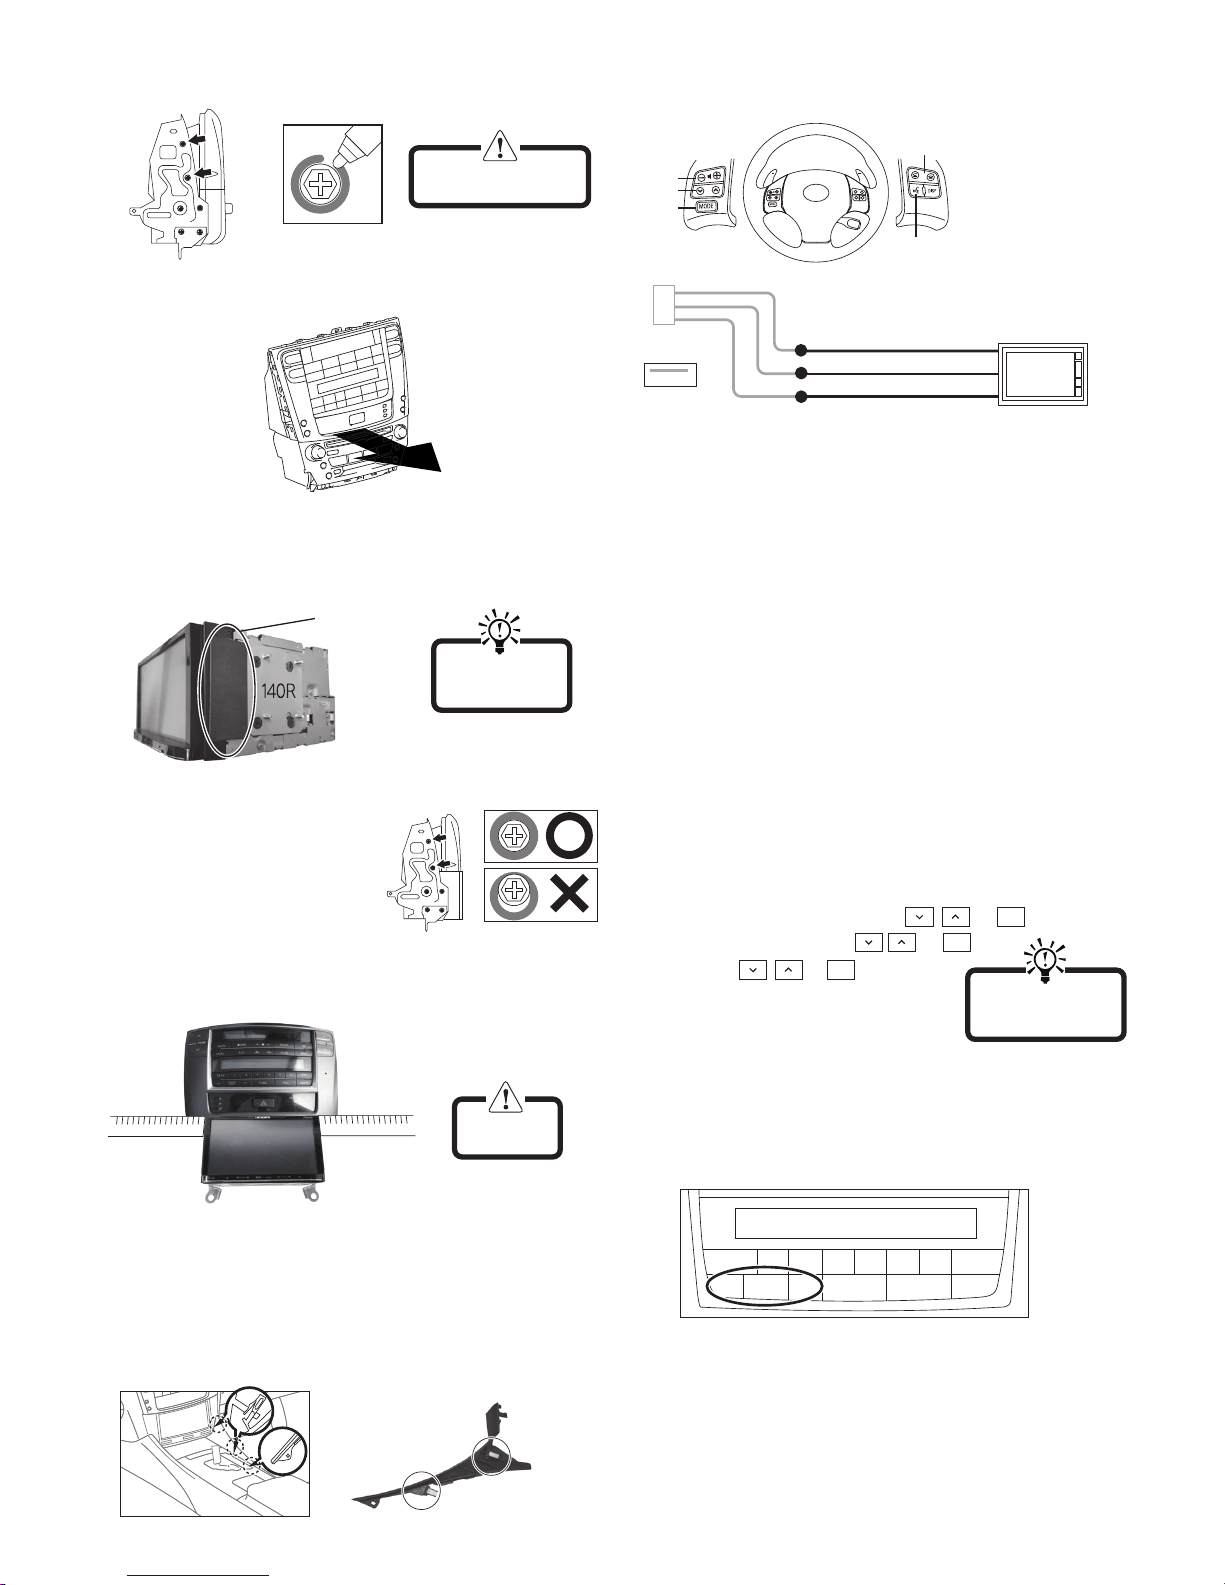
2.3 Attach the supplied mounting brackets to the 2-DIN aftermarket head unit using the
screws that came supplied with the head unit. Take care to install the left (marked “140L”)
and right (marked “140R”) brackets accordingly. Apply the supplied adhesive padding
tape to both sides as shown below.
2.4 Re-attach one of the OEM brackets to one side
of the Integration Control Panel and align the
fasteners with the previously marked positions.
Attach the 2-DIN aftermarket head unit to the
bracket and lightly secure using the fasteners.
Do not fully tighten the fasteners yet as
adjustment may be necessary. Repeat for the
other side so that both OEM brackets are
attached.
2.5 Align the 2-DIN aftermarket head unit so that it is exactly centered with respect to the
Integration Control Panel. Use a ruler to measure the distance from the outside edge of
the Integration Control Panel to the side of the 2-DIN aftermarket head unit. The distance
on both sides must be exactly the same. Tighten the fasteners on either side then
recheck to confirm alignment and adjust if necessary.
2. Install the Double DIN Head Unit. Steering Wheel Audio Controls
2.1 Use a marker pen to mark the positions of the upper 2 fasteners on both sides of the
brackets before unscrewing and removing. This is important to ensure correct alignment
when reassembling.
3. Re-Install the Integration Control Panel with 2-DIN Head Unit
3.1 Connect the SLX-140L adapter harness and all Integration Control Panel connectors.
Refer to Appendix A. for connection of steering wheel audio controls.
3.3 Re-install the Integration Control Panel assembly taking care not to crush or kink the
wiring behind. Secure using the 4 mounting fasteners.
3.4 Confirm operation of new head unit, steering wheel controls and Integration Control Panel
functions including air-con, heater, illlumination, hazard switch etc. Buttons related to the
factory radio receiver will no longer work (see Appendix B).
3.5 Re-install the ashtray and console sub panel assembly.
3.6 Insert fascia garnish trim on either side of the 2-DIN aftermarket head unit and sub panel
assembly. Start by locating clip 1 then clip 2 as shown below.
3.7 Re-install the upper vent to complete the installation.
Mark the position of fasteners
on both sides before unscrewing.
IMPORTANT!
Head unit must be
correctly centered
IMPORTANT!
Depending on head unit,
it may not be possible to
attach all 4 screws.
Hint!
1
2
Appendix A.
Adhesive
Padding Tape
Appendix B.
Audio Settings
Only the buttons circled below are retained after the OEM head unit has been removed.
All other Integration Control Panel buttons related to the OEM radio will not function after
the OEM head unit has been removed.
With the exception of fader (FAD), all audio setting adjustments are fixed to neutral and
cannot be adjusted by the Integration Control Panel. Adjustment can be made via the
aftermarket head unit.
* Buttons may vary depending on grade and model.
Vehicles equipped with Handsfree
Handsfree and Bluetooth is not retained after the OEM head unit has been removed.
Ensure that all registered mobile phones are deleted prior to removing the OEM head
unit to prevent accidental pairing to the redundant Bluetooth connection.
1. Select “Delete Phone” using a voice command or , and
2. Select mobile phone to be deleted using , and
3. Select “Yes” using , and
Ruler
Ruler
MENU
ENTER
MENU
ENTER
MENU
ENTER
TRAF 1 2 3 4 5 6 TEXT
MUTEASL
P.SEL
MENU
ENTER
^
^
2.3 With both brackets removed, hold the radio receiver stationary and slide the Integration
Control Panel forward in the direction of the arrow as shown below to separate.
The SLX-140L provides the necessary wires to connect the OEM steering wheel audio control
buttons to the aftermarket head unit. Depending on the head unit, a steering wheel control
interface (available separately) may be required.
1. Connect SWG (Pin-6 Black) to the SWG input on the aftermarket head unit.
2. Connect SW1 (Pin-7 White) to the SW1 input on the aftermarket head unit.
3. Connect SW2 (Pin-8 Green) to the SW2 input of the aftermarket head unit.
VOLUME
SEEK
Handsfree
VOICE
MODE
* Handsfree & Voice buttons not
available on all models
SWG (Black)
SW1 (White)
SW2 (Green)
SWG
SW1
SW2
Aftermarket
Head Unit
20-Pin Connector
Adapter Wires
Handsfree connection can be
made to aftermarket head unit
(provided this feature is supported)
Hint!
Table of contents
Other Beat-Sonic Automobile Accessories manuals

Beat-Sonic
Beat-Sonic Altezza & Gita SLA-91 User manual

Beat-Sonic
Beat-Sonic NDS6223EP User manual

Beat-Sonic
Beat-Sonic MVA-81 User manual

Beat-Sonic
Beat-Sonic SLA-91 User manual

Beat-Sonic
Beat-Sonic encore a PA2T1K User manual

Beat-Sonic
Beat-Sonic CS6EP User manual

Beat-Sonic
Beat-Sonic Altezza & Gita SLA-91 User manual
Popular Automobile Accessories manuals by other brands


Whelen Engineering Company
Whelen Engineering Company 10” Continuum Single installation guide

RSG
RSG Standby S-PAL06 user manual

MasterTop
MasterTop 142037 Series installation instructions

Edscha Trailer Systems
Edscha Trailer Systems TipperRoof quick guide

Becker
Becker BT-BKRMTCK Quick start installation guide

Hayman Reese
Hayman Reese 03274RW installation instructions