Beautural 722NA-0005 User manual

1byone Products Inc.
1230 E Belmont Street, Ontario, CA, USA 91761
Customer Service: +1 909-391-3888
www.1byone.com
Handheld Garment Steamer
Instruction Manual

1
Introduction
Thank you for purchasing Beautural Handheld Garment Steamer. This
instruction manual contains important information about safety, usage
and disposal. Use the product as described and keep this manual for future
reference. If you sell this steamer or pass it on, also give this manual to the new
owner.
Safety Instructions
• This steamer is only authorized for domestic use and not for commercial or
industrial purposes. It is only intended for applications described in these
instructions.
• This steamer is not intended for use by people with limited physical, sensory
or mental abilities, or persons without required knowledge or experience.
Product use by such people is allowed only under the supervision of the
person or guardian responsible for their safety, with the guardian providing
clear instructions on the device operation. Ensure that children do not play
with the steamer.
• This steamer may be used by children over 8 years old and by dependents
if they are properly supervised and have been made fully aware of the
risks of use. Children should not play with the steamer. Cleaning and user
maintenance should not be performed by children without supervision.
• If the supplied power cord is damaged, it should be replaced by a qualied
technician to avoid hazard.
• Care should be taken when using the product due to the emission of steam.
• Always unplug the steamer before attaching or detaching brush
attachments during lling, cleaning and de-scaling.
• Carefully read all instructions before operating the steamer for the rst time
and save for future reference.
• Any maintenance other than cleaning should be performed at an qualied
personnel.
• Remove and safely discard any packaging material and promotional labels
before using the steamer for the rst time.

2 3
• Do not place the steamer near the edge of a bench or table during
operation. Ensure the surface is level, clean and free of water and other
substances.
• Always ensure the steamer is properly assembled before use. Only use the
attachments or accessories provided and specied in this instruction manual.
Follow the instructions provided in this book.
• Do not leave the steamer unattended when connected or in use.
• Do not store the steamer with water in the water tank. Always empty the
tank after use.
• Do not touch hot surfaces. This steamer allows the user to steam fabrics with
a large ow of steam. High temperatures are generated during use, which
could cause burns. Always position your hands at the handle of the steamer
when holding it and warn others (especially children) of the possible
dangers of burns from steam, hot water or hot parts, especially when
steaming fabrics vertically.
• Allow the steamer to cool completely before storing.
• Store the steamer out of the reach of children.
• When placing the steamer on its base, ensure that the surface on which the
base is placed is stable.
• The steamer is not to be used if the steamer has been dropped, if there are
visible signs of damage or if it is leaking.
• The steamer is designed for household use and to be used with the tap
water. Do not put perfume, vinegar, or other chemicals in the tank. This
steamer is not designed to work with these chemicals.
• Do not touch the steam head during use. When using the steamer, make
sure the steamer head is facing away from the user and is in an upright
position.
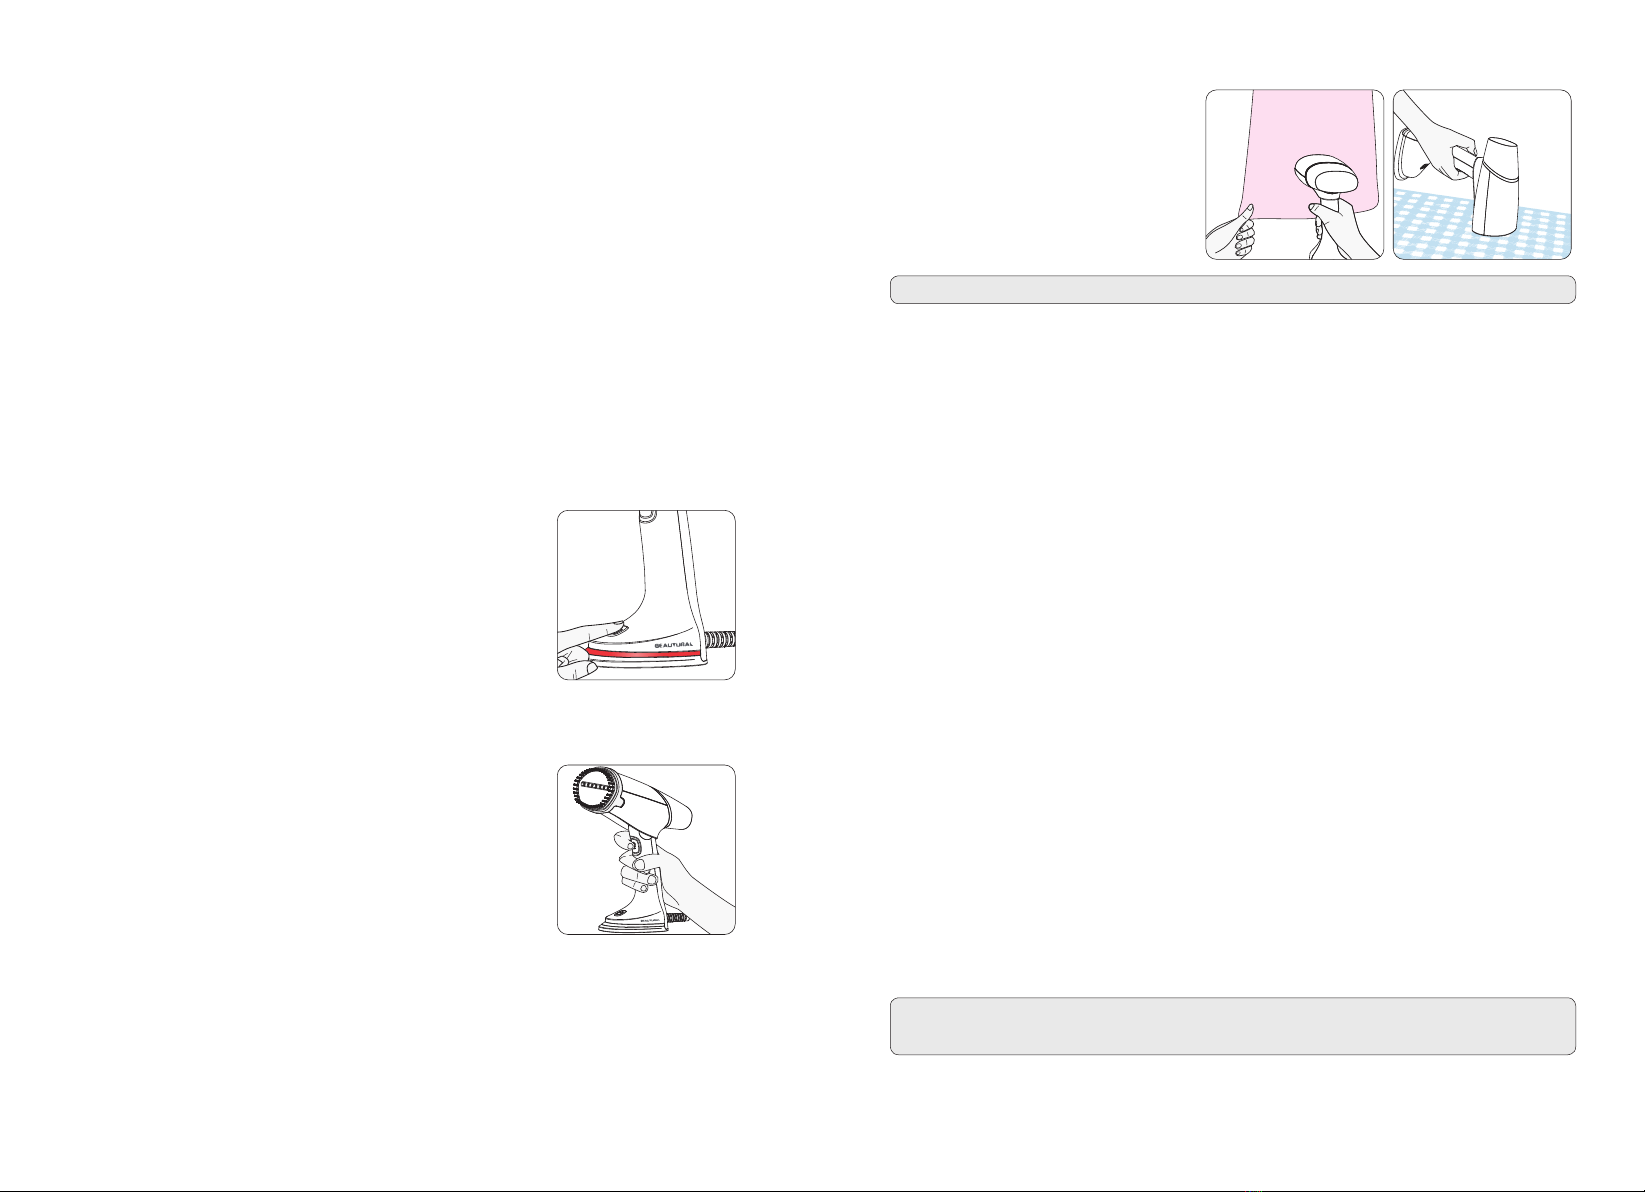
• Always test the steamer on a small discreet part of the fabric to be steamed
to ensure the temperatures is not too high for the fabric.
• The steamer incorporates a thermal safety fuse to protect the steamer from
over-heating. However the steamer should not be left unattended while it
is connected to the power outlet. Special care should always be taken when
there are children in the home/vicinity of the steamer.
• There may be leakage from the steam head if the steamer temperature is not
high enough to vaporize water and create steam. Therefore, ensure that the
steamer is always preheated prior to use.
• Never use the steamer while clothes are on the body or direct the steam
towards people or animals.
• To protect against electric shock, do not immerse the power cord, power
plug or steamer in water or any other liquid or allow moisture to come in
contact with the part, unless it is recommended in the cleaning instructions.
• It is recommended to regularly inspect the steamer. To avoid a hazard, do not
use the steamer if power cord, power plug or steamer becomes damaged
in any way. Return the entire product to the nearest repair service centre for
examination and repair.
• The installation of a residual current device (safety switch) is recommended
to provide additional safety protection when using electrical appliances. It
is advisable that a safety switch with a rated residual operating current not
exceeding 30mA be installed in the electrical circuit supplying the appliance.
See an electrician for professional advice.
• Do not place this steamer on or near a heat source, such as hot plate, oven
or heaters.
• Position the steamer at a minimum distance of 20cm away from walls,
curtains and other heat or steam sensitive materials and provide adequate
space above and on all sides for air circulation.

4 5
Product Description
50
mL
100
mL
11
8
9 2
3
4
5
6
7
10
11
1. Steam Head
2. Water Tank
3. Steam Button
4. Handle
5. Power Cord
6. Power Button
7. Indicator Lamp
8. Lint Brush
9. Soft Brush
10. Measuring Cup
11. Storage Bag
Included Items
1 x Garment Steamer
1 x Soft Brush
1 x Lint Brush
1 x Measuring Cup (3.4oz/100ml)
1 x Storage Bag
1 x Instruction Manual
Before using the Garment Steamer for the rst time, check the package
contents to ensure all parts are free of visible damage.
Getting Started
• Carefully remove the steamer from package, making sure all of the parts
and accessories are free of visible damage. Remove all protective packaging
material from the steamer prior to its rst use.
• Remove and save the instruction manual.
• Wipe the outside of the steamer with a damp cloth or sponge to remove any
dust, then dry thoroughly.
• When using the steamer for the rst time, you may notice a small amount of
smoke and a slight odor. This is normal when heating the appliance for the
rst time and there is no reason for concern.
Important Notes
• Using distilled, puried or ltered water is highly recommended to maintain
optimal performance. Tap water contains minerals that build up over time.
• Any water droplets visible inside the tank upon unpacking are from
individual quality control tests done to ensure every steamer meets our high
standards for product performance.
• Do not use perfumes, oils or other additives.
• Always review the garment manufacturer’s care label instructions before
steaming, and always test fabrics for colorfastness in inconspicuous areas
(such as an inseam). Steamers are not recommended for use on leather,
suede, vinyl, plastic or other steam-sensitive fabrics.
• During use the steamer and accessories will become hot. Avoid attaching or
removing brush attachments while still hot.
• After preheating, prime the water pump by pressing the steam button and
then wait as steam forms.
• It is normal to feel or hear the water pump in the handle.
• The water pump may become louder when the water level in the tank is
low. Check and rell the tank as needed.

6 7
Attaching/Removing Brush Attachments
The steamer comes with two optional-use brush attachments recommended
for use with a variety of fabrics and upholstery.
To Attach: While the brush and steamer are cool,
gently attach the top of the brush over the top
of the steamer head and then press the tabs on
both sides of the brush until it snaps into place.
To Remove: Allow the steamer to cool prior to
removing the brush. Gently pull on one side of
the tab to remove.
Brush Attachment Usage
Soft Brush
For garments that call for low heat. Allows for use of
steam to remove lint, pet hair, dust, dirt, dander on
overcoat and down jacket.
Lint Brush
For any garments that call for medium to high heat.
Allows for use of steam to dry steam suits, sweaters,
wool fabric and plush cloth.
Filling the Water Tank
1. Unfold the steamer. Place the steamer on its base on a stable surface.
2. Hold the handle to stabilize the steamer and lift up
the removable water tank with the other hand.
3. Gently pull out the rubber water tank cover at the
top of the tank.
Tip: Using distilled, puried or ltered water is highly recommended and
will reduce mineral buildup. Do not use oils, perfumes or scented additives.
4. Using the included measuring cup, pour water
into the opening and then close the rubber cover
securely.
5. Dry o any excess water from the tank. Push the water tank back into the
steamer until it clicks into place.
6. To rell at any time during use, turn the steamer o by pressing the power
button until the red indicator light is o, unplug from the outlet and follow
the above procedures.
Tip: After relling, allow to reheat for at least 40 seconds and then prime the
pump by holding steam button until steam forms.

8 9
Using the Steamer
1. Read the manufacturer's fabric label to make sure the fabrics are suitable for
steaming.
• If you see“do not iron,”attach the soft brush and make sure to test on an
inconspicuous area prior to steaming the entire garment.
• If you see“do not steam,”do not steam the garment.
2. Refer to the“Attaching/Removing Brush Attachments”section for
determining whether to use a brush. Attach or remove brushes while the
steamer and brushes are cool.
• Hang the garment in an area that will not be impacted by the heat and
steam, such as on a shower rod.
• This steamer is anti-dripping, meaning it can be used horizontally to steam
garments on an ironing board.
3. Plug the steamer into an outlet and then press the
power button; the red indicator light will blink,
indicating the steamer is heating.
4. After about 40 seconds the indicator light will become solid, indicating the
steamer is preheated.
5. Prime the water pump by pressing the steam
button and then wait for steam to form.
6. To generate steam, press the steam button; the indicator light will turn green
and steam will emit from the steamer.
7. Use your free hand to keep
the fabric taut and stretched.
Steam the garment with slow,
downward strokes, keeping the
head of the steamer in contact
with the fabric.
Note: It is normal to feel or hear the water pump in the handle.
8. When nished steaming, press the power button and unplug from the
outlet.
9. Stand the steamer on its base and allow it to completely cool o before
storing. To avoid mineral buildup, empty the tank after each use.
Auto Shuto
The steamer will automatically switch to auto shut-o mode after being
left inactive for 8 minutes. The red and green blinking of the indicator light
indicates that the steamer is going into auto shuto mode. To resume
steaming, press the steam button and wait for the steamer to fully reheat.
Steaming Tips
Steaming Garments
1. Place the fabric in a dry and ventilated place and at least 20 cm (8 inches)
away from any walls (otherwise moisture may cause mildew).
2. Empty garment pockets and straighten turn-ups such as cus and hems.
3. Hang the garment from a hanger and stretch the fabric slightly with one
hand, making sure there is nothing behind the fabric that could be damaged
by the steam.
4. Put the steam head against the garment and press and move your arm in an
up and down motion, targeting creases on the fabric.
Note: Do not steam over metal accessories. Use with caution when
steaming around metal accessories.

10 11
Steaming Curtains
1. Wash and dry the curtains.
2. Steam when they are hanging.
3. While steaming, stretch the curtains with one hand to help remove creases
more easily.
Steaming Upholstery
1. The garment steamer can be used to kill bacteria, remove odors and freshen
up furniture upholstery, slip covers and cushions.
2. Move the garment steamer over the fabric. Cushions should be removed for
steaming. Allow cushions to dry thoroughly before placing back on furniture.
Maintenance and Care
Cleaning the Steamer Exterior
1. Make sure steamer is o, unplugged and completely cool.
2. Wipe the ironing plate and outer surface with a soft, damp cloth. Water and
a small amount of gentle household soap, such as dishwashing liquid, can
be used on the exterior. Never use heavy-duty cleaner or abrasive scouring
pads that may scratch or discolor the steamer.
3. After the steamer has been thoroughly dried, turn it back on and lightly
steam over an old cloth. This will help remove any residue left in the steam
holes.
4. When nished cleaning, press the power button to turn o the steamer.
Unplug, empty the tank and allow it to cool before storing.
Cleaning Brush Attachments and Accessories
For all accessories, allow to fully dry before using again or storing.
Accessories are not suitable for cleaning in a washing machine.
• Lint brush: Wipe with a damp cloth to clean.
• Soft brush: Wash with cold water and small amounts of gentle cleanser if
needed. The fabric in the brush should not be removed.
Cleaning Water Tank with Vinegar and Water
It is recommended to clean the water tank every two months to reduce
mineral buildup that can aect the performance of the steamer.
1. Remove the water tank, open the rubber water tank cover and ll the water
tank with drops of vinegar and water.
2. Shake the water tank for several minutes until the mineral build up has been
removed.
3. Rinse the water tank with tap water until the vinegar is eliminated.
Warning: Do not heat the steamer with vinegar in the water tank, as this
will damage the steamer.
Storing the Steamer
Once the steamer has been disconnected from the power outlet, allow it to
cool, empty the water from the water tank and clean the tank, fold the steamer
and store it in an upright position on a at surface.

12 13
Troubleshooting
Issue Possible Solution
The steamer does
not heat up.
Check that the power plug is inserted correctly.
Check the power supply.
Check the power button.
The steamer does
not generate steam.
Check the water level and check that the water tank
inlet cover is properly closed.
The steamer has not heated up suciently. Let the
steamer heat up for about 40 seconds before using it.
Press the steam button harder.
Water spills from the
water tank.
Make sure the tank is not overlled.
Make sure the water tank inlet cover is properly closed.
The steamer is
producing a loud
humming or
pumping sound.
Check the water level. If there is no water or the water
level is low, rell the water tank.
The steamer does
not seem to remove
creases easily.
For more dicult wrinkles, try steaming from the
underside of the fabric.
Unsure when to use
the fabric brush.
Use when steaming is touching the fabric too directly.
When steaming delicate fabric, such as silk so as to
reduce the risk of water dripping onto the garment
while steaming.
Avoiding discoloring
of metal accessories
on the garment.
Do not directly hover the steamer over the metal
accessories.
Use caution and steam around the metal accessories.
Specications
Rated voltage (dual voltage)
For US: AC110-120V/220-240V 50/60Hz
830-1100W/900-1100W
For UK/EU: AC 100-127V 50/60Hz 750-1220W or
AC 220-240V 50/60Hz 900-1100W
Water tank capacity: 100ml (3.4 .oz)
Disposal
Disposal of the appliance
Under no circumstances should you dispose of the appliance in
normal domestic waste. This product is subject to the provisions of
European Directive 2012/19/EU.
Dispose of the appliance via an approved disposal company or your municipal
waste facility. Please observe currently applicable regulations. Please contact
your waste disposal center if you need any further information.
The appliance’s packaging is made from environmentally friendly
material and can be disposed of at your local recycling plant.

Customer Service/Kundenservice/Service Clients
Atención al cliente/Assistenza Clienti/ カスタマーサービス
US
To ensure speedy handling of your
issue, please call or email us for
assistance.
Phone: +1 909-391-3888
(Mon-Fri 9:00am - 6:00pm PST)
Email: ushelp@1byone.com
UK
To ensure speedy handling of your
issue, please call or email us for
assistance.
Phone: +44 158 241 2681
(Mon-Fri 9:00am - 6:00pm UTC)
Email: [email protected]om
FR
Pour vous assurez une assistance
rapide en cas de problème, veuillez
envoyer un e-mail.
Email: euhelp@1byone.com
IT
Per supporto immediato in caso di
bisogno, la invitiamo a contattarci via
email.
Email: euhelp@1byone.com
CA
To ensure speedy handling of your
issue, please email us for assistance.
Email: cahelp@1byone.com
DE
Für eine zügige Bearbeitung ihres
Problems, melden Sie sich bei uns
wie folgt.
Email: euhelp@1byone.com
ES
Para garantizar una rápida atención
de su problema, favor envíenos un
email para ayudarle.
Email: euhelp@1byone.com
JP
お客様の問題が直ちに解決され
るため、ぜひメールにて弊社ま
でご連絡ください。
Eメール:jphelp@1byone.com
Table of contents
Other Beautural Steam Cleaner manuals