Beautural 722UK-0001 User manual

名称 722NA-0001 722UK-0001 挂烫机 HJ-3000 天蓝色
说明书
颜色 封面四色、内页单黑
尺寸 148X210mm
工艺 封面哑胶
材质 封面铜版纸 128g、书写纸 80g
折叠方式 见折叠图
日期 20180508 设计 Jessica
折叠图
骑马钉

HANDHELD GARMENT STEAMER
Instruction Manual
1byone Products Inc.
1230 E Belmont Street, Ontario, CA 91761
Customer Service: +1 909-391-3888
www.beauturalglobal.com

1
Introduction
Thank you for purchasing BEAUTURAL Handheld Garment Steamer.This
instruction manual contains important information about safety, usage,
and disposal. Use the product as described and keep this manual for
future reference. If you sell this steamer or pass it on, also give this manual
to the new owner.
Safety Instructions
• This steamer should not be used by children. Only allow dependents to
use the steamer when under proper supervision.
• The voltage of the power source must be compatible with the voltage
displayed on the rating plate of this steamer.
• Never place heavy or sharp objects on the steamer's power cable.
• All cables should be positioned so they cannot be tripped over or
become obstructions.
• It is recommended to not plug in any other appliances into the same
circuit when the garment steamer is in use to avoid overload.
• If the supplied power cord is damaged, it should be replaced by a
qualified technician.
• Do not expose the steamer to humidity and or use it outdoors.
• Only fill the water tank with tap or distilled water. Other liquids may
damage the steamer.
• Do not put any additives in the water tank.These can damage the steamer.
• Never leave the steamer unattended when it is hot, switched on, or
connected to power.
• Do not use the steamer if it has fallen from a high place, or if there are
visible signs of damage or leakage.
• The garment steamer provides a thermal safety fuse to protect it from
over-heating. However, the steamer should not be left unattended
while it is connected to power.Take care when there are children in the
vicinity of the steamer.
• Never use the steamer on clothes that are being worn. Never direct the
steamer towards people or animals.
• There may be leakage from the steam head if the steamer's temperature
is not high enough to vaporize water and generate steam.Therefore,
make sure the steamer is always preheated for 2-3 minutes before use.

2 3
• Always unplug the steamer before attaching or detaching the
attachment brush.
• Only use officially provided attachments and accessories.
Appliance Description
A
B
C
D
E
F
G
H
I
J
K
L
A. Steam Head
B. Steam Trigger with Built-in
Continuous Steam Switch
C.Water Tank Release Button
D.Water Tank (removable)
E. Power Indicator Light
F. Handle
G. Power Button
H. Cord Guard
I. Fabric Brush (removable)
J. Lint Brush (removable)
K. Crease Clip (Removable)
L. Measuring Cup
Included Items
1 x Garment Steamer
1 x Fabric brush
1 x Lint brush
1 x Crease Clip
1 x Measuring cup
1 x Instruction Manual
Note: When unpacking the garment steamer, check if you have received
all the items listed.
Before the First Use
When you first use the steamer, some residual water from the testing
might be emitted from the steam head.This is normal and will not affect
the use of the steamer and will disappear quickly.
What Water to Use?
Your garment steamer has been designed to use tap water. If your water
is very hard, it is recommended to use distilled water. Never use water
containing additives (starch, perfume, aromatic substances, softeners, etc.),
or condensation water (for example water from tumble dryers, water from
refrigerators, water from air conditioning units, rainwater).This water contains
organic waste materials or minerals that concentrate under the effect of heat
and cause spitting, brown coloring or premature ageing of your steamer.
Before Use
Unlock and remove the water tank. Open the water inlet cover.
Fill the water tank with untreated tap
water to Max. level. Do not overfill.
Close the water inlet cover.
Push the water tank back into the
steamer until it clicks into place.
Hang your garment on a
clothes hanger.

4 5
Accessories
The fabric brush allows to remove lints, pet hair,
dust, dirt and dander on overcoat and down jacket.
To attach: While the brush and steamer are cool,
align the fabric brush to the steam head and lock it
into position (an audible "click" will be heard when
correctly locked). Keep the pointed side facing
downward.
To remove: Allow the steamer to cool prior to
removing the brush. Put your finger under the
pointed tip and lift it up.
The lint brush allows for use of steam to dry steam
suits, sweaters, wool fabric and plush cloth.
To attach: While the brush and steamer are cool,
align the lint brush to the steam head and lock it
into position (an audible "click" will be heard when
correctly locked). Keep the pointed side facing
downward.
To remove: Allow the steamer to cool prior to
removing the brush. Put your finger under the
pointed tip and lift it up.
The crease clip can be used to press a crease for
pants and skirts. Press the crease clip's trigger and
place the pants or skirts between the crease clip
and steam head. Steam in a downward motion
from top to bottom to press a crease.
To attach: Simply align the crease clip to the steam
head, and lock it into position (an audible "click" will
be heard when correctly locked).
To remove: Put your finger under the bottom of the
clip and lift it up with stress.
Use
Plug in the steamer. Switch on the steamer.
ON
Wait until the light stops flashing
(approximately 45 seconds).When
the light is steady the appliance is
ready to use.
45S
OK
Press the steam button with
the steam brush facing away
from you holding it in a vertical
position.
For continuous steam, lock the steam
trigger by pushing the locker switch
down.To release it, push it up.
For optimal use, move the
steam jets over your garment
from top to bottom.
Use your free hand to keep the
fabric taut and stretched.Steam
the garment with slow, downward
strokes, keeping the head of the
steamer in contact with the fabric.
This steamer is anti-dripping,
meaning it can be used
horizontally to steam garments
on an ironing board.

6 7
Press the On/Off button to switch the
steamer off.
OFF
3 sec.
Unplug the steamer.
Stand the steamer on its base and allow
it to completely cool off before storing.
To avoid mineral buildup,
empty the tank after each use.
Warning: Never steam a garment while
it is being worn.
Warning: Never touch the
soleplate of the steamer.
Note: When the water tank is empty, it is normal to feel or hear the water
pump in the handle.
Standby Mode
1) For your safety, the steamer is fitted with a standby
monitoring system, which is activated automatically
after approximately 8 minutes without using the
steam trigger.
2) The power indicator light flashes to indicate that the
steamer is on standby mode.
3) To reactivate the steamer:
a. Press the power button and wait that the power
indicator light stops flashing.
b. Press the steam trigger to start steaming again.
Steam
Trigger
After Use
Unlock and remove the water tank. Empty the water tank completely.
Return the water tank to its place
on the steamer.
Wait for an hour for your steamer
to cool before storing.
1h
Cleaning
Wait an hour for complete cool
down.
1H
Only use a soft sponge with
water to clean. Do not use any
detergent product.
Never wash or rinse steamer
directly over a sink.

8 9
Troubleshooting
Problems Possible Causes Solutions
There is no
steam.
The steamer is not plugged
in, or not switched on.
Check that your steamer is correctly
plugged in and switched on.
The water level is too low. Unplug your steamer and refill it.
The steam pump has not
been primed.
Press the steam trigger continuously for
a few seconds to begin steaming.
You are using the steamer
for the first time.
Press the steam trigger continuously for
a few seconds to begin steaming.
The water tank is not fully
in place.
Ensure that cover is closed and that the
water tank snaps when put into place.
The steamer is on standby
mode.
Please refer to the "Standby Mode"
section.
Not enough
steam coming
out.
There is not enough water
in the water tank.
Follow the instructions under the “Filling
the Water Tank”section and fill to Max
level.
The steamer is not heated
to full temperature.
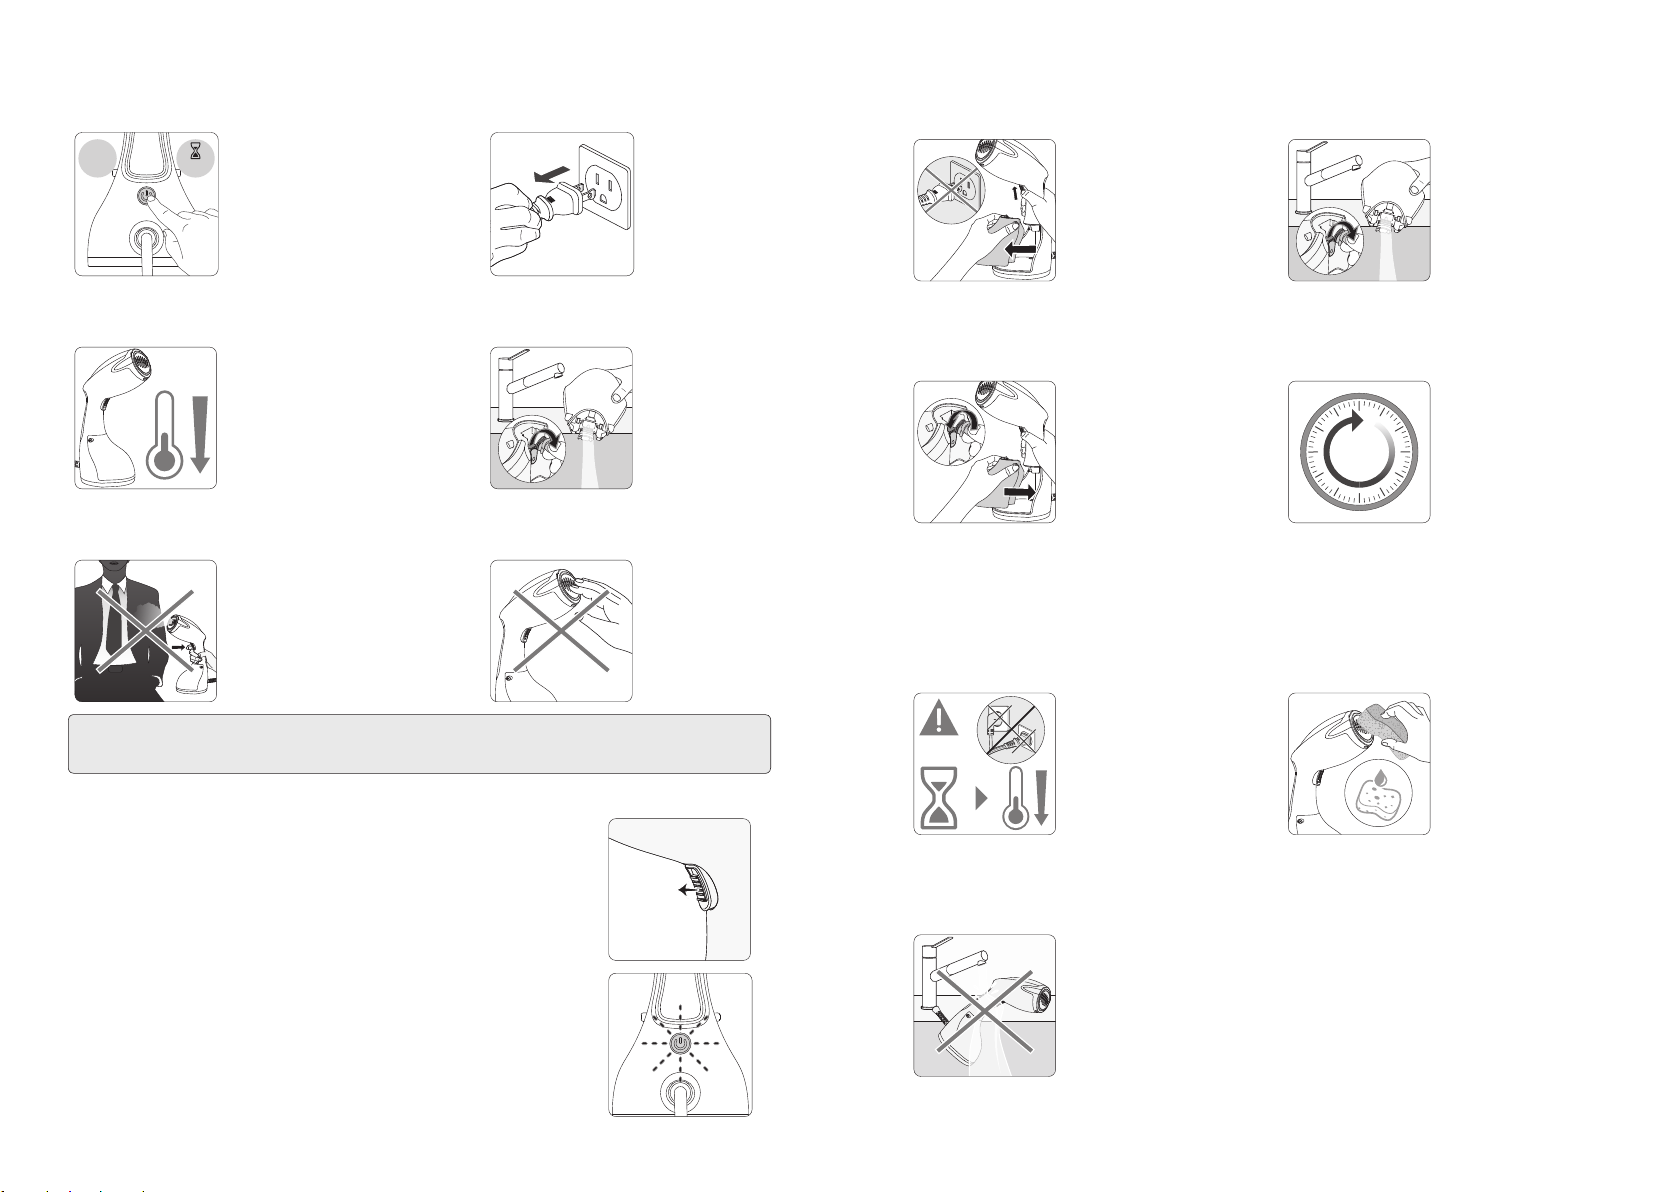
Always allow steamer to preheat at least
45 seconds, or until the power indicator
light becomes solid.
The steamer
does not heat.
It is not plugged in, or not
switched on. Plug in your steamer and switch on.
The steamer is on standby
mode.
Please refer to the "Standby Mode"
section.
Water leaks.
The water tank is not fully
in place or the cover is not
closed properly.
Ensure that cover is closed and that the
water tank snaps when put into place.
There water tank is
overfilled.
Fill the water tank to the Max. level, do
not overfill.
Water spits.
The steamer is not heated
to full temperature before
use.
Before steaming, always allow steamer to
preheat at least 45 seconds, or until the
power indicator light becomes solid.
There is remaining water
after last use which became
condensation water and
stored in the steam head.
After each use, empty the water tank
and power on the steamer to heat the
steamer for about 2 minutes to dry out
any remaining water.
The steam
leaves stains
on the fabric
or the steamer
spits.
You are using water with
additives. Never add any additive in the water tank.
The water in your home
too hard.
Read carefully the“What water to use”
section.
Specifications
Rated voltage:
For US: AC 120V ~ 60Hz
For UK: AC 220-240V ~ 50/60Hz
Rated power: 1200W
Water tank capacity: 0.26 liters (8.8 fluid ounces)
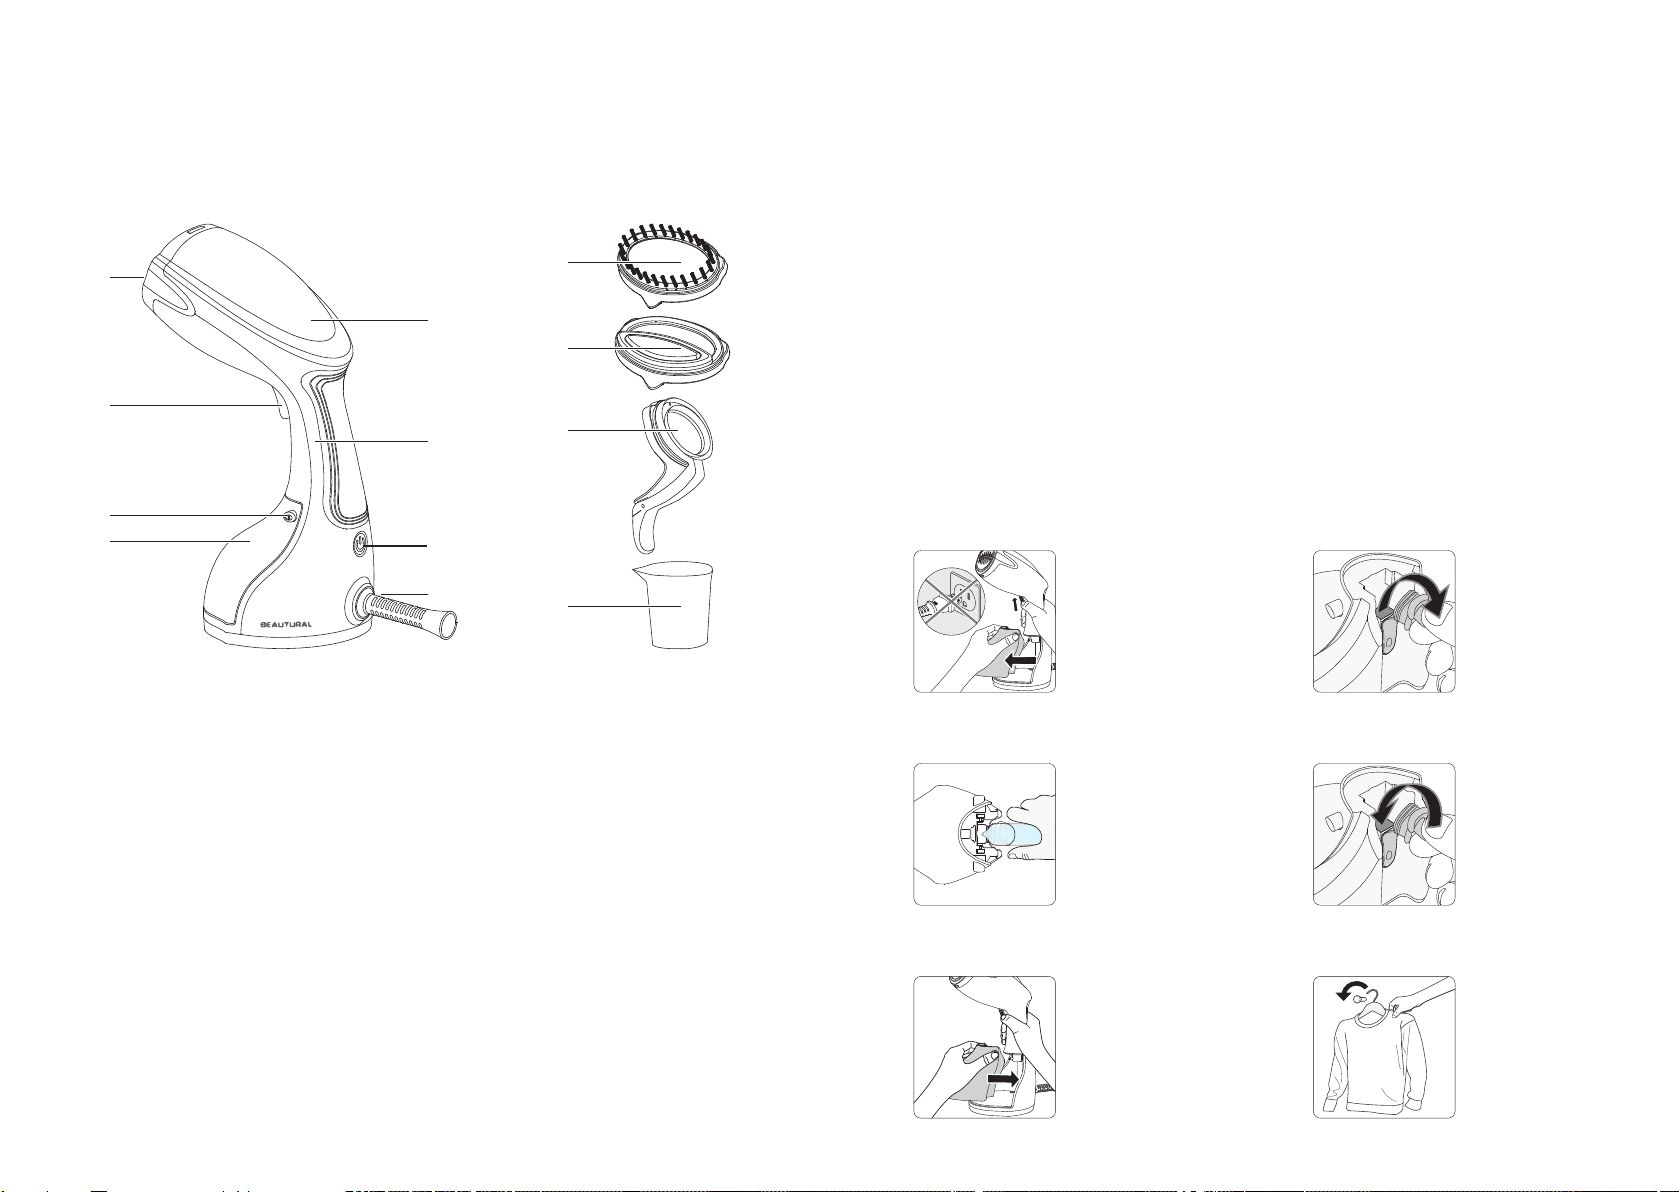
Steaming Tips
To Steam Garments
1. Place the fabric in a dry and ventilated place and at least 20 cm (8
inches) away from any walls (otherwise moisture may cause mildew).
2. Empty garment pockets and straighten turn-ups such as cuffs and
hems.
3. Hang the garment from a hanger and stretch the fabric slightly with
one hand, making sure there is nothing behind the fabric that could be
damaged by the steam.
4. Put the steam head against the garment, pressing and holding the
Steam Activation Button while moving your arm in an up and down
motion, targeting creases on the fabric.
5.When using the steamer without the brush attachment, it is advisable
to keep a distance of at least 5 cm (2 inches) between the steam head
and the garment at first few minutes. Because the temperature of the
stainless steel panel is not very high after the product is preheated,
there will be condensation or even water droplets on the surface of
the panel under normal steaming. If it is directly in contact with the
clothing, there will be some water stain on the garment.
NOTE: Do not steam over metal accessories. Use with caution when
steaming around metal accessories.
WARNING: When using the garment steamer, do not touch the steam
head.This garment steamer will generate a large flow of high temperature
air that can cause burns if not handled carefully.

10 11
Declaration of Conformity
We, the 1byone Products Inc. confirm that the appliance as detailed below
do comply with all essential requirements of the EMC directive 2014/30/
EU and governing EU-regulations as mentioned below.
Article Description: Handheld Garment Steamer
Brand Name: BEAUTURAL
Model Number: 722UK-0001
Governing EU-regulations: RoHS Directive 2011/65/EU
WEEE 2012/19/EU
Applicable Standard(s):
EN 55014-1:2006+A1:2009+A2:2011
EN 55014-2:1997+A1:2001+A2:2008
EN 61000-3-2:2014
EN 61000-3-3:2013
Ray Tang
Department Manager
To Steam Curtains
1.Wash and dry the curtains.
2. Steam when they are hanging.
3.While steaming, stretch the curtains with one hand to help remove
creases more easily.
To Steam Upholstery
1.The garment steamer can be used to kill bacteria, remove odors and
freshen up furniture upholstery, slip covers, and cushions.
2. Move the garment steamer over the fabric, cushions should be
removed for steaming. Allow cushions to dry thoroughly before placing
back on furniture.
Disposal
Disposal of the appliance
Under no circumstances should you dispose of the appliance in
normal domestic waste.This product is subject to the provisions of
European Directive 2012/19/EU.
Dispose of the appliance via an approved disposal company or your
municipal waste facility. Please observe currently applicable regulations.
Please contact your waste disposal center if you need any further
information.
The appliance’s packaging is made from environmentally friendly
material and can be disposed of at your local recycling plant.

Customer Service/Kundenservice
Service Clients/Atención al cliente/Assistenza Clienti
US
To ensure speedy handling of your
issue, please call or email us for
assistance.
Phone: +1 909-391-3888
(Mon-Fri 9:00am - 6:00pm PST)
Email: ushelp@1byonebros.com
CA
To ensure speedy handling of your
issue, please email us for assistance.
Email: cahelp@1byonebros.com
UK
To ensure speedy handling of your
issue, please call or email us for
assistance.
Phone: +44 158 241 2681
(Mon-Fri 9:00am - 6:00pm UTC)
Email: [email protected]
DE
Für eine zügige Bearbeitung ihres
Problems, melden Sie sich bei uns
wie folgt.
Email: euhelp@1byonebros.com
FR
Pour vous assurez une assistance
rapide en cas de problème, veuillez
envoyer un e-mail.
Email: euhelp@1byonebros.com
ES
Para garantizar una rápida atención
de su problema, favor envíenos un
email para ayudarle.
Email: euhelp@1byonebros.com
IT
Per supporto immediato in caso di
bisogno, la invitiamo a contattarci
via email.
Email: euhelp@1byonebros.com
Other manuals for 722UK-0001
1
Table of contents
Other Beautural Steam Cleaner manuals