bemodern BM06 Operating instructions

(Model BM06 - Elec) 2kw Electric Heater Fire
User / Installation instructions
These instructions should be read carefully and retained for future reference.

CONTENT
Important Notes………………………………………………………………………………..…..3
Technical Specification……………………………………………………………………….….4
Parts List……………………………………………………………………………………….…..…..5
Fire Installation…………………………..………………………………………………….………6 - 7
Operation by Manual Control…………………………………………………………………8
Operation by Remote Control…………………………………………………………………9 - 16
Electric Fire Guarantee…………………………………………………………………………..17

IMPORTANT NOTES
For indoor use only
This appliance is not suitable for use outside the house and only suitable for well insulated
spaces or occasional use.
This heater must not be located immediately below a fixed socket outlet.
Do not use the heater in the immediate surrounds of a bath, a shower, or a swimming
pool.
Do not cover this heater, or obstruct the air inlet or outlet, otherwise there is a risk of
overheating.
The heater must be cooled down completely before any maintenance.
This heater must be fixed against a vertical surface.
After unpacking, please make sure that the appliance is intact, with no signs of damage
caused by transport. If in doubt, do not use the appliance and contact the Service Centre.
During normal operation this appliance will emit noise from the internal fan unit.
If the supply cord is damaged, it must be replaced by the manufacturer, its service agent
or similarly qualified persons in order to avoid a hazard.
The meaning of this figure shown on the front of the appliances is WARNING:
“DO NOT COVER”.
Children should be supervised to ensure that they do not play with the appliance or
remote control.
Children of less than 3 years should be kept away unless continuously supervised.
Children aged from 3 years and less than 8 years shall only switch on/off the appliance
provided that it has been placed or installed in its intended normal operating position
and they have been given supervision or instruction concerning use of the appliance in a
safe way and understand the hazards involved.
Children aged from 3 years and less than 8 years shall not plug in, regulate and clean the
appliance or perform user maintenance.

This appliance can be used by children aged from 8 years and above and persons with
reduced physical, sensory or mental capabilities or lack of experience and knowledge if
they have been given supervision or instruction concerning use of the appliance in a safe
way and understand the hazards involved. Cleaning and user maintenance shall not be
made by children without supervision. Do not use this appliance in small rooms when they
are occupied by persons not capable of leaving the room on their own, unless constant
supervision is provided.
Children and vulnerable people must be supervised at all times when using this appliance,
as some parts can become very hot.
Do not use this appliance as a primary heat source.
Ensure that furniture, curtains and other combustible materials are positioned no closer
that 1m from the front of the fire.
If this fire is supplied through an extension cable, please ensure that it is the only
appliance plugged into the extension and that the instructions for the extension cable /
reel are followed.
CAUTION: In order to avoid a hazard due to inadvertent resetting of the thermal cut out,
this appliance must not be supplied through an external switching device, such as a timer,
or connected to a circuit that is regularly switched on and off by the utility.
This appliance must be positioned so that the plug / fused spur is accessible.
In the event of a fault please disconnect the fire from the mains supply.
Warning: This appliance must be earthed
TECHNICAL SPECIFICATION
Model NO.: BM06 Elec
Supply Voltage: AC220V-240V 50Hz
Maximum power consumption: 2KW
Heat Output:
Nominal heat output (Pnom): 2KW
Minimum heat output(indicative) (Pmin): 1KW
Maximum continuous heat output (Pmax): 2KW
Auxiliary Electricity Consumption:
At nominal heat output (elmax): 12.5W
At minimum heat output (elmin): 12W
In standby mode (elSB): 0.36W
Type of heat output / room temperature control
Other control options
Room temperature control, with presence detection
no
Room temperature control, with open window detection
yes
With distance control option
no
With adaptive start control
yes
With working time limitation
no
With black bulb sensor
no
Two or more manual stages, no room temperature control
no
With mechanic thermostat room temperature control
no
With electronic room temperature control
yes
Electronic room temperature control plus day timer
yes
Electronic room temperature control plus week timer
yes

PART LIST
Please unpack carefully ensuring that any loose parts and all packing items are
removed. Read any warning labels carefully (see Maintenance Section). Place
waste packaging back into box and dispose of RESPONSIBLY
1.Screws
4pcs
2.Instruction Manual
1pc
3.Remote Control
1pc
4.AAA battery
2pcs

FIRE INSTALLATION
Before You Start
● The appliance Data Plate is located Underneath the Heater box–Disconnect from the
mains supply before removing the Glass as described in the maintenance section.
● Required for installation:4 off screws and plugs suitable for the wall media (Not
supplied).
● The surround/appliance must be positioned so that plug (fused spur) is accessible. Only
when you are certain that you have completed the installation should you plug in and
switch on at the wall socket.
● This fire should not be installed into an open/existing fireplace without the opening
being professionally blanked off to reduce the risk of a back draught, which could cause
the safety cut-out to operate.
● Check that the supply voltage details on your flame effect fire are in accordance with
your electrical supply. Your fire is fitted with a plug incorporating a 13 Amp fuse. In the
event of replacing the fuse in the plug supplied, a 13 Amp fuse approved by ASTA to BS
1362 must be used. Before switching on, please read the following fire installation
instructions.
● In the event of any problems please contact: Be-Modern Helpline on 0191 430-0901.
Recommended Suite Installation Dimensions
Installation
●Ensure that the mains power is isolated to the fire plug / socket point.
(unit: mm)
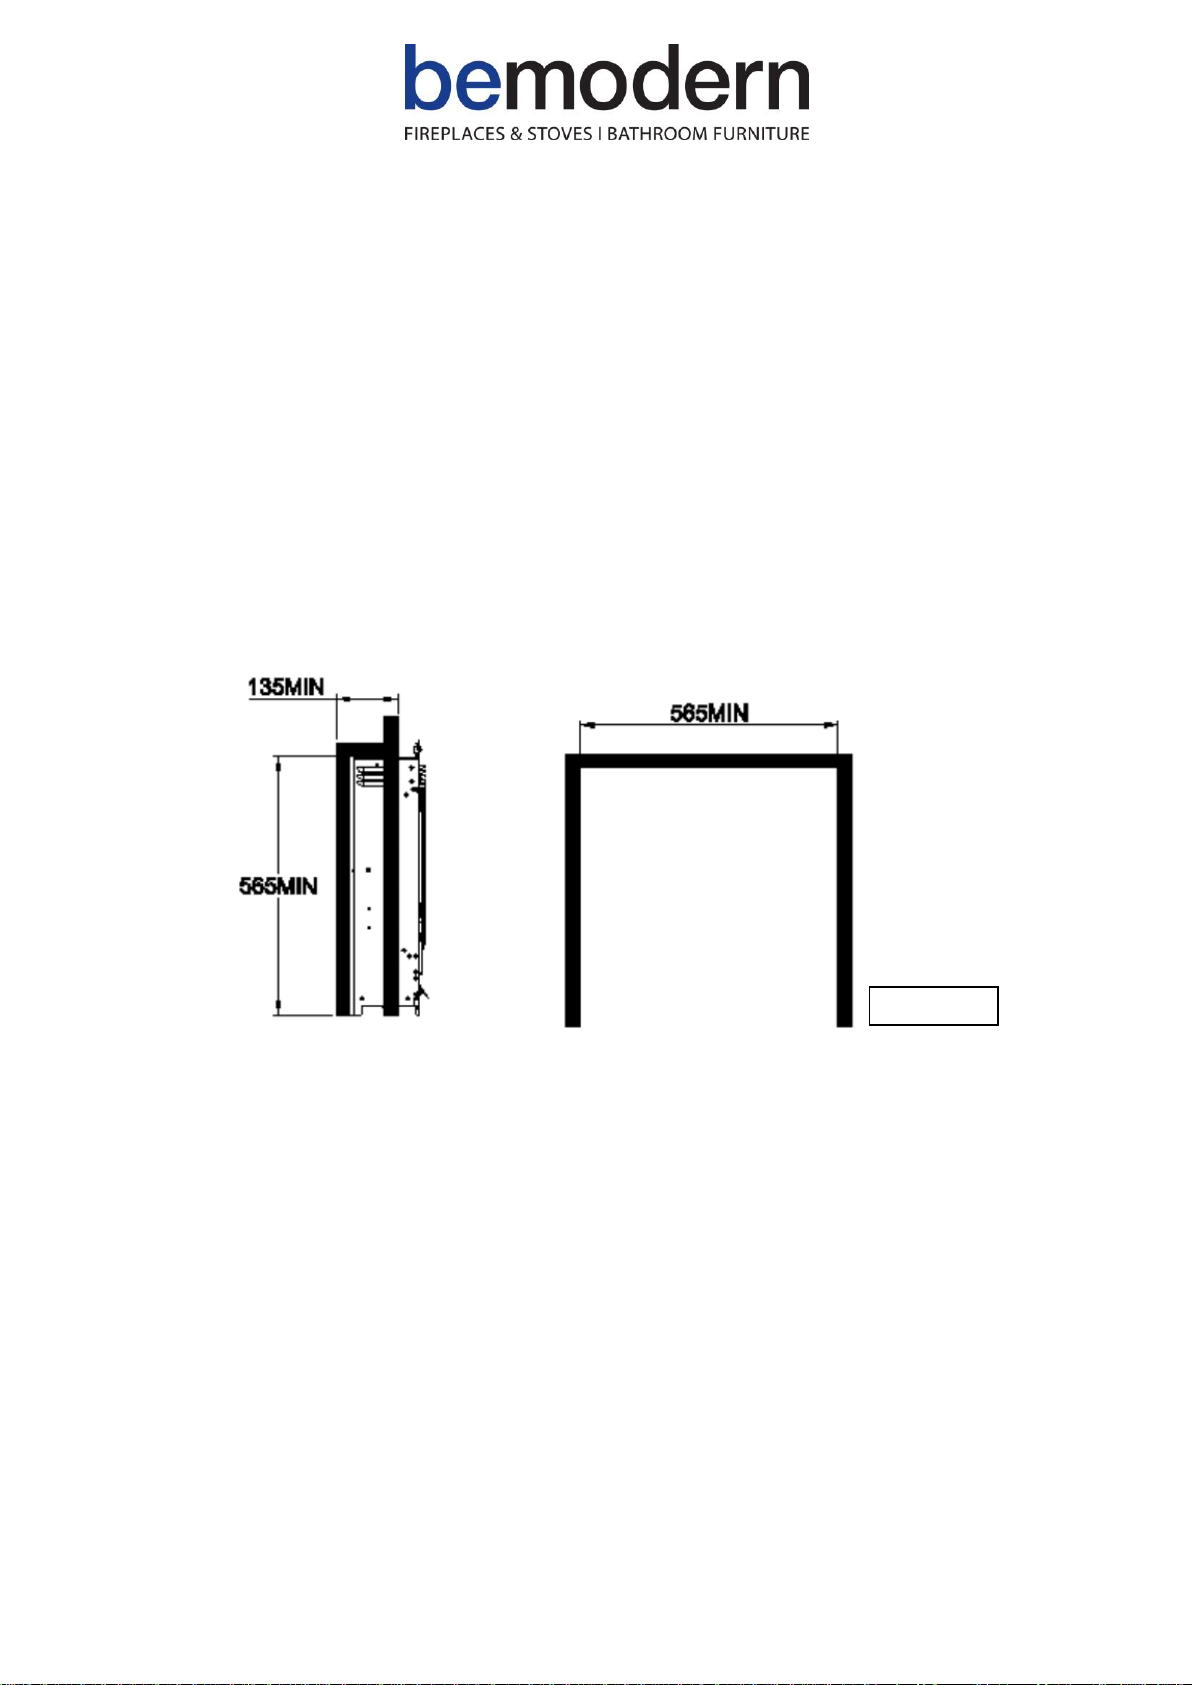
●Offer the fire into the opening, swinging in the
appliance as shown.
●Mark on the wall the positions of the fixing points on the side flanges of the fire.
●Remove the fire from the opening.
●Drill and plug the wall holes using suitable fixings.
●Connect the fire to the plug / socket.
●Offer the fire back into the opening and using suitable screws fix the fire in position.
●Fit the trim to the magnets provided on the fire.
●Restore power to the plug / socket.
(unit: mm)
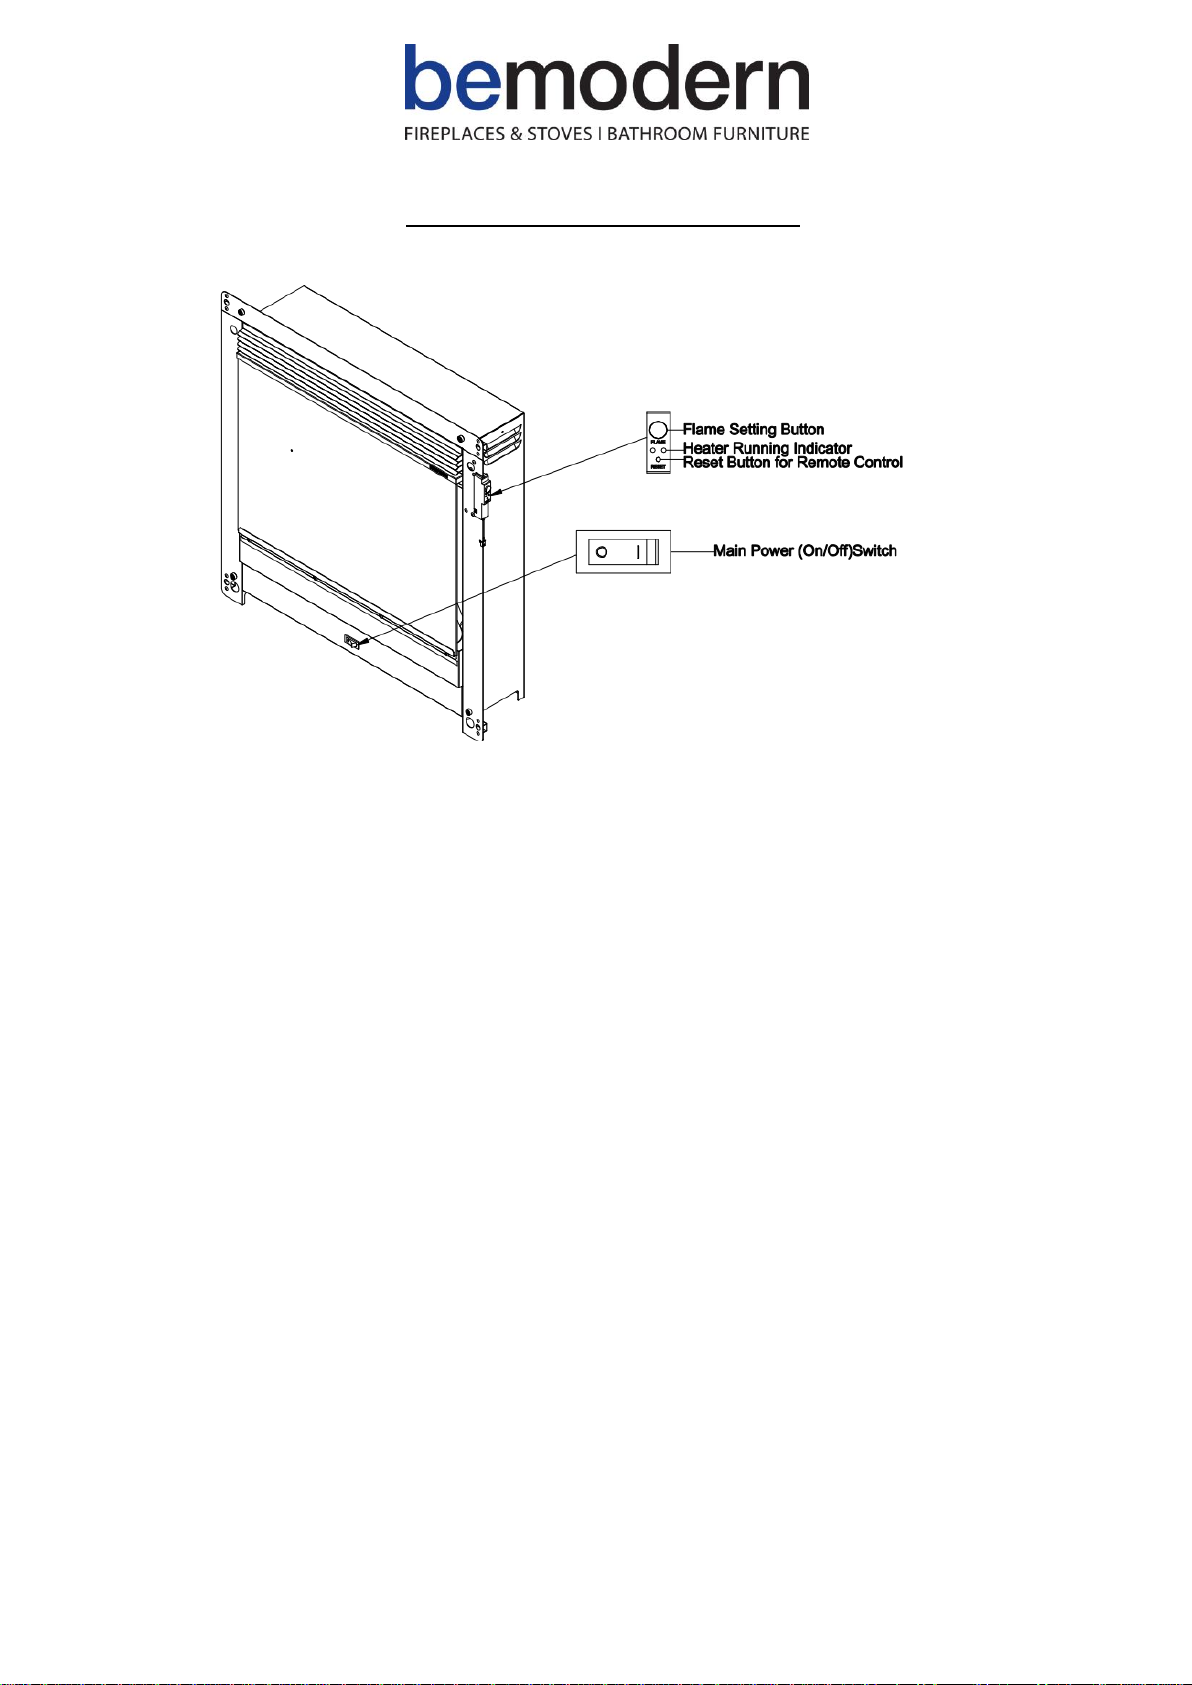
OPERATION BY MANUAL BUTTON
MAIN POWER (ON / OFF) SWITCH: The main switch is on the bottom front of product, and
it supplies power to all of the functions of the fireplace. This switch must be in the “ON”
position for any of the functions including the remote to work.
FLAME SETTING BUTTON: By pressing the FLAME button, the unit will cycle through four
flame effect settings (high, medium, low and off)
HEATER RUNNING INDICTOR: If the appliances heater is on and the flame and mood light
are simultaneously turned off, the heating running indicator light will stay on. If the
appliances heater is on and the flame or mood light is turned on, the heating running
indicator will be extinguished after 10 seconds.
RESET BUTTON FOR REMOTE CONTROL: If the appliance operates wrongly or the appliance
cannot be controlled by the remote, it might be necessary to reset the communication
between the remote and the appliance. See section OPERATION BY REMOTE CONTROL-
R32 for more details.
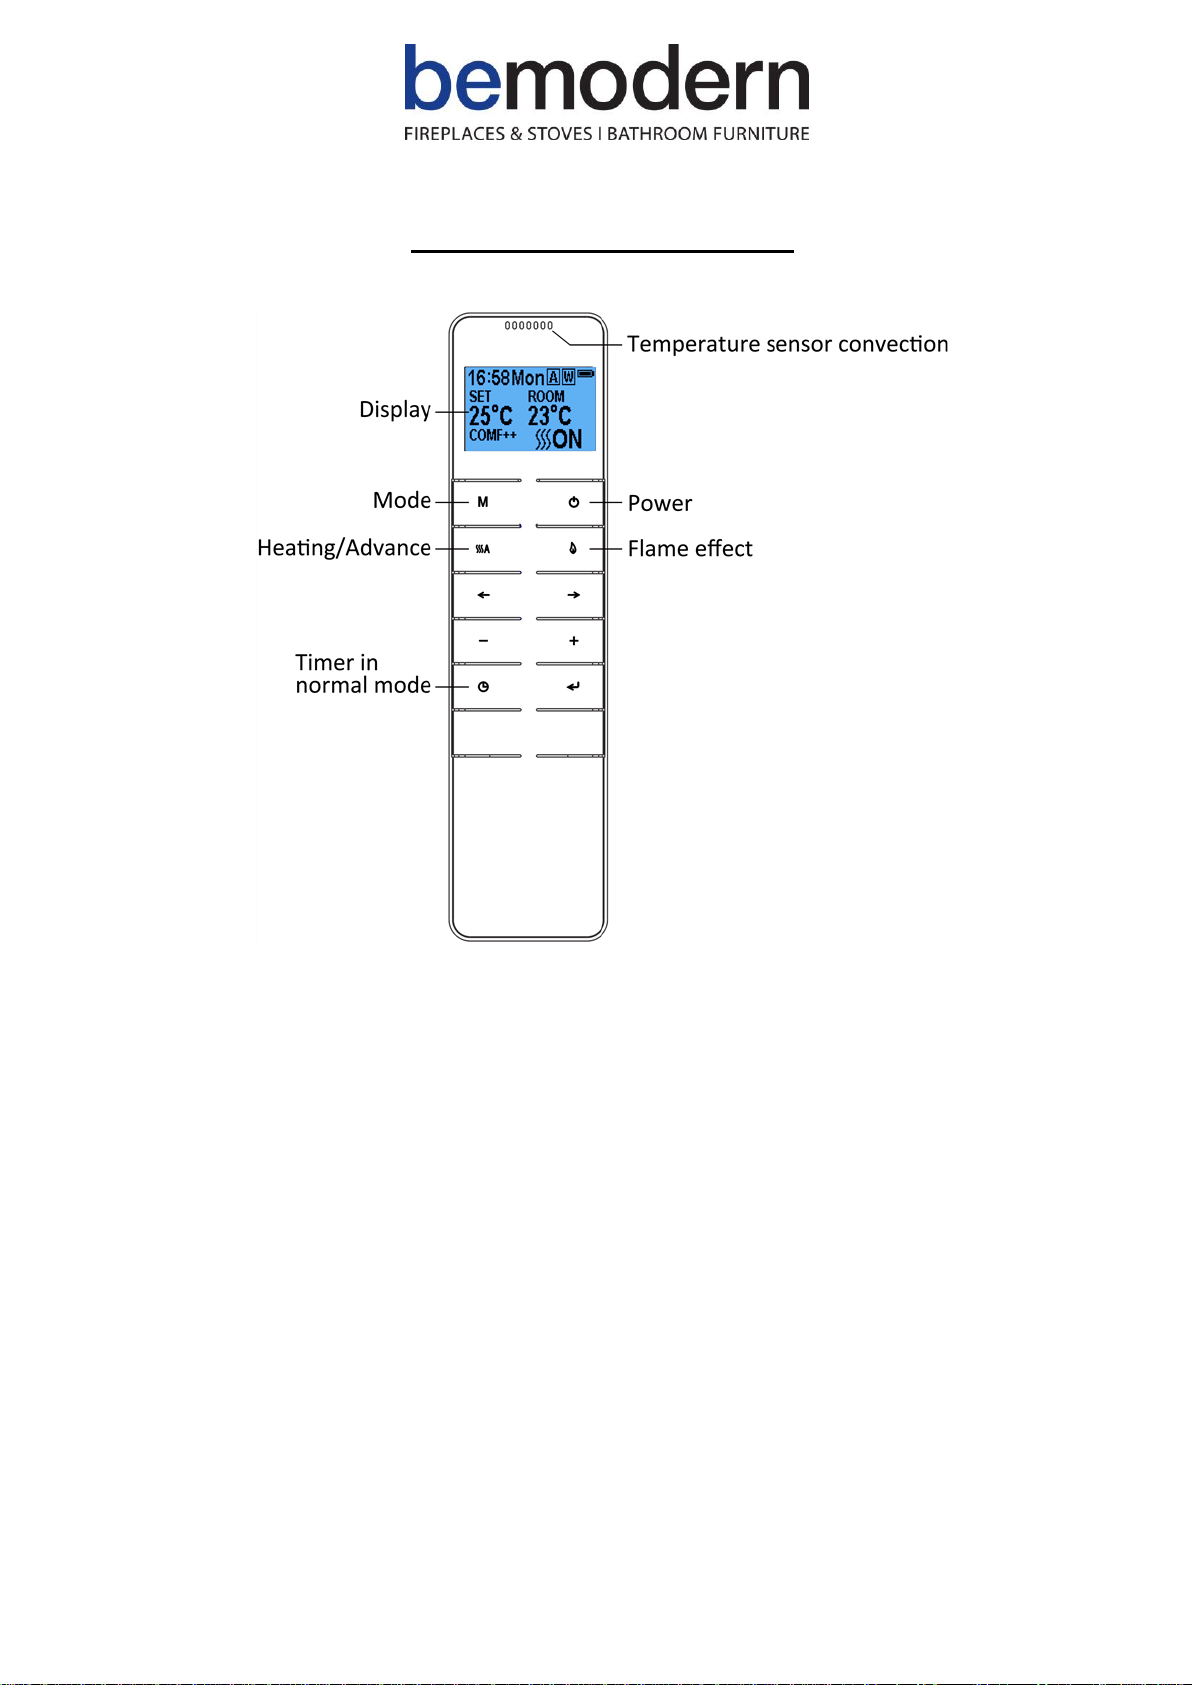
OPERATION BY REMOTE CONTROL
NOTE: This is thermostatic remote control. The remote should be in the same room as
fireplace and placed on a flat surface. It must be placed away from the fire to prevent
the hot air affecting the thermostatic reading.
The communication frequency between the fire and remote has already been set up. If
you cannot use the remote with the fire, please follow Step. R31 Setting up the
communication between the remote and appliance.
Other manuals for BM06
1
Table of contents
Other bemodern Electric Heater manuals

bemodern
bemodern 1471 User manual

bemodern
bemodern Elec BM06 Operating instructions

bemodern
bemodern 1434 User manual

bemodern
bemodern 1174 User manual

bemodern
bemodern 1640 User manual

bemodern
bemodern 1174 Installation instructions

bemodern
bemodern BM06 Operating instructions

bemodern
bemodern 1122 User manual

bemodern
bemodern 1434 User manual


