manuals.online logo
Brands
  1. Home
  2. •
  3. Brands
  4. •
  5. Beninca
  6. •
  7. Receiver
  8. •
  9. Beninca RR.1WBP User manual

Beninca RR.1WBP User manual

L8542099
Rev. 09/05/00
RR.1WBP/RR.2WBP
RR.1WIP/RR.2WIP
RR.1EBP/RR.2EBP
RR.1EIP/RR.2EIP
RR.1AIP/RR.2AIP
Radioricevitori 30,875MHz/306MHz/433,92MHz mono/bicanale
30.875MHz/306MHz/433.92MHz single/dual channel radio receivers
1-/2-Kanal-Funkempfänger 30,875MHz/306MHz/433,92MHz
Récepteurs radio 30,875 MHz/306 MHz/433,92 MHz mono/bicanal
Radiorreceptores 30,875MHz/306MHz/433,92MHz mono/bicanal
Odbiorniki radio 30,875MHz/306MHz/433,92MHz jedno/dwukanałowe
Manuale istruzioni
Operating instructions
Betriebsanleitung
Livret d’instructions
Manual de instrucciones
Książeczka z instrukcjami
UNIONE NAZIONALE COSTRUTTORI
AUTOMATISMI PER CANCELLI, PORTE,
SERRANDE ED AFFINI
3
3
RR.1WIP
RR.2WIP
RR.1EIP
RR.2EIP
RR.1AIP
RR.2AIP
*solo RR.2WIP/RR.2EIP/RR.2AIP
*only RR.2WIP/RR.2EIP/RR.2AIP
*nur RR.2WIP/RR.2EIP/RR.2AIP
*uniquement RR.2WIP/RR.2EIP/RR.2AIP
*sólo RR.2WIP/RR.2EIP/RR.2AIP
*tylko RR.2WIP/RR.2EIP/RR.2AIP
P
LED














�
�



*
4
5
1 2 3 4 5 6 7 8
LED
P














�
�

*
RR.1WBP
RR.2WBP
RR.1EBP
RR.2EBP
*solo RR.2WBP/RR.2EBP
*only RR.2WBP/RR.2EBP
*nur RR.2WBP/RR.2EBP
*uniquement RR.2WBP/RR.2EBP
*solo RR.2WBP/RR.2EBP
*tylko RR.2WBP/RR.2EBP
8
9
ENGLISH
30.875MHz/306MHz/433.92MHz single and dual channel
programmable code radio receivers.
Available in the versions shown in the table below:
Model
N° Channels
Frequency (MHz) Housing
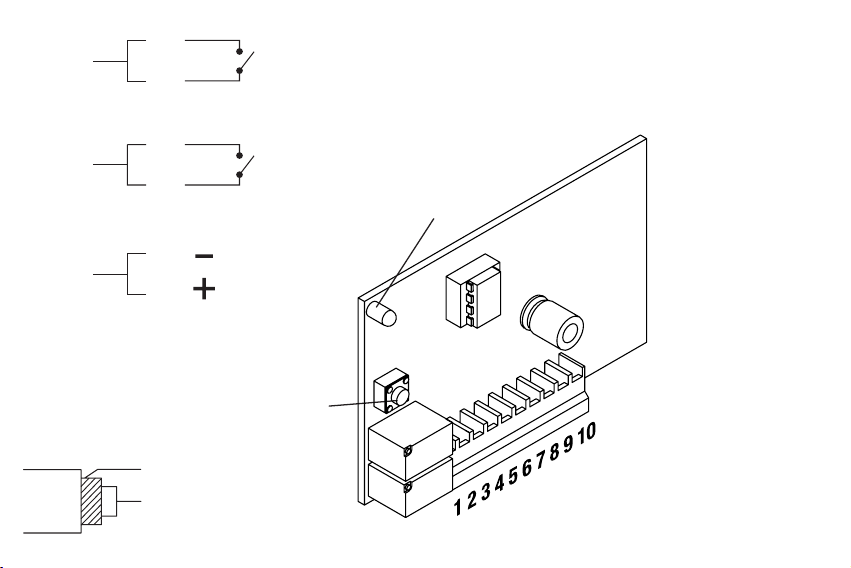
RR.1WIP 1 433.92 Molex Socket
RR.2WIP 2 433.92 Molex Socket
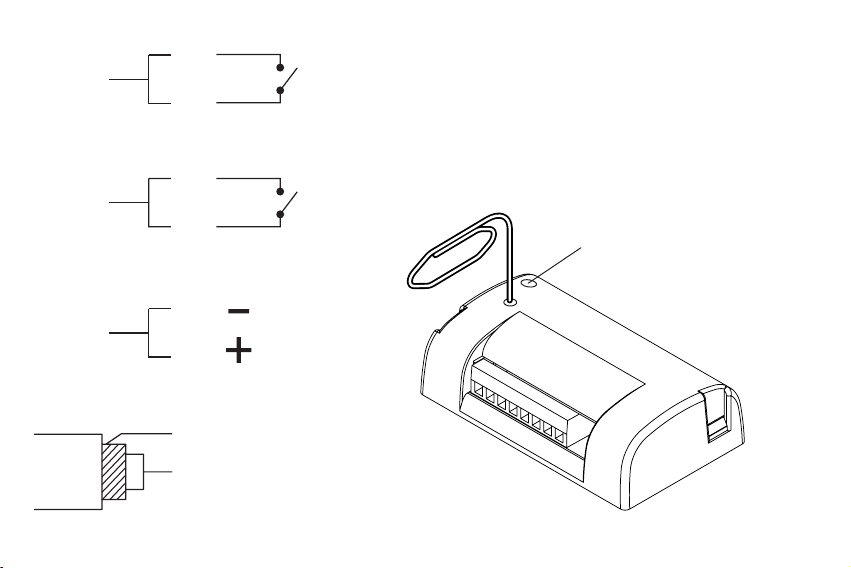
RR.1WBP 1 433.92 Plastic Box
RR.2WBP 2 433.92 Plastic Box
RR.1EIP 1 30.875 Molex Socket
RR.2EIP 2 30.875 Molex Socket
RR.1EBP 1 30.875 Plastic Box
RR.2EBP 2 30.875 Plastic Box
RR.1AIP 1 306* Molex Socket
RR.2AIP 2 306* Molex Socket
*only for non-EEC markets
The standard memory can hold a maximum of 16 fixed code
transmitters with different codes. A full memory is indicated by
10 Orange blinks.
Note
To optimise reception install the antenna away from metal
bodies and avoid positioning several receivers next to each
other. If no antenna is used reception will be considerably
reduced.
Memorising transmitters – Simplified procedure
To merely record one or more transmitters to activate the first
channel, follow this simplified procedure:
1 Press and release the button P on the receiver.
2 The Red LED will light up for 3 secs, then go out for 1 sec and
then light up again for 5 secs.
3 While the red LED is on, press the button on the transmitter
to associate with channel 1.
4 Other transmitters can be then be recorded by pressing a
button within 5 secs from recording the previous transmitter.
5 To end wait 5 secs, the receiver will exit programming.
Resetting the memory
Cut off the power to the receiver. Press and keep pressed the
button P. Restore the power keeping the button P pressed.
The LED will light up red, after 5 secs it will blink rapidly
alternating green-red, release the button. Wait for the LED to go
out. The memory is now completely erased.
Programming
Transmitters can be memorised and separate channel modes
can be set using the button “P” (see Fig.1/2).
To go from one programming mode to the next press the button
P within 3 secs from one press and another.
Once having selected a programming mode, wait for about 3-4
secs and a LED signal with indicate that programming has been
entered (see “Operations” column).
Table 1 lists the various programming modes.
10
11
TABLE 1
Mode LED Function Operations
0 Off No function Normal status.
Press the button P
1 Red Memorise channel 1
The red LED will light up, wait 3 secs, the LED will go out and light up again,
press within 5 secs the button on the transmitter to associate with channel 1.*
Press within 3 secs the button P
2 Green Memorise channel 2 (only for
dual channel receivers “RR.2”)
The green LED will light up, wait 3 secs, the LED will go out and light up again,
press within 5 secs the button of the transmitter to associate with channel 2.*
Press within 3 secs the button P
3 Orange
Memorise automatically
channels 1 and 2
(only for dual channel receivers
“RR.2”)
The orange LED will light up, wait 3 secs, the LED will go out and light up
again, press within 5 secs any button on the transmitter.
Button 1 will be associated with channel 1, button 2 with channel 2.*Il tasto 1
verrà associato al canale 1, il tasto 2 verrà associato al canale 2.*
Press within 3 secs the button P
4Red
Blinking Set channel 1 times
The LED will give 5 rapid blinks. If button P is pressed during these 5 blinks
the next mode is entered. After the 5 rapid blinks the Times menu is entered.
See section “Times Mode”
Press within 3 secs the button P
5Green
Blinking
Set channel 2 times
(only for dual channel receivers
“RR.2”)
The LED will give 5 rapid blinks. If button P is pressed during these 5 blinks
the next mode is entered. After the 5 rapid blinks the Times menu is entered.
See section “Times Mode”
Press within 3 secs the button P
0 LED Off No function Normal status.
10
11
* After pressing the button on the first transmitter the receiver will
wait 5 secs to memorise another transmitter.
In this way all the transmitters being associated with one channel
can be recorded in sequence. After the 5 secs the receivers exits
the programming mode. When using this method of recording in
sequence it is best to temporarily remove the antenna thereby
reducing the receiver’s range and limiting disturbance.
N.B.: Once a programming mode has been entered, other modes
cannot be accessed.
When programming several functions complete one programming
sequence, indicated by the LED going out, and restart with a new
programming mode.
Times Mode
This function is only necessary when one of the two channels
has to be set to be timed (from 1 sec to 10 min) or with bistable
operation. The pulse operating mode is set by default (1 sec
switching).
To set the times enter mode 4 (for channel 1) or mode 5 (for
channel 2) and wait until the end of the 5 rapid blinks.
The Times submenu is described in table 2 below.
TABLE 2
Mode LED Function Operations
11
rapid blink Set pulse mode If the P button is not pressed within 5 secs the channel is reset to the default
pulse mode (1 sec switching).
Press the button P for at least 2 secs
22
rapid blinks
Select switching time
If the P button is not pressed within 5 secs the LED will start blinking at a rate
of 1 blink/sec until the button P is pressed.
The number of blinks counted before pressing the P button selects the
switching time, as shown in table 3.
Press the button P for at least 2 secs
33
rapid blinks
Set
Bistable mode
If the P button is not pressed within 5 secs the channel is set to the bistable
mode: the relay changes status on each pulse.
Press the button P for at least 2 secs
4 Off No function Normal status.
12
13
TABLE 3
LED Blinks Switching
Time LED Blinks Switching
Time
11s 11 30s 21 1m
22s 12 60s 22 2m
33s 13 1,5m 23 3m
44s 14 2m 24 4m
55s 15 2,5m 25 5m
66s 16 3m 26 6m
77s 17 3,5m 27 7m
88s 18 4m 28 8m
99s 19 4,5m 29 9m
10 10s 20 5m 30 10m
Technical Characteristics RR.1/2WBP - RR.1/2WIP RR.1/2EBP - RR.1/2EIP RR.1/2 AIP
Frequency 433,92 MHz 30,875 MHz 306 MHz
Power supply 21÷28 Vac
12÷28 Vdc
21÷28 Vac
12÷28 Vdc
21÷28 Vac
12÷28 Vdc
Range Without antenna 30m
with antenna 100m
Without antenna 30m
with antenna 100m
Without antenna 30m
with antenna 100m
Channels 1/2 1/2 1/2
Relay contact 1A/24Vdc 1A/24Vdc 1A/24Vdc
Working temperature -20/+70°C -20/+70°C -20/+70°C
Consumption in standby 10 mA 10 mA 10 mA
Consumption ch. 1 or 2 actuated 42 mA 42 mA 42 mA
Consumption ch. 1 and 2 actuated 66 mA 66 mA 66 mA

This manual suits for next models

9

Other Beninca Receiver manuals

Beninca ONE2 WI User manual

Beninca

Beninca ONE2 WI User manual

Beninca SC.RF User manual

Beninca

Beninca SC.RF User manual

Beninca ONE.4WB User manual

Beninca

Beninca ONE.4WB User manual

Beninca RR.4WBP User manual

Beninca

Beninca RR.4WBP User manual

Beninca RR.1WBV User manual

Beninca

Beninca RR.1WBV User manual

Beninca RR.4WBV User manual

Beninca

Beninca RR.4WBV User manual

Beninca LO.R4WCV User manual

Beninca

Beninca LO.R4WCV User manual

Beninca ONE.4WB User manual

Beninca

Beninca ONE.4WB User manual

Beninca ONE2 WI User manual

Beninca

Beninca ONE2 WI User manual

Beninca SC.RF User manual

Beninca

Beninca SC.RF User manual

Beninca CALL User manual

Beninca

Beninca CALL User manual

Beninca CALL User manual

Beninca

Beninca CALL User manual

Beninca LO.R1-2 Series User manual

Beninca

Beninca LO.R1-2 Series User manual

Popular Receiver manuals by other brands

RF-Link WHD-5001 user manual

RF-Link

RF-Link WHD-5001 user manual

Harman Kardon AVR 635 owner's manual

Harman Kardon

Harman Kardon AVR 635 owner's manual

Hamy KT-2418 operation instruction

Hamy

Hamy KT-2418 operation instruction

JVC RX-8010RBK Service manual

JVC

JVC RX-8010RBK Service manual

Fagor Tedi 4000 HD manual

Fagor

Fagor Tedi 4000 HD manual

Yamaha RX-V1800 owner's manual

Yamaha

Yamaha RX-V1800 owner's manual

Sony STR-DE875 Service manual

Sony

Sony STR-DE875 Service manual

Microsoft DVD Movie Playback Kit user guide

Microsoft

Microsoft DVD Movie Playback Kit user guide

Philips LX600 Specifications

Philips

Philips LX600 Specifications

Pyle PT6000CH user manual

Pyle

Pyle PT6000CH user manual

Spektrum AR6410T user guide

Spektrum

Spektrum AR6410T user guide

ok2bwn SUPERFOX 3,5M manual

ok2bwn

ok2bwn SUPERFOX 3,5M manual

Inmarsat EXPLORER 527 user manual

Inmarsat

Inmarsat EXPLORER 527 user manual

Pyle PWPBT67 user manual

Pyle

Pyle PWPBT67 user manual

Denon AVR-X1100W Service manual

Denon

Denon AVR-X1100W Service manual

Nitek EtherStretch Lyte ER8200C Installation and operation manual

Nitek

Nitek EtherStretch Lyte ER8200C Installation and operation manual

Honeywell ADEMCO 5881EN Series installation instructions

Honeywell

Honeywell ADEMCO 5881EN Series installation instructions

Sherwood RD-6105 user guide

Sherwood

Sherwood RD-6105 user guide

manuals.online logo
manuals.online logoBrands
  • About & Mission
  • Contact us
  • Privacy Policy
  • Terms and Conditions

Copyright 2025 Manuals.Online. All Rights Reserved.