Bennett Read Power Up Pet Advanced User manual

USER GUIDE


Thank you for purchasing a BENNETT READ
POWER UP PET ADVANCED vacuum.
Your POWER UP PET ADVANCED vacuum incorporates the latest
technological advances in home cleaning systems. It imitates the
most powerful forces of nature in a sleek, elegant cleaning system
to ensure that your home is easily and properly cleaned.
Your new vacuum is manufactured to a high standard of quality
and is backed by a one year guarantee by Tevo. If you register
your guarantee online within 14 days of purchase, we will extend
the guarantee to 2 years. To activate your extended guarantee visit
www.tevo.co.za, click the “Register guarantee” tab at the top of the
page, then complete the form provided.
Should you need any support from us, please visit
www.tevo.co.za or call 0861 77 88 88.
PLEASE KEEP THIS USER GUIDE IN A SAFE PLACE AND
READ IT CAREFULLY BEFORE USING YOUR BENNETT READ
POWER UP PET ADVANCED VACUUM FOR THE FIRST TIME.
1

IMPORTANT SAFETY INSTRUCTIONS
2
When using an electrical appliance, basic precautions should be observed, including the
following:
To reduce the risk of fire, electric shock, or injury follow these instructions.
WARNING:
!
• For household use only. Only use indoors
• For dry pick-up only. Do not vacuum up any liquids
• Do not use with damaged cord or plug
• Return the appliance to a Tevo Service Centre if it is not working as it should, or has been
damaged in any way
• Do not disassemble or attempt to repair your vacuum cleaner. Return the unit to a certified
Tevo Service Centre for examination and repair
• Do not pull or carry the vacuum by the power cord. Do not use the power cord as a
handle, close door on cord, pull cord around sharp corners or edges, run appliance over
cord, or expose cord to heated surfaces
• Do not unplug by pulling on the power cord. Unplug by grasping the plug
• If the supply electric cord is damaged, it must be replaced by a Tevo Service Centre in
order to avoid danger
• Do not handle the power plug or appliance with wet hands
• Do not expose hair, loose clothing, fingers or body parts to openings or moving parts
• Do not pick up hot or burning objects such as cigarettes, matches or hot ashes
• Do not pick up flammable or combustible materials (lighter fluid, petrol, kerosene, etc.) or
use in the presence of explosive liquids or vapour
• Do not pick up toxic materials (chlorine, bleach, ammonia, drain cleaner, petrol, etc.)
• Do not use appliance in an enclosed space filled with vapours given off by oil based
paints, paint thinners, some moth proofing substances, flammable dust, or other explosive
or toxic vapours
• Not intended for use by persons (including children) with reduced physical, sensory or
mental capabilities, or lack of experience and knowledge
• Young children should be supervised to ensure that they do not play with the appliance
• Unplug from outlet when not in use

3
For operation on a 220-240 volt A.C. 50/60 Hz Power supply only.
NOT FOR COMMERCIAL USE - THIS MODEL IS FOR HOUSEHOLD USE ONLY
IMPORTANT:
!
• Do not put any object into the vacuum openings
• Remove plug from electrical outlet before cleaning or maintaining the appliance
• Do not use for any purpose other than described in this User Guide
• Do not use with any opening blocked. Keep your vacuum and accessories free of dust,
lint, hair or anything else which may reduce airflow
• Keep appliance on a level surface
• Turn off all controls before unplugging
• Take care when cleaning stairs
• Keep your work area well lit
• This appliance is provided with double insulation. Use only identical replacement parts
• Clean all filters regularly
• Do not use with wet filters, or without all filters securely in place
• Pay close attention when working around children and animals
• Store your vacuum cleaner in a cool, dry area
• Use only Bennett Read recommended attachments and spare parts
SAVE THESE INSTRUCTIONS FOR FUTURE REFERENCE

PRODUCT VIEW
4
1. Handle
2. Handle Release Button
3. Handheld Pet Turbo Brush Clip
4. Handheld Pet Turbo Brush
5. Dirt Container Release Button
6. Carry Handle
7. Power On/Off Button
8. Floor Turbo Brush On/Off Power
Button
9. Multi-cyclonic Filters
10. Dirt Container
11. Post-motor filter cover
12. Rotating Floor Turbo Brush
1
5
9
2
4
11
12
3
6
10
19
20

22
5
16
13
21
15
14
13. Integrated Extension Wand
14. Extension Wand Adjustment
Button
15. Quick-release power cord
holder
16. Power cord
17. Wire Reinforced Flex Hose
18. 2-in-1 Pet Upholstery Tool &
Dusting Brush
19. Pre-motor Filter
20. Post-motor Filter
21. Silicone-tipped Crevice Tool
22. Variable Suction Control Slider
23. Flex Hose Attachment Port
24. Large rubber wheels
7
8
23
17
18
24
4

6
Do not plug in your vacuum cleaner until you are familiar with all
instructions and operating procedures.
Before using your vacuum, make sure that the dirt container is in the
locked position and that all filters are in place. Do not operate your
vacuum without all the filters properly secured.
CAUTION:
CAUTION:
!
!
1. Connect the Handle (1) with the
Integrated Extension Wand (13)
2. Stand the vacuum upright and slide
the base of the Integrated Extension
Wand firmly into the opening at the
top of the vacuum body
3. Press the Extension Wand
Adjustment Button (14) to adjust the
height of the Integrated Extension
Wand
1. Attach the Silicone-tipped Crevice
Tool (21) and the 2-in1 Pet
Upholstery Tool/Dusting Brush (18)
to their on-board storage areas
2. Attach the Handheld Pet Turbo
Brush Clip (3) to the front of the
handle
3. Attach the Handheld Pet Turbo
Brush (4) by lining it up with the
hook on the base of the Clip then
pushing it forward to click into
place
Attach handle to vacuum
Attach tools and accessories
ASSEMBLY:
1
1
2
Before plugging the power cord into the electrical outlet, make sure the
power switch on the wall plug is in the ‘off’ position.
Hold the vacuum cleaner firmly by the Handle when starting and during use.
2
3
3

OPERATIONS
7
To lower the Handle, place your foot on one of the
foot icons on either side of the floor head. With your
opposite hand, gently pull the Handle backwards to
lower it to the desired height and for reaching under
low furniture.
Avoid dropping the Handle too low. Always ensure
the Rotating Floor Turbo Brush stays in contact with
the surface you are vacuuming.
To avoid personal injury and to prevent the cleaner from falling when
cleaning stairs, always place it at the bottom of the stairs.
CAUTION:
Before cleaning under low furniture, check the area first for
objects that might harm the unit or block the vacuum hose.
TIP
!
POWER SWITCH
HANDLE POSITIONS
Your vaccum is designed with an Easy-Steer mechanism.
With the Handle leaning backwards, simply twist the
Handle to the left or to the right to turn the vacuum while
moving it backwards and forwards.
1. Press the Power On/Off Button (7)
to switch the vacuum suction on.
Press again to switch it off
2. Press the Rotating Floor Turbo Brush
Button (8) to switch the Rotating
Floor Turbo Brush on. Press again to
switch it off
To use the Flex Hose and accessory attachments, press only the Power On/
Off Button to engage the vacuum suction.
Only press the Rotating Floor Turbo Brush Button when vacuuming floors/
carpets with the Rotating Floor Turbo Brush on the base of the vacuum.
NOTE:
!
1
2
EASY-STEER
VARIABLE SUCTION CONTROL
1. For stronger suction power, close the Variable
Suction Control Slider (22)
2. To reduce suction power for vacuuming delicate
fabrics, open the Variable Suction Control Slider
1 2

8
Your vacuum is not only a powerful carpet and rug cleaner, it is also a versatile above-floor
vacuum cleaner when you select one of the special tools:
• 2-in-1 Pet Upholstery Tool/Dusting Brush:
Use the dusting brush to dust furniture,
blinds, books, lamps, shelves
and baseboards
• Silicone-tipped Crevice Tool:
Use in tight, narrow spaces
• Hand-held Pet Turbo Brush:
Use rotating brush action for small flat
areas such as cushions and beds
Check the vacuum hose or tools
occasionally for obstructions. Hair, string
and small objects can block them.
Tools designed to remove pet hair from
upholstered or carpeted surfaces must not
be used directly on pets.
TIP
NOTICE:
!
1. To move your vacuum cleaner
from room to room, put the handle
in the upright position, tilt the
cleaner back on its rear wheels (24)
and push forward
2. The cleaner can also be moved
by using the carry handle (6)
TRANSPORTING CLEANER
SPECIAL ON-BOARD TOOLS
1
1 2
1. Insert the Flex Hose (17) into the
Flex Hose Attachment Port (23) and
secure the clip
2. Option A: Attach accessory to the
other end of the Flex Hose. After
inserting, twist the accessory slightly
to tighten
3. Option B: Remove the Integrated
Extension Wand (13) from the top
of the machine by pressing the
Adjustment Button (14). Attach the
Flex Hose to the port on the Handle
(1) (Fig 3.1). Then attach accessory
to the end if the Integrated
Extension Wand (Fig. 3.2). You can
also attach accessories directly to
the Handle (Fig. 3.3)
2
3.1
3.2
3.3
9
To maximize your cleaning performance and extend the life of your vacuum, it is very
important that you empty your dirt container and check and clean your filters frequently.
Perform the following maintenance steps:
When using the Handheld Pet Turbo Brush, press down gently and pull
towards you in a raking motion.
Too much pressure will cause the brush to stop rotating.
To reduce the risk of electric shock, turn power switch OFF and
disconnect plug from electrical outlet before performing maintenance
or troubleshooting checks.
To maximize cleaning performance, check and clean or replace
all filters as suggested.
To reduce the risk of injury from moving parts, always move the cleaner with
the carrying handle. Always place vacuum cleaner on the floor with handle
in upright position when using tools. Never place your fingers under the
cleaner when it is running. Never place vacuum foot on furniture or uneven
surfaces. Do not place vacuum cleaner close enough to objects to pull them
into rotating brush.
NOTICE:
WARNING:
TIP
TIP
!
!
CAUTION:
!
!
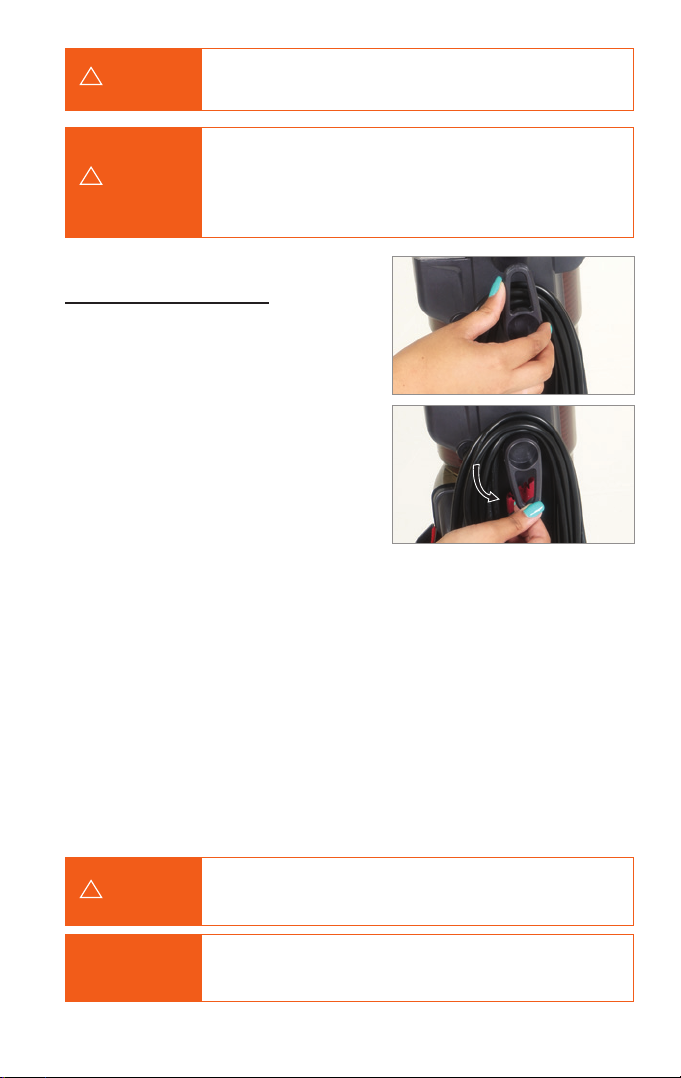
1. To use your vacuum, remove the Power Cord
(16) and plug it into an electrical outlet. For
your convenience, there is a Quick-release
Power Cord Holder (15) for easy storage
and removal. There is also a cord clip that is
located at the back of the Handle to attach
the Power Cord while vacuuming
2. When you are finished vacuuming, switch off
the wall plug and unplug the Power Cord,
then loop the Power Cord around the Cord
Holders. Be sure to first return the top Quick-
release Cord Holder back to its original
position before wrapping the Power Cord
1. Empty the dirt container when the dirt reaches the “Full” line on the container,
or more frequently to prevent overfills. For best performance, empty after each use
2. Check the pre-motor filter and post-motor filters at least twice a month, clean or replace
as needed.
NOTE: More frequent filter cleaning may be necessary if you are vacuuming new
carpet, fine dust, or have allergy concerns. Follow the instructions on the following
pages to perform these simple maintenance steps
POWER CORD USAGE
MAINTENANCE AND CARE

10
The dirt container should to be emptied before the dirt reaches the “Full” line on the container.
1. Unplug the vacuum
from electrical outlet
2. Lift the Dirt Container
(10) from the vacuum
cleaner by pressing
the Dirt Container
Release Button (5)
and pulling the Dirt
Container outwards
3. Hold the Dirt
Container over a dust
bin and press the Dirt
Container Release
Button to release the
bottom lid
4. Shake the Dirt
Container or gently
tap its side to ensure
all dirt and dust is
released into the
dust bin
5. Close the bottom lid
and return the Dirt
Container to the
Vacuum cleaner by
inserting the bottom
part first and then
gently clip the top
back in place
1. Unplug the vacuum
from electrical outlet
2. Pre-motor filter (19):
Remove the Dirt
Container from the
vacuum. Turn the
Lid anticlockwise to
unlock it. Remove the
foam filter and hand-
wash it in cold water
3. Post-motor filter (20):
Remove the Dirt
Container from the
vacuum. The Post-
motor filter is located
in the main body of
the machine under
the Dirt Container.
Turn the Post-motor
Filter Lid anticlockwise
to remove it (Fig.
3.1). Then twist the
Post-motor Filter
anticlockwise to
unlock it (Fig. 3.2)
and remove it from
the machine. Hand-
wash the filter in cold
water
EMPTY DIRT CONTAINER
CLEANING THE PRE-MOTOR
AND POST-MOTOR FILTERS
Emptying the dirt container after every use will help prevent over-filling
and ensure that the vacuum is ready to go the next time you clean.
The pre-motor and post-motor filters may be hand-washed in cold water.
Rinse well and air-dry thoroughly before replacing.
Do not operate cleaner with damp or wet filters or without all filters in place.
NOTE:
NOTE:
WARNING:
!
!
!
2
2.1
3.1
3
2.2
3.2

2
11
You should check your vacuum cleaner’s rotating floor brush and drive belt regularly for wear
or damage. You should also clean the brush and brush ends of string, hair and carpet fibers.
This type of debris can wrap around the brush and hamper its ability to effectively clean your
carpet. Also remove any debris that has accumulated under the brush cover.
CHECK ROTATING FLOOR BRUSH & DRIVE BELT
This product is intended for household use only and not for commercial
or industrial use. Vacuuming of dust from products like plaster, concrete
or ashes will damage the motor and void the guarantee.
To reduce the risk of injury from moving parts, first turn the vacuum cleaner
off and disconnect the power plug from the electrical outlet.
NOTICE:
!
WARNING:
!
1
1. Remove the 2 small rollers with a flat
head screwdriver
2. Remove the 2 screws underneath the
rollers with a Phillips screwdriver
3. Gently lift off the plastic base cover
4. Clean any string, hair and other
debris from the rotating floor brush,
paying particular attention to the
brush ends
5. Clean string, hair and other
debris from the motor pulley and
drive belt areas
6. Check the drive belt carefully
for wear, cuts or stressed areas.
Replace the drive belt if damaged.
See page (15) for spares details
7. Check air passageway for
obstructions. Remove debris
from this area
8. When clean, replace the plastic base
cover, screws and rollers before using
the machine
4 - 73
Drive belt
Air Passageway
Brush

12
Low suction or poor pick-up may be due to a clog in the vacuum cleaner.
If you notice a change in the sound of the motor, check for clogs.
The Hand-held Pet Turbo Brush should be checked regularly for blockages or debris wrapping
around the brush.
1. Remove the Pet Turbo Brush (4) from the hose
or from the on-board storage clip
2. Gently unclip the top transparent cover by
releasing the 2 holding tabs on either side of
the Turbo Brush. Do not use excessive force
which might damage the cover
3. Remove the turbine, belt and brush and
clean debris. Take note of the assembly
so that you can reverse the process to
reassemble when clean
4. Reposition the transparent top cover and clip
back into place
1. Unplug the vacuum from electrical outlet
2. Empty the Dirt Container (10)
3. Check upper tank for build up or blockages
4. If you notice blockages in the upper tank, remove the inner cyclone
(see page 13 “Cleaning the upper tank”)
5. Check the hose and wand for blockages
6. If the clog persists, follow the instructions for “Checking the
rotating floor brush and drive belt” on pages 11 and inspect the
air passageway for obstructions
MAINTAINING HAND-HELD PET TURBO BRUSH
CLEARING CLOGS
2
2
3

13
1. Remove the lid of the Dirt Container (10) by twisting the lid
to the “unlock” position. Remove the Pre-motor Filter (19)
2. Separate the Dirt Container (10) and Multi-cyclonic Filter
assembly (9)
3. Wipe the inside of the Dirt Container and Multi-cyclonic
Filter assembly with a damp cloth moistened with water
or a mild cleaning solution
4. To thoroughly clean the Multi-cyclonic Filter assembly, turn
the entire assembly upside-down, then turn the locking disk
to the “unlock” position to release
5. Separate the inner cyclone from the sheath
6. The inner cyclone and sheath may be washed with water
and a mild detergent. Be sure that they are completely dry
before reassembling or you may damage the unit
7. Once cleaning is complete, allow all the parts to air-dry
completely before reassembling
CLEANING THE UPPER TANK
1
24 5
1. Loop the Flex Hose (17)
over the storage hook
and insert the end of the
Flex Hose with the clip
into the on-board storage
slot and clip into place
2. Secure the 2 ends togther
with the slide-in slot
STORING THE FLEX HOSE
1 1

14
USE THIS TROUBLESHOOTING GUIDE AS A FIRST STEP TO RESOLVE ANY
PROBLEMS YOU MAY BE EXPERIENCING.
Any faults not covered in the below table should be resolved by a Tevo Service Centre. See
page 16 for contact details.
Other maintenance or service not included in the manual should be performed
by an authorized service representative.
Thank you for selecting a BENNETT READ product.
TROUBLESHOOTING:
To reduce the risk of electric shock, turn power OFF and disconnect the plug
from the electrical outlet before performing maintenance or troubleshooting.
WARNING:
!
PROBLEM POSSIBLE CAUSES REMEDIES
Vacuum cleaner
won’t run
1. Power cord not plugged in
2. Damaged power cord
1. Check electrical plug
2. Unplug, check for damage. If damaged,
contact a Tevo Service Centre
Vacuum cleaner
and tools won’t pick
up dirt
1. Hose not attached to suction
opening (only for hand tools)
2. Flex Hose not securely attached
3. Crack or hole in hose (only for
hand tools)
4. Broken or worn drive belt
5. Rotating floor brush bristles worn
6. Rotating floor brush jammed
7. Blockage in vacuum
8. Dirt container full
9. Dirt container not installed
properly
10. Filters are dirty
11. Turbo Brush is stuck or
debris is wrapped around
the brush roll
1. Firmly attach flex hose wand into flex
hose attachment port
2. Make sure Flex Hose is firmly in position
3. Check hose and replace if needed
4. Replace drive belt, see page 11
5. Replace brush
6. Remove brush and clean debris from
brush ends, see page 11
7. Clear clogs, see page 12
8. Empty dirt container
9. Position correctly and lock in place
10. Check pre-motor and post-motor filters
11. See page 12 for maintaining Turbo
Brush
Visible dirt escaping
from cleaner
1. Dirt Container full
2. Filters missing or installed
incorrectly
3. Dirt Container installed
incorrectly
1. Empty Dirt Container
2. Check pre-motor and post-motor
filters for correct installation
3. Remove and re-insert dirt
container correctly

15
REPLACEMENT PARTS
The items below are available for purchase as accessories for your BENNETT READ
POWER UP PET ADVANCED Multi-cyclonic vacuum. To purchase, contact TEVO Customer Care
in your area.
ITEM PART NO. PART NAME
1. HVC 104 CF16 Drive Belt
2. HVC 104 CD03 Pre-Motor Foam Filter
3. HVC 104 CB10 Post-Motor Microparticle Filter
ITEM PART NO. PART NAME
1. HVC 104 CA03 Crevice Tool
2. HVC 104 CA02 Dusting Brush (adjustable)
3. HVC 104 CA05 Hand-held Pet Turbo Brush
1
1 2 3
2 3
ADDITIONAL ACCESSORIES
It is important that you use only genuine Bennett Read replacement parts.
Generic parts may not meet the exact specifications required to keep
your vacuum operating at its peak performance. The use of unbranded
parts could lead to early product failure and could void your guarantee.
NOTE:
!

16
CONSUMER GUARANTEE:
Your BENNETT READ POWER UP PET ADVANCED is warranted against
manufacture faults for a period of 1 year. If you register your guarantee online
at www.tevo.co.za within 14 days of purchase, then your guarantee will be
extended to 2 years.
Tevo undertakes to repair or replace this product at no charge if found to
be defective due to a manufacturing fault during the guarantee period. This
guarantee excludes damage caused by misuse, neglect, shipping accident,
commercial use, incorrect installation, or unauthorized repair. This guarantee
does not apply to routine maintenance components such as, but not limited to,
filters and brushes. Tevo is not liable for incidental or consequential damages
of any nature associated with the use of this product. Tevo’s liability will not
exceed the purchase price of this product.
PLEASE KEEP YOUR RECEIPT TO VERIFY YOUR GUARANTEE.
Guarantee and service enquiries can be made by contacting:
Tevo (Pty) Ltd
Gauteng: 086 111 8386
or 012 740 5000
Durban: 031 570 5900
Cape Town: 021 380 0038/9
Customer Service Help Line: 0861 77 88 88
www.tevo.co.za


Brought to you by:
0861 77 88 88
www.tevo.co.za | info@tevo.co.za
Table of contents
Other Bennett Read Vacuum Cleaner manuals

Bennett Read
Bennett Read ONE 114 R User manual

Bennett Read
Bennett Read POWER UP PET CJTG00499B-120 User manual

Bennett Read
Bennett Read TOUGH 12 User manual

Bennett Read
Bennett Read Tough 15 User manual

Bennett Read
Bennett Read WHISPER User manual

Bennett Read
Bennett Read MULTI-FORCE User manual

Bennett Read
Bennett Read DYNAMITE User manual

Bennett Read
Bennett Read FORCE 10 User manual

Bennett Read
Bennett Read Force 8 User manual

Bennett Read
Bennett Read Tough 35 User manual


