Bennett Read HYDRO 15 User manual

USER GUIDE
WET & DRY WATER-FILTRATION VACUUM SYSTEM
WITH UNIQUE LARGE-VOLUME WATER PICK-UP CAPACITY

Congratulations on purchasing a BENNETT READ HYDRO 15.
We are confident that it will give you many years of outstanding service. Everything
we know about floorcare went into the design and construction of this complete,
high-tech home cleaning system.
Your HYDRO 15 imitates the most powerful forces of nature in a sleek, elegant vacuum
cleaning system, to ensure that your home is easily and properly cleaned. Dust, dirt,
dust mites and most other household allergens are removed, filtered and contained in
your HYDRO 15, resulting in a squeaky clean home and a healthier family.
EXTENDED GUARANTEE
Your
HYDRO 15
comes with a 1 year guarantee. If you register your guarantee
online within 14 days of purchase, we will extend the guarantee to 2 years.
To
activate your extended guarantee, scan the QR code on the front cover of this user
guide, tap on the link and complete the online form. Alternatively, visit
www.tevo.co.za, click the “Register guarantee” tab at the top of the page, then
complete the form provided. We also stand behind it with a knowledgeable,
dedicated Customer Care department, so should you ever have a problem, you'll
receive fast, considerate assistance.
Should you need any support from us, please visit: www.tevo.co.za or call
0861 77 88 88.

INDEX:
Pg 2 ................... IMPORTANT SAFETY INSTRUCTIONS
Pg 3 ................... PRODUCT OVERVIEW
Pg 4 ................... ACCESSORIES
Pg 5 ................... ACCESSORIES
Pg 6 ................... PRECAUTIONS
Pg 6 ................... ASSEMBLY INSTRUCTIONS
Pg 6 ................... 3-STAGE FILTRATION EXPLAINED
Pg 7 ................... DRY VACUUMING
Pg 8 ................... SETTING UP YOUR HYDRO 15 FOR DRY VACUUMING
Pg 9 ................... CLEANING YOUR HYDRO 15
Pg 10 ................. WET VACUUMING
Pg 10 ................. SETTING UP YOUR HYDRO FOR WET VACUUMING
Pg 11 ................. BLOWER FUNCTION
Pg 11 ................. TECHNICAL SPECIFICATIONS
Pg 11 ................. GUARANTEE
Pg 12 ................. TROUBLESHOOTING

2.
» Use the system only for its intended use
» To protect against a risk of electric shock,
do not immerse any part of the system in
water or other liquids
» Do not allow cord to touch hot surfaces
» Do not run appliance over cord
» Do not operate the system with a
damaged cord or plug, or if the appliance
or any other part of the system has been
dropped or damaged. To avoid the risk of
electric shock, do not disassemble or
attempt to repair the HYDRO 15. Return the
unit for examination and repair. Incorrect
reassembly or repair can cause a risk of
electrical shock or injury and will not be
covered by the guarantee
» Keep hair, loose clothing, fingers and all
parts of body away from openings and
moving parts
» Do not use to pick up flammable or
combustible liquids such as petrol. Do not use in
areas where these liquids may be present
» Do not pick up anything that is burning or
smoking such as cigarettes, matches or
hot ashes
» Use extra care when cleaning on stairs
» Do not use the HYDRO 15 without the
Microparticle filter in place, except
when vacuuming up liquids (Refer to
page 10 for wet operating instructions)
When using as a Wet Vacuum take
caution not to over-fill the tank with
liquid to avoid risk of electrical shock
and damage to your HYDRO 15. Refer to
page 3 of this manual for tank capacity
and instructions
» This appliance is intended for household
use only. Follow all user instructions in
this manual
» Do not leave the HYDRO 15 plugged in
when unattended
» Unplug the electrical cord when not in
use and before servicing
» Not intended for use by persons
(including children) with reduced physical,
sensory or mental capabilities, or lack of
experience and knowledge
» Do not allow to be used as a toy
» Close attention is necessary when used near
children, pets or plants
» Children should be supervised to ensure that
they do not play with the appliance
» Use only as described in this
manual. Use only manufacturer’s
recommended accessories
» Do not pull cord, use cord as a handle,
close a door on cord, or pull cord
around sharp edges or corners
» Turn off all controls as applicable before
unplugging from electrical outlet
» Do not unplug by pulling on cord.
To unplug, grasp the plug, not the cord
» Do not handle plug or vacuum with
wet hands or operate without shoes
» Do not put any objects into openings
» Do not use with any opening blocked
»Keep free of dust, lint, hair and
anything else that may reduce airflow
» Store your HYDRO 15 indoors in a
cool, dry area
» Keep your work area well lit
» Keep end of hose, wands and other
openings away from your face and body
» Using improper voltage may result
in damage to the motor and
possible injury to the user. Correct
voltage is listed on rating label. For
operation on a 220-240V, 50/60Hz
power supply only
» Use only identical replacement parts
» See instructions for Servicing of
Double-Insulated Appliances
WARNING:
» To reduce the risk of injury from moving
parts – Unplug before servicing
» To reduce the risk of electric shock –
Unplug before cleaning
» Do not use outdoors
SAVE THESE INSTRUCTIONS
FOR FUTURE USE.
Not For Commercial Use.
For Household Use Only.
IMPORTANT SAFETY INSTRUCTIONS
READ ALL INSTRUCTIONS
BEFORE USING YOUR VACUUM.
When using your Hydro 15 basic safety
precautions should be observed,
including the following:
!
TO REDUCE THE RISK OF FIRE,
ELECTRIC SHOCK, OR INJURY:
WARNING

PRODUCT OVERVIEW
1. Power switch
2. Self-sealing blowing port
3. Sealed motor unit
4. Advanced microparticle filter
5. Mechanical water-level detector
with float cage
6. Microparticle filter guard
7. Sponge filter
8. Sponge Filter guard
9-A. Diffuser pipe
9-B. Water max-level indicator
for dry vacuuming
(on Diffuser Pipe)
10. Vacuum function hose port
11. Water/Dirt tank
12. Front caster wheels
13. Locking clips
14. Integrated attachment holders
15. Large rubberised rear wheels
3.
1
2
3
6
8
7
13
15
10
12
11
14
5
4
9-A
9-B
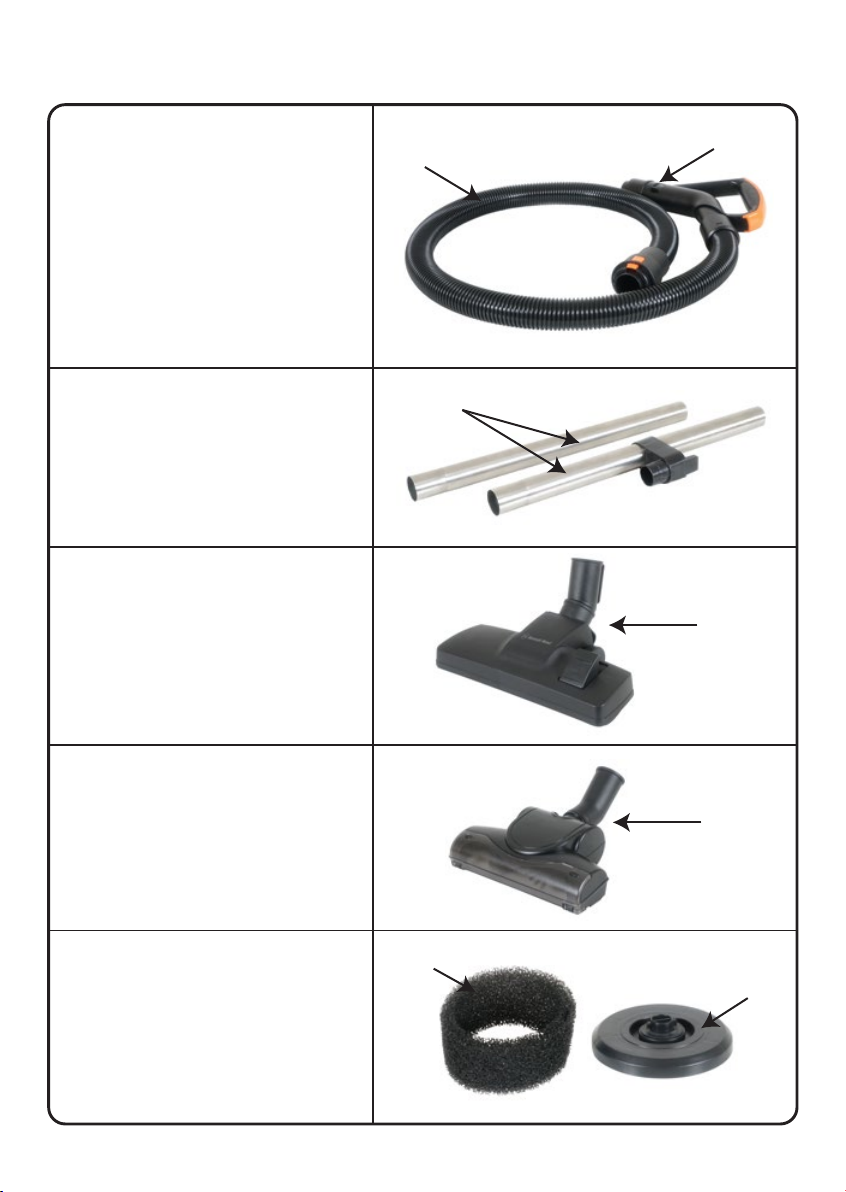
ACCESSORIES
16. Ultra-durable, polypropylene
vacuum hose
17. Variable airflow control
Close the slider on the handle to
increase suction. Open the slider
to decrease suction
18. 2-Piece stainless steel
extension wand
with accessory attachment
19. Multi-surface dry vacuum
nozzle
20. Dual-purpose high-speed
turbo brush head
4.
18
17
16
19
21. Foam filter 21
22. Foam filter lock
The foam filter and the foam filter
lock are for use with wet vacuuming
only.
20
22
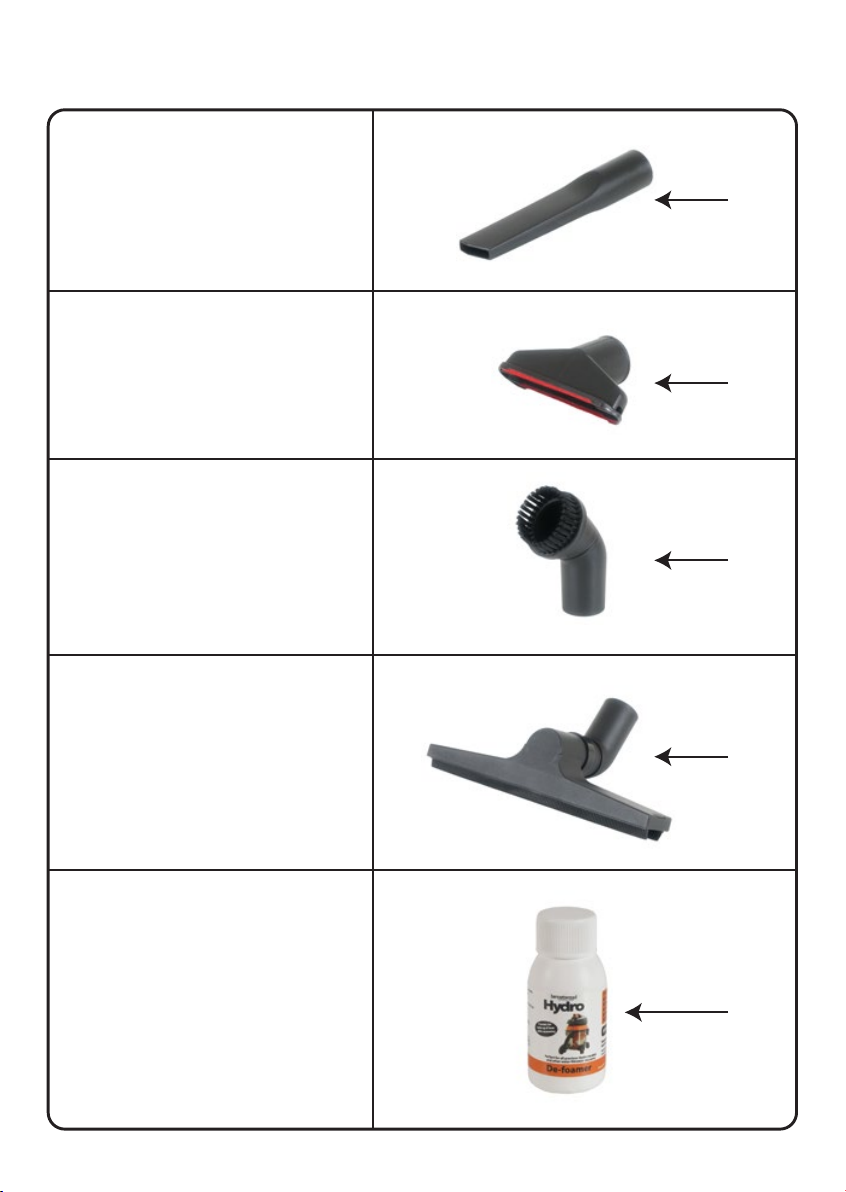
ACCESSORIES
23. Crevice tool
24. Upholstery tool
25. Dusting brush
26. Wet spill suction head
27. 50ml Bottle of de-foamer
Your HYDRO 15 comes with a 50ml
sample bottle of de-foamer.
Refill bottles are available from the store
where your HYDRO 15 was purchased.
5.
23
24
25
26
27

• Do not operate your HYDRO 15 if the power cable is damaged
• Always operate the unit with the power cable fully unwound
• Unplug your HYDRO 15 before carrying out any maintenance or cleaning
• Keep your HYDRO 15 away from open flames
• Never vacuum any substance that is hotter than 50˚C
• Vacuuming up hot or corrosive liquids with your HYDRO 15 will cause damage to the
machine and will void the guarantee
• Do not operate under the influence of alcohol or narcotics
• Other than routine cleaning of the unit and filters, refer the unit to any of our nationwide
certified service centres for maintenance and servicing (see Page 11 for contact details).
• When water in the unit becomes dirty during operation, replace with clean water to ensure
optimum filtration
• Carpets and household surfaces have residual detergents present. Always add 3 capfuls of
BENNETT READ HYDRO DE-FOAMER (27) to clean filter water before vacuuming. This is to
ensure that the residual detergents in carpets do not cause blockages to the filtration system
ASSEMBLY INSTRUCTIONS:
Your HYDRO 15 comes almost fully assembled and requires very little set up:
1. Remove the unit and attachments from their packaging. Some of the packaging poses a
choking risk to small children. Dispose of the packaging responsibly. Please recycle
2. Before using your HYDRO 15 for the first time check that all attachments listed are
included. If the unit is incomplete, return it to the retailer immediately. Take the entire unit,
packaging and proof of purchase to the store where your purchase was made
3-STAGE FILTRATION EXPLAINED:
Your HYDRO 15 uses an advanced 3-Stage filtration system when dry vacuuming. As you
vacuum, dust, dirt, and allergens are sucked from the surfaces in your home and the dirty air
mixture is passed through the first filtration stage which is the water in the Water/Dirt tank
(11). The dirt is then dissolved and absorbed into the water.
The dirty water then passes through a washable sponge filter (7) that assists in further mixing
the dirt into the water. This is the second stage of filtration.
For the third stage of filtration, the air passes through a washable and reuseable Advanced
microparticle filter (4). This filter is designed to trap any microscopic dirt and dust that may
escape filtration in the water. This is particularly useful when the water filter has been
working hard and is becoming saturated. Make sure to regularly clean all the washable
filters, ensuring that only clean air exits the machine into your home.
6.
PRECAUTIONS:
Only operate your HYDRO 15 in accordance with the instruction manual. Failure
to follow these instructions will result in decreased cleaning performance and may
invalidate your guarantee.

DRY VACUUMING:
Your HYDRO 15 vacuum is perfect for vacuuming carpets, tiles, mattresses, upholstery,
curtains and car upholstery. The powerful suction and exceptional combination of filters
ensures that all the dirt in your home is sucked up, filtered, and only clean, healthy air is
returned back into your home.
7.
SETTING UP YOUR HYDRO 15 FOR DRY VACUUMING:
5. Add 3 capfuls of BENNETT READ HYDRO de-foamer (27) to the water. The de-foamer is
important as it stops the formation of foam in the water filter. This protects the machine
from blockages and damage
6. Replace the complete filter housing assembly into the water filter tank. Make sure that the
microparticle filter is properly attached
7. Replace the motor unit and fasten the locking clips in place
2.1.
1. Lift the locking clips (13) upwards, then
remove the motor unit (3) from the water
filter tank (11)
2. Remove the filter housing assembly
(5+6+7+8) by lifting it upwards
3. 4.
4. Add clean water into the water filter tank.
Do not exceed the water max. level mark
on the diffuser pipe (9-B)
3. Attach the diffuser pipe (9-A) to the inlet
inside the water filter tank

8.
SETTING UP YOUR HYDRO 15 FOR DRY VACUUMING:
11. Unwind the power cable and plug it into the wall socket
12. Switch on the unit using the power switch (1)
13. Vacuum in different directions across your surfaces for best results
• After each cleaning session the water tank must be emptied and thoroughly rinsed and
dried before storing the unit. This will ensure that the unit continues to perform optimally
• The sponge filter (7) must be washed, rinsed and then air dried completely before
replacing it back into the machine
• The microparticle filter (4) should be inspected and cleaned when necessary
9.8.
8. Insert the vacuum hose (16) into vacuum
function hose port (10). The hose should
click into place
9. Join the 2-piece extension wand (18)
together and attach it the to the handle
end of the vacuum hose. Use a push and
twist action to secure
10.
10.Attach the appropriate cleaning head (19), (20), (23), (24), (25) or (26) to the free end of
the extension wand. Use a push and twist action to secure
NOTE: NEVER OPERATE YOUR HYDRO 15 WITHOUT ALL FILTERS PROPERLY INSTALLED
9.
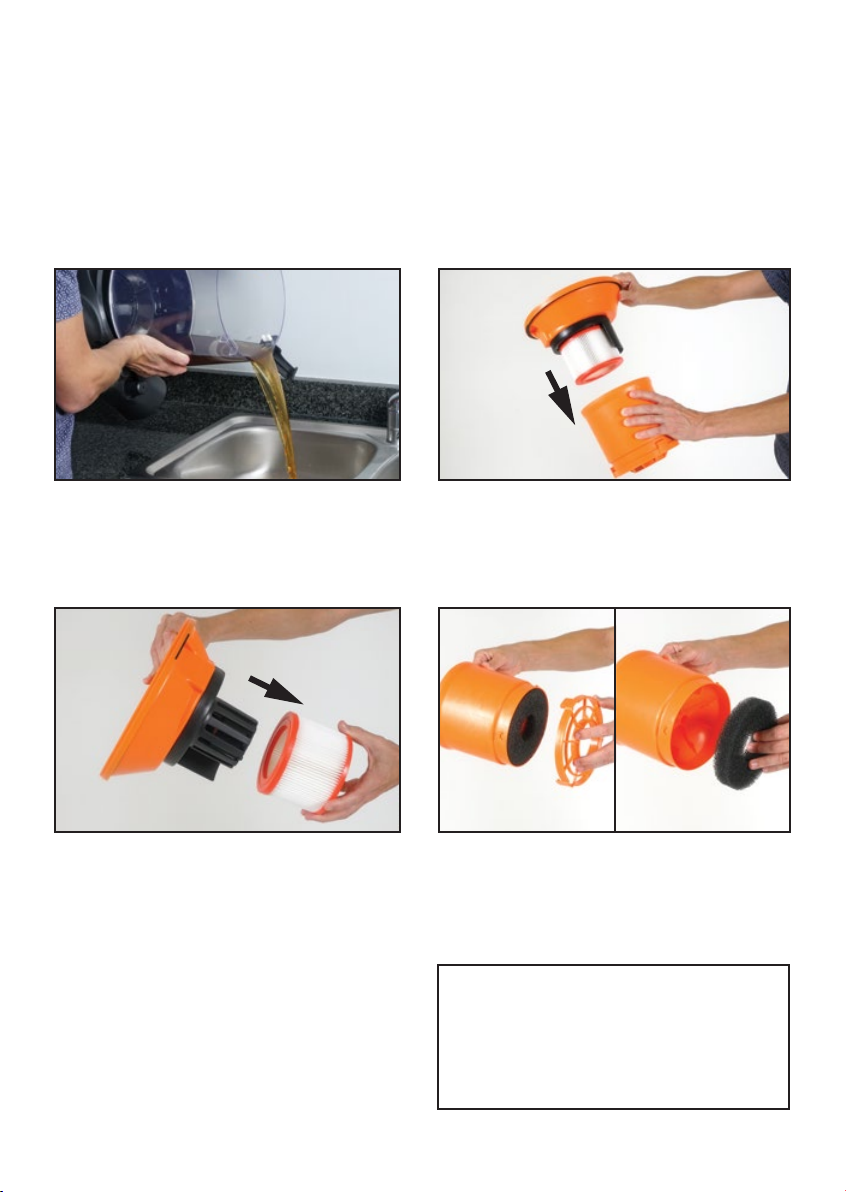
CLEANING YOUR HYDRO 15:
1. Unplug the unit from the electricity supply
2. Take the unit to a drain or disposal area
3. Lift the locking clips (13) to unlock the motor unit
4. Lift the motor unit (3) from the water filter tank and place it to one side
5. Remove the filter housing assembly (5+6+7+8) by lifting it upwards
6. Remove the diffuser filter pipe (9-A)
10.9.
10. Remove the sponge filter guard (8), then
remove the sponge filter (7) and wash it
in warm water. Allow to air dry
completely before replacing in machine
8.7.
7. Empty the dirty water into the drain or
disposal area. Rinse the water tank and
the filter housing under running water
and dry them completely
8. Seperate the filter housing assembly by
turning the microparticle filter guard (6)
anticlockwise
11. Replacement microparticle filters are
available from the retail outlet where you
purchased your HYDRO 15
12. Reassemble only when completely dry and
store in a cool, dry place
WARNING:
NEVER OPERATE YOUR VACUUM
WITH WET FILTERS. ALLOW ALL
FILTERS TO AIR-DRY COMPLETELY
BEFORE REINSTALLING.
9. Remove the microparticle filter (4) from
the mechanical water-level detector (5)
by turning it anticlockwise. If the filter is
dirty, wash it in warm water
10.
WET VACUUMING:
Your HYDRO 15 can also suck up large volumes of liquids in and around your home. Wet
spills can be responsible for harsh odours in your home and can also promote the growth of
mildew, bacteria and fungi. Please note that your HYDRO 15 is NOT a carpet deep cleaner.
Carpet deep cleaning should be done with specialised deep cleaners.
We recommend the BENNETT READ ONE for deep cleaning.
SETTING UP YOUR HYDRO 15 FOR WET VACUUMING:
If you intend using your HYDRO 15 to vacuum up liquids, DO NOT fill it with water at set up.
To beging setting up your HYDRO 15 for wet vacuuming follow steps 1 - 9 from “CLEANING
YOUR HYDRO 15” on page 9, then follow the steps below:
3. Ensure that the diffuser filter pipe (9-A) has been removed from the water/dirt tank
4. Replace the mechanical water-level detector (5) into the water/dirt tank
5. DO NOT install the microparticle filter guard (6) into the water/dirt tank
6. Replace the motor unit and fasten the locking clips
7. Attach the wet spill suction head (26) to free end of the extension wand (18)
8. Unwind the power cable and plug it into the wall socket
9. Switch on unit using the power switch (1)
10. Vacuum wet spill from surface
• Do not put water into the tank before vacuuming wet spills
• When you are done, follow the cleaning instructions as outlined on page 9
NOTE:
Your HYDRO 15 is equipped with an automatic suction cut-off valve. When using as a wet
vacuum, the valve will prevent further suction once the water tank full level of approximately 13
litres is reached.
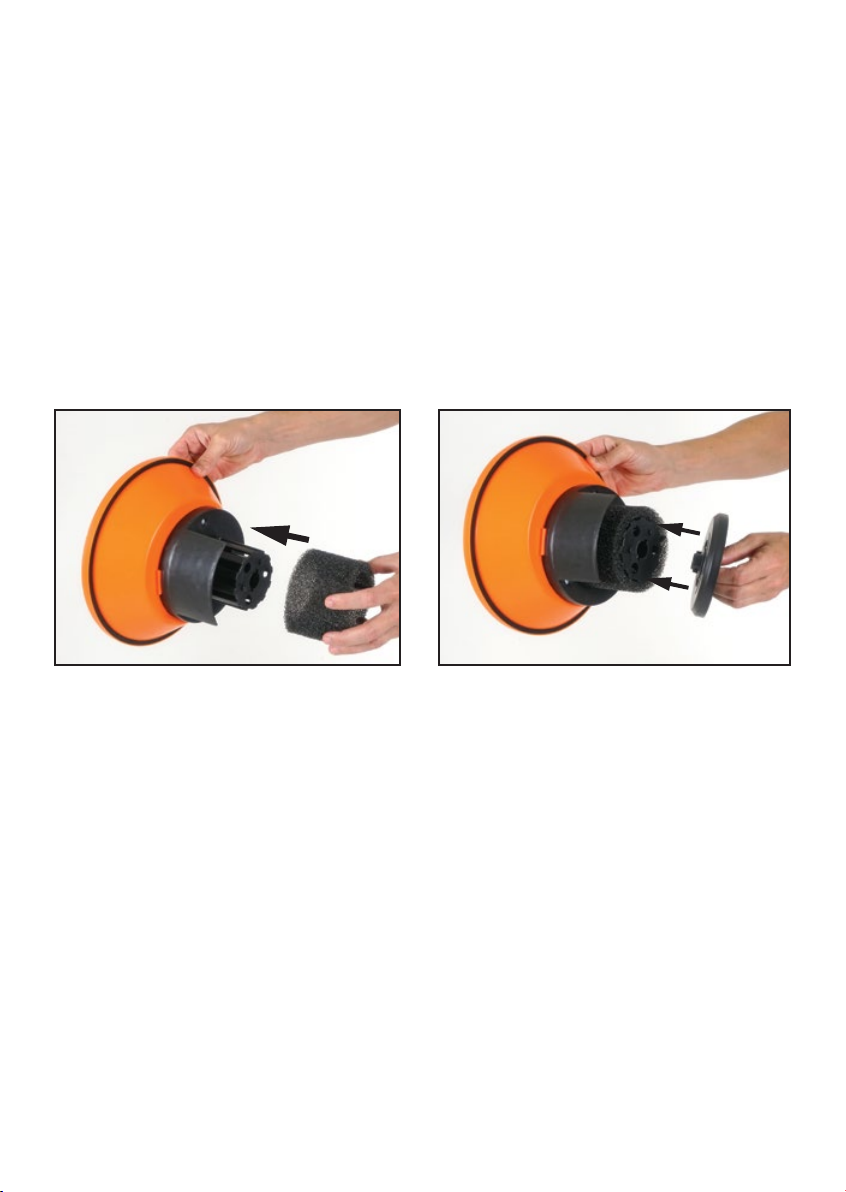
2.1.
1. Install the black sponge filter (21) over
the float cage located under the
mechanical water-level detector (5)
2. Then attach the filter lock (22) by lining
up the notches and turning it clockwise
until secured
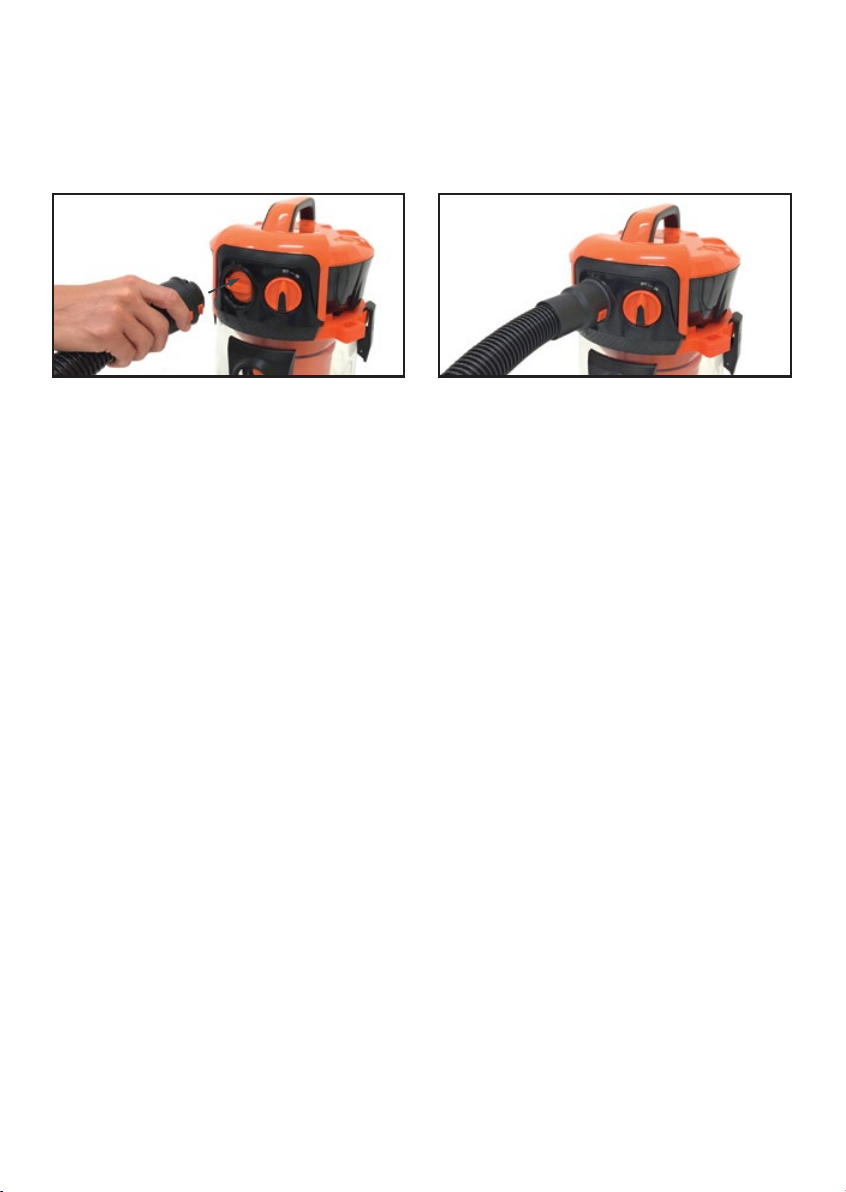
BLOWER FUNCTION:
You can use your HYDRO 15 to blow away leaves and other light debris. Simply connect the
flex-hose to the blower port (2) as shown in the pictures below, then switch on the machine
(the machine can be set up for wet or dry vacuuming, this will not affect the blower function).
TECHNICAL SPECIFICATIONS:
Nominal voltage: 220-230V AC
Nominal frequency: 50/60 Hz
Nominal power: 1400 W
GUARANTEE
Your BENNETT READ HYDRO 15 is warranted against manufacture faults for a period of 1
year. If you register your guarantee online at www.tevo.co.za within 14 days of purchase,
then your guarantee will be extended to 2 years. Tevo undertakes to repair or replace this
product at no charge if found to be defective due to a manufacturing fault during the
guarantee period. This guarantee excludes damage caused by misuse, neglect, shipping
accident, commercial use, incorrect installation, or unauthorized repair. Tevo is not liable for
incidental or consequential damages of any nature associated with the use of this product.
Tevo’s liability will not exceed the purchase price of this product.
PLEASE KEEP YOUR RECEIPT TO VERIFY YOUR GUARANTEE.
This guarantee applies to product used for personal or domestic use only, and specifically
excludes any malfunction or defect arising from commercial use. This guarantee excludes
consumable items such as filters, accessories etc that will wear-and-tear.
Guarantee and Service enquiries can be made by contacting:
Tevo (Pty) Ltd
Johannesburg (012) 740 5000
Durban (031) 570 5900
Cape Town (021) 380 0038/9
Customer Service Help Line: 0861 77 88 88
www.tevo.co.za
11.
2.1.

12.
TROUBLESHOOTING:
PROBLEM POSSIBLE CAUSES REMEDIES
Machine not switching on Check electrical plug
Weak suction power 1. Remove and clean Advanced
Microparticle Filter as explained
on page 9. It is important to
check and clean the filter regularly
2. Remove hose and filter housing
assembly as explained on page 7
and 8. Clean and check for any
obstructions
3. Empty dirty water, rinse water tank
and re-fill with clean water
Visible dust escaping from
the machine whilst
vacuuming
1. Check water level and replace if
necessary
2. Check Advanced Microparticle
Filter, situated underneath the motor
unit
3. Clean Advanced Microparticle
Filter as explained on page 9
Water leaking or spraying
from machine whilst
operating
1. Adjust water level to correct level
as explained on page 7 – “Setting
up your HYDRO for dry vacuuming”
*Do not overfill the water tank*
2. Add de-foamer as explained on
page 7, point 5
3. Check securing clips
Power cord not firmly plugged in or
switched on at wall socket
1. Advanced Microparticle Filter
dirty or clogged
2. Obstruction in hose or filter housing
assembly – see page 3 for
descriptions
3. Water saturated (extremely dirty and
muddy)
1. Water level too low or water is
saturated
2. Advanced Microparticle Filter not
installed (See page 3, point 4)
3. Advanced Microparticle Filter dirty
1. Water level too high
(See indicator on page 7)
2. No de-foamer added to water
3. Securing clips not locked in place

ENVIRONMENTALLY FRIENDLY DISPOSAL
Do not dispose of electrical appliances with general municipal waste.
Hazardous substances can leak and contaminate the groundwater,
affecting the food chain and ultimately damaging the environment and
your health. Contact your local municipality for information on safe
disposal in your area.
PLEASE RECYCLE

Table of contents
Other Bennett Read Vacuum Cleaner manuals

Bennett Read
Bennett Read FORCE 10 User manual

Bennett Read
Bennett Read MULTI-FORCE User manual

Bennett Read
Bennett Read POWER UP PET CJTG00499B-120 User manual

Bennett Read
Bennett Read TOUGH 12 User manual

Bennett Read
Bennett Read Tough 18 User manual

Bennett Read
Bennett Read Force 8 User manual

Bennett Read
Bennett Read Power Up Pet Advanced User manual

Bennett Read
Bennett Read ONE 114 R User manual

Bennett Read
Bennett Read Tough 35 User manual

Bennett Read
Bennett Read Tough 15 User manual


