Berchtold Podo S60 User manual

PREVENTATIVE MAINTENANCE:
Just like your car - a Podiatry Drill will operate best when serviced regularly.
In consultation with the Manufacturer, Briggate Medical Company
recommend that this appliance be sent to us for inspection every:
12 MONTHS
SERVICE FREQUENCY
Preventative Maintenance scope:
- dis-assemble and clean
- water pump clean and test
- circuit board inspection/clean
- handpiece clutch inspection/re-build
- handpiece motor testing
- handpiece bearing replacement
- electrical test and tagging
Serial No.: Date of Purchase:
PodoS60
WATER SPRAY PODIATRY DRILL
OWNER’S MANUAL

INDEX
3 Warranty Details
4 Technical Data
4 Safety Instructions
5 Main Features & Controls
5 Touch Control Functions
6 LCD Screen Indicators
6 Initial Set-up
6 Handpiece Care
7 Operational Instructions
7 Programming Memory Slots
PodoS60
WATER SPRAY PODIATRY DRILL
Manufactured in:
GERMANY

Warranty Details
Term: 24 Months ( from date of purchase )
Conditions:
- This warranty is set out by the Manufacturer
against faulty parts and/or workmanship.
- Briggate Medical Company is the sole
authorised warranty repair agent in Australia
and New Zealand.
- All warranty and service works are performed at
Briggate Medical Company’s service facility;
23-25 Lakewood Blvd, Braeside, Victoria, 3195.
No freight charges will be accepted for the
return of this appliance to Briggate Medical
Company - regardless of warranty claim
outcome.
- This warranty does not cover wear and tear on
the bearings and clutch mechanism within the
handpiece.
- This warranty will be VOID if there is evidence of
mistreatment or non-adherence to procedures
outlined within this document.
IMPORTANT:
Prior to operation, please ensure you read this document in it’s entiriety to avoid
possible damage to your new Berchtold PodoS60 Water Spray Drill.
3

4
Measurements: 290mmW x 110mmH x 280mmD
Delivery Contents: - Main Control Box
- Micro-Motor Handpiece
- Water Tank
- Water/Power Hose
- Mains Power Lead
- Handpiece Cradle
- Brush
- Owner’s Manual
Total Weight: 2.9 kg
Power: 230/240V
Warranty: 24 Months (Return to Base)
DO NOT use bent or damaged burrs (tools).
Only use quality tools which have a shaft diameter of 2.35mm (some inferior tools may have undersized
shafts which may slip and damage the Handpiece). All burrs available from Briggate Medical meet these
requirements.
To reduce any chance of overheating ensure clearance of at least 25mm around all sides of the
Main Control Box. Ensure the ventilation slots in the Main Control Box are clear of any blockage.
DO NOT clean the the Main Control Box with an alcohol based cleaner.
Only use an alcohol-free surface wipe (eg: Clinell).
The Main Control Box can only be opened by authorised service technicians.
Unauthorised opening of Main Control Box will negate the Manufacturers Warranty.
Do not operate the PodoS60 in extremely hot or very damp conditions.
The Handpiece on the Berchtold PodoS60 Spray Drill is designed NOT to be dismantled by anyone other
than our Trained Technicians and any dis-assembly by unauthorised persons will result in the
Manufacturer’s Warranty being voided.
Technical Data
ARTG#: 161408
Handpiece Weight: 140 g
Safety Instructions Please ensure the following are strictly adhered to:
5
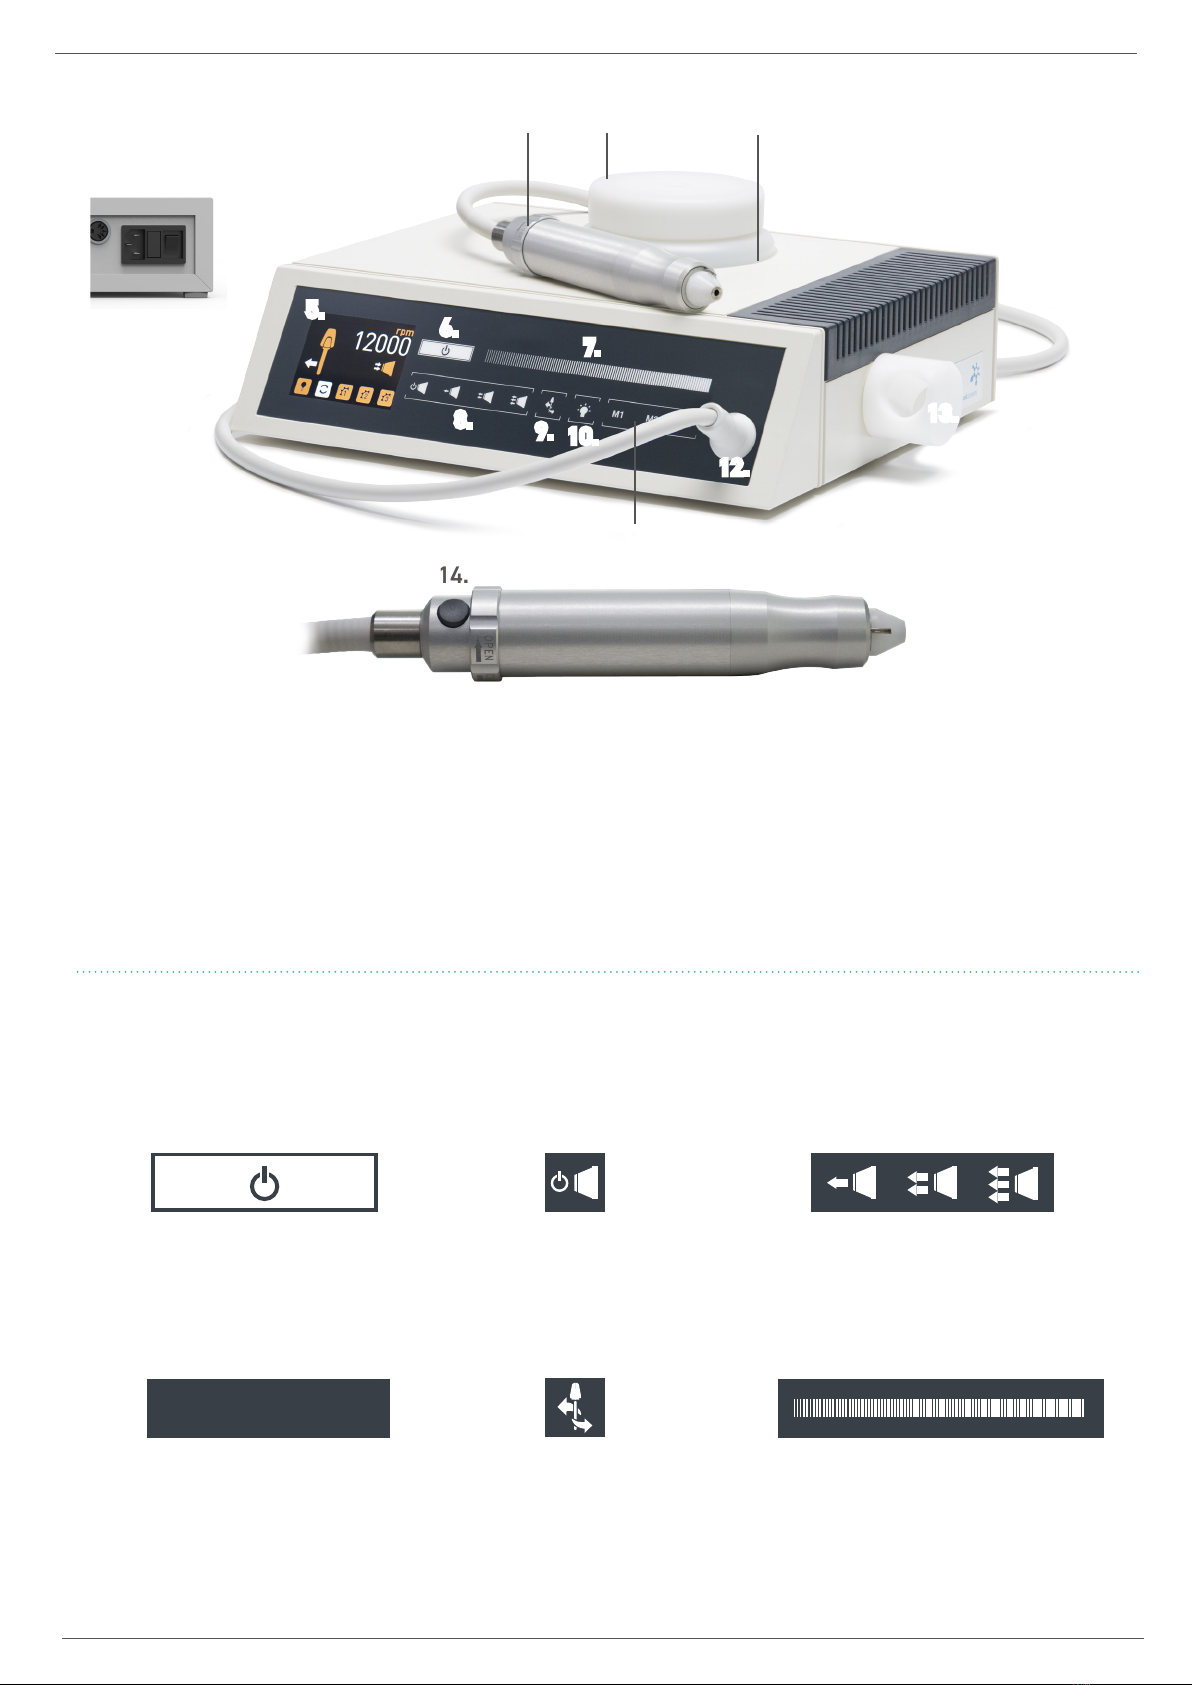
Main Features & Controls 3. 4.
1.
5.
7.
2.
6.
8. 9. 10.
11.
12.
13.
14.
1. On/Off Master Switch (located at rear left of unit)
2. Handpiece and Power Lead/Water Hose
3. Water Reservoir
4. Water Reservoir Cavity
5. LCD Display (indicates burr speed, direction and spray level)
6. On/Off Button for Handpiece Motor and Spray
7. Burr Rotation Speed Control
(if using a burr with a head diameter greater than 5mm,
DO NOT OPERATE THE HANDPIECE AT MORE THAN 10,000 RPM)
8. Spray Volume Setting Controls (Off, Low, Medium, High)
9. Burr Direction Control
(only change Burr Direction when hand-piece motor is not rotating)
10. Light On/Off Switch (feature not available in Australia)
11. Memory Buttons (M1, M2, M3)
12. Receiving Socket for Handpiece Hose/Power Lead
13. Handpiece Holster
14. Handpiece On/Off Button
Stand By Mode Button
Activates/de-activates both
Spray and Handpiece Motor.
Spray On/Off Button
Activates/de-activates
Water Spray.
Spray Volume Buttons
(3 Levels)
Adjusts level of Water Spray
(Low, Medium or High).
Memory Buttons
3 Programmable Memory Slots for Burr
Speed and Direction, and Spray Level.
Burr Speed Control Slide
Adjusts the burr speed from 4,000 to 40,000rpm.
Slide from left-to-right to increase speed.
Slide from right-to-left to decrease speed.
Touch Control Functions
M1 M2 M3
Burr Direction Button
Switches burr direction
clockwise/anti-clockwise.
Table of contents
Other Berchtold Medical Equipment manuals

Berchtold
Berchtold Operon D850 Guide

Berchtold
Berchtold Operon D860 User manual

Berchtold
Berchtold Podo-Q User manual

Berchtold
Berchtold OPERON B 810 Installation instructions

Berchtold
Berchtold CHROMOPHARE E 778 User manual

Berchtold
Berchtold OPERON B 810 Guide

Berchtold
Berchtold ELEKTROTOM 530 User manual
Popular Medical Equipment manuals by other brands


Getinge
Getinge Arjohuntleigh Nimbus 3 Professional Instructions for use

Mettler Electronics
Mettler Electronics Sonicator 730 Maintenance manual

Pressalit Care
Pressalit Care R1100 Mounting instruction

Denas MS
Denas MS DENAS-T operating manual

bort medical
bort medical ActiveColor quick guide

AccuVein
AccuVein AV400 user manual


