manuals.online logo
Brands
  1. Home
  2. •
  3. Brands
  4. •
  5. Bestop
  6. •
  7. Automobile Accessories
  8. •
  9. Bestop HighRock 4x4 Element User manual

Bestop HighRock 4x4 Element User manual

Installation Instructions
INSTALLATION TIME SKILL LEVEL
1/4 Hour 1 - Easy
TOOLS
Vehicle Application
HighRock 4x4™ Element™
Rear Door
www.Bestop.com - We’re here to help! Visit our web site and click on “Ask a Question”. Click here for more Jeep Accessories by Bestop.
•Jeep JK Wrangler Unlimited
2007 – Current
Part Number: 51800
3/8" T-45
Rev. E 0511 51800 pg. 2
HighRock 4x4™ Element™ Rear Door – Installation Instructions
Insert the Paddle Handle into the opening in the door plate so that the latch
mechanism is inside of the vehicle and the Rotary Latch Mechanism is toward
the rear of the door. Place the Latch Plate over the Paddle Handle on the
inside of the door. Align the holes in the Paddle Handle and Latch Plate. Insert
four #10-32 Truss Head Machine Screws from the outside and secure them
with #10-32 Locknuts.
Close the door and adjust the latch to ensure it latches properly.
Tighten the screws once the latch works properly.
Adjust the factory door striker if necessary to ensure the latch engages properly.
Install Paddle Handles
Parts List and
Hardware Identification
#10-32 Low Profile
Nut - Black, Part
Number 316.94,
Qty - 8
Right Door Frame Qty - 1
Right Door Bag Qty - 1
Left Door Frame Qty - 1
Left Door Bag Qty - 1 #10-32 Truss Head Machine Screw -
Black, Part Number 316.82, Qty - 8
Rotary Latch Paddle Handle, Right,
Qty - 1, Left, Qty - 1, Part Number
459.24 and 459.25 Door Restraint, Part Number
428.59, Qty - 2
The Paddle Handle must align correctly with the
automobile manufacturer’s original equipment steel
latch pin, located on the vehicle. Failure to properly
install the Paddle Handle may result in the door accidently opening. IMPROPER
CLOSURE COULD RESULT IN SERIOUS INJURY OR DEATH TO THE
OCCUPANTS. DRIVE CAREFULLY.
Insert Pins into Hinges
View from Outside
View from Inside
Door
Frame
Rotary Latch
Paddle Handle #10-32 Truss Head
Machine Screws
#10-32 Low
Profile Nuts
Door
Frame
Slide Frame
into Hinges
Latch Plate, Qty - 2
Latch Plate
Paddle Handle
Assembly
Latch
Plate
Paddle Handle
Assembly
Hold the door straight out from the vehicle with
the hinge pins over the body hinges. Lower the
pins into the hinges. Make sure that the pins
are fully inserted into the body hinges.
IMPORTANT: You should check the Paddle Handle periodically to ensure the
alignmenttothedoorstrikeriscorrect,allowingthedoortocloseproperly, and that
the screws are tight. If out of alignment, align and retighten the screws securely.
Repeat for both lower doors. If more adjustment is needed, adjust the vehicle’s
door striker.
View from Inside
HighRock 4x4™ Element™ Rear Door – Installation Instructions
51800 pg. 3Rev. E 0511
LIMITED WARRANTY
We warrant our product to be free from defects in material and workmanship, for the terms specified below, provided there has been normal use and proper maintenance. This warranty
applies to the original purchaser only. All remedies under this warranty are limited to the repair or replacement of any item or items found by the factory to be defective within the time
period specified. If you have a warranty claim, first you must call our factory at the number below for instructions. You must retain proof of purchase and submit a copy with any items
returned for warranty work. Upon completion of warranty work, if any, we will return the repaired or replaced item or items to you freight prepaid. Damage to our products caused by
accidents, fire, vandalism, negligence, misinstallation, misuse, Acts of God, or by defective parts not manufactured by us, is not covered under this warranty.
THE WARRANTY TIME PERIOD ISAS FOLLOWS FOR REPLACE-A-TOP™, SAILCLOTH REPLACE-A-TOP™, SUPERTOP®, SUPERTOP® REPLACEMENT SKINS, SUNRIDER®,
AND TIGERTOP®: TWO YEARS FROM DATE OF PURCHASE.
THE WARRANTY TIME PERIOD IS AS FOLLOWS FOR ALL OTHER “SOFT GOODS” MANUFACTURED BY OUR COMPANY (USING PRIMARILY VINYLS, PLASTICS, AND/OR
FOAM): ONE YEAR FROM DATE OF PURCHASE.
THE WARRANTY TIME PERIOD IS AS FOLLOWS FOR ALL OTHER “HARD GOODS” MANUFACTURED BY OUR COMPANY (USING PRIMARILY METALS, PLASTICS, AND/OR
FIBERGLASS): ONE YEAR FROM DATE OF PURCHASE.
ANY IMPLIED WARRANTIES OF MERCHANTABILITY AND/OR FITNESS FOR A PARTICULAR PURPOSE CREATED HEREBY ARE LIMITED IN DURATION TO THE SAME
DURATION AND SCOPE AS THE EXPRESS WRITTEN WARRANTY. OUR COMPANY SHALL NOT BE LIABLE FORANY INCIDENTAL OR CONSEQUENTIAL DAMAGE.
Some states do not allow limitations on how long an implied warranty lasts, or the exclusion or limitation of incidental or consequential damages, so the above limitations or exclusions
may not apply to you. This warranty gives you specific legal rights, and you may also have other rights which vary from state to state.
For further information or request for warranty work, please contact:
Bestop Inc., Customer Service
Toll-Free: (800)845-3567
Main: (303)465-1755
E-mail: [email protected]
Website: www.Bestop.com
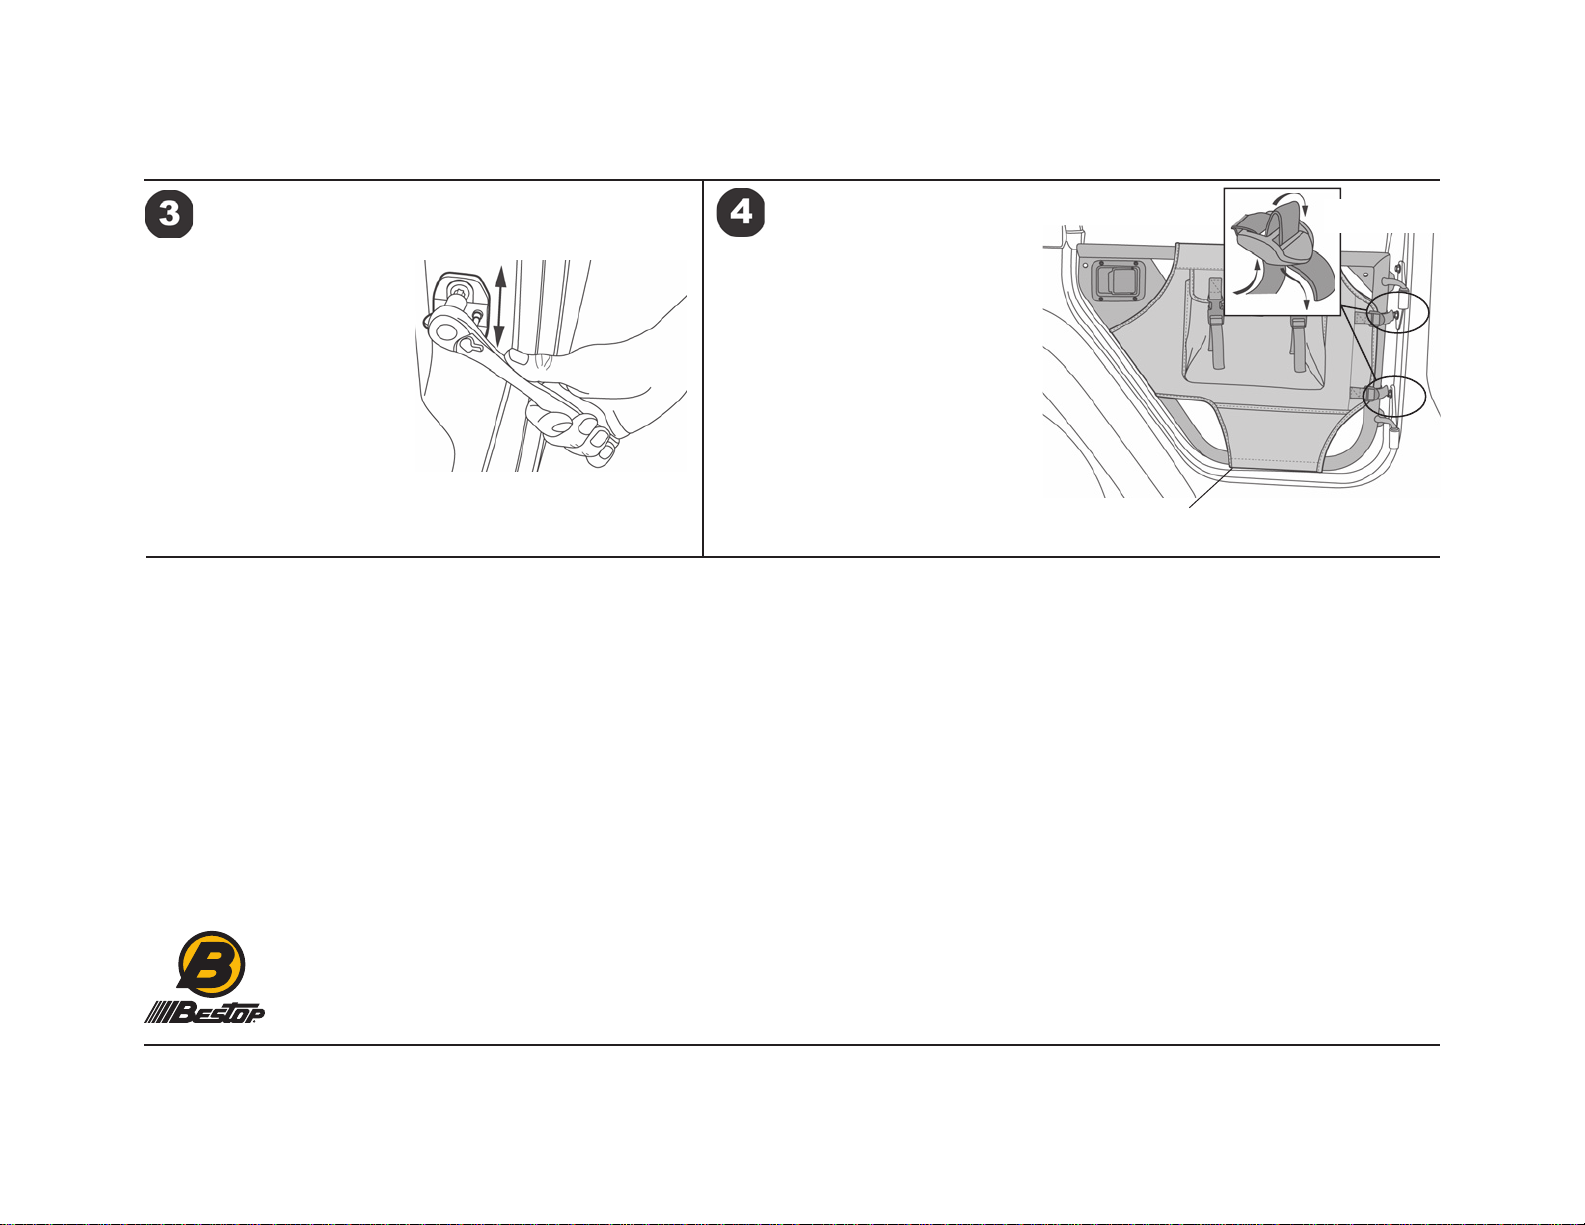
The Door Bags are reversible and can
be installed with the pockets facing
into the vehicle or out. Place a Door
Bag over the Door Frame from the top.
Wrap the Loop tabs under and around
the frame and attach them to the Hook
fasteners on the Bag. Thread the web
straps on the front of the Bag through
the buckles. Pull the ends of the straps
to tighten. Adjust the straps and the
hook and loop fasteners for a smooth
fit. Repeat this procedure with both
Door Bags.
Install Door Bags
Wrap Flap around
Door and Fasten
Hook and Loop
Thread Strap
Through Buckle
If the Element Door does not
match up with the door striker,
you may adjust the door striker
by loosening it with a T-45 torx
wrench and either lowering or
raising the door striker. Tighten
the door striker securely after
adjusting. The door striker
will have to be put back into
it’s original position to reinstall
O.E. doors.
Optional Door Striker Adjustment

This manual suits for next models

1

Other Bestop Automobile Accessories manuals

Bestop 51252 User manual

Bestop

Bestop 51252 User manual

Bestop 52529 User manual

Bestop

Bestop 52529 User manual

Bestop Tigertop Quick start guide

Bestop

Bestop Tigertop Quick start guide

Bestop HighRock 4x4 42910 User manual

Bestop

Bestop HighRock 4x4 42910 User manual

Bestop PowerBoard 75134-15 User manual

Bestop

Bestop PowerBoard 75134-15 User manual

Bestop 44943 User manual

Bestop

Bestop 44943 User manual

Bestop HighRock 4x4 Element 51814 User manual

Bestop

Bestop HighRock 4x4 Element 51814 User manual

Bestop Bikini User manual

Bestop

Bestop Bikini User manual

Bestop 29284 User manual

Bestop

Bestop 29284 User manual

Bestop Sunrider User manual

Bestop

Bestop Sunrider User manual

Bestop 51254 RT User manual

Bestop

Bestop 51254 RT User manual

Bestop HighRock 4x4 Element User manual

Bestop

Bestop HighRock 4x4 Element User manual

Bestop 52528 User manual

Bestop

Bestop 52528 User manual

Bestop Windjammer User manual

Bestop

Bestop Windjammer User manual

Bestop TREKTOP NX GLIDE User manual

Bestop

Bestop TREKTOP NX GLIDE User manual

Bestop BestRail 42792 User manual

Bestop

Bestop BestRail 42792 User manual

Bestop 44941 User manual

Bestop

Bestop 44941 User manual

Bestop 52544 User manual

Bestop

Bestop 52544 User manual

Bestop 17175 User manual

Bestop

Bestop 17175 User manual

Bestop Supertop NX Twill User manual

Bestop

Bestop Supertop NX Twill User manual

Bestop Supertop NX Twill User manual

Bestop

Bestop Supertop NX Twill User manual

Bestop 42503 User manual

Bestop

Bestop 42503 User manual

Bestop 53819 User manual

Bestop

Bestop 53819 User manual

Bestop TrekStep 75505 User manual

Bestop

Bestop TrekStep 75505 User manual

Popular Automobile Accessories manuals by other brands

Right Weigh 201 Series Installation & operation manual

Right Weigh

Right Weigh 201 Series Installation & operation manual

APS iBoard IB-192A-B manual

APS

APS iBoard IB-192A-B manual

weBoost 470106F Quick install guide

weBoost

weBoost 470106F Quick install guide

Dension ice-Link: Plus install guide

Dension

Dension ice-Link: Plus install guide

Defender CH-204+ manual

Defender

Defender CH-204+ manual

Toyota PZ445-E9330-00 installation instructions

Toyota

Toyota PZ445-E9330-00 installation instructions

Dometic GROUP Waeco CoolPower EPS100 Installation and operating manual

Dometic GROUP

Dometic GROUP Waeco CoolPower EPS100 Installation and operating manual

Toyota Blu Logic user manual

Toyota

Toyota Blu Logic user manual

Polaris 2878669 manual

Polaris

Polaris 2878669 manual

EROAD CoreHub Xtreme install guide

EROAD

EROAD CoreHub Xtreme install guide

Beam RST620B quick start guide

Beam

Beam RST620B quick start guide

Hayman Reese 41319R installation instructions

Hayman Reese

Hayman Reese 41319R installation instructions

Thule 987xt installation instructions

Thule

Thule 987xt installation instructions

Lucent Technologies CIB 2864 quick start guide

Lucent Technologies

Lucent Technologies CIB 2864 quick start guide

Inbay 241292-51-1 installation guide

Inbay

Inbay 241292-51-1 installation guide

Trux Accessories TLED-U59 Installation

Trux Accessories

Trux Accessories TLED-U59 Installation

Thermo King V220 Series Maintenance manual

Thermo King

Thermo King V220 Series Maintenance manual

Taffio JFQ237 quick guide

Taffio

Taffio JFQ237 quick guide

manuals.online logo
manuals.online logoBrands
  • About & Mission
  • Contact us
  • Privacy Policy
  • Terms and Conditions

Copyright 2025 Manuals.Online. All Rights Reserved.