Better Packages PS2A User manual

BEDIENUNGSANLEITUNG
PS2A
Elektrischer Klebebandspender
Für Selbstklebeband

Inhalt
Seite
SICHERHEITSHINWEISE 1
AUSPACKEN UND EINRICHTEN 2
A spacken nd Überprüf ng des Inhaltes 2
Einrichten 2
Einzelne Längen abschneiden 3
Einstellen der Bandlänge 3
ARBEITEN MIT DEM PS2A 4
A tomatikeinstell ngen 4
Bandandr ck 4
Klebebandsta 5
4. WARTUNG UND PFLEGE
. WECHSEL DER SICHERUNG 6
6. TECHNISCHE DATEN 7

SICHERHEIT
SICHERHEITSHINWEISE
Vor Wart ng oder Reparat r immer den
Netzstecker ziehen. Strom ist a ch dann im Gerät,
wenn der Ha ptschalter a f AUS steht.
•Vor Einschalten nd Arbeiten mit der Maschine, bitte alle
Sicherheitshinweise nd die Bedien ngsanleit ng lesen.
•Jeglicher Service oder Wart ng am Gerät, m ss von g t
gesch ltem Personal d rchgeführt werden.
•Achten Sie dara f, nicht mit den Fingern an/in die
Schneidevorricht ng z geraten nd schalten Sie das Gerät immer
bei Reinig ng der Schneidevorricht ng a s.
HADE PS2A Seite 1
ACHTUNG

Auspacken und Einrichten
AUSPACKEN UND EINRICHTEN
Auspacken und Überprüfung des Inhaltes
Beim A spacken des PS2A bitte überprüfen, ob folgenden Teile in der Verpack ng
enthalten sind:
•Bedien ngsanleit ng
•PS2A
•Rollena fnahme
Transportverpack ng für etwaige spätere Versend ngen nbedingt a fbewahren.
BEACHTEN: Entfernen Sie alle Klebebandstücke, die am Spender z r
Transportsicher ng angebracht sind.
EINRICHTEN
1. Nachdem Sie den PS2A a s der Versandverpack ng genommen haben, das
Gerät a f die Arbeitsfläche stellen. Vergewissern Sie sich, dass alle
Verpack ngsteile nd Klebebandstreifen entfernt w rden.
2. Entnehmen Sie den Rollenhalter, setzen Sie die z verarbeitende Rolle a f den
Kern nd setzen Sie sie wieder in die hintere Rollena fnahme ein.
3. Das Gerät ans Stromnetz anschließen nd am Ha ptschalter einschalten.
HADE PS2A Seite 2

Auspacken und Einrichten
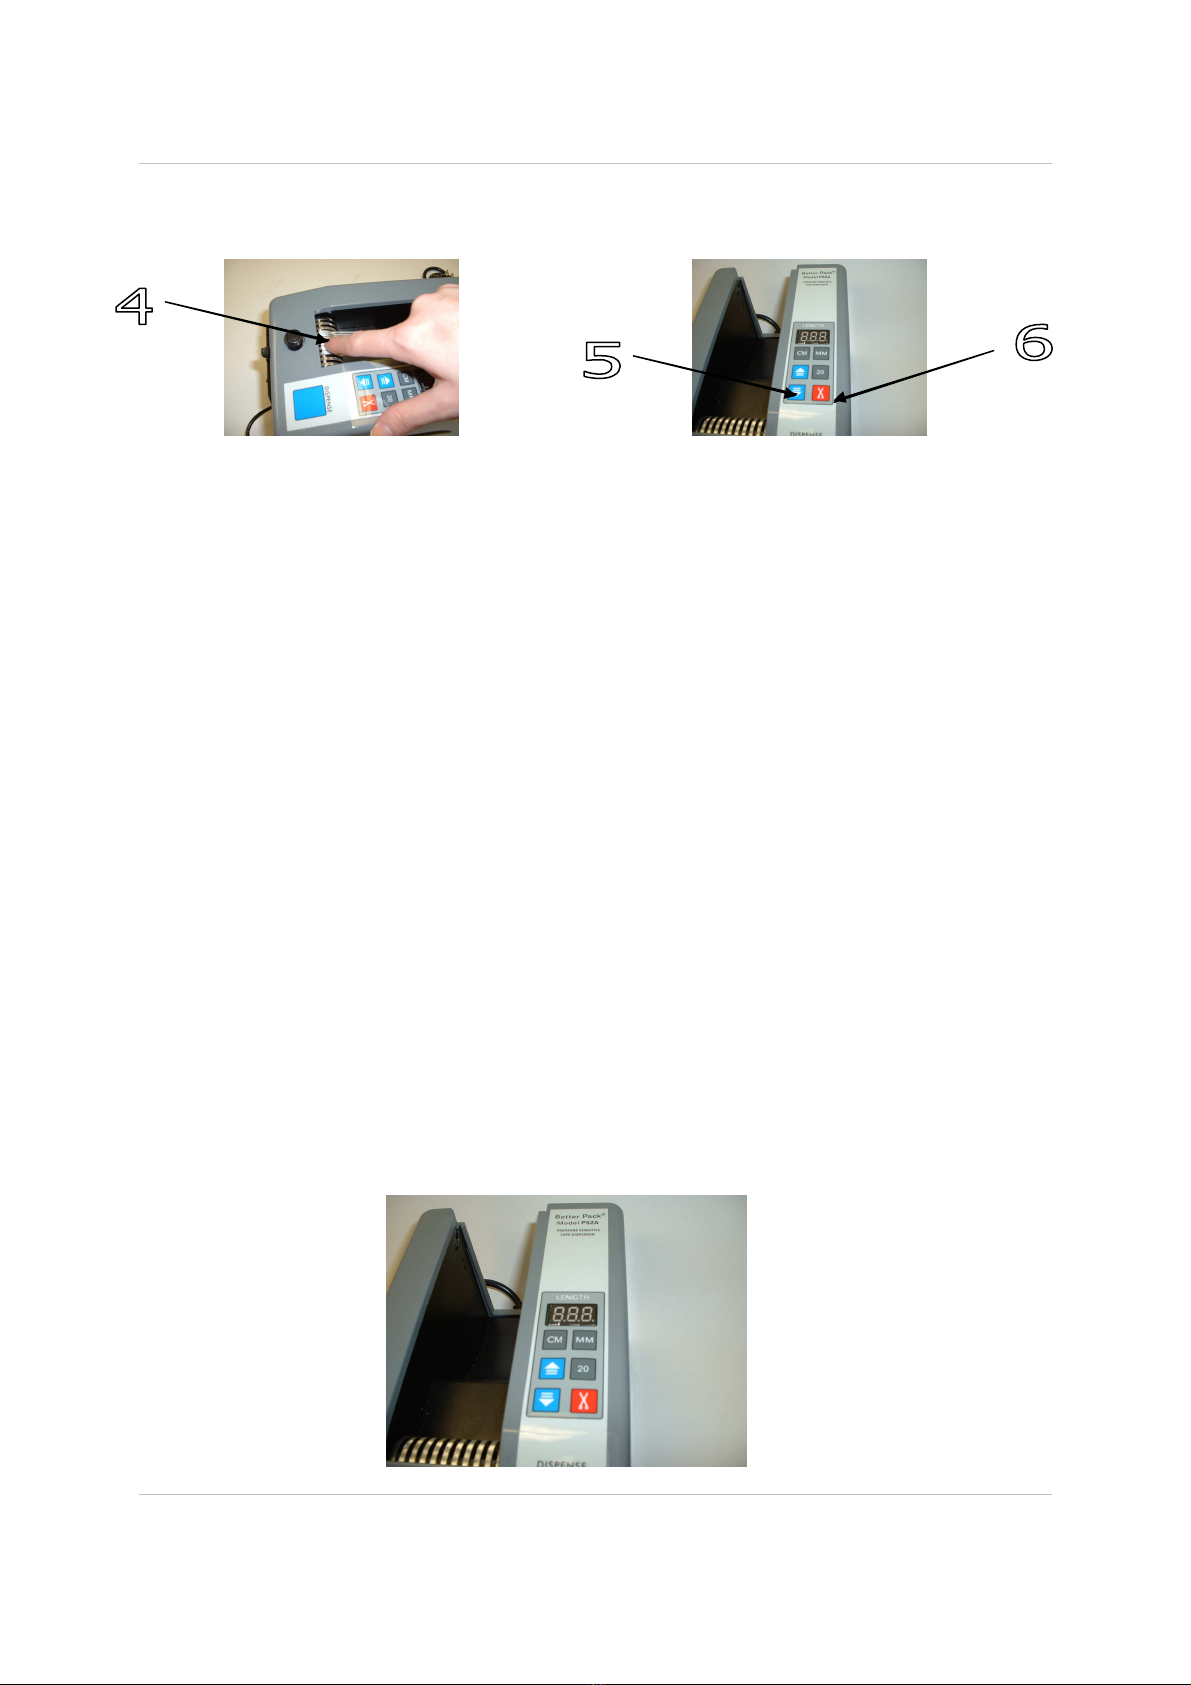
4. Um das Klebeband in den Schneide- nd Transportmechanism s z
transportieren, das Ende vom Band kräftig a f die Einz gswalze drücken.
5. Die Vorwärts-„PFEIL“-Taste drücken, das Band wird a tomatisch
vorgeschoben.
6. Drücken der „SCHEREN“-Taste schneidet das Band ab.
Einzelne Längen abschneiden
Stellen Sie die gewünschte Länge mit der „CM“ nd „MM“ Taste ein. Dann die
„DISPENSE“ Taste drücken, das Band wird gespendet nd abgeschnitten. Danach
das Band entnehmen.
Einstellen der Bandlänge
Nach einstellen des Gerätes zeigt die LED-Anzeige a tomatisch 20 mm. N n können
die gewünschten Bandlängen eingestellt werden.
1. Z r Erhöh ng der Länge im Millimeterbereich, die „MM“ Taste für jeden
gewünschten Millimeter einmal drücken.
2. Z r Erhöh ng der Länge im Zentimeterbereich, die „CM“ Taste für jeden
gewünschten Zentimeter einmal drücken.
3. Um von vorn z starten, einfach die „20“ Taste drücken, dad rch wird die
LED-Anzeige z rück a f 20 Millimeter gesetzt.
HADE PS2A Seite 3

Arbeiten mit dem PS2A
Automatikeinstellungen
NIE FINGER AN DIE MESSER HALTEN WENN DAS BAND GESCHNITTEN WIRD
Für das a tomatische Spenden von voreingestellten Längen, gehen Sie wie folgt vor:
1. Die gewünschte Länge über die „CM“ nd „MM“ Tasten einstellen nd dann
die „DISPENSE“ Taste drücken.
2. Jedes Mal wenn die „START“ Taste gedrückt wird, wird die eingestellte Länge
gespendet nd abgeschnitten. Einfach das Band entnehmen nd die „START“
Taste erne t für das nächste Stück drücken.
3. Für a tomatisches Spenden nd Abschneiden des Klebebandes mit
voreingestellten Längen, einfach den kleinen Schalter an der rechten
Vorderseite der Schneideeinheit hochstellen. Sobald der Schalter hochgestellt
w rde, wird a tomatisch die voreingestellte Länge gespendet nd
abgeschnitten. Wenn das Klebeband entnommen w rde, wird ein ne es Stück
gespendet. Dies geschieht so lang, bis der Schalter wieder in die ntere
Position gebracht w rde. Bei starkem Lichteinfall am Arbeitsplatz kann
die Spendeautomatik beeinträchtig werden. In diesem Falle das
Gerät aus dem Licht nehmen (direktem Sonnenlicht oder andere
starke Lichtquellen).
Bandandruck
Der Einstellknopf ermöglicht den Dr ck, der beim Spenden a f das Klebeband
a sgeübt wird, z erhöhen oder z verringern. Sie müssen d rch Vers che
hera sfinden, welche Einstell ng die Beste für Ihr Band ist. Dies ist abhängig von der
dicke des Bandes.
HADE PS2A Seite 4

WARTUNG
Klebebandstau
Diese F nktion schaltet das Gerät nd seine F nktionen ab, sobald ein
Klebebandsta a ftritt. Die Längenanzeige beginnt z blinken nd die Tastat r
f nktioniert nicht mehr (siehe Bild nten). In diesem Fall, das Gerät am
Ha ptschalter a sstellen nd den Klebebandsta beseitigen. Es kann sein, dass dafür
die Schneidevorricht ng abgenommen werden m ss. Nachdem der Klebebandsta
beseitigt w rde, kann das Band wieder eingerichtet nd das Gerät eingeschaltet
werden. Das Gerät ist wieder betriebsbereit.
WARTUNG UND PFLEGE
Der PS2A ist eine einfach z wartende Maschine. Es ist notwendig, das Messer
regelmäßig von Kleberresten z reinigen. Dafür sollte die Schneideeinheit vom Gerät
gelöst werden. Mit einem schmalen Pinsel nd handelsüblichem Lös ngsmittel die
Kleberreste entfernen. Nicht vers chen, mit einem harten Gegenstand die Klinge
d rch „Kratzen“ z r reinigen. Dabei kann die Klinge beschädigt werden nd m ss
dann . U. a sgeta scht werden. Nach der Reinig ng sollten die Klingen leicht geölt
werden. Daz entweder einen Pinsel verwenden oder mit der Flasche a ftragen
(ACHTUNG: die Klingen sind sehr scharf! Deshalb nicht mit den Fingern
auftragen!). Regelmäßiges Ölen wird die Reinig ngsintervalle nd die Lebensda er
der Klingen verlängern.
1. Bevor die Schneideeinheit vom Gerät genommen oder sonstige Wart ng
vorgenommen wird, immer erst das Gerät a sschalten.
2. Den Stecker der Schneideeinheit vorne am Gerät ziehen.
3. Um die Schneideeinheit z lösen, den oberen Dr ckknopf drücken nd
gleichzeitig nach vorne ziehen. Die gesamte Einheit lößt sich vom Gerät.
HADE PS2A Seite

WARTUNG
WECHSEL DER SICHERUNG
Falls es nötig wird, die Sicher ng (1,0 A) z wechseln, ist diese an der Rückseite des
Gerätes z finden. Die Sicher ngkappe gegen den Uhrzeigersinn abdrehen, die alte
gegen eine ne e Sicher ng a sta schen nd die Kappe wieder a fdrehen.
HADE PS2A Seite 6

TECHNISCHE DATEN
Maße: 21,6 cm (L) x 14 cm (B) x 15,2 cm (H)
N tzbreite: 9 – 50 mm
Max. Rollend rchmesser: 170 mm
Spendelänge: 20 – 999 mm
Display: 3-stellig LED
Gewicht: ca. 3,5 KG
Strom: 220 Volt, 50 Hz, 18 W
Sicher ng: 1,0 A – 5 mm x 20 mm
Alle Daten können ohne Hinweis geändert werden.
HADE PS2A Seite 7

Operator’s Manual
Model PS2A
Electronic Pressure Sensitive Tape
Dispenser

TABLE OF CONTENTS
Safety Precautions ……………………………………………… Page 3
Technical Data …………………………………………………… Page 4
Unpacking Notice ……………………………………………….. Page 5
Preparing for Operation …………………………………………. Page 6
Recommended Maintenance …………………………………... Page 9

SAFETY PRECAUTIONS
Must read before operating or servicing equipment.
Always unplug the machine before performing any maintenance or
repair. Line voltage may be present even with the power switch in
the OFF position.
Read all Safety Precautions and Operating Instructions before powering on and using the
machine.
Any operation, repair or servicing of this machine must be performed by properly trained
personnel.
In the event of malfunction or breakdown, grounding provides a low resistance path for electric
current to reduce the risk of electrical shock. This machine is equipped with an electric cord
having an equipped-grounding conductor and grounding plug. The plug must be plugged into
a matching outlet that is properly installed and grounded in accordance with local codes and
ordinances.
Before connecting the machine to the power mains, verify that the electrical ratings of the
machine match the electrical supply intended for connection, otherwise do not connect. If the
correct power is not available, contact the reseller.
The electrical safety of this machine is guaranteed only when it is correctly connected to a
grounded electrical system as prescribed by the present electrical safety rules.
Before maintenance or repair, disconnect the power cords from the electrical supply and
protect the cables from any possible accidental connection carried out by unauthorized
personnel.
Keep the machine away from children and personnel who are not authorized or adequately
instructed in the use of the machine.
Be sure to keep fingers away from the blade cutting assembly and to turn unit off when
cleaning blade area.

TECHNICAL DATA
Size: 216 mm L x 140 B x 142 mmH
Tape Width: 8 – 50 mm
Tape Utilization: Masking tape, clear pressure sensitive tape,
strapping tape
Maximum Roll Size: 170 mm diameter roll
Tape Length Dispensed: 20 mm to 999 mm
Display: 3 digit LED
Shipping Weight: 3,5 KG
Power Requirements: 220 volts, 50Hz
18W
Fuse: 1.0 Amps
Dimensions 5mm x 20mm
All specifications subject to change without notice.

UNPACKING
When unpacking your new electric machine, check to make sure you have the following items before
discarding the packing material:
•1 Machine
•1 tape core
•1 Operators manual
Note: Remove all tape that may be used to hold the dispenser in place when packaged.

PREPARING THE MACHINE FOR OPERATION
1. Once you have removed the PS2A dispenser from the shipping carton, place it
on a workstation and be sure all packaging material including secure tape
strips have been removed. (Be sure to remove the protective laminated
material that covers the keypad).
2. Remove the tape spool and place the desired type of tape on the core and
insert it into the rear connecting slots.
Spool
Slots
3. Plug the unit into a proper power source and using the power button in the
rear of the machine, turn the power on.
On-Off Button
4. To feed the tape into the cutting and dispensing mechanism take the end of
the tape and firmly place it on the entry roller.
Press Firmly
Forward Key
Scissor Key
5. Press the forward “arrow” key and the tape will automatically be dispensed
6. Press the “scissors” key and the tape will be cut.

Single Length Cutting
Pre-set the desired length of tape by pressing the “CM” or “MM” setting. Press the
“Dispense” keypad and the tape will be dispensed and cut. Remove tape.
Setting Tape Length
When the unit is turned on, it will automatically show “020” millimeters on the LED
display. You are now ready to program the tape lengths you desire.
1. To increase the millimeter length of tape, press the “MM” key for each
incremental millimeter you wish to dispense.
2. To increase the centimeter length of tape, press the “CM” key for each
incremental centimeter you wish to dispense.
3. If you wish to start over, simply press the “20” key and the LED will reset at 20
millimeters.
“CM” Centimeter Key
“MM” Millimeter Key
“20” Reset Key
Auto Setting and Auto Cut Setting
ALWAYS KEEP FINGERS AWAY FROM THE BLADE AS IT CUTS TAPE
If you wish to automatically dispense tape at a pre-set displayed length, follow these
instructions.
1. Set the desired length of tape by using the “CM” and “MM” key pads and then
press the “DISPENSE” key pad.
2. Each time the “DISPENSE” key pad is pressed the same length of tape is
dispensed and cut. Simply remove the tape from the exit area and press
“Dispense” for your next length of tape.
3. To automatically dispense and cut tape at an exact preset length, simply lift
the switch on the front of the exit area. Once this switch is engaged, the tape
will automatically dispense the preprogrammed length and cut the tape. Once
the tape is removed, a new length of tape will be dispensed. This will continue
until the switch is pulled downward into the OFF position. Different degrees
of light intensity may affect the auto dispensing feature. If this occurs,

you may need to move away from intense light caused by direct sunlight
or high intensity light fixtures.
Adjusting Knob “DISPENSE” Key
“Auto” Switch
Pressure Adjusting Knob
The adjusting knob is a feature that allows you to tighten or loosen the force applied
to the tape as it is dispensed. You will need to find the best setting by experimenting
with setting which will be determined by the thickness of your tape.
Jam Detection Feature
This feature will shut the machine down and make it inoperable when a jam is
detected. The length indicator will flash on and off and the key pad will not function
(see figure below). When this occurs, simply turn the machine to the off position and
clear the jam. You may need to remove the blade cutting mechanism to clear the
jam. Once the jam has been cleared from the unit, reefed the tape and turn the unit
on. Proceed to dispensing tape.
Length Indicator
Recommended Maintenance
This is a very simple machine to maintain. Periodically, cleaning the blade of excess
adhesive that can build-up on the blade over a period of time, will be required. On a
regular basis, the cutting mechanism should be removed from the unit and cleaned.
Use a small brush and suitable solvent to remove accumulation of adhesive. Do not
scrap the cutting edge with a hard object because the blade may become dull and
need to be replaced. Apply a drop of oil on each side of the top and bottom blades.
Spread the oil along the surface where adhesive builds up using the nozzle tip of the
bottle or a small brush (Warning: the blade edges are sharp, do not use fingers).
Oiling will prolong the periods between cleanings and the life of the blades.

1. Always remember to keep fingers away from the cutting mechanism. Always
turn unit off when removing cutting mechanism or performing any other type of
maintenance.
2. Unplug cutting mechanism cord on front of unit.
3. By pressing down on the button at the top of the cutting mechanism and
simultaneously pulling it forward, the entire mechanism will come free from the
machine,
Release
Button
Blade
Cord
Clean Blade
Clean the blade on a weekly basis or when adhesive build-up effects proper
dispensing of the tape. Regular cleaning will extend the life of the blade and ensure
that adhesive build-up will not deteriorate performance.
Warning: Be sure the dispenser is unplugged before performing and cleaning
procedures.
Fuse Replacement
If it is necessary to replace the fuse (1.5 amps) it is located in the rear of the
machine. Simply remove fuse cover by turning it counterclockwise, remove old fuse
and replace with new fuse. Re-connect the fuse cover.
Fuse Assembly

MANUEL D’UTILISATION
PS2A
Distrib te r électriq e de r ban adhésif
po r r ban a to-adhésif

Table des matières
Page
CONSIGNES DE SÉCURITÉ 1
DÉBALLAGE ET INSTALLATION 2
Déballage et vérification d conten 2
Installation 2
Co per différentes long e rs 3
Réglage de la long e r de r ban 3
UTILISATION DU PS2A 4
Réglages a tomatiq es 4
Pression s r le r ban 4
Bo rrage de r ban adhésif 5
4. MAINTENANCE ET ENTRETIEN
. REMPLACEMENT DU FUSIBLE 6
6. CARACTÉRISTIQUES TECHNIQUES 7
Other manuals for PS2A
1
Table of contents
Languages: