Beurer medical FT 58 User manual

D
Ohrthermometer
Gebrauchsanweisung............................2–13
G
Ear thermometer
Instructions for use..............................14–25
F
Thermomètre auriculaire
Mode d’emploi .....................................26–37
E
Termómetro para el oído
Instrucciones de uso ...........................38–49
I
Termometro per orecchio
Istruzioni per l’uso ...............................50 –61
T
Kulak Termometresi
Kullanım Kılavuzu ................................62–73
r
Термометр для измерения
температурывухе
Инструкция по применению .............74–87
Q
Termometr douszny
Instrukcja obsługi.................................88–99
ELECTROMAGNETIC COMPATIBILITY
INFORMATION .......................................100 – 103
FT 58

14
ENGLISH
Read these instructions for use carefully
and keep them for later use, be sure to
make them accessible to other users
and observe the information they con-
tain.
Dear customer,
Thank you for choosing one of our products. Our name stands
for high-quality, thoroughly tested products for applications in
the areas of heat, gentle therapy, blood pressure/diagnosis,
weight, massage and air.
With kind regards,
Your Beurer team
Included in delivery
Check that the delivery has not been tampered with and make
sure that all components are present. Before use, ensure that
there is no visible damage to the device or accessories and
that all packaging material has been removed. If you have any
doubts, do not use the device and contact your retailer or the
specified Customer Services address.
1 x ear thermometer
2 x 1.5V AAA batteries
10 x protective caps
1 x set of instructions for use
Subsequent purchase articles
Protective cap set replacement available: 2 x 10 protective
caps, item no. 795.34
1. Signs and symbols ......................................................................... 15
2. Intended use ................................................................................... 15
3. Notes ............................................................................................... 16
4. Unit description .............................................................................. 17
5. Initial use ......................................................................................... 18
6. Settings ........................................................................................... 18
6.1 Setting the time/date.................................................................. 18
6.2 Setting the temperature unit (°C or °F) ....................................... 19
7. Measuring ....................................................................................... 19
7.1 Measuring body temperature ..................................................... 19
7.2 Measuring object temperature ................................................... 21
7.3 Displaying room temperature ..................................................... 21
7.4 Displaying stored measurements ............................................... 22
8. Replacing the battery..................................................................... 22
9. Cleaning and storage .................................................................... 23
10. Disposal .......................................................................................... 23
11. What if there are error messages? ............................................... 23
12. Technical data................................................................................. 25
Table of contents

15
1. Signs and symbols
The following symbols appear in these instructions for use
and on the device:
WARNING
Warning notice indicating a risk of injury or
damage to health.
IMPORTANT
Safety note indicating possible damage to
the unit/accessory.
Note
Note on important information
Observe the instructions for use
Application part, type BF
Disposal in accordance with the Waste
Electrical and Electronic Equipment EC
Directive – WEEE
The CE labelling certifies that the product
complies with the essential requirements of
Directive 93/42/EEC on medical products.
Storage
Permissible storage temperature and
humidity
Operating
Permissible operating temperature and
humidity
Manufacturer
IP 22
IP 22, protection against harmful ingress of
water and dust
Certification symbol for products that are ex-
ported to the Russian Federation and mem-
bers of the CIS
2. Intended use
The ear thermometer is intended for measuring the body tem-
perature in the ear. Do not use the ear thermometer for meas-
urements in other parts of the body.
You can also use the ear thermometer to measure room and
object temperatures.
The ear thermometer has been carefully developed for precise,
safe and rapid temperature measurements in the ear. It is a
non-invasive ear thermometer with an infra-red detector to de-
termine the body temperature in the auditory canal of adults
and children.
Use the device for the intended purpose only and in the manner
specified in these instructions for use. Any form of improper use
can be dangerous. The manufacturer is not liable for damage
resulting from improper or careless use.

16
The quality of the device has been verified and conforms to the
requirements of Council Directive 93/42/EEC (Medical Devices
Directive) Annex I, Essential requirements, and the correspond-
ing harmonised standards. ISO 80601-2-56:2009 Clinical ther-
mometers – Part 5: Performance of infra-red ear thermometers
(with maximum device).
Please note that portable and mobile HF communication systems
may interfere with this device. More details can be requested from
the stated Customer Services address or found at the end of the
instructions for use.
3. Notes
Safety notes
WARNING
•
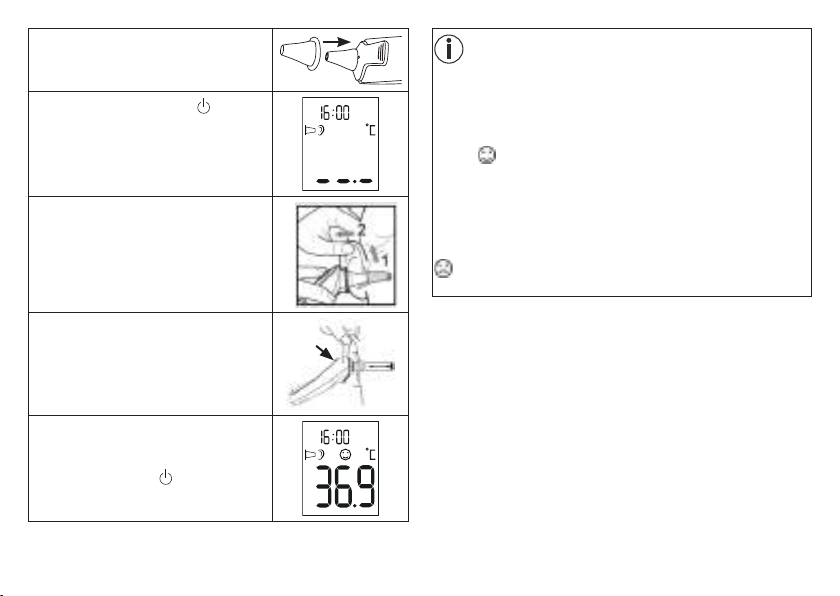
To measure temperature, insert the sensor tip of the ear
thermometer carefully into the ear.
•
Use of the ear thermometer on dierent persons can be inap-
propriate in the event of certain acute infectious diseases be-
cause of the possible spread of germs despite cleaning and
disinfection. If you have any doubts, please consult your doctor.
•
The body temperature measured in the ear may dier from
other measurements taken in the mouth, rectum or armpits.
Any comparison of these values is therefore futile. Meas-
ure temperature regularly to calculate the normal ear tem-
perature and then use these measurements as a basis for
comparison when taking measurements in the event of a
suspected high temperature.
•
This ear thermometer is intended for measuring the temper-
ature in the ear. Do not use this ear thermometer for meas-
urements in other parts of the body.
•
Replace the protective cap after each use to ensure an accu-
rate measurement and prevent cross-contamination.
•
The ear thermometer may only be used with protective caps
from Beurer; other protective caps may result in faulty meas-
urements. If you have run out of protective caps, contact the
manufacturer or retailer for replacements.
•
Consult a doctor if you believe your medical condition to
be poor.
Notes on handling batteries
WARNING
•
If your skin or eyes come into contact with battery fluid, rinse
the aected areas with water and seek medical assistance.
•
Choking hazard! Small children may swallow and choke
on batteries. Store the batteries out of the reach of small
children.
•
Observe the plus (+) and minus (-) polarity signs.
•
If a battery has leaked, put on protective gloves and clean
the battery compartment with a dry cloth.
•
Protect batteries from excessive heat.
•
Risk of explosion! Never throw batteries into a fire.
•
Do not charge or short-circuit batteries.
•
If the device is not to be used for a relatively long period, take
the batteries out of the battery compartment.
•
Use identical or equivalent battery types only.
•
Always replace all batteries at the same time.

17
•
Do not use rechargeable batteries.
•
Do not disassemble, split or crush the batteries.
Risks to the device
IMPORTANT
•
Do not subject the device to mechanical impacts.
•
Do not expose the device to direct sunlight.
•
Do not expose the device to liquids. The device is not wa-
terproof. Avoid all direct contact with water or other liquids.
•
Have the device repaired by authorised service centres only,
otherwise its warranty is invalidated.
•
Portable and mobile HF communication systems may inter-
fere with this device. More details can be requested from
the stated Customer Services address or found at the end
of the instructions for use.
4. Unit description
1 Protective cap
2 Measuring sensor
3 START button
4 ON/OFF button
5 Battery compartment
LCD display
1 Room temperature mode
2 Displays room temperature/
time/date
3 AM/PM display (time)
4 Battery symbol
5 Memory mode
6 No fever symbol
7 Temperature unit (°C or °F)
8 Fever symbol
9 Temperature display
10 Object temperature mode
11 Protective cap symbol
12 Body temperature mode
1
2
3
45
E
1
5
7
6
8
9
10
11
12
2 3 4

18
5. Initial use
The batteries are already inserted in new de-
vices. Before first use, remove the protrud-
ing plastic insulating strip from the battery
compartment. The ear thermometer will then
switch on automatically.
6. Settings
6.1 Setting the time/date
Before beginning to take measurements, we recommend that you
set the current time and date. This will allow you to organise the
saved measurements more easily later.
1. Press and hold the ON/OFF but-
ton on the switched-o de-
vice for three seconds. “24 H”
appears on the display.
2. Use the START button to select
the hour format (12h or 24h) and
confirm using the ON/OFF but-
ton .
3. The hour setting appears on the
display. Use the START button to
select the current hour and con-
firm using the ON/OFF button .
4.
The minute setting appears on
the display. Use the START but-
ton to select the current minute
and confirm using the ON/OFF
button .
5. The year setting appears on the
display. Use the START button to
select the current year and con-
firm using the ON/OFF button .
6.
The day flashes on the display.
Use the START button to select
the current day and confirm us-
ing the ON/OFF button .
7.
The month flashes on the display.
Use the START button to select
the current month and confirm
using the
ON/OFF button
.
The device then switches itself
o automatically. The date and
time are now saved.

19
6.2 Setting the temperature unit (°C or °F)
You can set the device to display the temperature in degrees
Celsius (°C) or degrees Fahrenheit (°F).
1.
Press and hold the START but-
ton on the switched-o device
for three seconds. “°C” ap-
pears on the display.
2.
Use the START button to select
the temperature unit (°C or °F)
and confirm using the ON/OFF
button .
7. Measuring
Note
Check before each use that the lens is intact. If it is damaged,
contact your retailer or the service address. Bear in mind that
the ear thermometer needs to have been in the room in which
the measurement is taken for at least 30 minutes before use.
7.1 Measuring body temperature
WARNING
•
Some people produce dierent readings in their left and right
ear. In order to record temperature changes, always measure
a person’s temperature in the same ear.
•
The ear thermometer may be used by children only under
adult supervision. Measurement is usually possible over the
age of 6 months. In infants under 6 months, the ear canal
is still very narrow so the temperature of the eardrum often
cannot be recorded and the result displayed is often too low.
•
The measurement must not be taken in an ear aected by
inflammatory diseases (e.g. discharging pus or secretion),
after possible ear injuries (e.g. eardrum damage) or in the
healing period after operative procedures. In all of these
cases, please consult your doctor.
•
Use of the ear thermometer on dierent persons can be in-
appropriate in the event of certain acute infectious diseases
because of the possible spread of germs despite cleaning
and disinfection. If you have any doubts, please consult
your doctor.
•
This ear thermometer may only be used with the protective
cap in place.
•
The following circumstances may influence the temperature
in the ear: if you have been lying on the ear for an extended
period, the ears are covered, the ears are exposed to exces-
sive heat/cold, or after swimming or bathing. In the event
of one of these circumstances, wait 20 minutes before per-
forming the measurement.
•
As ear wax can aect the measurement, you should clean
the ear before measuring if necessary.

20
1. Place a clean protective cap on to the
sensor tip of the ear thermometer.
2. Press the ON/OFF button to switch
on the ear thermometer. Three acoustic
signals sound and the display switch-
es on.
3. As the ear canal is slightly curved, you
have to pull the ear slightly up and
backwards before inserting the sensor
tip. This is important so that the tip of
the protective cap can be pointed di-
rectly at the eardrum.
4.
Insert the sensor tip with the protec-
tive cap carefully into the ear canal and
press the START button to begin the
measurement.
5.
After approx. one second, a long
acoustic signal sounds and the meas-
urement is shown in the display. Press
the ON/OFF button to switch o the
ear thermometer.
Note
If no button is pressed for one minute after the measurement,
the ear thermometer automatically switches itself o again.
Fever indicator
If the measured temperature is <38 °C (100.4°F), a laughing
smiley appears on the display and a short acoustic sig-
nal sounds.
If the measured temperature falls between 37.5 and 37.9°C,
two short acoustic signals will also sound (the indication for
“raised temperature”).
If the measured temperature is ≥38°C (100.4°F), a sad smiley
appears on the display and a short, a long and three short
acoustic signals sound one after the other.

21
7.2 Measuring object temperature
1.
Remove the protective cap from the
sensor tip of the ear thermometer (if
it is on).
2. Press the ON/OFF button to switch
on the ear thermometer. Three acoustic
signals sound and the display switch-
es on.
3. Ensure that you are in object tempera-
ture mode ( ).
To switch between body temperature
and object temperature mode, brief-
ly press and hold the ON/OFF button
and the START button at the same
time.
4.
Hold the sensor tip of the ear thermom-
eter 1 to 2cm from the desired measur-
ing point and press the START button.
5. After one second, a long acoustic sig-
nal sounds and the measurement is
shown in the display. Briefly press the
ON/OFF button to switch o the ear
thermometer.
7.3 Displaying room temperature
When you switch on the ear thermometer, the room tempera-
ture, the date and time appear alternately on the display every
3 seconds.

22
7.4 Displaying stored measurements
The ear thermometer automatically stores the last 10 temper-
ature measurements of body and object temperature respec-
tively (incl. date and time). To recall the stored measurements,
proceed as follows:
1.
Press the ON/OFF button to
switch on the ear thermometer.
2. Press and hold the ON/OFF but-
ton for 3 seconds. An Mand
the last stored measurement ap-
pear on the display.
3. To switch between the individu-
al stored measurements, press
the ON/OFF button . With
each subsequent pressing of the
ON/OFF button , the memory
space number is displayed first
followed by the measurement.
4.
If you would like to proceed with a measurement, press the
START button. Press and hold the ON/OFF button for 3sec-
onds to switch o the ear thermometer.
8. Replacing the battery
Before replacing the battery, ensure that the device is switched
o.
1.
Replace the batteries as soon as the
battery symbol ( ) appears on the
display.
2.
Slide open the battery compartment
and remove the used batteries from
the battery compartment.
3.
Insert two new 1.5 V AAA batteries.
Make sure that the batteries are in-
serted the right way round. Close the
battery compartment.

23
9. Cleaning and storage
Protective caps are only intended for
single use.
The sensor tip is the most sensitive part
of the ear thermometer. Work carefully
when cleaning the sensor tip to avoid
causing any damage. Use a clean cloth
or cotton bud that can be moistened with
disinfectant, alcohol or warm water.
To clean the entire device, use a soft cloth slightly moistened
with a mild soapy solution.
Do not use any harsh cleaning products.
If prolonged storage is intended, you should remove the bat-
teries. The device must not be stored or used at an excessively
high or low temperature or humidity (see technical data), in
sunlight, in association with an electrical current or in dusty
locations. Otherwise inaccuracies can occur.
10. Disposal
The empty, completely flat batteries should be disposed of
through specially designated collection boxes, recycling points
or electronics retailers. You are legally required to dispose of
the batteries.
Note: The codes below are printed on batteries
containing harmful substances: Pb = Battery con-
tains lead, Cd = Battery contains cadmium, Hg =
Battery contains mercury.
For environmental reasons, do not dispose of the de-
vice in the household waste at the end of its useful
life. Dispose of the unit at a suitable local collection
or recycling point. Dispose of the device in accord-
ance with EC Directive – WEEE (Waste Electrical and Electronic
Equipment). If you have any questions, please contact the local
authorities responsible for waste disposal.
11. What if there are error messages?
Error
message Cause Solution
ER1 The ear thermometer
is not yet ready for
measurement.
Take measurements only
once body ( ) or object
temperature mode ( )
appears on the display.
ER2
The measured ambi-
ent temperature is not
in the range from 10°C
– 40°C (50 – 104°F).
Place the ear thermometer
in a room with an ambient
temperature between 10°C
and 40°C (50°F and 104 °F)
for at least 30minutes.
ER3 The ear thermometer
is not placed in the ear
correctly.
Please observe the notes
in the chapter “Measuring”.
Perform the measurement
again.

24
Error
message Cause Solution
ER4
The ear thermometer
registered a large
change in the ambient
temperature.
Place the ear thermometer
in a room with an ambient
temperature between 10°C
and 40°C (50°F and 104 °F)
for at least 30minutes.
ER5 The ear thermom-
eter is not working
properly.
Replace the batteries and
try again. If the fault occurs
again, contact Customer
Services.
ER6
You are in the “Measur-
ing object temperature”
mode and the protec-
tive cap is still on.
The protective cap must be
removed to measure object
temperatures.
In-ear measurement:
the measured tem-
perature is over 43°C
(109.4°F).
Object measurement:
the measured temper-
ature is over 100°C
(212°F).
Ensure that the device and
the protective cap are fully
functioning. Perform the
measurement again.
Error
message Cause Solution
Lo
In-ear measurement:
the measured temper-
ature is below 28°C
(82.4°F).
Object measurement:
the measured
temperature is below
-20°C (-4°F).
Ensure that the device and
the protective cap are fully
functioning. Perform the
measurement again.
The batteries are
empty.
Remove the two empty
batteries and insert two
new 1.5 V AAA batteries in-
to the ear thermometer.
If you cannot find a solution to your problem here, contact our
Customer Services.

25
12. Technical data
Temperature range
•
In ear: 28.0 – 43.0°C (82.4 – 109.4°F)
•
Object temperature: -20–100°C
(-4–212 °F)
•
Room temperature: 0–50 °C
(32–122°F)
Laboratory
measurement accuracy
•
In ear: ±0 .2 °C (0.4°F) in meas-
urement range of 35.5–42.0 °C
(95.9–107.6 °F); ±0.3°C (0.5 °F) in
measurement range of ≤35.5°C
(95.5°F) and ≥42.0°C (107.6 °F)
•
Object temperature: ±4% or ±2 °C (4°F)
•
Room temperature: ±2°C (± 4 °F)
Clinical reproducibility 0.11°C (0.2°F)
Duration of
measurement
Approx. one second
Operating temperature
range
10–40 °C (50–104 °F),
humidity 15–85% (non-condensing)
Storage temperature
range
-25–55 °C (-13–131 °F),
humidity 15–95% (non-condensing)
Memory 10 memory spaces
Display resolution 0.1°C or 0.1°F
Battery DC 3 V (2 x 1.5 V AAA batteries)
Dimensions 155 x 38 x 47 mm
Weight Approx. 63 g (without batteries)
Protective caps 10
Automatic switch-o 60 seconds
Battery operating life
3,000 measurements in succession or one
year with one to two measurements per
day, including standby mode.
Safety classification
Connected medical device of
typeBF
IP protection class IP 22, protection against harmful ingress
of water and dust
The serial number is located on the device or in the battery
compartment.
Subject to errors and changes

26
FRANÇAIS
Lisez attentivement cette notice, conser-
vez-la pour un usage ultérieur, mettez-la
à disposition des autres utilisateurs et
suivez les consignes qui y figurent.
Chère cliente, cher client,
Nous vous remercions d’avoir choisi l’un de nos produits.
Notre société est réputée pour l’excellence de ses produits et
les contrôles de qualité approfondis auxquels ils sont soumis
dans les domaines suivants: chaleur, thérapie douce, dia-
gnostic de pression artérielle, contrôle de poids, massage et
purification d’air.
Sincères salutations,
Votre équipe Beurer
Contenu
Vérifiez si l’emballage carton extérieur du kit est intact et si tous
les éléments sont inclus. Avant l’utilisation, assurez-vous que
l’appareil et les accessoires ne présentent aucun dommage
visible et que la totalité de l’emballage a bien été retirée. En cas
de doute, ne l’utilisez pas et adressez-vous à votre revendeur
ou au service client indiqué.
1 thermomètre auriculaire
2 piles 1,5V, type AAA
10 embouts de protection
1 mode d’emploi
Accessoires en option
Recharges lot d‘embouts de protection: 2 x 10embouts de
protection, réf.-n°795.34
1. Symboles utilisés ........................................................................... 27
2. Utilisation conforme aux recommandations ............................... 27
3. Remarques...................................................................................... 28
4. Description de l’appareil................................................................ 29
5. Mise en service............................................................................... 30
6. Paramètres...................................................................................... 30
6.1 Réglage de l’heure/la date ......................................................... 30
6.2 Sélection de l’unité de température (°C ou °F) ........................... 31
7. Mesures........................................................................................... 31
7.1 Mesurer la température corporelle ............................................. 31
7.2 Mesurer la température d’objet .................................................. 33
7.3 Acher la température ambiante ............................................... 33
7.4 Acher les valeurs de mesure enregistrées............................... 34
8. Changement des piles ................................................................... 34
9. Nettoyage/stockage....................................................................... 35
10. Élimination des déchets ................................................................ 35
11. Que faire en cas de messages d’erreur? .................................... 35
12. Données techniques ...................................................................... 36
Table des matières

27
1. Symboles utilisés
Les symboles suivants sont employés dans ce mode d’emploi
et sur l’appareil:
AVERTISSEMENT
Ce symbole vous avertit des risques de
blessures ou des dangers pour votre santé.
ATTENTION
Ce symbole vous avertit des éventuels
dommages au niveau de l’appareil ou d’un
accessoire.
Remarque
Indication d’informations importantes
Respecter les consignes du mode d’emploi
Appareil de type BF
Élimination conformément à la directive
européenne WEEE (Waste Electrical and
Electronic Equipment) relative aux déchets
d’équipements électriques et électroniques
Le sigle CE atteste de la conformité aux
exigences fondamentales de la directive 93/42/
EEC relative aux dispositifs médicaux.
Storage
Température et taux d’humidité de stockage
admissibles
Operating
Température et taux d’humidité d’utilisation
admissibles
Fabricant
IP 22 IP 22, Protection contre la pénétration nuisible
d’eau et de poussière
Marque de certification pour les produits, qui
sont exportés en Fédération de Russie et dans
les pays de la CEI.
2. Utilisation conforme aux
recommandations
Le thermomètre auriculaire est conçu pour des mesures de
la température corporelle dans l’oreille. N’utilisez pas le ther-
momètre auriculaire pour des mesures à d’autres endroits du
corps!
Avec ce thermomètre auriculaire, vous pouvez également mesu-
rer la température ambiante ou la température d’objet.
Le thermomètre auriculaire a été développé pour des mesures
de température précises, sûres et rapides dans l’oreille. Il s’agit
d’un thermomètre auriculaire non invasif avec un détecteur infra-

28
rouge pour le relevé de la température corporelle dans le canal
auditif d’enfants et d’adultes.
N’utilisez l’appareil qu’aux fins pour lesquelles il a été conçu et
conformément aux indications données par ce mode d’emploi.
Toute utilisation inappropriée peut être dangereuse! Le fabricant
ne peut être tenu pour responsable des dommages causés par
une utilisation inappropriée ou non conforme.
La qualité de l’appareil a été contrôlée et respecte les exigences
de la directive du Conseil de l’UE 93/42/EEC (dispositifs mé-
dicaux) Annexe I, les exigences fondamentales ainsi que les
normes harmonisées respectives. ISO 80601-2-56:2009 Ther-
momètres médicaux – Partie 5: exigences sur les thermomètres
auriculaires infrarouges (avec dispositif à maximum).
Veuillez noter que les dispositifs de communication HF portables
et mobiles sont susceptibles d’influer sur cet appareil. Pour plus de
détails, veuillez contacter le service après-vente à l’adresse men-
tionnée ou vous reporter à la fin du mode d’emploi.
3. Remarques
Consignes de sécurité
AVERTISSEMENT
•
Lors des mesures, insérez avec précaution la pointe du cap-
teur du thermomètre auriculaire dans l’oreille.
•
Dans le cas de certaines maladies infectieuses aiguës, l’utilisa-
tion du thermomètre auriculaire sur plusieurs personnes peut
être inappropriée en raison d’une éventuelle transmission de
germes malgré le nettoyage et la désinfection nécessaires. Le
cas échéant, consultez votre médecin traitant.
•
La température corporelle mesurée dans l’oreille peut varier
par rapport à d’autres mesures dans la bouche, le rectum ou
les aisselles. Il ne sert donc à rien de comparer ces valeurs.
Mesurez régulièrement la température afin de déterminer la
température auriculaire normale et utilisez ensuite ces me-
sures comme point de comparaison pour les mesures qui
vous font soupçonner de la fièvre.
•
Ce thermomètre est conçu pour mesurer la température au-
riculaire. N’utilisez pas ce thermomètre auriculaire pour des
mesures à d’autres endroits du corps.
•
Remplacez la protection après chaque utilisation afin de
garantir une mesure précise et empêcher toute contami-
nation croisée.
•
Le thermomètre auriculaire doit être utilisé uniquement avec
des embouts de protection de Beurer. D’autres embouts
de protection peuvent provoquer des erreurs de mesure. Si
vous n’avez plus d’embout de protection, consultez le fabri-
cant ou un revendeur pour en obtenir d’autres.
•
Consultez un médecin si vous constatez une dégradation
de votre état de santé.
Remarques relatives aux piles
AVERTISSEMENT
•
Si du liquide de la cellule de pile entre en contact avec la
peau ou les yeux, rincez la zone touchée avec de l’eau et
consultez un médecin.

29
•
Risque d’ingestion! Les enfants en bas âge pourraient
avaler des piles et s’étouer. Veuillez donc conserver les
piles hors de portée des enfants en bas âge!
•
Respectez les signes de polarité plus (+) et moins (-).
•
Si une pile a coulé, enfilez des gants de protection et net-
toyez le compartiment à piles avec un chion sec.
•
Protégez les piles d’une chaleur excessive.
•
Risque d’explosion! Ne jetez pas les piles dans le feu.
•
Les piles ne doivent être ni rechargées, ni court-circuitées.
•
En cas de non utilisation prolongée de l’appareil, sortez les
piles du compartiment à piles.
•
Utilisez uniquement des piles identiques ou équivalentes.
•
Remplacez toujours l’ensemble des piles simultanément.
•
N’utilisez pas d’accumulateur!
•
Ne démontez, n’ouvrez ou ne cassez pas les piles.
Risques pour l’appareil
ATTENTION
•
Ne soumettez l’appareil à aucun choc mécanique.
•
N’exposez pas l’appareil à la lumière directe du soleil.
•
Ne soumettez l’appareil à aucun liquide. L’appareil n’est pas
étanche. Évitez tout contact direct avec l’eau ou d’autres
liquides.
•
Ne faites réparer l’appareil que dans un centre de service
autorisé, sous peine d’annulation de la garantie.
•
Les dispositifs de communication HF portables et mobiles
sont susceptibles d’influer sur cet appareil. Pour plus de
détails, veuillez contacter le service après-vente à l’adresse
mentionnée ou vous reporter à la fin du mode d’emploi.
4. Description de l’appareil
1 Embout de protection
2 Capteur de mesure
3 Touche START
4 Touche MARCHE/ARRÊT
5 Compartiment à piles
Écran LCD
1 Mode température ambiante
2 Achage de la température
ambiante/l’heure/la date
3 Achage AM/PM (heure)
4 Symbole de pile
5 Mode mémoire
6 Symbole d’absence de
fièvre
7 Unité de température
(°C ou °F)
8 Symbole de fièvre
9 Achage de la température
10 Mode température d’objet
11 Symbole d’embout de
protection
12 Mode température
corporelle
1
2
3
45
E
1
5
7
6
8
9
10
11
12
2 3 4

30
5. Mise en service
Les piles sont déjà insérées dans l’appareil
neuf. Avant la première utilisation, retirez la
bande de protection des piles qui dépasse du
compartiment à piles. Le thermomètre auricu-
laire s’allume alors automatiquement.
6. Paramètres
6.1 Réglage de l’heure/la date
Avant de commencer les mesures, nous vous conseillons de
régler l’heure et la date. Ainsi, vous pourrez aecter les mesures
enregistrées plus simplement plus tard.
1.
Maintenez la touche MARCHE/
ARRÊT de l’appareil enfoncée
pendant troissecondes. «24 H»
s’ache sur l’écran.
2.
À l’aide de la touche START,
sélectionnez alors le format de
l’heure souhaité (12h ou 24h)
et confirmez avec la touche
MARCHE/ARRÊT .
3.
L’heure s’affiche sur l’écran.
À l’aide de la touche START,
sélectionnez l’heure actuelle
et confirmez avec la touche
MARCHE/ARRÊT .
4.
Les minutes s’affichent sur
l’écran. À l’aide de la touche
START, sélectionnez les minutes
actuelles et confirmez avec la
touche MARCHE/ARRÊT .
5.
L’année s’ache sur l’écran.
À l’aide de la touche START,
sélectionnez l’année actuelle
et confirmez avec la touche
MARCHE/ARRÊT .
6.
Le jour clignote sur l’écran.
À l’aide de la touche START, sé-
lectionnez le jour actuel et confir-
mez avec la touche MARCHE/
ARRÊT .
7.
Le mois clignote sur l’écran.
À l’aide de la touche START,
sélectionnez le mois actuel
et confirmez avec la
touche
MARCHE/ARRÊT
. Ensuite,
l’appareil s’arrête automatique-
ment. La date et l’heure sont
alors enregistrées.

31
6.2 Sélection de l’unité de température (°C ou °F)
Vous pouvez acher vos résultats de mesure dans l’unité de
la température degrés Celsius (°C) ou degrés Fahrenheit (°F).
1. Maintenez la touche START de
l’appareil enfoncée pendant
troissecondes. «°C» apparaît
sur l’écran.
2.
À l’aide de la touche START,
sélectionnez alors l’unité de
température souhaitée (°C ou
°F) et confirmez avec la touche
MARCHE/ARRÊT .
7. Mesures
Remarque
Avant chaque utilisation, vérifiez que la lentille n’est pas en-
dommagée. Si elle l’est, adressez-vous au vendeur ou au ser-
vice après-vente. Tenez compte du fait que le thermomètre
auriculaire doit se trouver au moins 30minutes dans la pièce
dans laquelle la mesure est eectuée.
7.1 Mesurer la température corporelle
AVERTISSEMENT
•
Certaines personnes ont des valeurs de mesure diérentes
dans l’oreille gauche et l’oreille droite. Pour évaluer les chan-
gements de température, mesurez toujours dans la même
oreille pour une même personne.
•
Les enfants ne doivent utiliser le thermomètre auriculaire
que sous la surveillance d’un adulte. En général, une me-
sure est possible à partir de l’âge de 6 mois. Chez les petits
enfants de moins de 6 mois, le conduit auditif est encore
très étroit. Ainsi, la température du tympan ne peut sou-
vent pas être évaluée et des résultats de mesure trop bas
peuvent être achés.
•
La mesure ne doit pas être eectuée dans une oreille atteinte
de maladies inflammatoires (par ex. pyorrhée, sécrétions),
après d’éventuelles blessures des oreilles (par ex. blessures
du tympan) ou lors de la phase de guérison après une inter-
vention chirurgicale. Dans tous ces cas, veuillez consulter
votre médecin traitant.
•
Dans le cas de certaines maladies infectieuses aiguës, l’uti-
lisation du thermomètre auriculaire sur plusieurs personnes
peut être inappropriée en raison d’une éventuelle transmis-
sion de germes malgré le nettoyage et la désinfection né-
cessaires. Le cas échéant, consultez votre médecin traitant.
•
Ce thermomètre auriculaire doit être utilisé uniquement
quand un embout de protection est installé.
•
Les circonstances suivantes peuvent avoir un impact sur la
température auriculaire: si vous restez couché sur une oreille
pendant un temps prolongé, si les oreilles sont couvertes,

32
si elles sont exposées à une chaleur ou un froid intense ou
après la natation/baignade. Si vous êtes dans l’un de ces
cas, patientez 20minutes avant d’eectuer la mesure.
•
Le cérumen peut influencer la mesure, veuillez donc nettoyer
l’oreille avant la mesure le cas échéant.
1.
Vissez un embout de protection propre
sur la pointe du capteur du thermo-
mètre auriculaire.
2.
Pour allumer le thermomètre auricu-
laire, appuyez sur la touche MARCHE/
ARRÊT . Trois signaux sonores re-
tentissent et l’écran s’allume.
3.
Comme le conduit auditif est légère-
ment incurvé, vous devez tirer légè-
rement l’oreille vers le haut et l’arrière
avant d’introduire la pointe de l’embout
de protection afin que celle-ci puisse
être dirigée directement sur le tympan.
4.
Insérez la pointe du capteur avec l’em-
bout de protection dans le conduit au-
ditif et appuyez sur la touche START
pour commencer la mesure.
5.
Au bout d’environ une seconde, un
signal sonore retentit et le résultat
de la mesure s’ache à l’écran. Pour
éteindre le thermomètre auriculaire, ap-
puyez sur la touche MARCHE/ARRÊT
.
Remarque
Après une mesure, si vous n’appuyez sur aucune touche pen-
dant une minute, le thermomètre auriculaire s’éteint automa-
tiquement.
Indicateur de fièvre
Si la température mesurée est <38°C (100,4°F), une émo-
ticône souriante s’ache à l’écran et un signal sonore
bref retentit.
Si la température mesurée se situe entre 37,5 et 37,9°C, deux
bips brefs retentissent (indication de «température élevée»).
Si la température mesurée est ≥38°C (100,4°F), une émo-
ticône triste s’ache à l’écran et à la suite retentissent un
signal bref, un signal long et trois signaux courts.
Table of contents
Languages:
Other Beurer medical Thermometer manuals
Popular Thermometer manuals by other brands

Hanna Instruments
Hanna Instruments Checktemp Dip HI98539 instruction manual

Sper scientific
Sper scientific 800120 manual

ETEKCITY
ETEKCITY Lasergrip 1080 user manual

Swiss
Swiss dr Frei T-30 instructions

Küchenprofi
Küchenprofi Digital Thermometer QUICK instruction manual

DeWalt
DeWalt DCT416S1 instruction manual