Beward N35110 User manual

IR LEDs built in

Table of contents
N35110 Operations User Manual
1
Table of contents
CHAPTER 1. SAFETY INSTRUCTIONS............................................................................................... 3
CHAPTER 2. OVERVIEW...................................................................................................................... 5
2.1. OVERVIEW OF BEWARD N35110................................................................................................ 5
2.2. N35110 FEATURES...................................................................................................................... 6
2.3. THE N35110 SPECIFICATIONS ...................................................................................................... 6
2.4. PACKAGE CONTENTS ................................................................................................................... 7
2.5. DEFAULT SETTINGS...................................................................................................................... 7
2.6. PURPOSE OF USER MANUAL......................................................................................................... 8
2.7. MINIMUM SYSTEM REQUIREMENTS ............................................................................................... 8
CHAPTER 3. USING THIRD PARTY CLIENTS..................................................................................... 9
3.1. PLAYING 3GP VIDEO.................................................................................................................... 9
3.2. PLAYING STREAMING VIDEO IN 2.5G NETWORKS OVER WAP......................................................... 9
3.3. PLAYING STREAMING VIDEO IN 2.5G NETWORKS VIA BROWSER ..................................................... 9
3.4. PLAYING STREAMING VIDEO VIATHIRD PARTY SOFTWARE.............................................................. 9
3.4.1. Playing MPEG-4 Video .................................................................................................... 10
3.4.2. Playing MJPEG Video...................................................................................................... 10
3.4.3. Getting a JPEG Image..................................................................................................... 10
CHAPTER 4. MANAGING THE IP CAMERA VIA INTERNET EXPLORER ........................................11
4.1. INSTALLING ACTIVEXCONTROLS................................................................................................. 12
CHAPTER 5. MAIN MENU................................................................................................................... 16
5.1. [LIVE VIEW]PANE....................................................................................................................... 16
5.1.1. [Snapshot] Button............................................................................................................. 17
5.1.2. [Fullscreen] Button........................................................................................................... 17
5.1.3. [Open Digital Zoom] Button.............................................................................................. 17
5.1.4. Video Control Buttons ...................................................................................................... 18
5.1.5. Audio Control Buttons ...................................................................................................... 18
5.2. SETTING MENU.......................................................................................................................... 19
5.3. CLIENT SETTING ........................................................................................................................ 20
5.3.1. Mode ................................................................................................................................ 21
5.3.2. View Size.......................................................................................................................... 21
5.3.3. Protocol............................................................................................................................ 21
5.3.4. Video Buffer...................................................................................................................... 22
5.4. IMAGE SETUP ............................................................................................................................ 22
5.4.1. Brightness ........................................................................................................................ 23
5.4.2. Contrast............................................................................................................................ 23
5.4.3. Saturation......................................................................................................................... 23
5.4.4. Sharpness........................................................................................................................ 23
5.4.5. Exposure.......................................................................................................................... 23
5.4.6. Default.............................................................................................................................. 23
CHAPTER 6. SETTING: BASIC MENU............................................................................................... 24
6.1. SYSTEM..................................................................................................................................... 24
6.1.1. Information ....................................................................................................................... 24
6.1.2. Date/Time......................................................................................................................... 25
6.1.3. Initialize ............................................................................................................................ 27
6.1.4. Language ......................................................................................................................... 28
6.2. CAMERA.................................................................................................................................... 29
6.2.1. General............................................................................................................................. 29
6.2.2. H.264................................................................................................................................ 32
6.2.3. MPEG-4............................................................................................................................ 34
6.2.4. MJPEG............................................................................................................................. 36
6.2.5. 3GPP................................................................................................................................ 38
6.2.6. Advanced ......................................................................................................................... 39
6.2.7. Playback........................................................................................................................... 40
6.3. NETWORK.................................................................................................................................. 42
6.3.1. Information ....................................................................................................................... 43
6.3.2. PPPoE (Point-to-Point Protocol over Ethernet) ............................................................... 45
6.3.3. DDNS (Dynamic DNS)..................................................................................................... 46
6.3.4. UPnP (Universal Plug and Play) ...................................................................................... 47

Table of contents
N35110 Operations User Manual
2
6.3.5. Bonjour............................................................................................................................. 48
6.3.6. IP notification.................................................................................................................... 49
6.4. SECURITY.................................................................................................................................. 51
6.4.1. Account ............................................................................................................................ 51
6.4.2. HTTPS.............................................................................................................................. 53
6.4.3. IP Filter............................................................................................................................. 54
CHAPTER 7. SETTING: ADVANCED.................................................................................................. 56
7.1. FTP CLIENT............................................................................................................................... 56
7.1.1. General............................................................................................................................. 57
7.1.2. Alarm Sending.................................................................................................................. 58
7.1.3. Periodical Sending ........................................................................................................... 60
7.2. SMTP....................................................................................................................................... 62
7.2.1. General............................................................................................................................. 63
7.2.2. Alarm Sending.................................................................................................................. 64
7.2.3. Periodical Sending ........................................................................................................... 67
7.3. NETWORK STORAGE .................................................................................................................. 69
7.3.1. General............................................................................................................................. 70
7.3.2. Alarm Sending.................................................................................................................. 71
7.3.3. Periodical Recording........................................................................................................ 74
7.4. HTTPEVENT............................................................................................................................. 76
7.4.1. General............................................................................................................................. 76
7.4.2. Alarm Sending.................................................................................................................. 77
7.5.ALARM OUTPUT ......................................................................................................................... 79
7.6. SCHEDULE................................................................................................................................. 81
7.7.ALARM INPUT............................................................................................................................. 82
7.8.ALARM BUFFER.......................................................................................................................... 83
7.9. MOTION DETECTION................................................................................................................... 84
7.10AUDIO DETECTION .................................................................................................................... 86
7.11. SYSTEM LOG ........................................................................................................................... 87
APPENDIX............................................................................................................................................ 88
APPENDIXA. BITRATE VALUES........................................................................................................... 88
APPENDIX B. REQUIRED DISK SPACE................................................................................................. 92
APPENDIX C. REQUESTS FOR IMAGES FROM IPCAMERA..................................................................... 95
APPENDIX D. PORT VALUES............................................................................................................... 97
APPENDIX E. FACTORY DEFAULTS...................................................................................................... 98
APPENDIX F. ACCESSING THE CAMERA OVER THE INTERNET USING DYNDNS SERVICE......................... 99
F.1. Overview of Internet Access to Cameras Using DynDNS service...................................... 99
F.2. Creating an Account at DynDNS Service............................................................................ 99
F.3. Creating a Domain Name at DynDNS............................................................................... 103
F.4. Setting up the Equipment to Work with DynDNS.............................................................. 107
APPENDIX G. GLOSSARY..................................................................................................................111

Chapter 1. Safety Instructions
N35110 Operations User Manual
3
Chapter 1. Safety Instructions
Before using this product
This camera complies with all safety rules. However, improper use of any electric device
can be a cause of fire and bring to property damage. Before you start using this camera, please
study this user manual carefully.
IMPORTANT!
Use accessories recommended by the manufacturer only. Use of the improper accessories may cause
camera’s breakdown.
Follow the operating instructions
Do not use and store this camera in severe environment:
avoid extremely low or high ambient temperatures (the camera’s operating temperature
is -40°C to +50°C)
avoid exposure to direct sunlight and do not locate the camera near any heat sources
avoid exposure to high humidity
do not locate the camera near any electrical appliances which can be electromagnetic
transmitters
avoid exposure to high vibration
IMPORTANT!
In case of malfunction of the product, please contact your local dealer for technical assistance.
In case of:
detection of a strange smell or smoke
penetration of any liquid or foreign objects into the camera
the camera has been dropped or damaged
Do the following:
unplug the power cord and disconnect all other cords from the camera
contact our Service Center. You can find contact information on our website:
http://www.beward.eu/.
Transportation
Ttransport the camera carefully, using the original box and protective packing.

Chapter 1. Safety Instructions
N35110 Operations User Manual
4
Ventilation
To prevent overheating of the device, keep free air circulation in the area where the camera
is located.
Cleaning
Use a soft, dry cloth for cleaning camera’s external surfaces. It is acceptable to use some
detergent for removing persistent dirt, but not the volatile cleaners such as the alcohol-containing
solvents, benzene and so on, because of the risk to damage the camera’s housing.
Chapter 2. Overview
N35110 Operations User Manual
5
Chapter 2. Overview
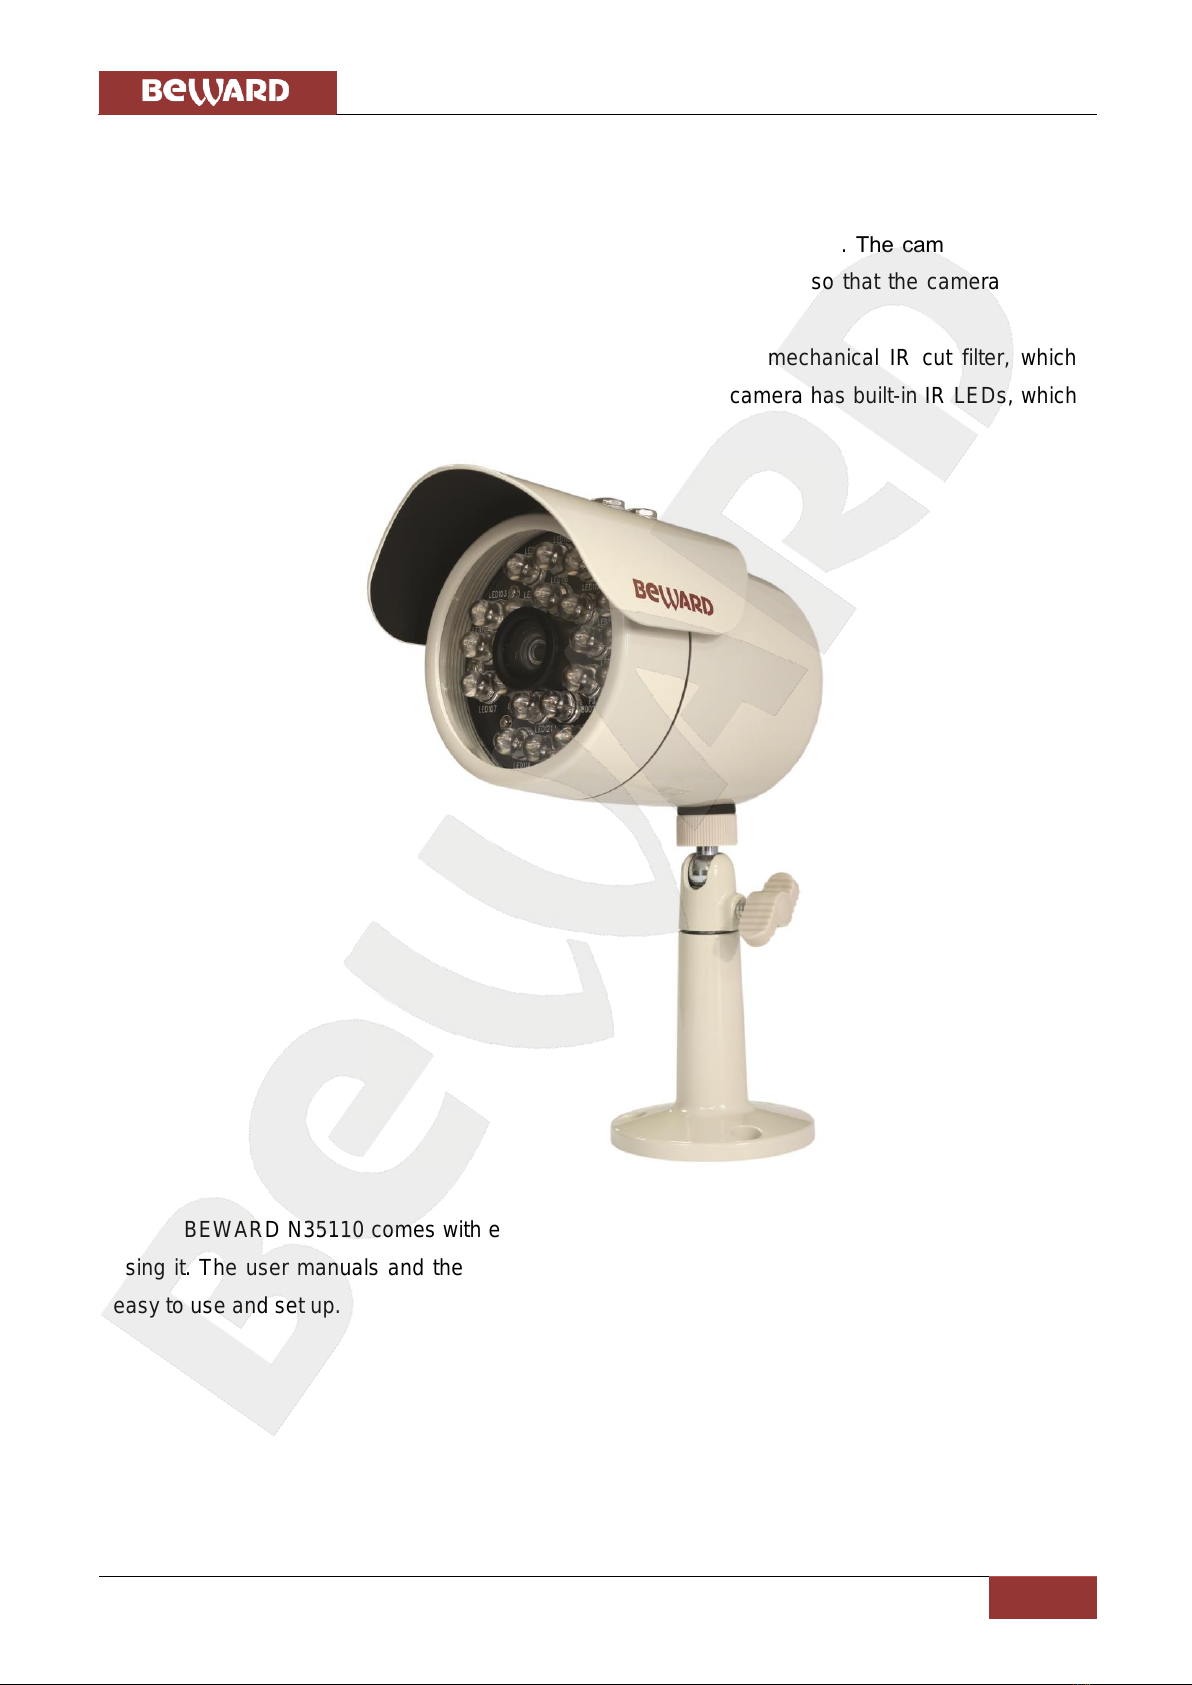
2.1. Overview of BEWARD N35110
BEWARD N35110 is designed for both indoor and outdoor usage. The camera’s housing
surely protects it against harsh weather conditions and is IP66 rated, so that the camera can be
used in any environmental conditions.
The N35110 features a megapixel CMOS sensor and a mechanical IR cut filter, which
ensures clear pictures under low-light conditions. Besides, the camera has built-in IR LEDs, which
provide twenty-four-hour surveillance.
Pic. 2.1
BEWARD N35110 comes with everything you need to quickly set up your camera and start
using it. The user manuals and the surveillance software in English are included. The N35110 is
easy to use and set up.

Chapter 2. Overview
N35110 Operations User Manual
6
2.2. N35110 Features
IP66 rated housing
Motorized IR cut filter
15 meter IR distance
Optimal solution concerning price/quality
Recording to network attached storage (NAS)
Professional surveillance software included (16 channels)
Simultaneous streaming: Н.264/MPEG-4/MJPEG/3GPP
High-resolution sensor (up to 1280x1024 resolution)
Two-way audio, support for connecting an external microphone
Viewing camera images on a mobile phone (including iPhone)
Built-in multi-zone motion detection
Support for audio detection (when an external microphone is connected)
Sending of images and videos via e-mail and to FTP
PoE IEEE 802.3af Class 0 support
2.3. The N35110 Specifications
Compact size (80 хØ102 mm (with sunshield: 116/145 mm), weight is 635 g)
Sensor: 1/4'' 1.3 megapixel progressive scan CMOS
Built-in lens: M12, f4.0 mm, F1.5 (angle of view: 65°diagonal, 48°horizontal, 40°
vertical)
Motorized IR cut filter
Sensitivity: 0.5 lux (0 lux if IR LED is on)
Shutter time: 1 ~ 1/17780 sec
Illumination: IR LED (850 nm), 21 pcs, 8 mm diameter, up to 15 meters
S/N ratio: 44 dB
Resolution: 1280х1024, 1280х720, 640х480, 320х240
Simultaneous streaming: Motion JPEG, Н.264, MPEG-4 part 2 (ISO/IEC 14496-2)
Profile: SP, 3GPP
Frame rate: Н.264/MPEG-4/MJPEG: up to 30 frames per second at 640х480, 320х240,
up to 15 frames per second at 1280х1024, 1280х720. 3GPP: up to 10 frames per
second at 640х480, 320х240
Digital zoom: 10x

Chapter 2. Overview
N35110 Operations User Manual
7
Two-way audio with support for switching between G.711 μlaw, a-law, and AMR
compression formats, 3.5 mm jack, output for connection of an external microphone and
speakers
Built-in multi-zone motion detection and audio detection, sensitivity and threshold control
Up to 5 simultaneous connections
Continuous, scheduled and motion detection triggered sending of images and video via
e-mail and to FTP
Power: 12 V DC, 0.5 A, 12 W maximum, PoE IEEE 802.3af Class 0
Operating temperature: -40 to +50°С
Supported protocols: Bonjour, TCP/IP, DHCP, PPPoE, ARP, ICMP, FTP, SMTP, DDNS,
NTP, UPnP, RTSP, RTP, RTCP, HTTP, TCP, UDP, 3GPP/ISMA RTSP
Support for ONVIF v1.02
2.4. Package Contents
IP camera N35110 (lens M12, 4.0 mm, F1.5 pre-installed)
Sunshield
RJ-45 adapter
Quick installation guide
CD with user manuals and software
Bracket
Power supply 12 V 1 A DC
2.5. Default Settings
The main default settings are:
IP address: 192.168.0.99
Subnet mask: 255.255.255.0
Gateway: 192.168.0.1
Username: admin
Password: admin
HTTP port: 80
RTSP port: 554

Chapter 2. Overview
N35110 Operations User Manual
8
2.6. Purpose of User Manual
BEWARD N35110 is an outdoor camera that features a web server, a network interface
and can be connected to the Ethernet directly.
The camera images can be viewed via a web browser or the free Beward software that
comes with this camera. Besides, the live images can be viewed over mobile networks, via stream
players, over the Internet remotely, etc.
This User manual provides information on the camera’s web interface and how to configure
it without using software but with the use of the built-in web server only.
Despite some BEWARD IPS options are not available (see BEWARD IPS Operations User
Manual) when you are managing the camera via a web browser or a mobile device, it allows
viewing camera images from any location in the world, though. Moreover, you can view it on any
device such as a laptop, a cell phone, a PDA, etc. This User manual provides detailed information
on managing the N35110 without using any software.
2.7. Minimum System Requirements
Verify that your computer meets the system requirements listed on the camera packaging.
If your computer does not meet these requirements, this IP camera may not work correctly.
Item
Requirements
CPU
2.8 GHz Pentium 4 (or equivalent AMD)
Video Card
256 MB (or equivalent integrated video card)
RAM
1 GB
Operating System
Windows 2000, XP, Vista, Windows 7, Mac OS X Leopard
Web Browser
Internet Explorer 8.0 or later
NOTE:
1. If you cannot play records, please install Xvid codec or VLC freeware player
(http://www.videolan.org/vlc/).
2. For correct program operation, you may need to update some Windows components (.Net Framework,
Windows Media Player, Enhance ActiveX Security).
Chapter 3. Using Third Party Clients
N35110 Operations User Manual
9
Chapter 3. Using Third Party Clients
The N35110 supports RTSP/RTP streaming.
RTSP (Real Time Transfer Protocol) is a network control protocol designed for use in
entertainment and communications systems to control streaming media servers. The protocol is
used for establishing and controlling media sessions between end points. Clients of media servers
issue VCR-like commands, such as play and pause, to facilitate real-time control of playback of
media files from the server (see paragraph 6.2.1 for details).
NOTE:
You can play RTSP stream with any supported video player (Real Player, VLC, Quick Time, etc).
3.1. Playing 3GP Video
You can view camera images on a computer as well as a mobile device such as cell
phones, smartphones, PDA, etc (iPhone supported as well). You can configure the stream to be
viewed on a mobile device at SETTING –Basic –Camera –3GPP.
If your phone does not support streaming video, type «rtsp://<IP>:<PORT>/video.3gp»in
the address bar of the streaming player installed in your phone to view the 3GP video. <IP> is the
public IP address of your camera, <PORT> is the RTSP port (default value is 554). Example:
rtsp://89.57.167.76:554/video.3gp.
3.2. Playing Streaming Video in 2.5G Networks over WAP
If your phone is used on a 2.5G network, type «http://<IP>/mobile.wml»in the WAP
browser’s address bar to the images. <IP> is the public IP address of your camera.
3.3. Playing Streaming Video in 2.5G Networks via Browser
If your phone is used on a 2.5G network, type «http://<IP>/mobile.htm»in the browser’s
address bar to view the images. <IP> is the public IP address of your camera.
3.4. Playing Streaming Video via Third Party Software
If your computer is connected to high-speed Internet or you need to view the streaming
video in other formats, you can use real time RTSP players such as VLC, Quick Time, Real Player,
etc.
NOTE:
The connection speed to the camera depends on the bandwidth.

Chapter 3. Using Third Party Clients
N35110 Operations User Manual
10
3.4.1. Playing MPEG-4 Video
Type rtsp://<IP>:<PORT>/video.mp4, <IP> is the IP address of your camera, <PORT> is
the RTSP port of your camera (default value is 554). Example: rtsp://89.57.167.76:554/video.mp4.
3.4.2. Playing MJPEG Video
Type rtsp://<IP>:<PORT>/video.mjpg, <IP> is the IP address of your camera, <PORT> is
the HTTP port of your camera (default value is 80). Example: rtsp://89.57.167.76:80/video.mjpeg.
3.4.3. Getting a JPEG Image
Type http://<IP>:<PORT>/jpg/image.jpg, <IP> is the IP address of your camera, <PORT>
is the HTTP port of your camera (default value is 80).
Example: rtsp://89.57.167.76:80/jpg/image.jpg.
NOTE:
You can get 5-6 images per second maximum.
Chapter 4. Managing the IP Camera via Internet Explorer
N35110 Operations User Manual
11
Chapter 4. Managing the IP Camera via Internet Explorer
Step 1: connect your camera according to the User manual.
Step 2: open Internet Explorer, type the camera’s IP address in the address bar. The
default IP address is 192.168.0.99.
NOTE:
There are two ways to assign an IP address to this IP camera:
1. An IP address can be obtained automatically from a Dynamic Host Configuration Protocol (DHCP)
according to the network parameters.
2. Use a manually specified IP address. See paragraph 6.3.1 for details. Contact your system
administrator to avoid IP address conflict.
NOTE:
To view the camera images without showing the control panel, type «http://<IP>/index2.htm»in the
address bar of the browser. <IP> is the IP address of your camera
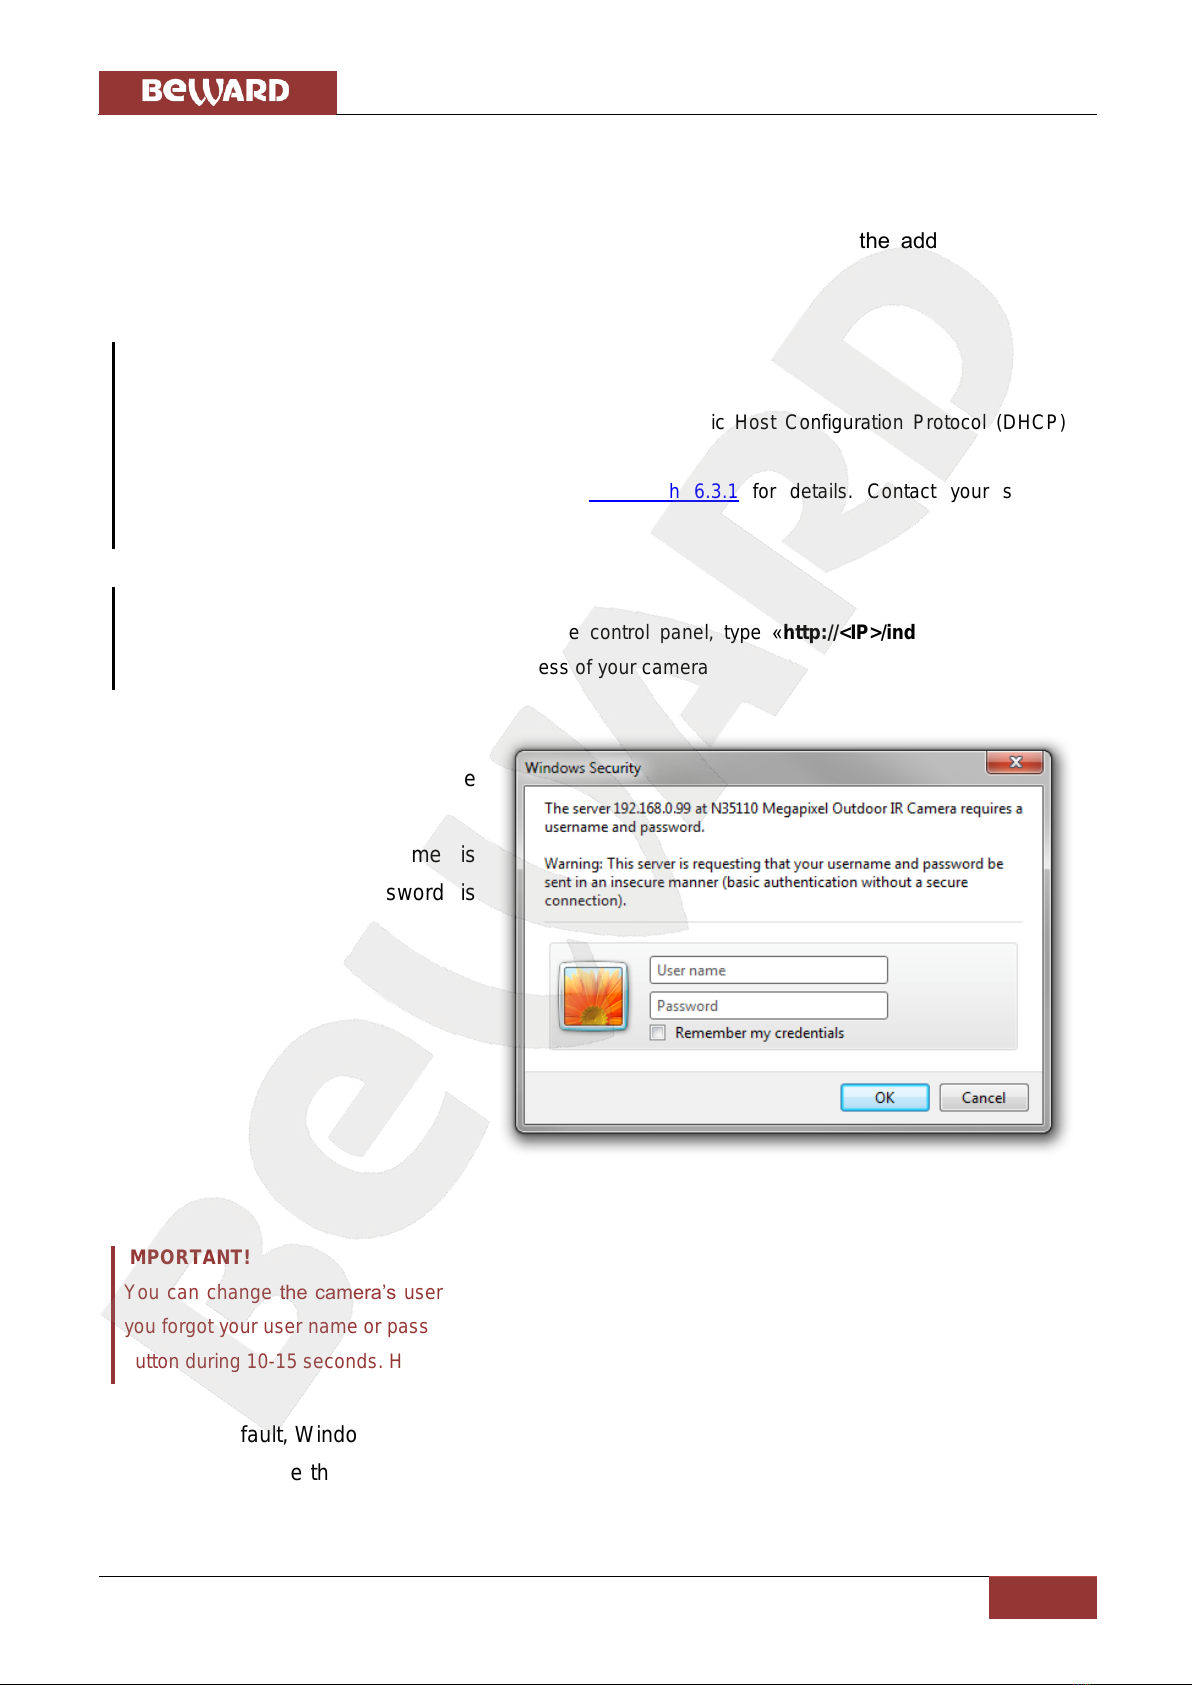
Step 3: enter the camera’s
username and password in the
authorization window (Pic. 4.1).
The default user name is
«admin», the default password is
«admin».
Pic. 4.1
IMPORTANT!
You can change the camera’s user name and password at SETTING –Basic –Security –Account.If
you forgot your user name or password, you can reset your camera to factory settings by holding [RESET]
button during 10-15 seconds.Hold [RESET] button during 5-7 seconds to restart the camera.
By default, Windows prevents ActiveX add-ons from running but some ActiveX add-ons are
required to operate this IP camera. Therefore, you need to install the ActiveX add-ons to operate
your camera.

Chapter 4. Managing the IP Camera via Internet Explorer
N35110 Operations User Manual
12
4.1. Installing ActiveX Controls
To view the camera images via Internet Explorer, you need to install the ActiveX controls.
To do so, follow these steps:
NOTE:
The installation is shown for Internet Explorer 8.0 and Windows 7.
Step 1: open Internet Explorer, type the IP address of your camera in the address bar (Pic.
4.2). Press Enter or click the Go To button.
Pic. 4.2
IMPORTANT:
The camera’s default IP address is 192.168.0.99. If the camera was assigned an IP address by a DHCP
server on the local network, use BEWARD IP Installer to find your camera on the network. If you use
multiple IP cameras, you need to change their default IP addresses so that each camera will have a
unique IP address.
NOTE:
To connect to the camera, you need to get your computer and your camera to the same subnet.
Step 2: you will see an authorization window where you should enter the camera’s
username and password (Pic. 4.3)

Chapter 4. Managing the IP Camera via Internet Explorer
N35110 Operations User Manual
13
Pic. 4.3
IMPORTANT:
The default user name is admin, the default password is admin.
Step 3: after successful authorization you will be prompted to install an ActiveX add-on.
You will see a system notification under the address bar: “This website wants to install the
following add-on: “AxMediaControl.cab” from “BEWARD Co., Ltd.”. If you trust the website
and the add-on and want to install it, click here…” (Pic. 4.4).
Pic. 4.4
Step 4: click right mouse button on this notification. In the drop-down menu select “Install
This Add-on for All Users on This Computer…” or click on the area “Click here to install the
following ActiveX control: “AxMediaControl.cab” from “BEWARD Co., Ltd.”…” (Pic. 4.5).

Chapter 4. Managing the IP Camera via Internet Explorer
N35110 Operations User Manual
14
Pic. 4.5
NOTE:
Titles of system menu and notifications may differ from the titles of system menu and notifications that
appear in other versions of Windows and Internet Explorer.
Step 5: by default, Internet Explorer prevents ActiveX add-ons from installation, click
[Install] to continue. (Pic. 4.6)
Pic. 4.6
NOTE:
When installing ActiveX controls for Windows 7 with enabled User Account Control (UAC), it prevents
them from installation and generates a warning message. Click yes in the appeared window.

Chapter 4. Managing the IP Camera via Internet Explorer
N35110 Operations User Manual
15
Step 6: if everything was done correctly, you should get the camera images via your
browser. The settings bar is on the left side, the camera images are on the right side (Pic. 4.7).
Detailed information is discussed later in this Manual.
Pic. 4.7
Chapter 5. Main Menu
N35110 Operations User Manual
16
Chapter 5. Main Menu
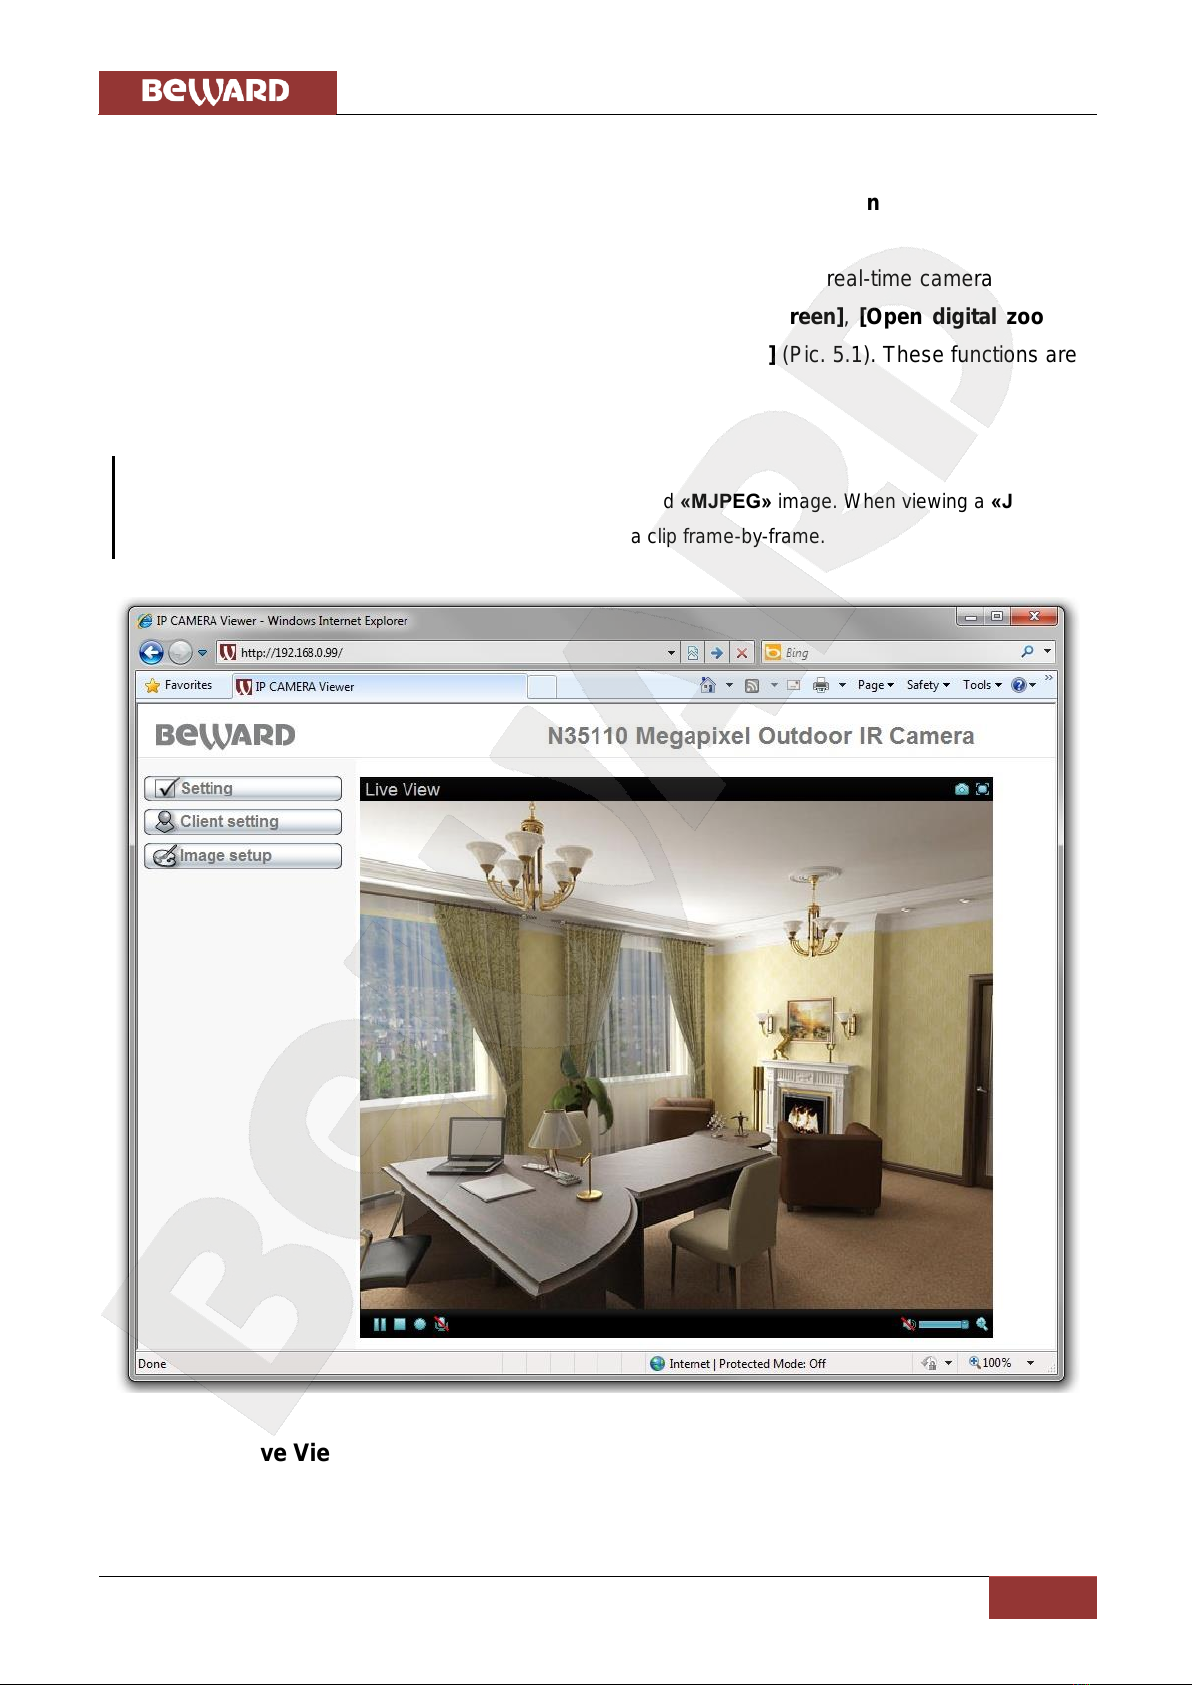
The main menu consists of two panes. The left pane contains [Setting],[Client setting],
and [Image setup] menus (Pic. 5.1).
The right pane contains the “Live view”window, which displays real-time camera images.
Also, this pane contains the following buttons: [Snapshot],[Fullscreen],[Open digital zoom],
[Start record], [Microphone],[Pause],[Play/Stop], and [Volume] (Pic. 5.1). These functions are
discussed later in this Manual.
NOTE:
The example in the picture below is shown for «MPEG-4» and «MJPEG» image. When viewing a «JPEG»
image, there are no control buttons. You can only rewind a clip frame-by-frame.
Pic. 5.1
5.1. [Live View] Pane
This pane displays real-time camera images and allows you to manage them.
Chapter 5. Main Menu
N35110 Operations User Manual
17
5.1.1. [Snapshot] Button
This button captures and saves a snapshot image of the current video image from your
camera to your computer’s hard drive. To do so, click the icon and specify the path where you
want to save the snapshot.
NOTE:
When specifying the path, check the permissions on the folder where you want to save the snapshot. If
you do not have the permissions, you cannot save snapshots there.
In Windows 7, you need to start Internet Explorer as an administrator to save records on your local HDD.
5.1.2. [Fullscreen] Button
Click the button to hide the controls and stretch the image to fill the screen. Press
[ESC] or double-click left mouse button to exit full screen mode.
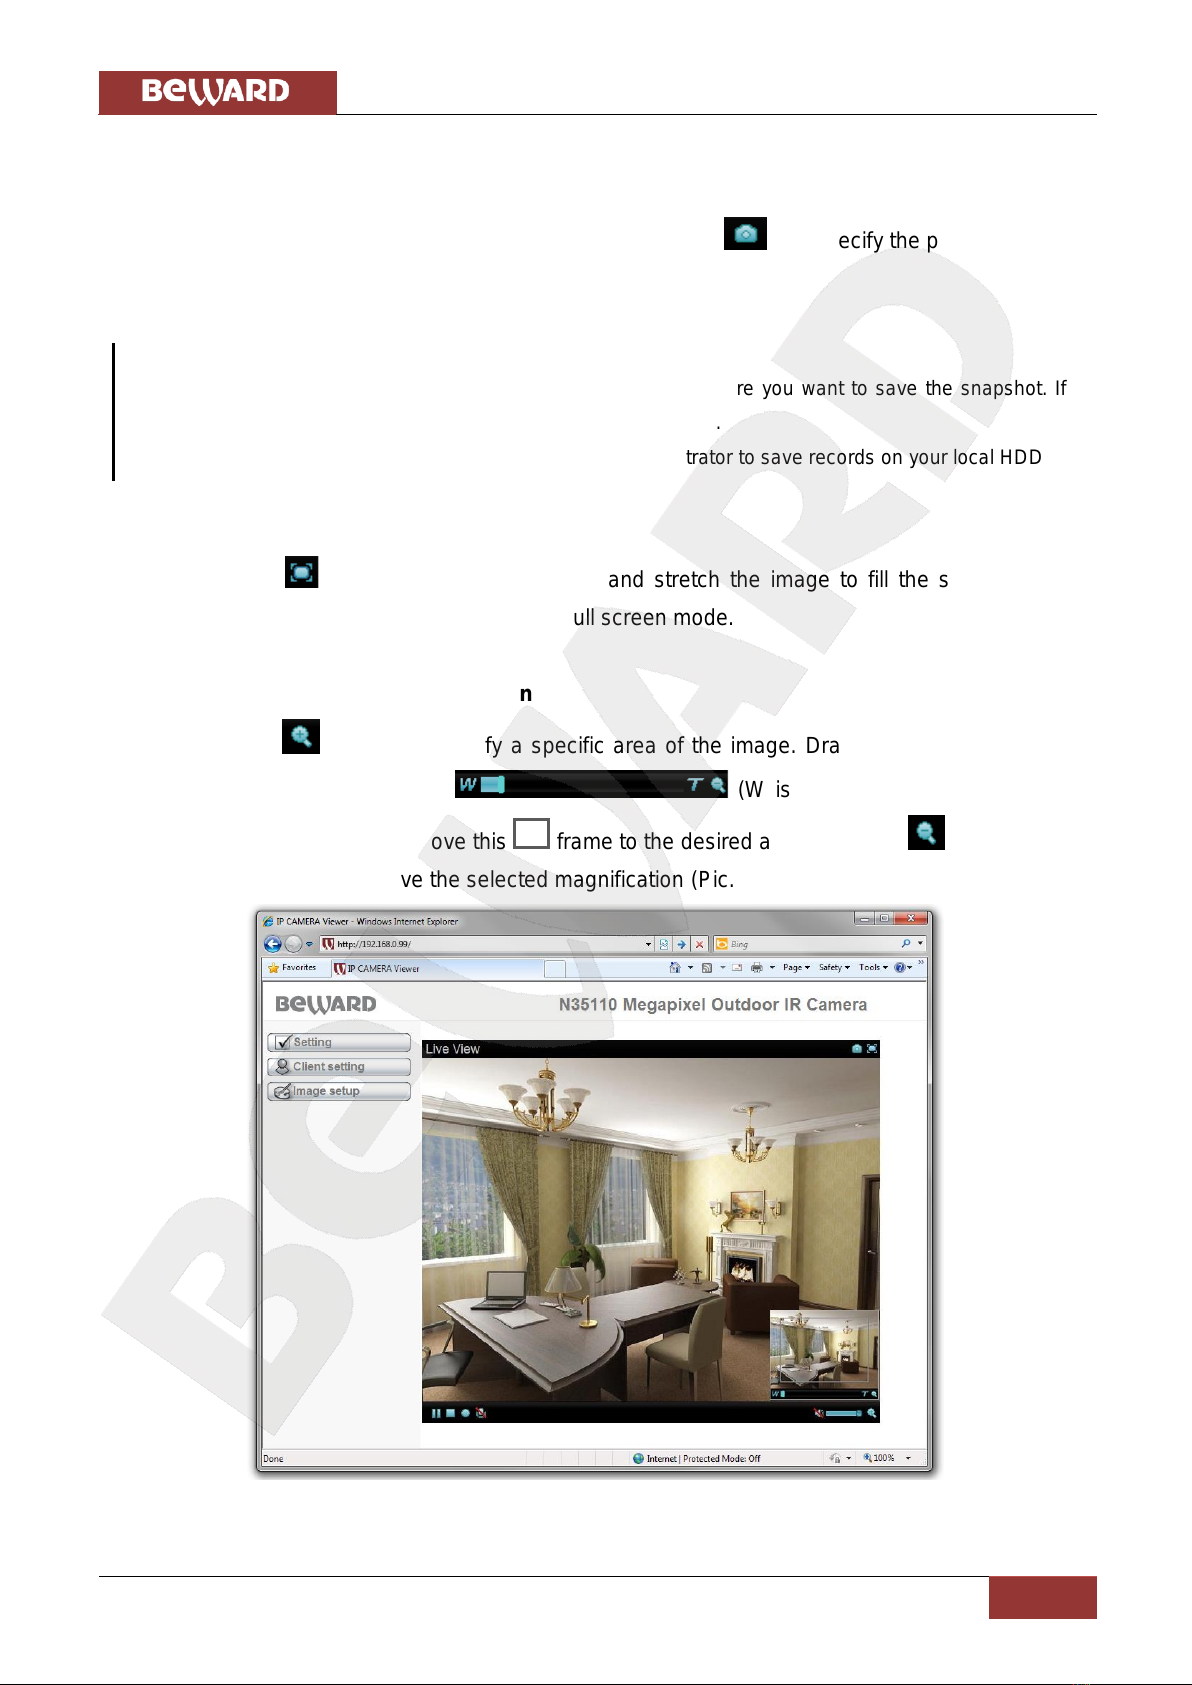
5.1.3. [Open Digital Zoom] Button
Click the button to magnify a specific area of the image. Drag the slider towards the
magnification level that you want (W is wide (no magnification)/T is
tele (maximum magnification). Move this frame to the desired area. Click the button to exit
the digital zoom mode and save the selected magnification (Pic. 5.2).
Pic. 5.2

Chapter 5. Main Menu
N35110 Operations User Manual
18
NOTE:
The image zoom is applied only for the current images in the browser. Such parameters are saved in the
browser’s temporary folder. The next time you open the browser, the magnification level of the image will
be set to the value that was set when you previously closed the browser (if the option for saving settings is
enabled in the browser). If the image is viewed through software, the magnification settings will not be
applied.
5.1.4. Video Control Buttons
Icon
Function
[Pause]: click this button to temporarily pause the playback.
[Play]: click this button to resume the playback.
[Stop]: click this button to stop the playback.
[Start record]: click this button to specify the path for saving the files and after that start
recording the video.
[Stop record]: click this button to stop recording the video.
IMPORTANT:
To playback the recorded video, use the integrated player at SETTING –Camera –Playback, otherwise
you may need to install third-party software, e.g. VLC media player. Its official website is
http://www.videolan.org/vlc/.
NOTE:
When specifying the path, check the permissions on the folder where you want to save the snapshot. If
you do not have the permissions, you cannot save snapshots there.
In Windows 7, you need to start Internet Explorer as an administrator to save records on your local HDD.
5.1.5. Audio Control Buttons
Icon
Function
Comments
[Sound enabled]
Transmits sound from the camera’s microphone (Audio In) to
the speakers connected to your computer (if the microphone
is connected to the correct jack).
[Sound disabled]
Stops transmitting sound from the camera’s microphone to
the speakers connected to your computer.

Chapter 5. Main Menu
N35110 Operations User Manual
19
[Mic is on]
Transmits sounds from the microphone connected to your
computer to the speakers connected to your camera (Audio
Out).
[Mic is off]
Stops transmitting sounds from the microphone connected to
your computer to the speakers connected to your camera.
[Volume level]
Move this slider to the desired level to adjust the volume at
which sound is transmitted from the camera (if the
microphone is connected to the correct jack).
5.2. Setting Menu
This menu provides options for configuring the IP camera (Pic. 5.3). The menu is divided
into two sections, the [Basic] (Pic. 5.4) and the [Advanced] (Pic. 5.5), which are both provide
options for adjusting and configuring the IP camera.
Pic. 5.3
IMPORTANT:
This menu is available only for administrators.
The [Basic] menu is divided into the following sections: [System], [Camera], [Network],
and [Security] (Pic. 5.4). Detailed information is discussed later in this Manual.
Table of contents
Other Beward IP Camera manuals

Beward
Beward N6603 User manual

Beward
Beward N6601 User manual

Beward
Beward N13100 User manual

Beward
Beward N1250 User manual

Beward
Beward N 13102 User manual

Beward
Beward N300 Instruction Manual

Beward
Beward N37210 User manual

Beward
Beward N120 Instruction Manual

Beward
Beward N6603 User manual

Beward
Beward N13103 Instruction Manual


Popular IP Camera manuals by other brands


Hanwa Security
Hanwa Security Wisenet HCO-6070RP user manual

Iqinvision
Iqinvision IQeye 4 Series IQeye 040S Specifications

Genius
Genius IPCAM 300 manual

Cablematic DOS MIL
Cablematic DOS MIL H Series user manual

IMAGO
IMAGO IVN-x2P3 NB 2.8 Quick installation guide

Velleman
Velleman AVTECH CAMIP16N Quick installation guide


