BH Emotion Evo User manual
ES
MANUAL Ebikes
EN
Ebikes MANUAL
FR
MANUEL Ebikes
DE
GEBRAUCHSANWEISUNG E-BIKES
IT
MANUALE Ebikes
EVO / AWD / NITRO / EASYGO
USER MANUAL 2018

INTRODUCTION 28
SAFETY INFORMATION 29
OVERVIEW OF THE PEDAL-ASSIST BIKE 31
PEDAL ASSISTANCE SYSTEM OPERATION 33
Components of the Pedal Assistance System 33
The Pedal Assistance System 34
Assistance Modes of the Pedal Assistance System 34
Range of the Pedal Assistance System 34
Starting pedalling 35
DISPLAY PANEL 35
Overview of the Display Panel 35
Display Panel Operation 36
BATTERY AND CHARGER 42
Technology 42
Energy Saving Modes 43
Suitable Charging Environments 43
Unsuitable Charging and Discharging Environments and Solutions 44
Battery Charging Process 44
Checking the Charge Level of the Battery 46
MOTOR 46
WARRANTY PROGRAMME 46
Warranty 46
Exceptions 46
Liability 47
CLEANING, MAINTENANCE AND STORAGE 47
Battery Care 47
Motor Maintenance 47
Storage 47
Prolonged Storage 48
TECHNICAL SPECIFICATIONS 48
Motor 48
Battery 48
Central Display Panel 48
FAQ 48
TROUBLESHOOTING 50
EN
EASYGO / EVO / NITRO / AWD USER MANUAL
1
2
4
6
8
15
19
19
20
21
21
23

EN
28
USER MANUAL EASYGO / EVO / NITRO / AWD
INTRODUCTION
Congratulations on your purchase of this BH EMOTION. Enjoy your BH bike!
For over a century, BH has been synonymous with bicycles, cycling, sportsmanship and the will to improve.
Many children have given their rst, hesitant turns of the pedals with BH and many legendary cyclists built
their reputations on our bicycles. The industrial activity of BH (Beistegui Hermanos) began in 1909, in the
arms manufacturing town of Eibar (Guipúzcoa, Spain) thanks to the talent and entrepreneurial spirit of three
brothers: Cosme, Domingo and Juan Beistegui Albistegui. The company, which initially manufactured weapons,
took a radical change of direction after the First World War and set out to provide a fast, comfortable and
affordable means of transport for the residents of Eibar. The result was some very lightweight, agile and reliable
bicycles. This was the birth of one of the current cycling icons and one of the strongest and most successful
brands. From that point onwards, thanks to technological advances and its commitment to sport, BH has
brought sporting triumphs and numerous innovations to the world of cycling.
This manual is designed to help you with the functions and maintenance of your BH EMOTION pedal-assist bicycle.
FAILURE TO OBSERVE THE WARNINGS INCLUDED IN THIS MANUAL MAY LEAD TO SERIOUS INJURY
OR DEATH.
Especially important information in this manual is highlighted by the following notations:
WARNING WARNING indicates a dangerous situation which, if not avoided, could lead
to a fatal accident or serious injury. Follow the safety instructions that follow
this symbol to avoid any injuries or fatal accidents.
ATTENTION ATTENTION indicates special precautions that should be taken to prevent
the vehicle and other property from being damaged.
NOTE NOTE provides essential information to facilitate or explain the procedures.
* The product and specications are subject to change without notice
SEE THE LOCAL HIGHWAY CODE AND ROAD SAFETY REGULATIONS BEFORE OPERATING THIS
PEDAL-ASSIST BICYCLE.
1

EN
29
EASYGO / EVO / NITRO / AWD USER MANUAL
SAFETY INFORMATION
RIDING
• Do not pedal or move the bicycle while the battery charger is connected. If you do, it may cause the power
cable to become entangled in the pedals, which may damage the battery charger, the power cable and/or
the charging port.
• Do not ride the bicycle if there is a fault with the battery or any component of the pedal assistance system.
Otherwise you may lose control and suffer serious injury.
• Do not start moving with one foot on a pedal and the other on the ground and then start riding the bicycle
when you have reached a certain speed. Otherwise you may lose control and suffer serious injury.
You should only start moving when you are properly seated on the bicycle seat.
• Do not activate the throttle function if the back wheel is not touching the ground. Otherwise, the wheel
will rotate in the air at high speed and may cause injury.
• Be sure to check the remaining battery capacity before riding at night. The light powered by the battery
pack will go off soon after the remaining battery capacity decreases to the point where riding with assisted
power is no longer possible. Riding without a light may increase the risk of injury.
• Do not modify or remove any parts of the pedal assistance system. Do not install non-original parts
or accessories. If you do, they may damage the product, cause a fault or increase the risk of being injured.
• When you stop, make sure that you apply the front and rear brakes and keep your feet on the ground.
Leaving one foot on a pedal when stationary could accidentally activate the assisted power function,
which could cause you to lose control and suffer serious injury.
CHARGER
• Never use this battery charger to charge other electrical devices.
• Do not use any other charger or charging method to recharge the batteries of the electric bicycle.
Using any other charger may lead to a re, explosion or damage to the batteries.
• This battery charger may be used by children aged 8 or over and by persons with physical, sensory
or mental impairments, or who lack the necessary experience and knowledge, provided that they are
supervised and instructed on how to use the battery charger safely and they understand the dangers
involved. Do not allow children to play with the battery charger. Cleaning and maintenance should not
be performed by unsupervised children.
• Although the battery charger is water resistant, do not allow it to be submerged in water or other liquids.
Furthermore, never use the battery charger if the terminals are wet.
• Never touch the charger's power plug, charging port or contacts with wet hands. You may suffer an electric shock.
• Do not touch the charger's contacts with metal objects. Do not allow any foreign matter to enter, it may cause
short circuits in the contacts, which may cause electric shock, a re or damage to the battery charger.
• Regularly clean any dust off the power plug. Moisture or other problems could reduce the effectiveness
of the insulation and cause a re.
• Never dismantle or modify the battery charger. You may cause a re or suffer an electric shock.
• Do not use multi-socket adaptors or extension cables. Using a multi-socket adaptor or similar may exceed
the rated current and cause a re.
• Do not use with the cable tied up or coiled and do not store with the cable coiled around the body of the
main charger. If the cable is damaged it may cause a re or you may suffer an electric shock.
• Firmly insert the power plug and charging plug in the socket. If the power plug and charging plug are
not fully inserted, this may cause a re due to an electric discharge or overheating.
• Do not use the battery charger near to ammable materials or gases. This may cause a re or explosion.
• Never cover the battery charger or place objects on it while it is charging. This may lead to internal
overheating and cause a re.
• Do not drop the battery charger or expose it to strong impacts. Otherwise, it may cause a re or electric shock.
• If the power cable is damaged, stop using the battery charger and take it to an authorised dealer.
• Handle the power cable with care. Plugging in the battery charger indoors while the bicycle is outdoors
may lead to the power cable being caught on or damaged by doors or windows.
• Do not pass the wheels of the bicycle over the power cable or plug. Otherwise you may damage the power
cable or port.
2
EN
30
USER MANUAL EASYGO / EVO / NITRO / AWD
BATTERY
• Keep the battery and battery charger out of the reach of children.
• Do not touch the battery or battery charger during charging. As the battery pack and battery charger reach
temperatures of 40–70°C during charging, touching them may lead to rst degree burns.
• If the battery case is damaged, cracked or you notice unusual smells, do not use it. The leakage of uid
from the battery may cause serious injury.
• Do not short the contacts of the battery's charging port. If you do, it may cause the battery to heat up
or catch re, causing serious injury or damage to property.
• Do not dismantle or modify the battery. If you do, it may cause the battery to heat up or catch re,
causing serious injury or damage to property.
• Do not drop the battery or subject it to impacts. If you do, it may cause the battery to heat up or catch re,
causing serious injury or damage to property.
• Do not dispose of the battery in a re or expose it to heat sources. Otherwise, this may cause a re or
explosion, resulting in serious injury or damage to property.
BLUETOOTH (ONLY COMPATIBLE MODELS)
• Do not use the wireless Bluetooth function in areas such as hospitals or medical institutions where it is
forbidden to use electronic or wireless equipment. Otherwise, this may affect the medical equipment and
cause an accident.
• When using the wireless Bluetooth function, keep the screen at a safe distance from any pacemakers
in use. Otherwise, the radio waves may interfere with the operation of the pacemaker.
• Do not use the wireless Bluetooth function near to automatically controlled equipment, such as automatic
doors, re alarms, etc. Otherwise, the radio waves may interfere with the equipment and cause an accident
due to a malfunction or unintended operation.
WASTE
• The drive unit, battery, charger, display panel, torque sensor and accessories and packaging must be
disposed of and recycled in an environmentally friendly way.
• Do not dispose of the bicycle or its components together with household waste.
• For EU countries:
Pursuant to Directive 2012/19/EU and Directive 2006/66/EC, electrical devices/tools that can no longer be
used and defective or used battery packs/batteries must be disposed of and recycled separately and in an
environmentally friendly way. Hand over any batteries that can no longer be used to an authorised bicycle supplier.
3
EN
31
EASYGO / EVO / NITRO / AWD USER MANUAL
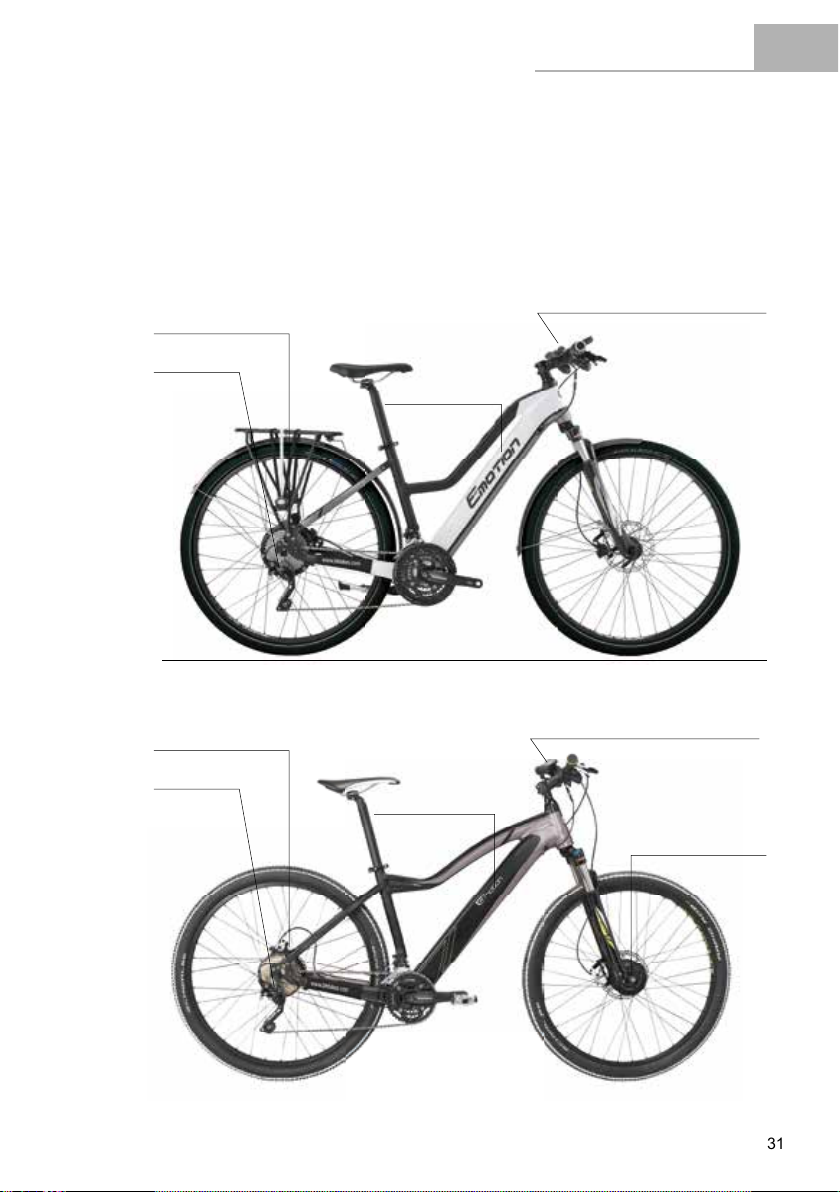
OVERVIEW OF THE PEDAL-ASSIST BIKE
Motor
Motor
Front Motor
Torque sensor
Torque sensor
Ion Lithium battery
Ion Lithium battery
EMOTION Display Panel
EMOTION Display Panel
EVO/NITRO
Rear motor
EVO AWD
Double Motor
4
EN
32
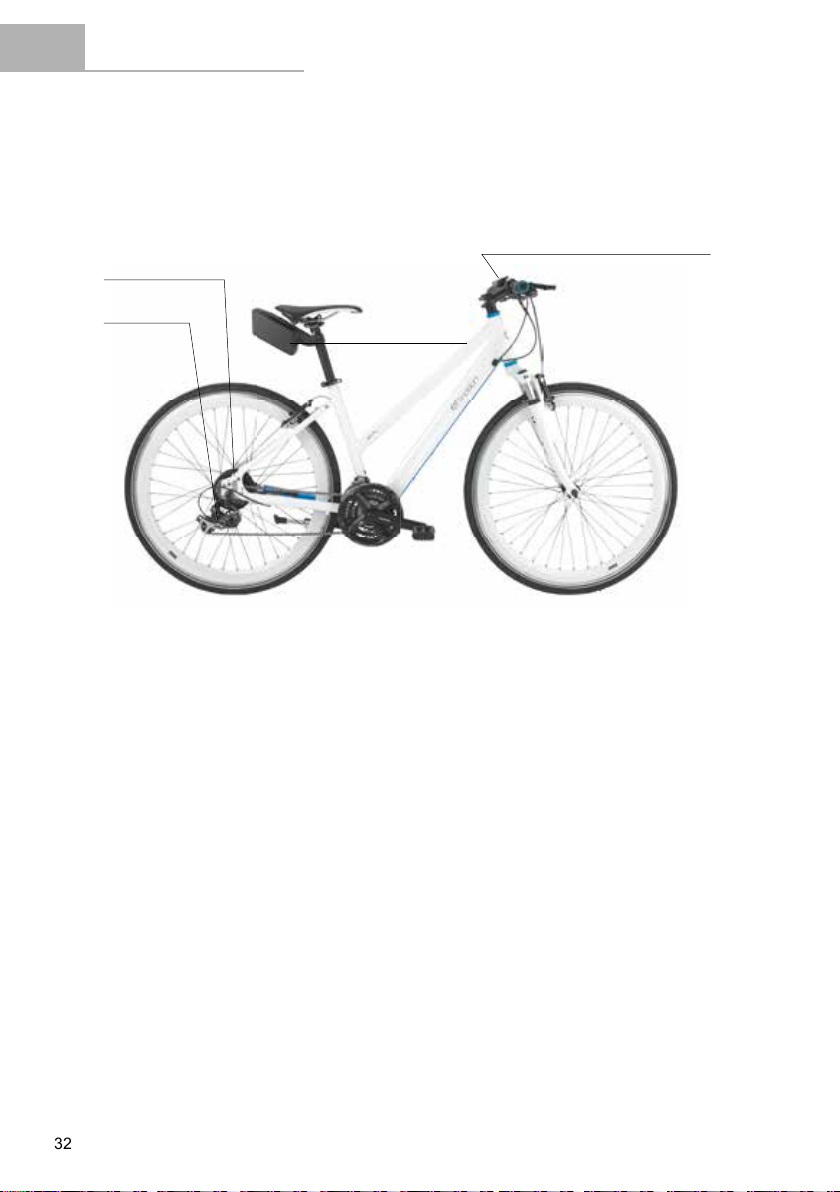
USER MANUAL EASYGO / EVO / NITRO / AWD
EASY GO
Rear motor
Motor
Torque sensor
EMOTION Display Panel
Ion Lithium battery
5

EN
33
EASYGO / EVO / NITRO / AWD USER MANUAL
PEDAL ASSISTANCE SYSTEM OPERATION
Components of the Pedal Assistance System
The BH EMOTION pedal assistance system consists of the following components:
A. A motor, which drives the bicycle. The location of the motor identi es the type of system used
in the bicycle:
a. Central Motor System. Motor located on the bottom bracket axle.
b. Rear Motor System. Motor located on the rear hub.
c. AWD System (All Wheel Drive System). Two motors located on the front and rear hubs.
B. A control panel which, among other things, allows you to select the assistance mode.
C. A battery that powers the operation of the motor and can be located in different places.
D. A torque sensor that reads the force applied on the pedal by the user
E. A control system that acts as the brain of the system, receiving and sending signals to the
other components.
AWD System
(All Wheel Drive System). Two motors located on the front and rear hubs.
AWD System
Rear Motor SystemCentral Motor System
Central Motor System
ATOM
EVO/NITRO
EVO AWD EASY GO
D
D D
A
A
A A
D
B
BB
B
E
E
C
C
C
E
C
A
E
6

EN
34
USER MANUAL EASYGO / EVO / NITRO / AWD
The Pedal Assistance System
The pedal assistance system is designed to provide the optimal amount of assisted power. It provides assistance
within a standard range, based on factors such as the pedalling force, the speed of the bicycle and the drivetrain.
The system does not provide assistance in the following situations:
- If the display panel is switched off.
- When travelling at 25 km/h or faster.
- If you are not pedalling and the throttle function is released at 6 km/h.
- If there is no remaining battery life.
- If the assistance mode selected is 0% assistance.
Assistance Modes of the Pedal Assistance System
There are multiple power assistance modes available.
Select the 100% power mode (or BOOST), the 70% mode (or SPORT), the 50% mode (or NORMAL),
the 30% mode (or ECO) or the 0% mode (or NO ASSIST), depending on what best suits your cycling conditions.
See the “DISPLAY PANEL” section to nd out how to switch between assistance modes.
100% or BOOST Use when you want to get maximum power from the system.
70% or SPORT Use when climbing difcult terrains.
50% or NORMAL Use when you want a more comfortable ride, e.g. when climbing a steep heel.
30% or ECO Use when you want to travel as far as possible.
0% or NO ASSIST Use when you want to travel without assisted power. You can continue to use the other
functions of the display panel.
Range of the Pedal Assistance System
The range of the system will vary, depending on the following riding conditions, among others:
• Frequent starts and stops.
• Gear ratio of the drivetrain.
• Numerous steep slopes.
• Poor road conditions.
• Transporting heavy loads.
• Cycling into a strong headwind.
• Low ambient temperature.
• Deteriorated battery.
• When using the light (only applicable to models equipped with battery-powered lights).
• If the bicycle is not in a suitable condition, e.g. low pressure in the tyres, insufcient lubrication of the chain
or a brake not tted correctly.
7
EN
35
EASYGO / EVO / NITRO / AWD USER MANUAL
Starting Pedalling
Before resting your feet on the pedals, you must sit on the seat and hold the handlebar rmly.Special care
should be taken if you start pedalling when using a high assistance mode (100%/BOOST mode, or 70%/SPORT
mode), as the motor will respond with maximum thrust and you may lose control. To facilitate acceleration, the
motor provides an additional initial thrust as soon as you start pedalling. So minimal force is necessary to put the
bicycle in motion, helping you to join the traf c quickly and safely.
WARNING
Start pedalling with a short gear ratio (higher gears) and low assistance mode
(30% or ECO mode). As well as providing greater control and safety on the
bicycle, it requires less energy consumption and, therefore, ensures a longer
range. Please note that starting with a higher assistance mode (50%/NORMAL,
70%/SPORT, or 100%/BOOST modes), may put the user's safety at risk.
WARNING
When the user pushes the bike while walking alongside it, they must make
sure that the system is disconnected.
DISPLAY PANEL
Overview of the Display Panel
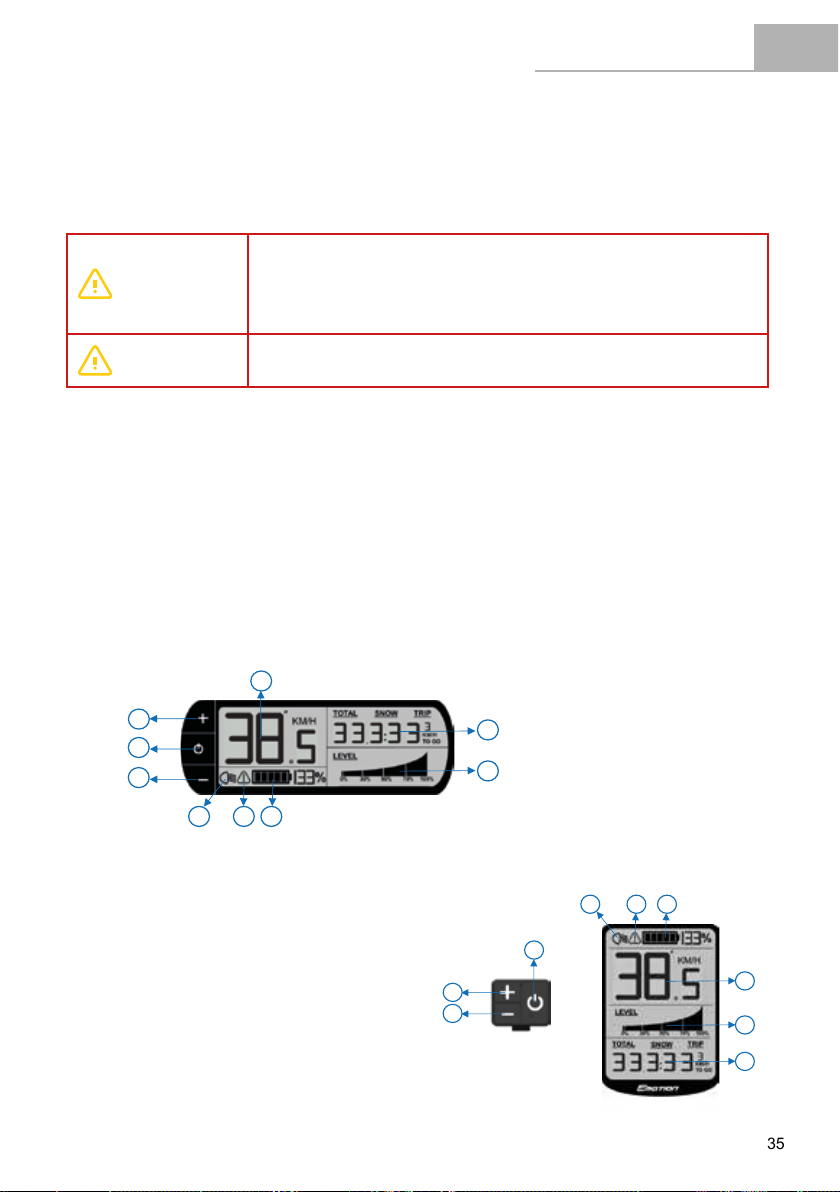
There are two Display Panels, depending on the model:
• Side Display Panel, located on the left side of the handlebar:
2
1
3
4
6
8
5
7
9
1
2
3
4 6 8
5
7
9
Mando Remoto
Pantalla Central
• Central Display Panel.Screen located in the centre
of the handlebar, with a remote control located on the
left side of the handlebar:
1. POWER button.
2. (+) button.
3. (-) button.
4. Lights indicator.
5. Bicycle instant speed indicator.
6. System error indicator.
7. Pedal assistance mode indicator.
8. Battery level indicator.
9. Bicycle information indicator.
2
1
3
4 6 8
5
7
9
1
2
3
4
6
8
5
7
9
Mando Remoto
Pantalla Central
8
EN
36
USER MANUAL EASYGO / EVO / NITRO / AWD
Display Panel Operation
The display panel provides the following operations and information screens:
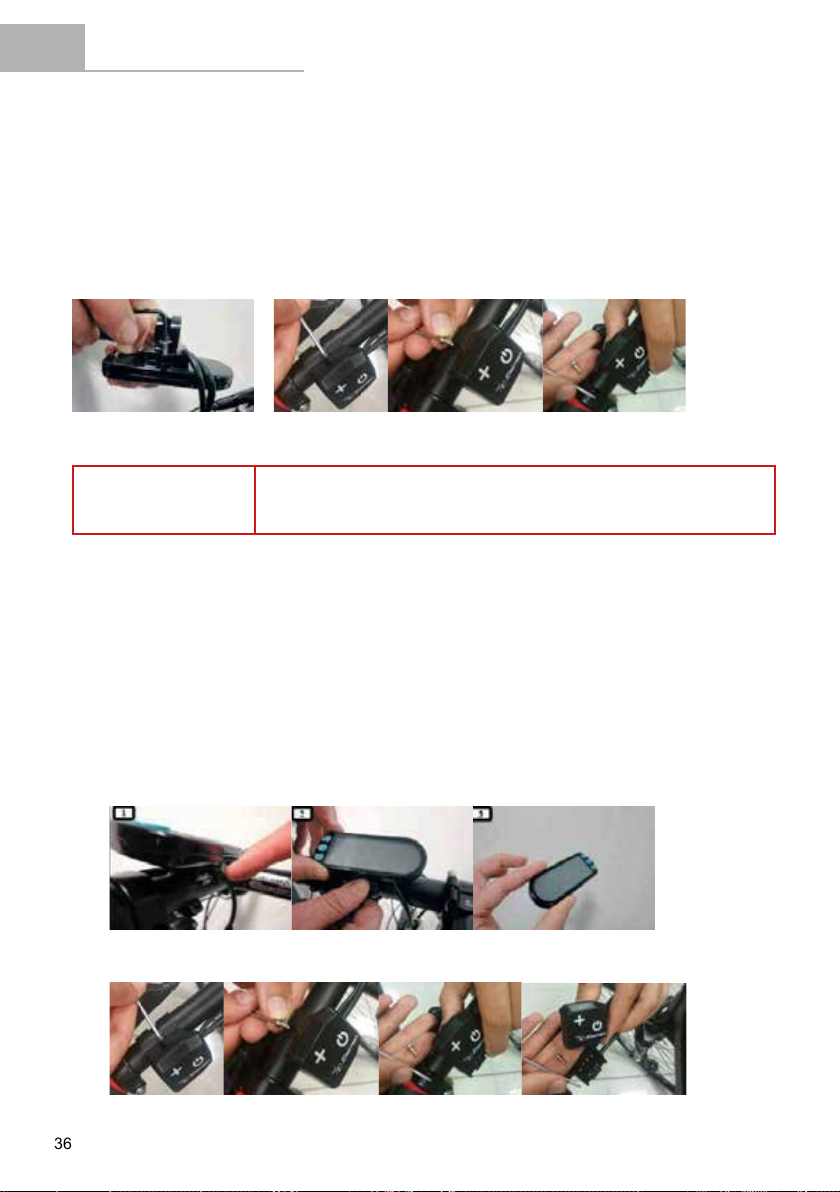
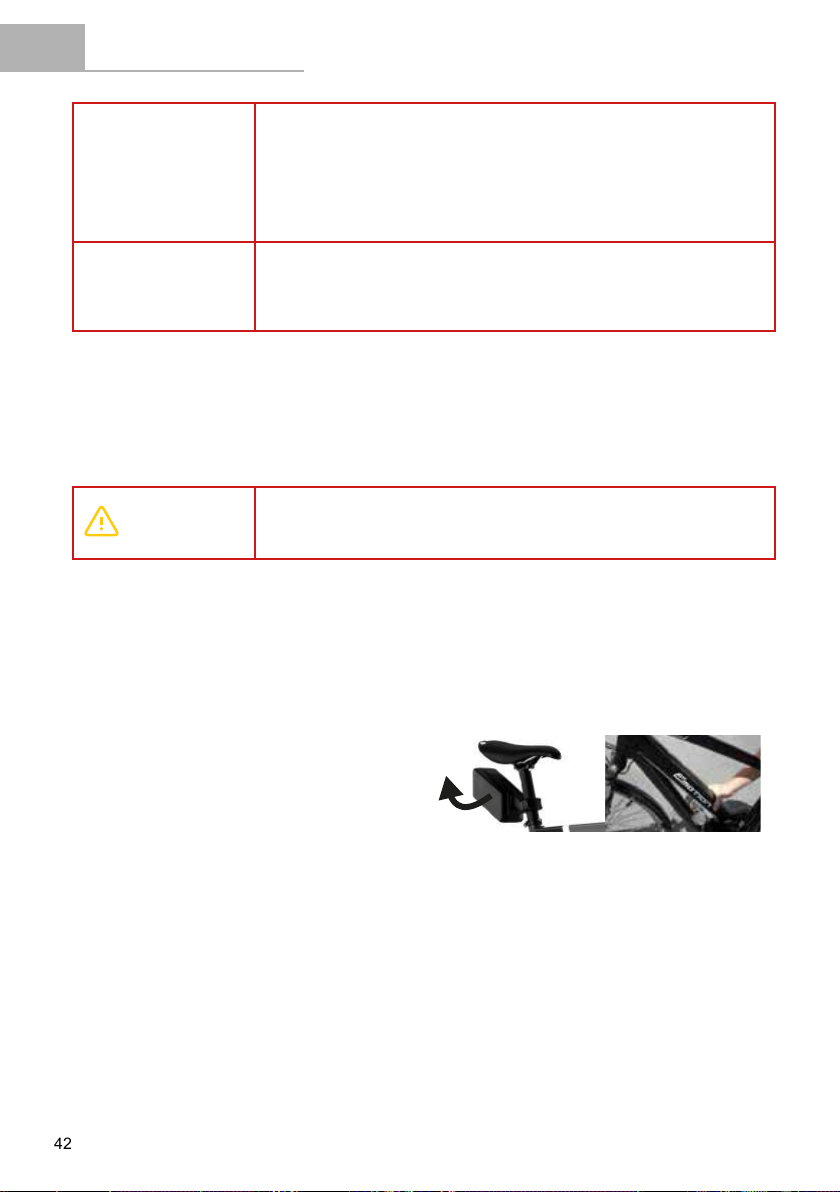
1. Installation of the Fixed or Removable Display Panel.
The side display panel or remote control (for the central version of the display panel) can either be made
xed or removable, depending on the needs of the user, by simply inserting or removing an M3 screw,
as shown in the image. By default, the side display panel or remote control (for the central version of the
display panel) will be xed with the screw.
NOTE To reduce the risk of theft, to remove (or insert) the panel's screw, the user must
rst loosen the grips, left brake lever, shift lever and the panel's support bracket.
Here are the steps to remove the display panel or remote control (for the central version of the display panel)
after removing the screw; follow the instructions below:
1. The user pushes the ap beneath the side display panel or remote control (for the central version of
the display panel).
2. While holding down the ap, the user slides the panel upwards to fully remove it.
3. The panel is released.
9

EN
37
EASYGO / EVO / NITRO / AWD USER MANUAL
2. Switching the Pedal Assistance System on and off.
The pedal assistance system is turned on by holding down the POWER button for 3 seconds. The pedal
assistance system is turned off by holding down the POWER button again for 3 seconds. The bicycle can
be used normally without any type of assistance.
3 sec
WARNING
After turning the system on, make sure that you do not start riding without
checking the assistance mode. By default, it starts with the assistance mode
selected before it was last switched off.
NOTE
Wait 3 seconds after turning on the system before you start applying pressure
on the pedals. During this 3-second period, the assistance system is starting
up and calibrating the torque sensor. Otherwise, if you press the pedal
beforehand, this may weaken assistance and error 14 may even be displayed
on the screen (see Troubleshooting section). To x this, you should reboot the
system without applying pressure on the pedals for a period of 3 seconds.
3. Pedal Assistance Mode Selection.
The system has 5 pedal assistance modes:
100% or BOOST Use when you want to get maximum power from the system.
70% or SPORT Use when climbing difcult terrains.
50% or NORMAL Use when you want a more comfortable ride, e.g. when climbing a steep heel.
30% or ECO Use when you want to travel as far as possible.
0% or NO ASSIST Use when you want to travel without assisted power. You can continue to use
the other functions of the display panel.
To toggle through the assistance modes, the user must press the (+) button to increase the level
of assistance and the (-) button to reduce the level of assistance.
NOTE
During a journey, selecting suitable assistance modes for the terrain and
pedalling conditions that you encounter will ensure the best balance between
battery economy and pedalling comfort.
10
EN
38
USER MANUAL EASYGO / EVO / NITRO / AWD
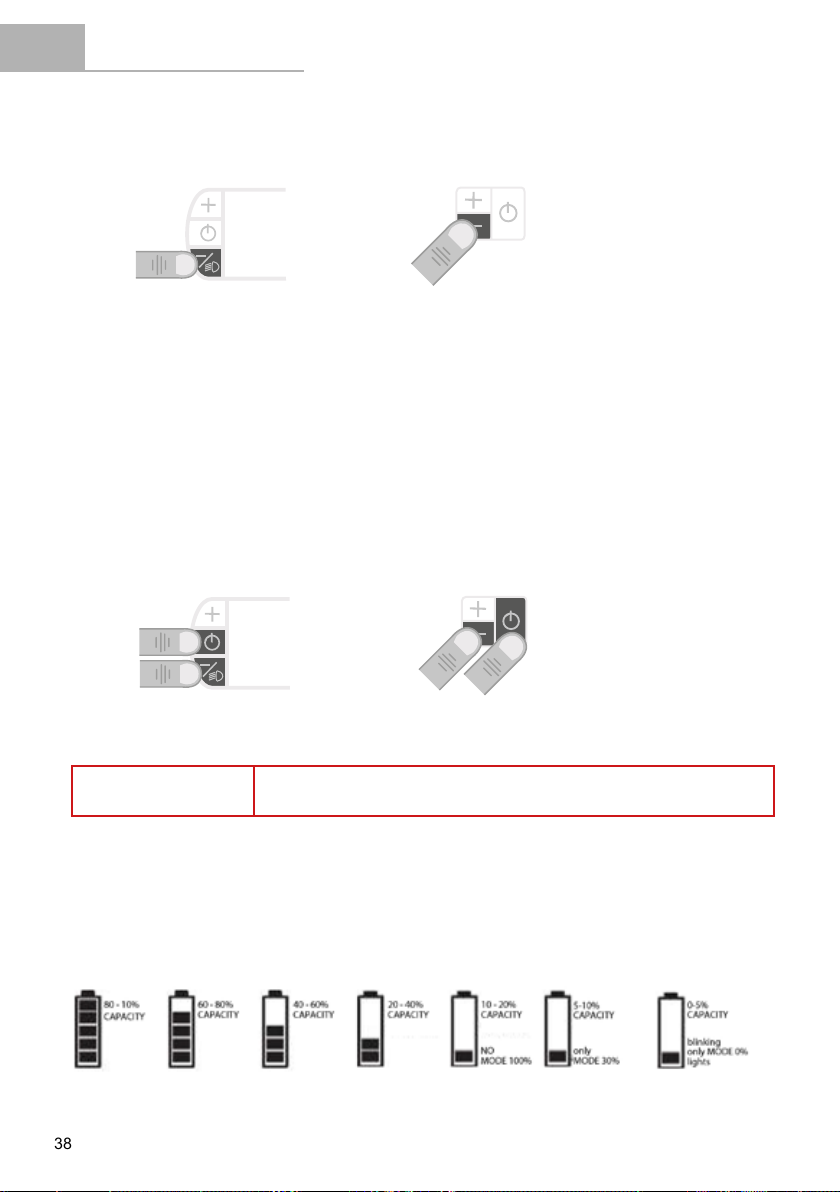
4. Turning the Bicycle Lights and the Backlighting of the Display Panel On and Off.
Holding down the (-) button for 3 seconds will turn the backlighting of the display panel on and off.
The lights will also be switched on and off in those models equipped with a battery-powered light system.
At this moment, the lights on indicator will appear on the screen:
3 sec
5. Selecting Information on the Screen.
The display panel's screen allows the user to view various useful information. The information on the
screen changes when you press the POWER button:
1. Total distance (km).
2. Total time (hh:mm).
3. Average total speed (km/h).
4. Trip distance (km).
5. Trip time (hh:mm).
6. Average trip speed (km/h).
7. Range (TO GO km).
When starting a new journey that you want to measure, you must reset the trip information to zero,
by holding down the ON/OFF and (-) buttons at the same time for 3 seconds.
3 sec
NOTE The range is calculated based on the riding conditions during the last
kilometre and the remaining capacity of the battery.
6. Battery Level Indicator.
The battery level indicator shows the estimated remaining battery capacity on a 5-segment scale,
as shown in the image below:
11
EN
39
EASYGO / EVO / NITRO / AWD USER MANUAL
NOTE
In order to increase the life of the battery and prevent a full discharge which
may damage it, the assistance modes are limited based on the state of charge
of the battery:
• Battery with charge above 20%: All assistance modes are available.
• Battery with charge of 10-20%: 100%/BOOST assistance mode is
not available.
• Battery with charge of 5-10%: Only 30% (ECO) and 0% (NO ASSIST)
assistance modes are available.
• Battery with charge of 1-5%: No pedal assistance mode is available
(0%/NO ASSIST). Only the lights can be turned on.
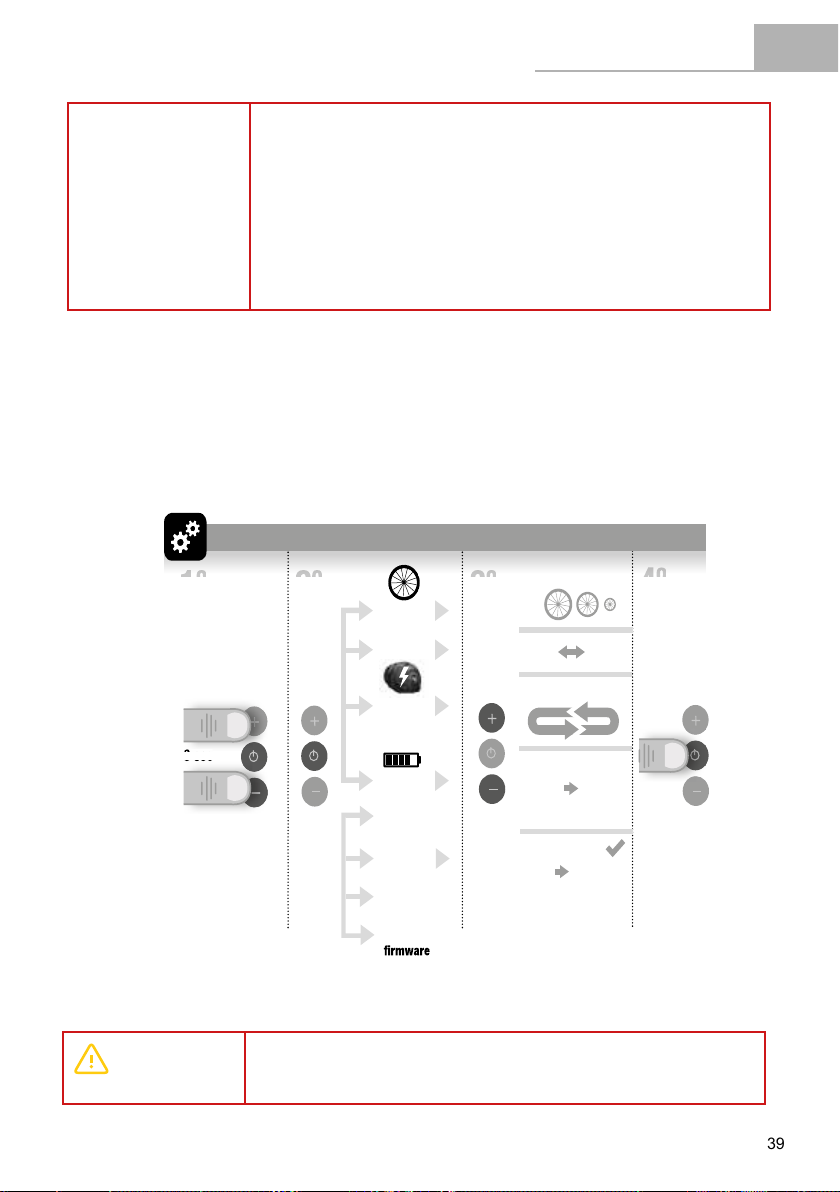
7. Settings Menu.
The user can access the settings menu by holding down the (+) and (-) buttons for 3 seconds. Press the
POWER button to scroll through the different settings options. Additionally, the system will exit the settings
menu when the user holds down the POWER button for 3 seconds.
QUICK GUIDE Q U ICK GUI D E2 3
push
3 sec
3 sec
1 1
22
Km / Miles
Wheel size
AWD motor
Battery
Battery type
AWD Mode
(+) Ah (-) Ah
3 3
4 4
3 sec
automatic
Km
Miles
OFF
ECO FRONT
REAR
ALL
1º 2º 3º 4º
Charger
Charger
Battery port
External port
External port
Battery port
1º
1º
2º
2º
3 sec
3 sec
Controller
temperature
5
Torque
sensor
6
Battery state
of health
7
1º
2º
3º
4º
Torque sensor
0,5 V 1,5 V
6
INFORMATION
SETTINGS
THROTTLE
On Off
Enter Exit
Change information Reset trip information
EN
ES
FR
i
BATTERY
Utilice únicamente el cargador suministrado para la carga de la batería. No coloque ningún
objeto sobre el cargador.
Antes de un largo periodo de inutilización o almacenamiento cargue la batería BH EMOTION
al 70-80%. Asimismo, supervise su nivel de carga trimestralmente y manténgala a un nivel
superior al 20%.
La batería puede encontrase en modo letargo. Para despertarla, por favor, cargue al 100%.
Only use the charger provided with the battery. Do not place any object on the charger.
Charging the BH EMOTION battery at 70-80% is mandatory if not used or stored for a long
time period. Additionally, control the level of the battery charger evevery 3 months and keep
it always above 20% charge.
If the battery is in deep sleep mode and in order to wake it up, please charge the battery to
100% capacity.
Utilisez uniquement le chargeur fourni pour la charge de la batterie. Ne posez aucun objet
sur le chargeur.
Il est recommandé de charger la batterie à 70-80% avant une longue période d’inutilisation
ou de rangement. De même, contrôlez le niveau de charge chaque trois mois et maintenez
un niveau de charge supérieur à 20%.
Si la batterie est en mode sommeil, dans le but de la réactiver, il faudra obligatoirement
effectuer une pleine charge à 100%.
3 sec
Controller
Only
with
central
display
8
WARNING
When making any adjustments, make sure that you stop the bicycle
and perform them in a safe place. Otherwise, the lack of attention to the
surrounding traf c could cause an accident.
12
EN
40
USER MANUAL EASYGO / EVO / NITRO / AWD
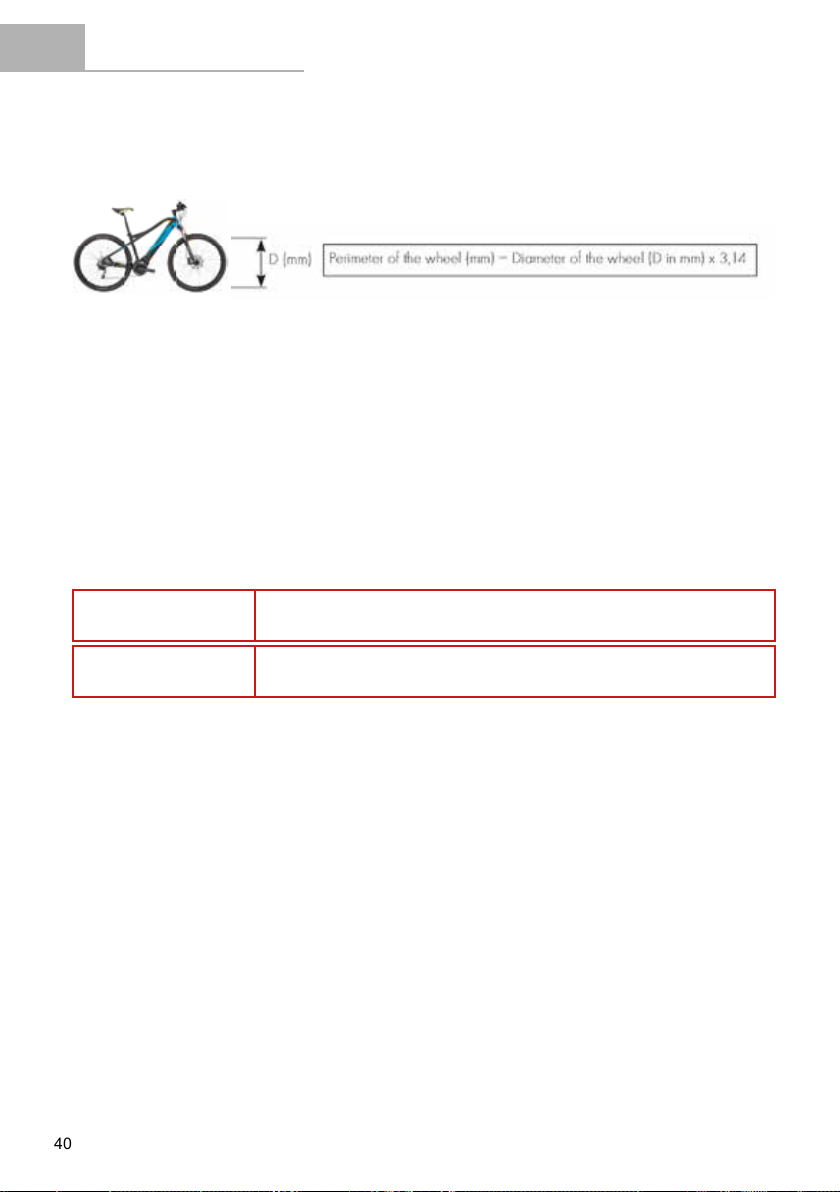
1. Wheel Size Selection.
The user can change the size of the wheel at any time. When doing so, the panel will display the
size of the wheel's circumference in millimetres and its equivalent in inches (16, 20, 24, 26, 27’5,
28 or 29). This size can be changed using the (+) and (-) buttons.
The circumference of the wheel is measured as follows:
2. Metric and Imperial Systems.
The user can switch between the metric system (kilometres) and imperial system (miles) by
pressing the (+) or (-) buttons, to select the units of distance and speed.
3. SNOW motorisation (only works in models with AWD dual motors).
AWD models have 2 motors on the front and rear hubs. Pressing the (+) and (-) buttons allows
you to select one of the following motor modes:
• ALL. The two motors work simultaneously, with traction control activated.
• ECO. The two motors are coordinated and complement each other to achieve energy
ef ciency.
• FRONT. Only the front motor works.
• REAR. Only the rear motor works.
• OFF. Select this option for e-bikes that are not AWD.
ATTENTION For models without AWD dual motors to work correctly, you must select
motor mode OFF.
ATTENTION The AWD models are not approved under standard EN 15914 and are
therefore only intended for off-road use.
4. Battery Capacity.
To accurately calculate the range, it is necessary to correctly determine the capacity of the
battery being used (i.e. 10 Ah, 12 Ah, etc.).
5. Controller Temperature (only available on the Central Display Panel)
The user can view the temperature on the controller in degrees centigrade.
6. Torque Sensor Reading (only available on the Central Display Panel).
The user can view the reading from the torque sensor in volts. The reading on the sensor varies
according to the pressure on the pedal. The sensor is considered to be properly calibrated when the
reading gives a voltage of between 0.5 V and 1.5 V in a resting position, with no pressure on the pedal.
7. Battery Deterioration (only available on the Central Display Panel).
The user can nd out the state of deterioration of the battery by viewing its actual capacity in Ah.
8. The Controller's Firmware Version (only available on the Central Display Panel).
The user can see the version of the controller's rmware that is installed.
13

EN
41
EASYGO / EVO / NITRO / AWD USER MANUAL
8. Throttle Function up to 6 km/h.
The pedal assistance system has a throttle function integrated into the display panel, limited to a maximum
speed of 6 km/h, compliant with standard EN 15194. To activate the system's throttle, the user must hold
down the (+) button for 3 seconds. To cancel the throttle function, the user simply releases the (+) button.
ON - 3SEC OFF - AUTOMATIC
9. System Error Indicator.
The pedal assistance system continuously checks its status. This is an intelligent system that continuously
checks the status of its different components. The display panel's error indicator is activated when there is
a malfunction in the system. When this happens, make sure that the battery is charged, turn the system off
and back on, taking care not to apply any force on the pedal. If the problem persists, disconnect the motor
and contact a BH store.
The possible operating errors are described in the Troubleshooting section of this manual.
WARNING
If the problem cannot be xed, contact a BH store to inspect the bicycle
as soon as possible.
10. USB (only available on the Central Display Panel).
The display panel has a USB port below the screen, to charge devices.
14
EN
42
USER MANUAL EASYGO / EVO / NITRO / AWD
ATTENTION
• Do not apply excessive force on the USB port or pull the USB cable.
• Check that the USB plug is facing in the right direction and is not
completely misaligned or at an angle with the USB port, and make
sure that it is fully inserted.
• Do not connect the USB port or plug if they are wet or damp.
• Use a standard-compliant USB 2.0 OTG cable.
• Do not insert foreign objects into the USB port.
NOTE
• Using the USB port to charge different devices may affect the bicycle's
range, reducing the battery's capacity.
• When an external device is connected to the USB cable, power is
supplied automatically.
• If the battery's remaining capacity is low, no power will be supplied.
11. Exclusive features of NITRO models.
NITRO models include a throttle in the right hand grip of the handlebar, with a maximum speed
of 20 km/h. The throttle is only activated when the selected assistance mode is “0%”.
WARNING
The NITRO models have been approved as motorcycles and for road
use; they require third-party liability insurance, a helmet, a licence and
a registration plate.
BATTERY AND CHARGER
Technology
The battery that your BH bike is equipped with contains
lithium-ion cells and is the most advanced technology
available in terms of energy density (energy stored per
kilogram of weight and per cm3 of volume). There are
several different battery versions, depending on the
model of the bicycle. Additionally, the current range
of BH EMOTION batteries have different capacities,
depending on the version purchased.
Lithium-ion batteries have the following characteristics:
Their performance decreases in extremely hot or cold environments.
• One additional characteristic of BH EMOTION lithium-ion batteries is that they have no “memory effect”,
and are not affected by incomplete discharging.
• They lose their charges naturally and gradually with use. The battery can be fully discharged (100%)
approximately 500 times, with maximum battery deterioration of 20%. In the case of partial discharges,
only the discharged part is counted. For example, if we charge the battery every time its charge level falls
by 25%, we will be able to charge it to 100% of its initial capacity 2,000 times. In short, the guaranteed
durability of the battery with maximum degradation of 20% is at least 20,000 km.
FR
M A N U E L D E L Ú T I L I S A T E U R
4 8
Charge de la batterie
En raison de sa technologie innovante Ion-Lithium, il n’est pas nécessaire d’atteindre la décharge complète de la
batterie avant de la brancher sur le chargeur. De même qu’il n’est pas non plus nécessaire d’effectuer une charge à
100% avant de pouvoir la réutiliser. Néanmoins, il convient de prendre en compte qu’afin d’obtenir un rayon d’action
maximum, il est recommandé d’effectuer sa charge complète.
Pour charger la batterie des modèles EASY GO, il convient de suivre les indications suivantes:
1. L’utilisateur peut charger la batterie en la retirant
du sac de la selle.
2. L’utilisateur doit débrancher le chargeur avant
de le connecter à la batterie.
Pour charger la batterie intégrée au cadre, il convient de suivre les indications suivantes:
1. L’utilisateur doit ouvrir le cadenas situé dans le
cadre sous la batterie intégrée.
2. L’utilisateur fera délicatement coulisser la
batterie en la retirant hors du cadre à l’aide
d’un petit tour.
GREEN LIGHT: STANDBY
RED LIGHT: CHARGING
RED LIGHT: ABNORMAL CHARGING
GREEN LIGHT: FULLY CHARGED
Charger
Charger
Battery port
External port
External port
Battery port
1º
1º
2º
2º
GREEN LIGHT: STANDBY
RED LIGHT: CHARGING
RED LIGHT: ABNORMAL CHARGING
GREEN LIGHT: FULLY CHARGED
Charger
Charger
Battery port
External port
External port
Battery port
1º
1º
2º
2º
15

EN
43
EASYGO / EVO / NITRO / AWD USER MANUAL
Energy Saving Modes
The battery has been designed to ensure a long service life. This is possible thanks to the energy saving modes
that prevent inefcient consumption of the battery:
• Transport Mode (only during the rst use)
In order to minimise internal consumption while transporting the bicycle from the factory to the store,
the battery is in Transport mode.
The user can nally exit this Transport mode by charging the battery to 100% before its rst use.
ATTENTION The AWD models are not approved under standard EN 15914 and are
therefore only intended for off-road use.
• Stand By Mode
In order to minimise internal consumption, the battery automatically switches to Stand By mode.
This happens automatically when the system detects no charging, no discharging and no communication
with the battery for a period of 10 minutes. So, for example, this mode will automatically turn off the display
panel after 10 minutes without use, if the user has left it on after parking.
The user can exit this Stand By mode by simply turning on the bicycle's display panel.
• Deep Sleep Mode
In order to protect the battery during long periods of inactivity or storage (for example, during the winter),
the battery automatically switches to Deep Sleep mode. This happens automatically when any of the
following situations occur:
• If the charge level of the battery is below 1%, the battery goes into Deep Sleep mode when the
battery has continuously been in Stand By mode for 10 minutes.
• If the charge level of the battery is below 10%, the battery goes into Deep Sleep mode when the
battery has continuously been in Stand By mode for 48 hours.
• If the charge level of the battery is below 40%: Deep Sleep mode is activated when the battery has
continuously been in Stand By mode for 14 days.
• If the charge level of the battery is below 80%: Deep Sleep mode is activated when the battery has
continuously been in Stand By mode for 30 days.
The user can exit this Deep Sleep mode by holding down the battery's SOC button (which
checks the charge level) for 5 seconds or starting to charge the battery with the charger.
Suitable Charging Environments
For safe and efcient charging, use the battery charger in a place that:
- Is at and stable (as it is on the bicycle).
- Is free from rain and moisture.
- Is out of direct sunlight.
- Is well ventilated and dry.
- Is not accessible to children or pets.
- Has a temperature of between 15–25°C.
16

EN
44
USER MANUAL EASYGO / EVO / NITRO / AWD
Unsuitable Charging and Discharging Environments and Solutions
The hot and cold environments described below may lead to charging entering stand by or sleep mode without
fully charging the battery.
• Winter discharging stand by mode or DUT (Discharge Under Temperature)
Battery discharging will enter stand by mode if the temperature is below -20 °C, stopping the pedal
assistance system from working and protecting the battery.
In such cases, stand by mode will automatically be disabled when the battery exceeds -20 °C.
• Winter charging stand by mode or CUT (Charge Under Temperature)
Battery charging will enter stand by mode if the temperature is below 0 °C. If charging starts and the
temperature falls below this level due to night cooling or other factors, charging will be stopped and
stand by mode will be activated to protect the battery.
In such cases, stand by mode will automatically be disabled when the battery exceeds 0 °C.
• Noise on televisions/radios/computers
Charging near to televisions, radios or similar devices may cause static, ickering images and
other interference.
If this happens, recharge somewhere that is away from the television or radio
(e.g. in another room).
Battery Charging Process
Due to its advanced lithium-ion technology, there is no need to wait for the battery to completely discharge before
connecting it to the charger. Likewise, it is also not necessary to charge it to 100% before using it again. But bear
in mind that, in order to achieve a maximum operating range, a full charge is recommended.
WARNING
Turn off the pedal assistance system before removing the battery from
the bicycle.
Use both hands to remove the battery, taking special care not to drop it. Dropping
the battery on your foot could cause injury and may damage the battery.
• To remove and charge the battery of EASYGO models, follow the instructions below:
1. The user can charge the battery by removing it from the seat bag.
2. The user should turn off the charger before connecting it to the battery.
ES
M A N U A L D E L U S U A R I O
1 2
Carga de la batería
Debido a su avanzada tecnología Ion-Litio, no es necesario esperar a la descarga completa de la batería antes
de conectarla al cargador. Asimismo, tampoco es necesario realizar una carga al 100% antes que pueda volver a
utilizarla. Pero tenga en cuenta que, con el fin de obtener un radio de acción máximo, es aconsejable proceder a
su carga completa.
Para cargar la batería de los modelos EASY MOTION, se deberá seguir las siguientes indicaciones:
1. El usuario puede cargar la batería retirándola
de la bolsa de sillín.
2. El usuario debe apagar el cargador antes de
conectarlo a la batería.
Para cargar la batería integrada en el cuadro, se deberá seguir las siguientes indicaciones:
1. El usuario debe abrir el candado situado en el
cuadro por debajo de la batería integrada.
2. El usuario deslizará cuidadosamente la
batería hacia fuera mediante un pequeño
giro.
GREEN LIGHT: STANDBY
RED LIGHT: CHARGING
RED LIGHT: ABNORMAL CHARGING
GREEN LIGHT: FULLY CHARGED
Charger
Charger
Battery port
External port
External port
Battery port
1º
1º
2º
2º
GREEN LIGHT: STANDBY
RED LIGHT: CHARGING
RED LIGHT: ABNORMAL CHARGING
GREEN LIGHT: FULLY CHARGED
Charger
Charger
Battery port
External port
External port
Battery port
1º
1º
2º
2º
17

EN
45
EASYGO / EVO / NITRO / AWD USER MANUAL
• To remove and charge the battery integrated into the frame, follow the instructions below:
1. The user must open the lock that is on the frame, below the built-in battery.
2. The user should carefully slide the battery out by twisting it slightly.
ES
M A N U A L D E L U S U A R I O
1 2
Carga de la batería
Debido a su avanzada tecnología Ion-Litio, no es necesario esperar a la descarga completa de la batería antes
de conectarla al cargador. Asimismo, tampoco es necesario realizar una carga al 100% antes que pueda volver a
utilizarla. Pero tenga en cuenta que, con el fin de obtener un radio de acción máximo, es aconsejable proceder a
su carga completa.
Para cargar la batería de los modelos EASY MOTION, se deberá seguir las siguientes indicaciones:
1. El usuario puede cargar la batería retirándola
de la bolsa de sillín.
2. El usuario debe apagar el cargador antes de
conectarlo a la batería.
Para cargar la batería integrada en el cuadro, se deberá seguir las siguientes indicaciones:
1. El usuario debe abrir el candado situado en el
cuadro por debajo de la batería integrada.
2. El usuario deslizará cuidadosamente la
batería hacia fuera mediante un pequeño
giro.
GREEN LIGHT: STANDBY
RED LIGHT: CHARGING
RED LIGHT: ABNORMAL CHARGING
GREEN LIGHT: FULLY CHARGED
Charger
Charger
Battery port
External port
External port
Battery port
1º
1º
2º
2º
GREEN LIGHT: STANDBY
RED LIGHT: CHARGING
RED LIGHT: ABNORMAL CHARGING
GREEN LIGHT: FULLY CHARGED
Charger
Charger
Battery port
External port
External port
Battery port
1º
1º
2º
2º
WARNING
Turn off the pedal assistance system before starting to charge it from the
bicycle's charging port.
• To charge the battery integrated into the frame using the bicycle's charging port, follow the
instructions below:
1. The user must locate the bicycle's charging port.
2. The user must plug in the charger's extension cable, which will t into the bicycle's
charging port.
ES
M A N U A L D E L U S U A R I O
1 2
Carga de la batería
Debido a su avanzada tecnología Ion-Litio, no es necesario esperar a la descarga completa de la batería antes
de conectarla al cargador. Asimismo, tampoco es necesario realizar una carga al 100% antes que pueda volver a
utilizarla. Pero tenga en cuenta que, con el fin de obtener un radio de acción máximo, es aconsejable proceder a
su carga completa.
Para cargar la batería de los modelos EASY MOTION, se deberá seguir las siguientes indicaciones:
1. El usuario puede cargar la batería retirándola
de la bolsa de sillín.
2. El usuario debe apagar el cargador antes de
conectarlo a la batería.
Para cargar la batería integrada en el cuadro, se deberá seguir las siguientes indicaciones:
1. El usuario debe abrir el candado situado en el
cuadro por debajo de la batería integrada.
2. El usuario deslizará cuidadosamente la
batería hacia fuera mediante un pequeño
giro.
GREEN LIGHT: STANDBY
RED LIGHT: CHARGING
RED LIGHT: ABNORMAL CHARGING
GREEN LIGHT: FULLY CHARGED
Charger
Charger
Battery port
External port
External port
Battery port
1º
1º
2º
2º
GREEN LIGHT: STANDBY
RED LIGHT: CHARGING
RED LIGHT: ABNORMAL CHARGING
GREEN LIGHT: FULLY CHARGED
Charger
Charger
Battery port
External port
External port
Battery port
1º
1º
2º
2º
WARNING
• Never charge or use a damaged bicycle.
• Be careful not to touch the charger during the charging process. It may
be hot, especially in high ambient temperatures.
• If a fault occurs while the battery is being charged, remove the charger's
power plug from the socket and wait for the battery to cool down.
• Never touch the power plug, charging plug or contacts with wet hands.
• Make sure that there is no foreign matter on the battery's contacts
before placing it on the bicycle.
ATTENTION
• Do not connect the charger's power plug to the battery or bicycle's
charging port if it is wet or damp. Make sure that you only connect the
power plug when the battery or bicycle's charging port is completely dry.
• Do not apply excessive force on the power plug or pull the cable with the
power plug connected to the battery.
18
Other manuals for Evo
2
This manual suits for next models
3
Table of contents
Other BH Emotion Bicycle manuals


