Bio-Art Microblaster User manual

MicroBlaster
i n t e l l i g e n t s o l u t i o n s
U S E R M A N UA L

INDEX
1. Introduction ......................................................................................
2. Technical specifications....................................................................
3. Package content...............................................................................
4. Main characteristics of the model.....................................................
5. Main items of the product.................................................................
6. Installation instructions.....................................................................
7. Use instructions................................................................................
8. Maintenance and cleaning................................................................
9. Safety precautions............................................................................
10. Warnings.........................................................................................
11. Special storage conditions..............................................................
12. Problems and solutions..................................................................
13. Symbols.........................................................................................
14. Term of warranty and technical assistance....................................
15. Authorized technical assistance....................................................
16. European authorized representative.............................................
2
2
2
3
3
4
5
6
6
8
9
9
10
10
11
11
1
Watch the video:
2
1. INTRODUCTION
2. TECHNICAL SPECIFICATIONS
3. PACKAGE CONTENT
Bio-Art Microblaster is a portable pneumatic device, easy to install and
operate, designated to surface blasting, mainly in dental works.
The use of Microblaster in dentist's offices and dental laboratories has more and
more been requested for being practical, ergonomic and accurate in small jobs
and/or where the area to be blasted has a slight contact with areas of preservation
from blasting.
Bio-Art Microblaster is provided with an ejecting needle made of
sintered carbide, which assures higher durability and accuracy during blasting.
Bio-Art has developed three Microblaster models depending on the
purpose:
Microblaster Standard and Lab Models
One fixed nozzle mounted at a 138°angle.
Microblaster Plus Model
Two removable and autoclavable nozzles,
mounted at 90° and 138° angles.
Attention! Before operating the equipment, read carefully all
instructions contained in this manual.
Weight of Microblaster Standard and Lab without the package:.....................
Weight of Microblaster Plus without the package............................................
Weight of Microblaster Standard and Lab with the package.........................
Weight of Microblaster Plus with the package:.............................................
Package dimension (W x T x H)..............................................
Work pressure...................................................
Granulation of the supported aluminum oxide:.........................
65g
70g
210g
215g
190 x 133 x 50 mm
60 a 80 lbf/pol² (4~5,5 Kgf/cm²)
up to 100 microns
When opening the package, check for the presence of the following items inside,
according to the specified model:
Microblaster Standard and Lab Models:
01 Microblaster with fixed nozzle and ejecting needle at 138º;
01 Quick coupling;
01 Handpiece Connector;
01 A tank with 40g aluminum oxide 50 microns;
01 Instruction Manual.
Microblaster Plus Model:
01 Microblaster;
01 Removable nozzle with ejecting needle at 90°;
01 Removable nozzle with ejecting needle at 138°;
01 Quick coupling;
01 Handpiece Connector;
01 A tank with 40g aluminum oxide 50 microns;
01 Instruction Manual.
4. MAIN CHARACTERISTICS
OF THE MODEL
3
Characteristics Standard Lab Plus
Fixed nozzle with ejecting needle at 138° Yes Yes No
No No Yes
No No Yes
Yes Yes Yes
Yes No Yes
No Yes No
Removable nozzles with ejecting needles
at 90º and 138°
Autoclavable nozzles
Use of aluminum oxide with granulation
up to 100 microns
Possibility for intraoral use
Exclusive use in laboratories
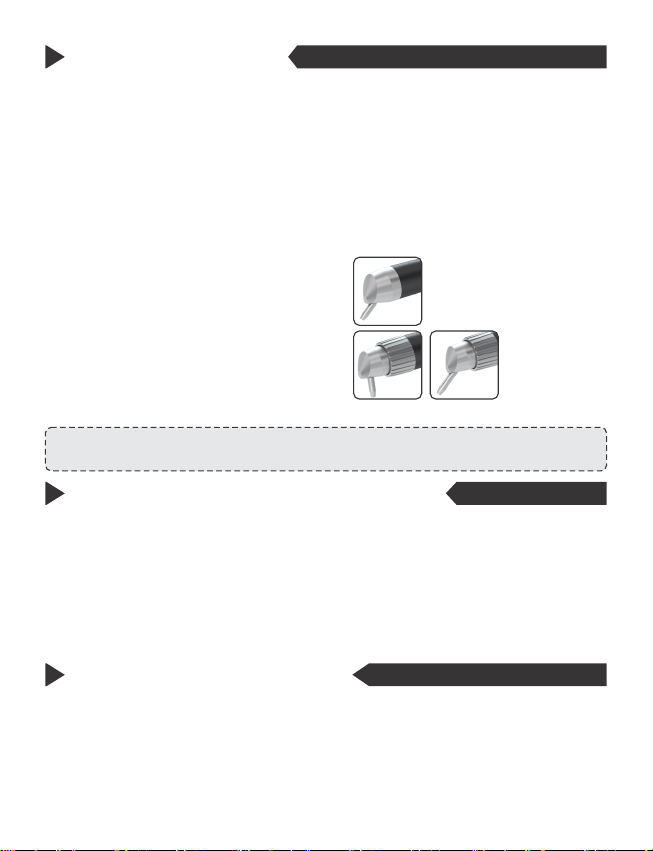
5. MAIN ITEMS OF THE PRODUCT
Microblaster Standard and Lab Models:
01 - Ejecting needle
02 - Fixed nozzle 138º
03 - Microblaster Body
04 - Switch button
05 - Lid of the tank for abrasive
06 - Tank for abrasive
07 - Quick coupling for use on compressor
08 - Engaging nut for fixation of the PU hose
09 - Handpiece Connector
10 - Nut with spigot MICROBLAST STANDARD
MAIN ITEMS
01
02
03
04 05
06
07
08
09
10

MICROBLASTER
PLUS MAIN ITEMS
Microblaster Plus Model
01 - Ejecting needle
02 - Removable nozzle 138º
03 - Microblaster body
04 - Switch button
05 - Lid of the tank for abrasive
06 - Tank for abrasive
07 - Quick coupling for use on compressor
08 - Engaging nut for fixation of the PU hose
09 - Handpiece Connector
10 - Nut with spigot
11 - Removable nozzle 90º
12 - Nut for fixation of the removable nozzles 90º and 138º
6. INSTALLATION INSTRUCTIONS
The Bio-Art Microblaster shall be installed by means of a nut with a
spigot (10) in a pure and dry compressed air network.
For the equipment and the user's safety, and for better performance
during the blasting works, make sure the compressed air pressure is kept stable at
60 to 80 lbf/inch2 (4~5.5 Kgf/cm² ).
Bio-Art supplies the connections (07, 08 and 09) together with the
product, aiming to facilitate their connection during installation, considering that it
can be connected to a standard compressed air network or to the equipment low
rotation terminal, as described in the illustration below:
USING THE
CONNECTIONS
FOR USE ON A
COMPRESSOR
USING THE
CONNECTIONS
FOR USE IN
EQUIPMENT
COMPRESSED AIR
HOSE PU 6.0
OR SIMILAR MICROBLASTER
HOSE
MICROBLAST
HOSE
NUT WITH
SPIGOT
NUT WITH
SPIGOT
COUPLING BODY
FOR HOSE CONNECTION
CONNECTION FOR
COUPLING OF
EQUIPMENT
4
01
02
12
03 04
11 10
09
08
07
05
06

After the Microblaster installation has been finished, correctly follow the use
instructions and the other information about precautions and safety, described below.
7. USER INSTRUCTIONS
1-Remove the switch button clamp (04).
_______When removing the switch button clamp (04), try using it immediately
_______afterwards and always after using Microblaster, return the respective
_______clamp to the button (04) thus keeping it always pressed. The act of
_______keeping the button clamp released for long periods might generate
_______adherence of the internal driving tube walls, which might make the oxide
_______passage difficult.
2-Microblaster Plus model is provided with two removable and autoclavable
nozzles (02 and 11) offering two options for the ejecting needle angling, one at 90º
(indicated for intraoral works on posterior teeth) and another at 138º (indicated for
laboratory works and intraoral works on anterior teeth). According to the kind of
work to be carried out, fix one of the nozzles on the Microblaster body by means of
the fixing nut (12).
_______During the nozzles removal or fixation (02 or 11) on Microblaster Plus,
_______firmly hold the nozzle with the fingers of one hand without turning it and
_______then turn the connecting nut with the fingers of the other hand (12), thus
_______fixing or releasing the chosen nozzle by means of the nut thread.
_______Never use any kind of wrench or tool to fix or release the nozzle on
_______Microblaster Plus.
Note: Nozzle (02) used in the Microblaster models allows rotation up to 180º,
facilitating the performance of very different kinds of works.
3- Fill the tank (06) in to maximum ¾ of its capacity with aluminum oxide and fix it
on the tank for abrasive lid (5) located at the end of the Microblaster body.
_______Use only abrasives of the type aluminum oxide and with granulations in
_______the range up to 100 microns.
Note: Bio-Art commercializes the perfect aluminum oxide for consumption and
refill to be used with Microblaster.
5
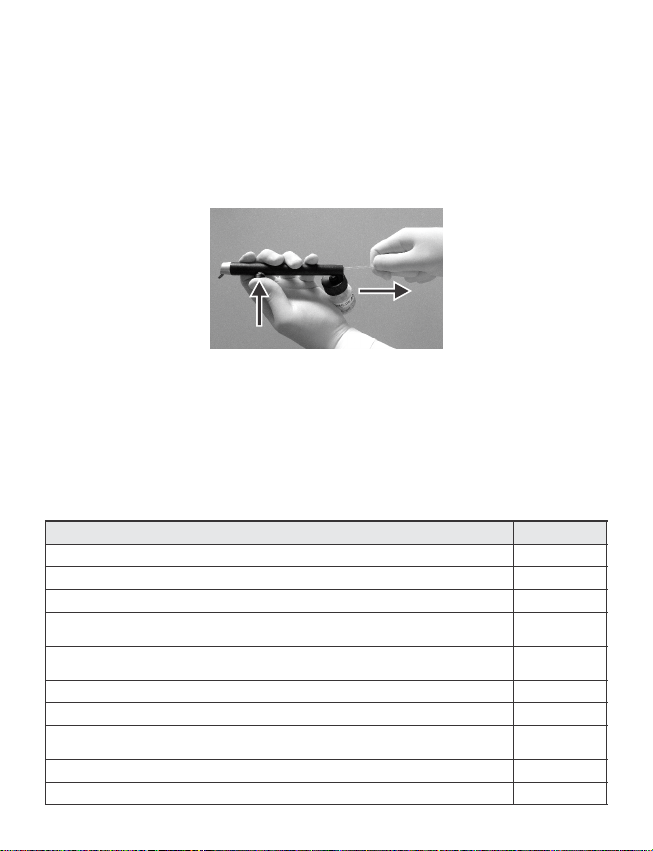
4- With the tank duly filled in and introduced in Microblaster, press the switch
button (04) to start the blasting process.
Remark:
If the blasting is interrupted for any reason even with the switch button (04)
pressed and the tank (06) filled in with abrasive, follow the steps below:
• keep the switch button (04) pressed;
• with the other hand, hold the hose firmly in the region close to the end of the
Microblaster body, pulling slightly and releasing immediately afterwards;
• repeat this procedure until the air passage is free.
5- Always try to keep a distance from 5 to 10 mm between the face of the
Microblaster needle tip (01) and the surface to be worked during blasting.
Important note:
• In order to obtain better results during the blasting works, make small fast and
constant movements throughout the whole surface to be blasted.
• Some recommendations for the aluminum oxide granulation, indicated for some
application examples are presented below. It is upon the professional's discretion
to choose the best applicable granulation, provided that it is supported by
Microblaster (up to 100 microns).
Applications Granulation
Micro-retentions (surface roughness) 50 microns
90 microns
50 microns
50 microns
50 microns
50 microns
50 microns
90 microns
90 microns
90 microns
Bracket recycling (cleaning)
Internal "inlay-onlay" cleaning of resin and ceramics
Internal evidencing for crown adjustment and seating
Occlusal blasting for fine-tuning, replacing the use
of carbon
Adjustment of interproximal contacts
Cleaning of cast parts
Removal of oxidation
Removal of cement from metal crowns, resins, ceramics
and other materials
Cleaning or degreasing of metal and/or ceramics when the
"intraoral ceramic repair technique" is used
6

7
_______Bio-Art Microblaster is equipment exclusively designed to produce a
_______abrasion function blast, without prophylaxis function, i.e., there is no any
_______similarity with sodium bicarbonate blasting equipment.
8. MAINTENANCE AND CLEANING
9. SAFETY PRECAUTIONS
Before disconnecting Microblaster from the compressed air network or
the equipment, remove the tank for abrasive (06) and then place your finger on the
tip of the ejecting needle (01) closing the needle orifice, and simultaneously press
the switch button (04) for approximately three seconds for the internal hose to
totally empty the abrasive that might still be in the system. This process is called
“Retro-blasting”.
_______The “Retro-blasting” procedure shall not be executed for more than five
_______seconds, which might cause breakage of the tank for abrasive (06).
For the Microblaster cleaning and disinfection, use only a cloth
dampened with water or alcohol 70%.
_______Bio-Art Microblaster shall never be sprayed with liquids; be submerged
_______or sterilized in an oven or an autoclave, except for the removable nozzles
_______(02 and 11) in the Plus model, which, after being released from the
_______product, can be sterilized in autoclaves.
Keep the compressed air network always free of moisture and oil,
always observing the efficiency of your compressor's coalescent filters.
For model Microblaster Plus, whenever changing the nozzles (02 and
11), carefully clean the nozzles' and the fixation nut's (12) thread in order to
eliminate possible aluminum oxide residues or dust and to avoid their damage or
locking.
Intraoral Use:
_______Bio-Art Microblaster was developed for general use and mainly for
_______application in laboratories. Its intraoral use can be based on health,
_______safety rules and restricted to the exclusive technical responsibility of the
_______Dental Surgeon or the responsible professional.
8
_______Due to the constructive features of the Microblaster Lab model, its use
_______shall be restricted to laboratories, thus it is not indicated for intraoral
_______procedures.
_______The Dental Surgeon or the responsible professional are fully responsible
_______for the product use, regarding the safety items, the environment, the
_______operator's and the patient's personal protection, indications and contra-
_______indications and side effects.
Bio-Art denies any responsibility for any damage caused by undue use
of Microblaster and in cases where the safety items described in this document
have not been complied with.
General and laboratory use:
The Use of personal protective equipment (PPE's) when working with
Bio-Art Microblaster is compulsory. Use protection goggles, gloves and breathing
mask when operating the equipment.
In addition to these EPI's and for cases when the work offers such
conditions, we recommend the use of the Bio-Art Bio-Chamber (suction
chamber).
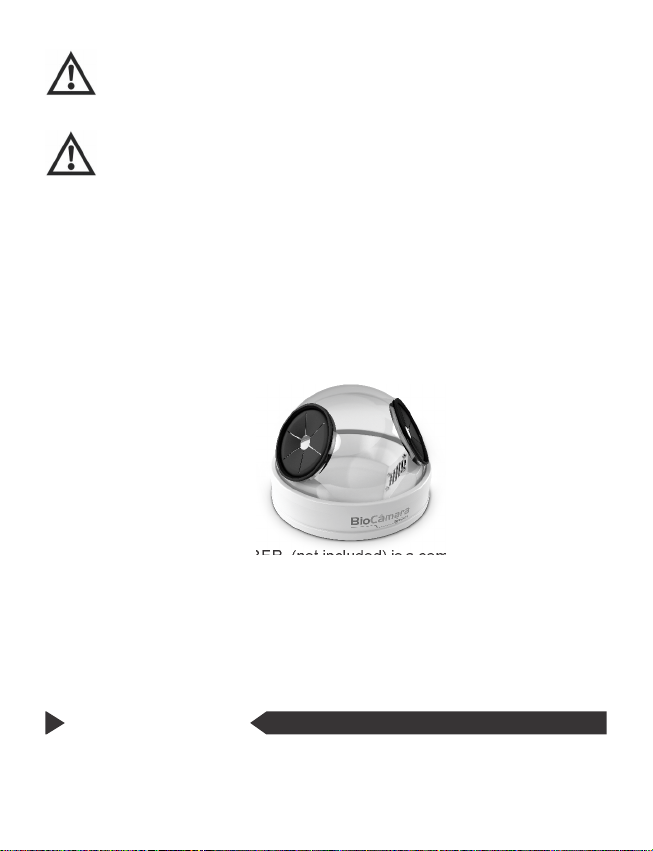
Using Bio-Art Bio-Chamber
(suction chamber):
Bio-Art BIO-CHAMBER, (not included) is a complementary product for
use with Microblaster. Manufactured by Bio-art, it is an exhaustion chamber used
in the blasting processes with the purpose not to allow the excess of aluminum
oxide and the impurities generated in the blasting process to be launched to the
environment.
Bio-Art BIO-CHAMBER is provided with an exclusive exhaustion
system and a blasting chamber with high visibility and exclusively designed to
work with Microblaster, thus providing higher cleaning, speed, efficiency, safety
and practicality in the blasting processes.
• Never point the ejecting needle (01) to any part of the body during the blasting
process.
• Use only abrasive of the type aluminum oxide.
10. WARNINGS

9
12. PROBLEMS AND SOLUTIONS
11. SPECIAL STORAGE CONDITIONS
• The aluminum oxide used in Microblaster might cause skin, eye and respiratory
tract irritation. Never use Microblaster without personal protective equipment
(PPE).
• Never use aluminum oxide with traces of moisture or contaminants.
• Never use aluminum oxide with granulation out of the manufacturer's
specification (up to 100 Microns).
Bio-Art Microblaster shall be stored under the following conditions:
• With the clamp installed on the switch button (04), keeping it always pressed.
• Always disconnected from the compressed air network and/or the equipment;
• In a cool, dry and free of dust place;
• Far from chemical products and protected from sources of heat and sun light;
• Preferably in its original packaging.
Problem Cause Solution
Air and/or abrasive
flow missing, or
insufficient at the
ejecting needle
(01) ***.
Clogging***.
Air leaking on the
Microblaster body.
Air leaking through the
ejecting nozzle needle.
See item 6 of this user manual
and install Microblaster correctly.
See item 6 of this user manual
and monitor the correct pressure,
(60 to 80 lbf/inch² (4~5.5 Kgf/cm² ).
Fill the tank (06) in with aluminum
oxide at maximum of 3/4 of its capacity.
The compressed air network shall be dry.
Check the coalescent filter efficiency
and the presence of moisture.
The abrasive shall be free of moisture, with humid
weather it is necessary to pre-dry in an oven
or an open pot at 250°C for 30 minutes.
Use only abrasive of the type aluminum oxide
up to 100 microns, preferably supplied
by Bio-Art itself.
The excess of aluminum oxide in
the blasting shall be disposed.
Contact the Authorized Technical
assistance Service.
Contact the Authorized Technical
assistance Service.
Incorrect connection of
Microblaster to the compressed
air network.
Insufficient or instable
compressed air
network pressure.
Throttling of the driving hose
by the button lever. See item 7, part 4 of this user manual.
Insufficient quantity
of abrasive (aluminum oxide)
in the tank (06).
Presence of moisture in the
compressed air system.
Presence of moisture in
the abrasive.
Incorrect granulation, out of
specification in the user
manual.
Reuse of abrasives containing
residues (“recycling" attempt).
Internal driving hose damaged.
Displacement of the driving
lever internal hose.
10
***In case of clogging in the Microblaster internal pipeline, a simple "Retro-
blasting" procedure might solve the problem. For this purpose, see the
information described in item 8. Maintenance and cleaning of this user manual.
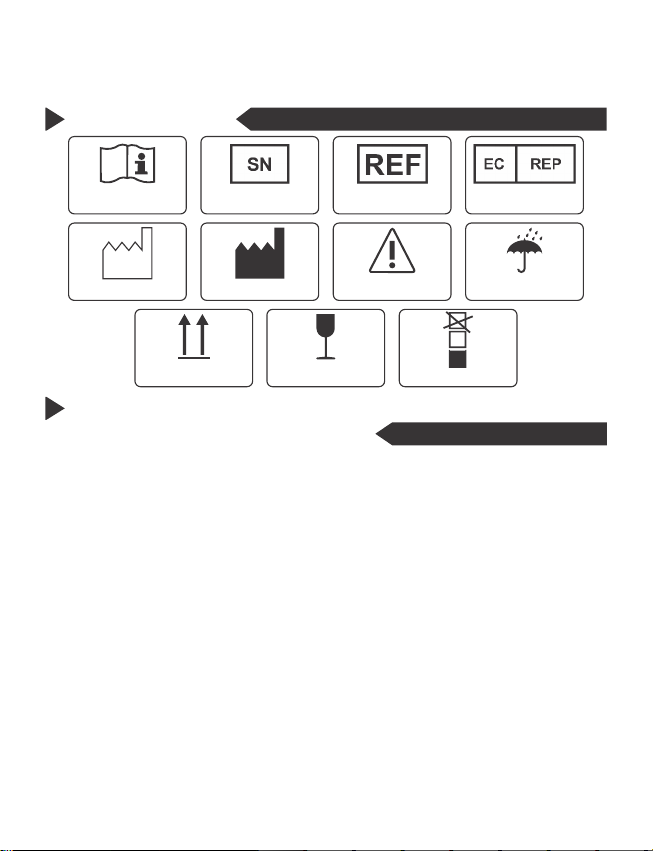
13. SYMBOLS
14. TERM OF WARRANTY AND AUTHORIZED
TECHNICAL ASSISTANCE
Check Instructions
for Use
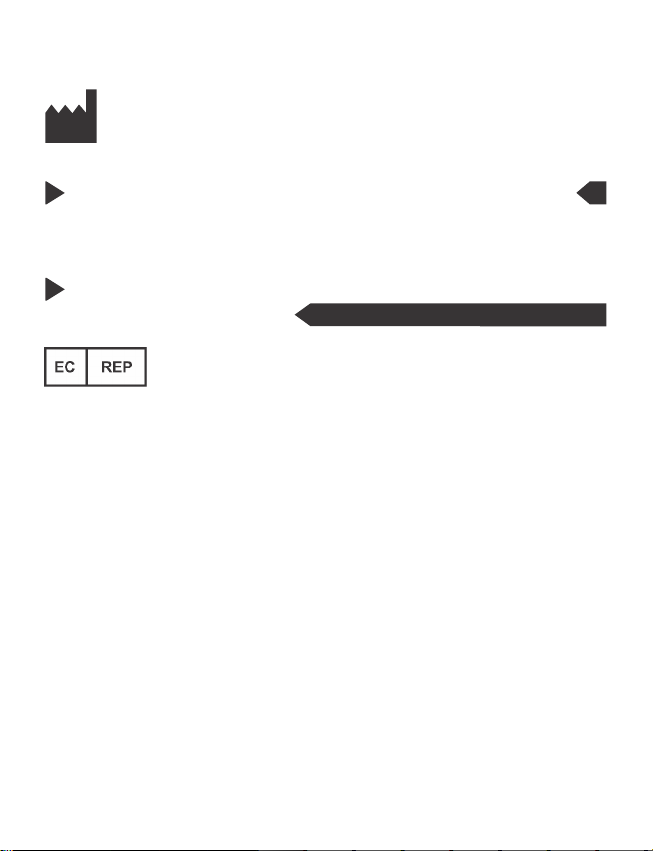
Authorized Representative in
the European Community
Serial Number Model Code
Date of manufacture Manufacturer's data Attention! Keep in dry place
This side up Fragile
10
Maximum piling
BIO-ART Equipamentos Odontológicos Ltda., grants a six-month warranty for this
product, starting from the date of its acquisition. This warranty covers all and any
manufacturing defect, being provided through repair of the equipment, and
subjected to the following requirements:
• That the product has been used correctly in accordance with the instructions
described in the user manual;
• The claim is accompanied by the purchase invoice and registered within the
warranty period, followed by a report with description of the defect and the product
serial number;
• The product is handled, transported and stored with care;
• The transport cost (round trip) is paid by the customer;
Warranty limitations:
• Natural wear of parts;
• Misuse, falls or accidents;
• Inadequate transport;
• Repair by non-authorized personnel;
• Use in disagreement with the device features and purposes;
• Wear due to exposure to adverse conditions (humidity, cold and intense heat);
• Damage due to lack of cleaning or maintenance with inappropriate products;
11
In case of doubts, contact the manufacturer:
_______BIO-ART EQUIPAMENTOS ODONTOLÓGICOS LTDA
_______Rua Teotônio Vilela, 120 – Jardim Tangará
_______Zip Code 13568-000 – São Carlos – SP – Brazil
_______Tel. +55 (16) 3371-6502 – Fax +55 (16) 3372-5953
_______CNPJ 58.538.372/0001 – State Regis. 637.034.447.113
_______www.bioart.com.br
15. AUTHORIZED TECHNICAL ASSISTANCE
16. EUROPEAN AUTHORIZED
REPRESENTATIVE
For your safety, technical assistance on this product shall only be provided by
authorized personnel/companies. See our site www.bioart.com.br for the
Authorized Technical assistance posts.
____________OBELIS s.a
____________Boulevard Général Wahis 53 - 1030 Brussels, BELGIUM
____________Tel: +(32) 2. 732.59.54 - Fax: +(32) 2.732.60.03
____________E-Mail : [email protected]


Rev: CMAN0274 f - Fev/2016
i n t e l l i g e n t s o l u t i o n s
Rua Teotônio Vilela, 120 - Jd. Tangará - CEP 13568-000 - São Carlos - SP - Brasil
Tel. +55 (16) 3371-6502 - Fax +55 (16) 3372-5953
www.bioart.com.br
Table of contents
Other Bio-Art Dental Equipment manuals


Popular Dental Equipment manuals by other brands


Eighteeth
Eighteeth Fast-Fill user manual

Coltene
Coltene Coltolux LED owner's guide

Pelton & Crane
Pelton & Crane Spirit 3000 Series installation instructions

DENTSPLY
DENTSPLY SmartLite Max Directions for use

Vatech
Vatech EzRay Air Wall VEX-S300W installation manual

Baumann Dental
Baumann Dental Arto XP Series Nstruction manual

Durr Dental
Durr Dental Tyscor VS 1 Plus Installation and operating instructions

HAGER WERKEN
HAGER WERKEN LaserHF standard user manual

3TECH
3TECH TURBINE Ti-940L manual

Komet
Komet SFSQ 100 quick start guide

BRASSELER USA
BRASSELER USA enLITE Instructions for use

Chirana Medical
Chirana Medical Smile Mini 04 Instructions for use