Biomeme Franklin User manual

Franklin™ Real-Time PCR
Thermocycler (EUA)
For IVD Use ONLY. For Emergency Use Authorization ONLY.
This product has not been FDA cleared or approved, but has been authorized by
FDA under an EUA for use by authorized laboratories that are
certified under the Clinical Laboratory Improvement Amendments of 1988 (CLIA),
42 U.S.C. §263a, that meet requirements to perform high complexity tests.
This product has been authorized only for the detection of nucleic acid from SARS-
CoV-2, not for any other viruses or pathogens.
The emergency use of this product is only authorized for the duration of the
declaration that circumstances exist justifying the authorization of emergency use
of in vitro diagnostics for detection and/or diagnosis of COVID-19 under Section
564(b)(1) of the Act, 21 U.S.C. § 360bbb-3(b)(1), unless the declaration is terminated
or authorization is revoked sooner.
Last Updated: 3/16/2023

2
Franklin™ PCR Thermocycler User Manual (EUA)
© Biomeme, Inc. 2023
Version 2.0
Table of Contents
1
Franklin™ Real-Time PCR Thermocycler (EUA) 1
Table of Contents 2
Franklin™ Thermocycler 3
Technical Specifications 4
Thermocycler Button Layout 6
LED Status Indicators 7
Turning Your Thermocycler On and Off 8
Charging & Checking Battery Status 8
Enabling & Disabling Bluetooth (BLE ) 10
Recovering & Reattaching Test Data 10
Transferring Data 14
Loading Pure Sample into Go-Strips 15
Placing Go-Strips into Franklin™ Thermocycler 17
Maintenance & Cleaning 19
Safety Notice 19
General Safety Warnings 20
Declaration of Conformity 22
Troubleshooting 23
Disclaimer 25

3
Franklin™ PCR Thermocycler User Manual (EUA)
© Biomeme, Inc. 2023
Version 2.0
Franklin™ Thermocycler
The Biomeme Franklin™ transforms your smartphone into a thermocycler for
real-time PCR analysis with results in under an hour. Our mobile thermocycler
enables multiplex real-time detection of up to 27 targets from 1 sample or test 9
samples for up to 3 targets each. Just under 3 pounds, hand-held, and battery-
operated for maximum portability enabling a full day’s work out in the field on a
single charge.

4
Franklin™ PCR Thermocycler User Manual (EUA)
© Biomeme, Inc. 2023
Version 2.0
Technical Specifications
SPECIFICATION
VALUE
Sample Capacity
9 Wells
Reaction Volume per Well
20µL
Total Channels
3
Franklin™ three9 Fluorophores
FAM / SYBR (Green), TexasRedX (Amber),
ATTO647N (Red)
System Control & Data Transfer
Wireless (BLE)
Integrated Barcode Scanner
Yes
Max Samples per Run
9
Max PCR Targets per Run
27
Weight
1.20 kg / 2.65 pounds

5
Franklin™ PCR Thermocycler User Manual (EUA)
© Biomeme, Inc. 2023
Version 2.0
Operating Ambient Temperature
4 - 40°C / 39 - 104°F
Operating Humidity Limit
0 - 99%
Operating Altitude Limit
3,048 m / 10,000 ft
Wall Power (VAC)
100 - 240V
Voltage
19V
Full Load Current
3.3A
Internal Battery
5 hours
Quantitative
Yes
IP Rating
IP30
Indoor/Outdoor?
Indoor or Outdoor in a Covered Area

6
Franklin™ PCR Thermocycler User Manual (EUA)
© Biomeme, Inc. 2023
Version 2.0
Pollution Degree
2
Degree of Ingress Protection
Keep 5 cm Clearance Around the
Thermocycler for Proper Performance
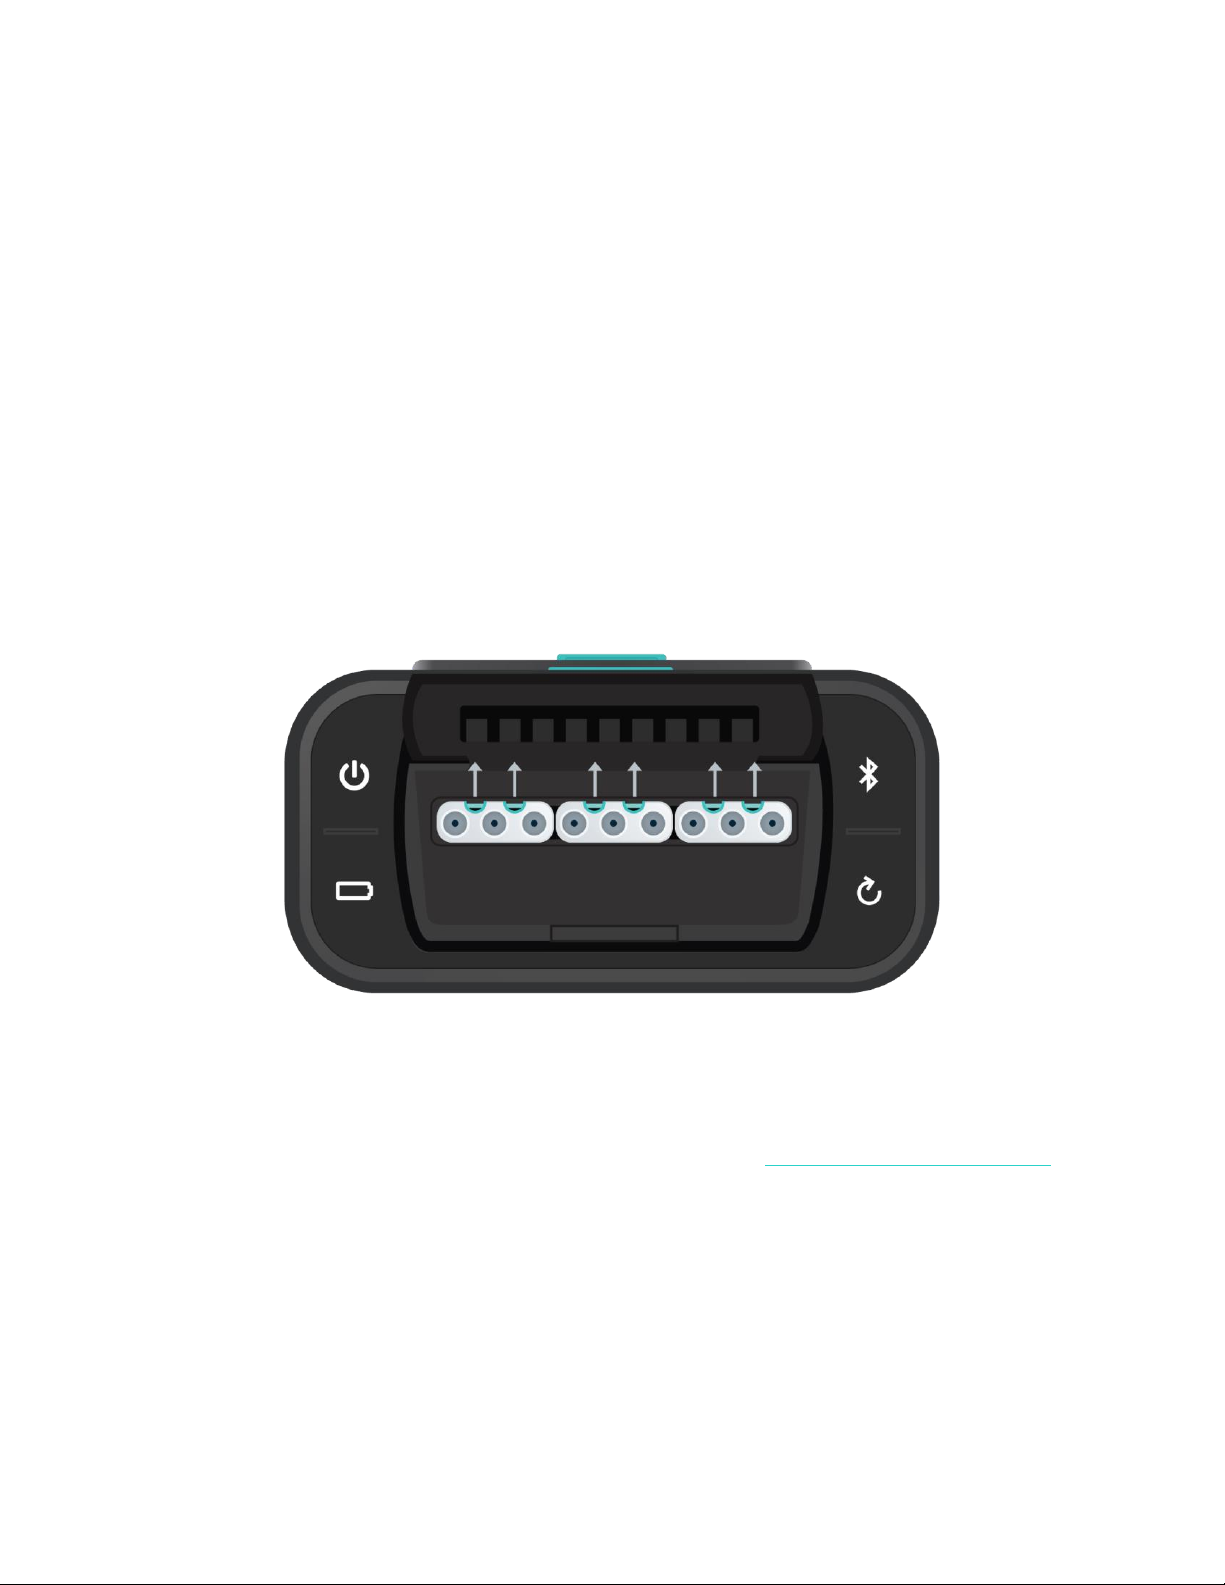
Thermocycler Button Layout
There are a total of 4 buttons located on the top of your Franklin™ thermocycler:

7
Franklin™ PCR Thermocycler User Manual (EUA)
© Biomeme, Inc. 2023
Version 2.0
LED Status Indicators
Vertical LED on the front of your thermocycler.
The Franklin™ thermocycler has 5 LEDs on the front of the unit. The LEDs are used
to convey various states of the thermocycler as outlined in the table below.
COLOR
INTERPRETATION
5 solid indicates your thermocycler is on
5 blinking indicates Bluetooth (BLE) is pairing
2 solid indicates remaining battery is between 21 and 40%
3 solid indicates remaining battery is between 41 and 60%
4 solid indicates remaining battery is between 61 and 80%
5 solid indicates remaining battery is between 81 and 100%
1 blinking indicates charging
1 solid indicates run start to 9% complete
2 solid indicates run is between 10 and 31% complete
3 solid indicates run is between 32 and 53% complete
4 solid indicates run is between 54 and 75% complete
5 solid indicates run is between 76 and 99% complete
1 solid indicates remaining battery is between 0 and 20%
5 blinking indicates thermocycler lid is open or an error
Note: If the battery is in the red, you shouldn’t start your run until you plug your
thermocycler into power.
5 blinking indicates your test is complete and data is ready to
be synced to your smartphone
WHITE
GREEN
YELLOW
RED
BLUE
8
Franklin™ PCR Thermocycler User Manual (EUA)
© Biomeme, Inc. 2023
Version 2.0
Turning Your Thermocycler On and Off
To power on your thermocycler, press and hold the power button (located on
the top of the unit) for roughly half a second. The status LED on the front of your
thermocycler will illuminate white to indicate it has successfully turned on. To turn
the unit off, press and hold the power button for 1.5 seconds and the status LED
will turn off upon release of the button. The unit will also turn itself off after 15
minutes of inactivity.
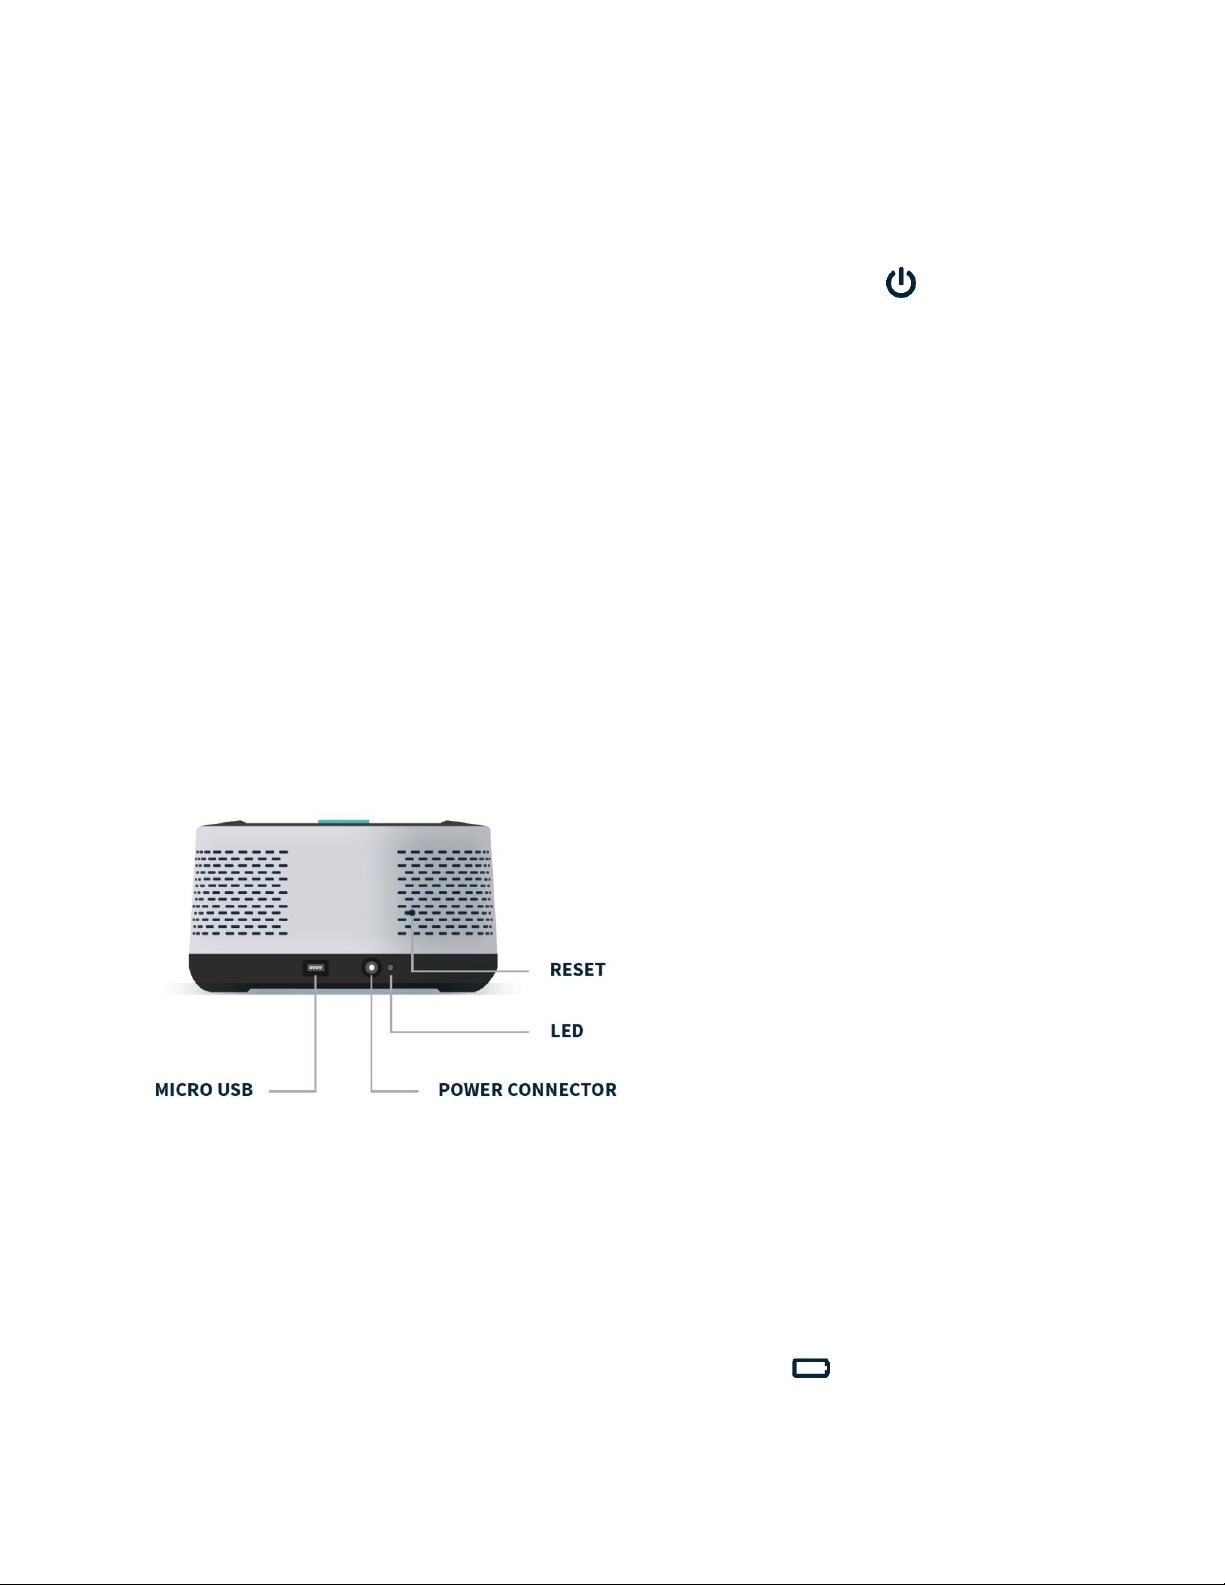
Charging & Checking Battery Status
Note: To preserve your smartphone’s
battery life, disconnect from the
thermocycler when it is not in use.
If your battery is running low, plug the AC power adapter into an outlet and insert
the power connector into the back of your thermocycler. The LED on the back of
the thermocycler will illuminate blue. If you are unable to turn your thermocycler
off using the power button on top, you may press the reset button to force it off (all
test data on the unit will be lost). Lastly, when the battery button is held, the

9
Franklin™ PCR Thermocycler User Manual (EUA)
© Biomeme, Inc. 2023
Version 2.0
LED on the front of your thermocycler indicates the battery charge status as
follows:
LED STATUS
BATTERY PERCENTAGE
5 solid
81 - 100%
4 solid
61 - 80%
3 solid
41 - 60%
2 solid
21 - 40%
1 solid
0 - 20%
A single green LED will blink while charging. If your battery charge is between 0 and
20%, the bottom most LED will blink green while charging. If your battery charge is
greater than 20%, the topmost LED will blink green while charging.
For proper battery maintenance and performance, please fully charge the
thermocycler battery at least once every six months. The thermocycler should not
be left without charging for extended periods of time. If your device has not been
charged in more than six months and you cannot get the thermocycler to turn back
GREEN
GREEN
GREEN
GREEN
RED
10
Franklin™ PCR Thermocycler User Manual (EUA)
© Biomeme, Inc. 2023
Version 2.0
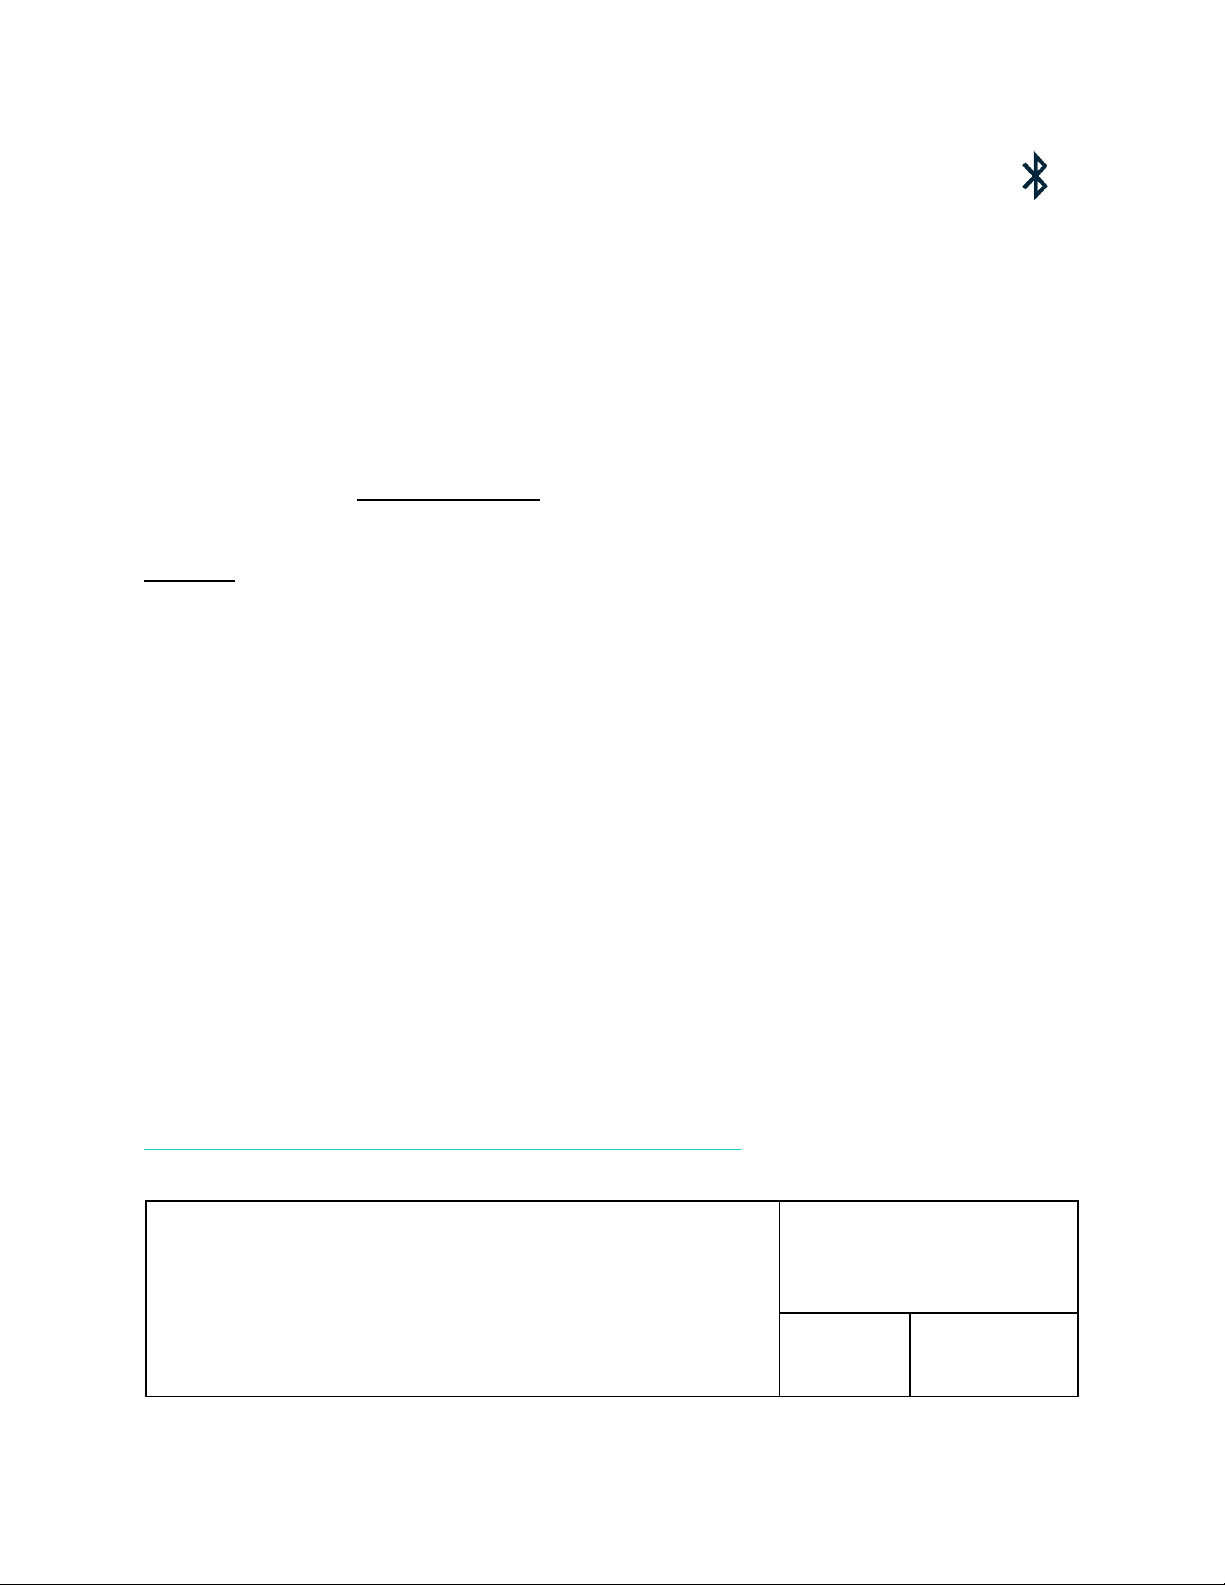
Enabling & Disabling Bluetooth (BLE )
Bluetooth can be turned on or off at any time by pressing and holding the
Bluetooth button on the top of your thermocycler for roughly half a second. By
default, Bluetooth is disabled. A blue LED will light up next to the BLE button
indicating it is enabled.
Once enabled, tap Connect via BLE when prompted in the smartphone app. If
working with multiple Franklin™ thermocyclers, select the appropriate unit and tap
Confirm. The LED on the front of your thermocycler will flash white indicating it’s
connected.
Recovering & Reattaching Test Data
Common Scenarios
Did you start your run and return to your thermocycler later in the day only to
realize it is now off? Maybe your app crashed, or your phone died and you are
wondering how to retrieve your test results? Below are some common scenarios
and the steps to take to get your results. You can find these same protocols with
their connected How-To videos on our Help Desk:
https://help.biomeme.com/reattach-recover-guide
Scenario Reference Table
Biomeme Go Dx App
Open
Closed

11
Franklin™ PCR Thermocycler User Manual (EUA)
© Biomeme, Inc. 2023
Version 2.0
Franklin Thermocycler
On
A
B
Off
C
D
Note:
DO NOT
push Stop Run in the app. This will lose any run data that has not successfully synced from the device to
the app. For security reasons the same smartphone that was used to initiate the test must be used to download the test
results.
“My test has been running for a while but the number of cycles isn’t decreasing on
the app. What should I do?
This means that the Bluetooth connection between the device and the app may
have been interrupted. DO NOT press Stop Run. Instead, you just need to reset
the Bluetooth connection. Follow the steps in Scenario
A
below.
“My run has completed, and I’ve pressed a bunch of buttons. I’m feeling flustered,
confused, and frustrated; what should I do?”
1. Turn off the thermocycler and close the Biomeme Go Dx app.
2. Follow the steps described in Scenario
D
below.
If you’re still having problems recovering and/or reattaching your test data, please
contact suppo[email protected]om.
“My Biomeme Go Dx app is returning a WRONG THERMOCYCLER error.”
1. Turn off the thermocycler and close the Biomeme Go Dx app.
2. Follow the steps described in Scenario
D
below.

12
Franklin™ PCR Thermocycler User Manual (EUA)
© Biomeme, Inc. 2023
Version 2.0
A: Thermocycler ON / App OPEN
1. Press the Bluetooth button on top of the thermocycler to turn OFF the
Bluetooth.
2. Press the Bluetooth button on the top of the thermocycler to turn the
Bluetooth back on.
3. Within the Biomeme Go Dx app, you should see a pop-up screen that reads:
“Connect via BLE”. If so, press Scan in the Biomeme Go Dx app. If not,
power OFF the thermocycler, CLOSE the app, and to Scenario
D
below.
4. Select your thermocycler.
5. Tap Confirm in the app.
Note: If your test is currently running, the LED on the front of your thermocycler will be blinking amber. If your
test has been completed, the LED will be blinking blue.
B: Thermocycler ON / App CLOSED
1. Relaunch the Biomeme Go Dx app by selecting the icon on your
smartphone’s home screen.
2. Press the Bluetooth button on top of the thermocycler to turn OFF the
Bluetooth connection.
3. Press the Bluetooth button on the top of the thermocycler to turn the
Bluetooth connection back ON.
4. From the app’s home screen, tap Incomplete Runs.
5. Select your test from the list of incomplete runs.
6. Press the Scan button in the app and select your thermocycler.
7. Tap Connect via BLE.
8. Tap the Reattach Test button.

13
Franklin™ PCR Thermocycler User Manual (EUA)
© Biomeme, Inc. 2023
Version 2.0
9. Please wait while your run data is transferred.
C: Thermocycler OFF / App OPEN
1. Press the Power button on top of your Franklin™ thermocycler to turn it
back on. If your thermocycler doesn’t turn back on, make sure it’s connected
to a power source as your battery may have died.
2. Press the Recovery button on top of your thermocycler.
3. The thermocycler will quickly blink blue, white, red, then green indicating it
has successfully recovered the previously completed or failed run.
4. Press the Bluetooth button on top of your thermocycler.
5. Press Scan in the Biomeme Go Dx app.
6. Select your thermocycler.
7. Please wait while your run data is transferred.
Note: This assumes your test was completed
before the thermocycler powered off
. It is usually not possible to
reattach and recover the run data if the thermocycler shut off during the run. Please always ensure your device has at
least 20% battery power before starting your run.
D: Thermocycler OFF / App CLOSED
1. Press the Power button on top of your Franklin™ thermocycler to turn it
back on. If your thermocycler doesn’t turn back on, make sure it’s connected
to a power source as your battery may have died.
2. Press the Recovery button on top of your thermocycler.
3. The thermocycler will quickly blink blue, white, red, then green indicating it
has successfully recovered the previously completed or failed run.
4. Press the Bluetooth button on top of your thermocycler.
14
Franklin™ PCR Thermocycler User Manual (EUA)
© Biomeme, Inc. 2023
Version 2.0
5. Relaunch the Biomeme Go Dx app by selecting the icon on your
smartphone’s home screen.
6. From the app’s home screen, tap Incomplete Runs.
7. Select your test from the list of incomplete runs.
8. Press the Scan button in the app and select your thermocycler.
9. Tap Connect via BLE.
10.Tap the Reattach Test button and wait until your run data is transferred.
Note: This assumes your test was completed
before the thermocycler powered off
. It is usually not possible to
reattach and recover the run data if the thermocycler shut off during the run. Please always ensure your device has at
least 20% battery power before starting your run.
Transferring Data
Wireless (Bluetooth)
On your computer, make sure your Bluetooth is set to Receive a File. This will
prepare your computer to accept the data transfer from your smartphone.
1. In the mobile app, navigate through View Results and select a test.
2. Once on the test result screen, tap Send in the top right corner.

15
Franklin™ PCR Thermocycler User Manual (EUA)
© Biomeme, Inc. 2023
Version 2.0
3. A menu will slide in with sharing options. Select Bluetooth and transition to
the Choose Bluetooth Device screen.
Note: Instructions could vary depending on your computer and/or smartphone Operating System. If you require further
Note: Cutting and pasting OR deleting the .xlsx files will permanently delete them off the smartphone. If you want them
to remain, make sure to only copy and paste.
Loading Pure Sample into Go-Strips
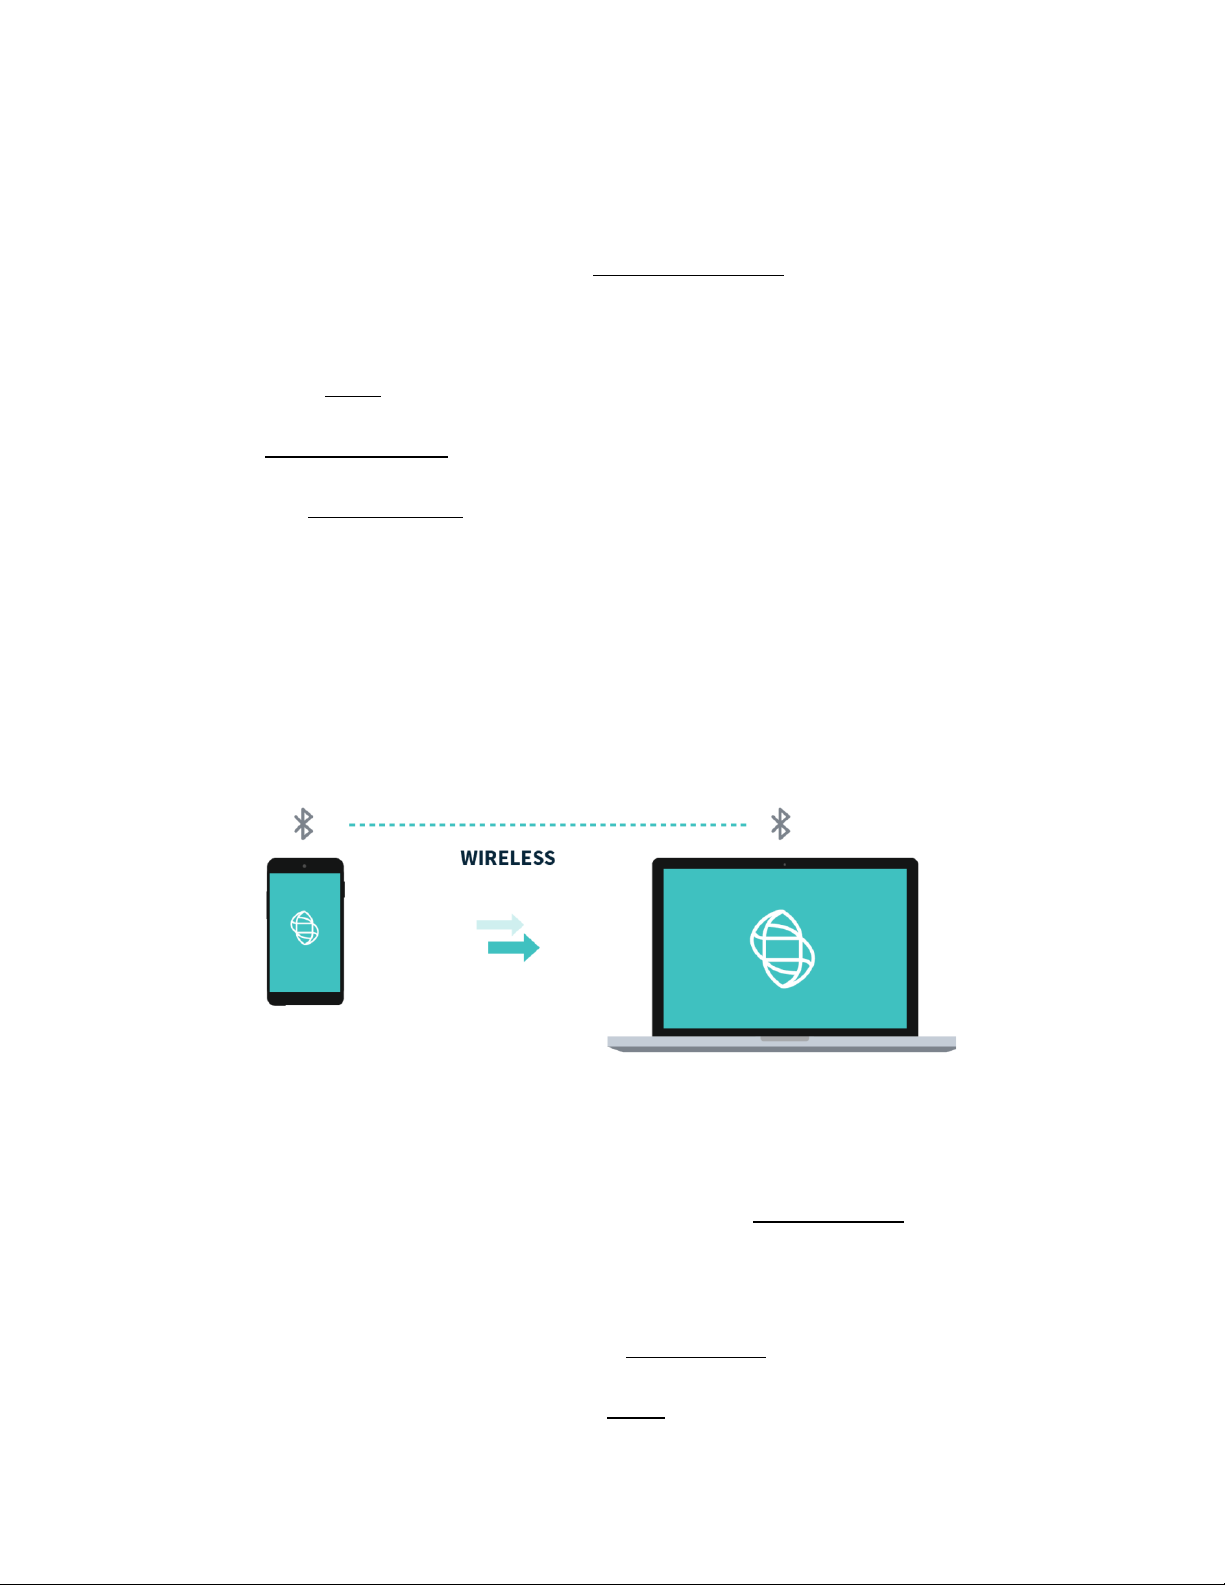
Attention: Contents of the Go-Strip may shift during transport. When starting to
work with your test, make sure the cake of the lyophilized reagent rests at the
bottom of the Go-Strip wells. Tap the bottom of the sealed Go-Strip gently but
firmly against a solid surface before removing the foil seal and adding your sample.
1. Open the contents of a Biomeme SARS-CoV-2 Go-Strips pouch. Do not
immediately discard the Go-Strips pouch as you’ll need to scan the QR code
in a later step.
2. Start with a single Go-Strip and remove the foil covering.
3. Attach a pipette tip to a 20µL fixed volume pipette or prepare your own 20µL
pipette.
Note: The strip connections between the tubes of your Go-Strip will face the back of the thermocycler once
inserted. When resuspending your reactions and transferring your extracted RNA into the different reaction
wells, replicate this orientation to ensure accurate result interpretation (e.g., transfer sample 1 into the far left
reaction well of your first Go-Strip, sample 2 into the middle reaction well of your first Go-Strip, and sample 3
into the far right reaction well of your first Go-Strip).
4. Additionally, when mixing your samples try to avoid introducing bubbles.
16
Franklin™ PCR Thermocycler User Manual (EUA)
© Biomeme, Inc. 2023
Version 2.0
Note: If bubbles have been introduced, remove
them from the lower portion of the PCR tubes by
gently tapping the Go-Strips against your work
surface before capping. Bubbles may remain at the
top of the tube, but bubbles at the bottom are not
acceptable.
5. Unscrew the cap of your first purified sample in the 2mL tube and transfer
20µL of the extracted RNA into the first reaction well of your Go-Strip.
Pipette up and down 3-5 times to mix your PCR reaction.
6. Discard your pipette tip and repeat the process of transferring your samples
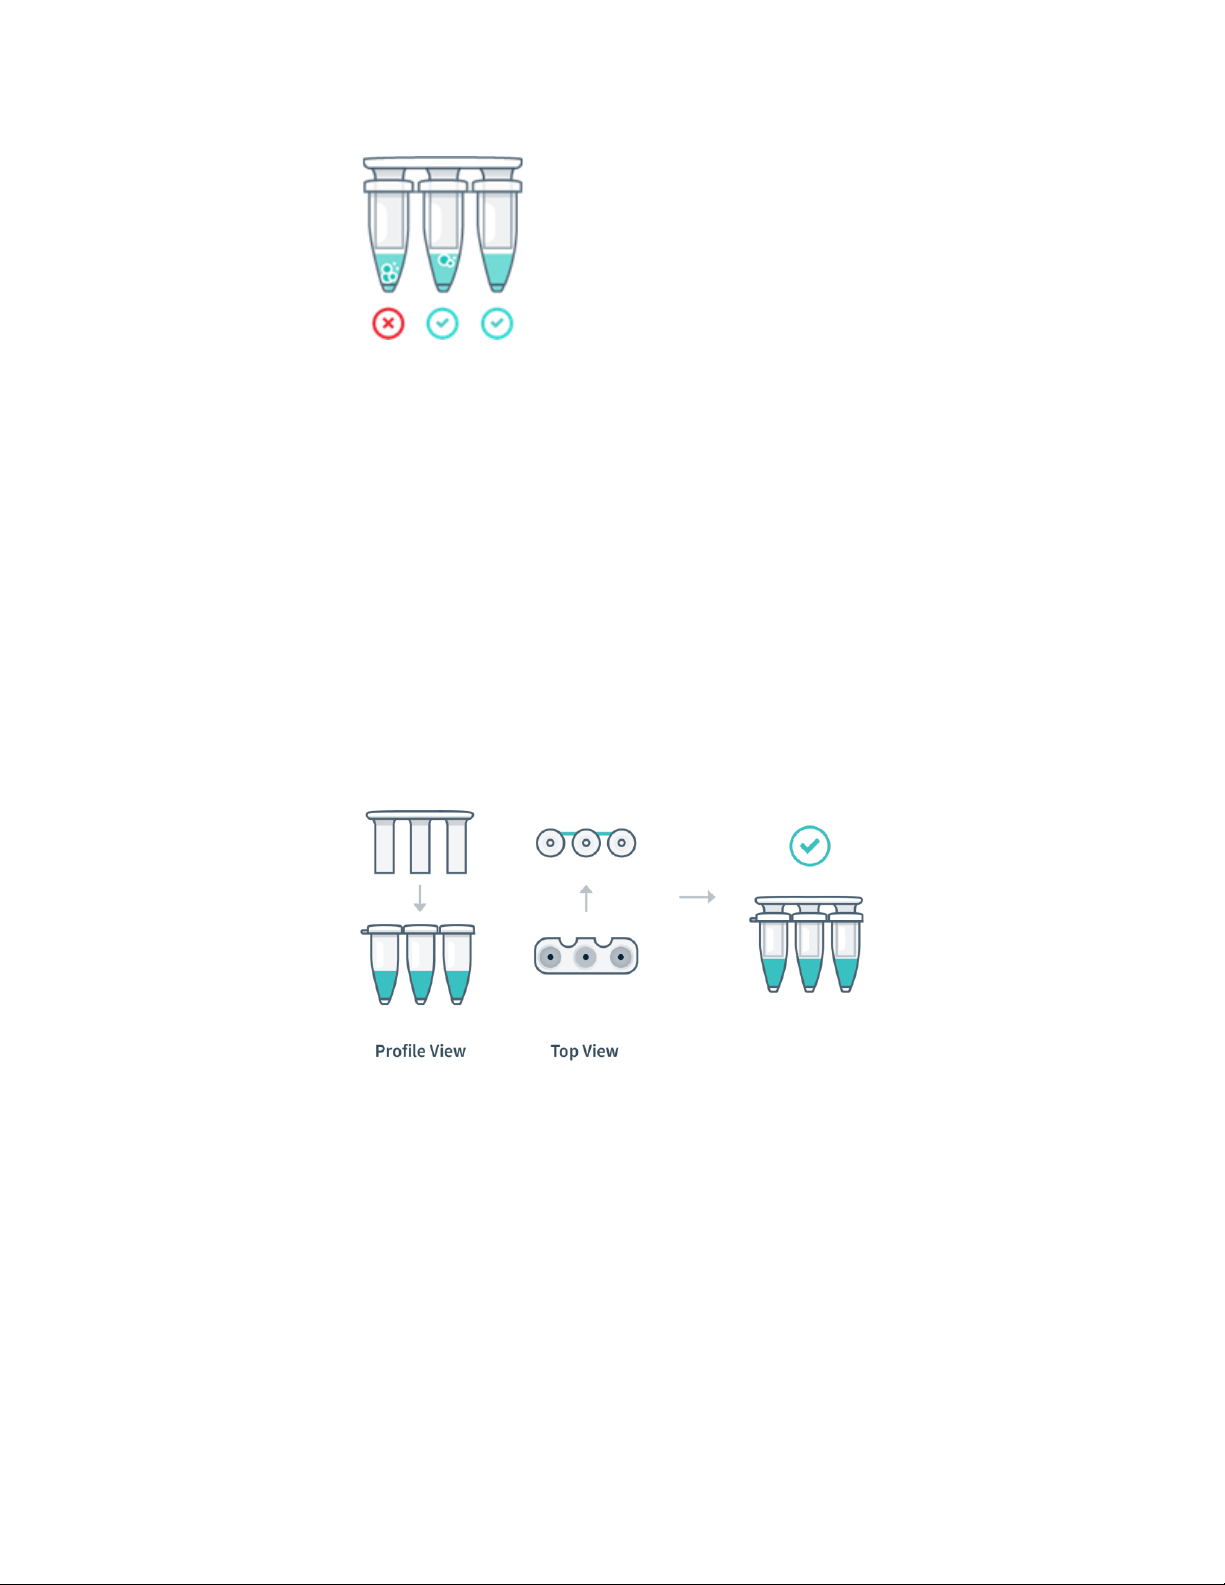
only for the remaining 2 reaction wells. Once all wells of a single Go-Strip are
filled, make sure to place a void filling cap into the Go-Strip to minimize any
risk of contamination. Align the Go-Strip and void filling cap so that the strip
connections are visible through the cap cutouts as shown in the illustration
below:
7. The void filling caps may feel slightly loose, this is normal. The thermocycler
lid will secure the caps into place when closed, sealing each PCR reaction.
DO NOT attempt to push the cap down.
Note: If utilizing a No Template Control (NTC) and/or external Positive Control (PC), add in a similar manner to
other samples. It is recommended that the NTC be added first (Well 1) and the PC last (Well 9) after the
addition of samples.
17
Franklin™ PCR Thermocycler User Manual (EUA)
© Biomeme, Inc. 2023
Version 2.0
Placing Go-Strips into Franklin™
Thermocycler
1. Open the lid of your thermocycler by pressing the latch on top of the unit.
2. Place your Go-Strips, with the void filling caps inserted, into each 3-well slot.
Once again, make sure the strip connections are visible through the void
filling cap cutouts and are facing the back of the thermocycler as shown in
the illustration below.
3. Close the thermocycler lid securely and navigate to the Biomeme Go Dx
mobile application on your smartphone to begin your testing protocol. For
further instructional information, please contact support@biomeme.com.

18
Franklin™ PCR Thermocycler User Manual (EUA)
© Biomeme, Inc. 2023
Version 2.0
PCR Layout Example (for one full Franklin™ run) Without External Controls
Go-Strip
Go-Strip 1 (left)
Go-Strip 2 (middle)
Go-Strip 3 (right)
Well
1
2
3
4
5
6
7
8
9
Samples
S1
S2
S3
S4
S5
S6
S7
S8
S9
PCR Layout Example (for one full Franklin™ run) With External Controls
Go-Strip
Go-Strip 1 (left)
Go-Strip 2 (middle)
Go-Strip 3 (right)
Well
1
2
3
4
5
6
7
8
9
Samples &
Controls
NTC
S2
S3
S4
S5
S6
S7
S8
PC
Note: Transport your Franklin™ thermocycler in its carrying case. Additionally, moving your thermocycler while
thermocycling could result in errors. We highly recommend not moving or opening the device while thermocycling to
avoid losing your PCR run. After your run has completed, be careful when removing your Go-Strips and void filling caps
to avoid liquid splatter and PCR amplicon contamination.

19
Franklin™ PCR Thermocycler User Manual (EUA)
© Biomeme, Inc. 2023
Version 2.0
Maintenance & Cleaning
The Biomeme Franklin™ thermocycler is maintenance-free and has no serviceable
parts. In the case of thermocycler failure or damage, please contact
support@biomeme.com.
The outside of the Franklin™ thermocycler can be cleaned using a 70% ethanol
solution which must be sprayed on a cloth rather than directly on the Franklin™
thermocycler. Lysol wipes or Micro-Chem Plus wet paper towels are acceptable as
well. Do not spray or pour solution directly onto the thermocycler when cleaning.
4. Do not disassemble the thermocycler for cleaning
5. Do not immerse in water or cleaning solutions
6. Do not clean with soap or other solutions
7. Avoid cleaning the heating wells (silver)
If you do need to clean your heating wells because it's impacting performance,
please contact support@biomeme.com for specific instructions.
Safety Notice
The instrument can pose electrical hazards to the operator if used inappropriately
and hence it is important to understand, familiarize and implement the safety
notices given below to ensure safety of the operator.

20
Franklin™ PCR Thermocycler User Manual (EUA)
© Biomeme, Inc. 2023
Version 2.0
The instrument and its equipment should be operated, maintained, stored and as
directed in this document. Failure to comply may impair the protection provided
by the instrument and its ancillary equipment.
General Safety Warnings
Do not modify the instrument hardware. The system is not user
serviceable by the user in any circumstances.
Do not place the instrument near liquid filled containers or areas
where the instrument and its equipment may be subjected to
dripping or splashing liquids.
Do not use the instrument in extreme heat, humidity, dust and
vibration conditions Electrical Safety Notice.
CAUTION - Heating wells may be hot. Care must be taken when
inserting or removing cuvettes.
Electrical Safety Warnings
Unplug AC power cord from the wall outlet in case of an
emergency.
SYMBOL
DESCRIPTION
Caution, possibility of electric shock
Other manuals for Franklin
4
Table of contents
Other Biomeme Laboratory Equipment manuals


Popular Laboratory Equipment manuals by other brands


Teledyne Tekmar
Teledyne Tekmar Lumin 15-2500-074 user manual

Commodity Axis
Commodity Axis ViaAqua Terminator UVS-9N manual

NANOE
NANOE Zetamix ZetaSinter Operation manual

Agilent Technologies
Agilent Technologies BenchCel user guide

Penn
Penn Photoreactor m2 user manual

Bruker
Bruker 600'54 Ascend ULH user manual