Biomeme Franklin User manual

Franklin™
Real-Time PCR
Thermocycler and
Biomeme Go App
Last Updated: 03/13/2020
Version: 1.0

2
Table of Contents
Brief Overview 4
Thermocycler Technical Specifications 5
Thermocycler Button Layout 7
Logging In and Out of Biomeme Go 8
Loading Sample into Go-Strips 8
Placing into Franklin™ Thermocycler 9
How To Start Your First Run 10
During the Run 13
How To Create a New Project Folder 13
How To Create a New Protocol 14
How To Delete a Protocol 14
Interpreting Results 15
Viewing Completed Run Data 19
Viewing Incomplete Runs 19
Thermocycler LED Status Indicators 20
Turning Your Thermocycler On and Off 21
Franklin™ PCR Thermocycler and Biomeme Go
User Manual
© Biomeme, Inc. 2020
Version 1.0

3
Charging & Checking Thermocycler Battery Status 21
Enabling & Disabling Bluetooth (BLE ) on Your Thermocycler 23
How To Update the Biomeme Go App 23
How To Run a Melt Curve 24
Transferring Data 25
Wireless (Bluetooth) 25
Reporting a Problem or Error 25
Viewing Thermocycler Device Information 26
Switching Teams (Enterprise Plan Only) 26
Maintenance & Cleaning 27
Safety Notice 28
General Safety Warnings 28
Declaration of Conformity 30
Troubleshooting 31
Disclaimer 38
Franklin™ PCR Thermocycler and Biomeme Go
User Manual
© Biomeme, Inc. 2020
Version 1.0

4
Brief Overview
The Biomeme Franklin™ transforms your smartphone into a thermocycler for
real-time PCR or isothermal analysis with sample-to-result in 30-60 minutes,
depending on the test protocol. Our mobile thermocycler enables multiplex
real-time detection of up to 27 targets from 1 sample or test 9 samples for up to 3
targets each. Just under 3 lbs, hand-held, and battery-operated for maximum
portability enabling a full day’s work out in the field on a single charge. Franklin™
comes in 3 different variations depending on the color channel detection you
require (see Technical Specifications
for details).
Franklin™ PCR Thermocycler and Biomeme Go
User Manual
© Biomeme, Inc. 2020
Version 1.0
5
Thermocycler Technical
Specifications
SPECIFICATION
VALUE
Sample Capacity
9 Wells
Reaction Volume per Well
20µL
Total Channels
3
Franklin™ one9 Fluorophore*
FAM / SYBR (Green)
Franklin™ two9 Fluorophores*
FAM / SYBR (Green), ATTO647N (Red)
Franklin™ three9 Fluorophores
FAM / SYBR (Green), TexasRedX (Amber),
ATTO647N (Red)
System Control & Data Transfer
Wireless (BLE)
Integrated Barcode Scanner
Yes
Max Samples per Run
9
Max PCR Targets per Run
27
Franklin™ PCR Thermocycler and Biomeme Go
User Manual
© Biomeme, Inc. 2020
Version 1.0

6
Weight
1.20 kg / 2.65 lb
Operating Ambient Temperature
4 - 40°C / 39 - 104°F
Operating Humidity Limit
0 - 99%
Operating Altitude Limit
3,048 m / 10,000 ft
Wall Power (VAC)
100 - 240V
Voltage
19V
Full Load Current
3.3A
Internal Battery
5 hrs
Quantitative
Yes
IP Rating
IP30
Indoor/Outdoor?
Indoor or Outdoor in a Covered Area
Pollution Degree
2
Franklin™ PCR Thermocycler and Biomeme Go
User Manual
© Biomeme, Inc. 2020
Version 1.0

7
Degree of Ingress Protection
Keep 5 cm Clearance Around the
Thermocycler for Proper Performance
Note:
The Franklin™ one9 is limited to the FAM/SYBR (Green) channel and the two9 is limited to the FAM/SYBR (Green)
and ATTO647N (Red) channels only. You can
upgrade your thermocycler(s)
at any time without returning your device.
Thermocycler Button Layout
There are a total of 4 buttons located on the top of your Franklin™ thermocylcer:
Franklin™ PCR Thermocycler and Biomeme Go
User Manual
© Biomeme, Inc. 2020
Version 1.0
8
Logging In and Out of Biomeme Go
To log in (Requires internet connection)
1. Open the Biomeme Go mobile app on your smartphone by tapping the app
icon on your phone’s home screen.
2. Enter your email address and password (both are case sensitive).
3. Tap the Login button.
4. If you’re part of multiple teams (Enterprise Users Only), select which team
to log in under (you can toggle between teams once logged in).
Note:
If you have forgotten your password, click “Forgot Password” or email
. If you
are traveling to a remote location to perform PCR and will not have internet access while there, you must log
in before your connection is lost.
To log out
1. Open the User menu by clicking the user icon in the top left corner.
2. Select Logout.
Loading Sample into Go-Strips
Attention: Contents of the Go-Strip may shift during transport. When starting to
work with your test, make sure the cake of the lyophilized reagent rests at the
bottom of the Go-Strip wells. Tap the bottom of the sealed Go-Strip gently but
firmly against a solid surface before removing the foil seal and adding your sample.
Franklin™ PCR Thermocycler and Biomeme Go
User Manual
© Biomeme, Inc. 2020
Version 1.0

9
●Tear open the foil pouch to retrieve your Go-Strip, but do not discard the foil
pouch as you’ll need to scan the QR code.
●Remove the foil seal from your Go-Strip, and transfer 20µL of purified sample
into each well of your Go-Strip.
●Once all wells of your Go-Strip are filled, place a void filling cap into the strip.
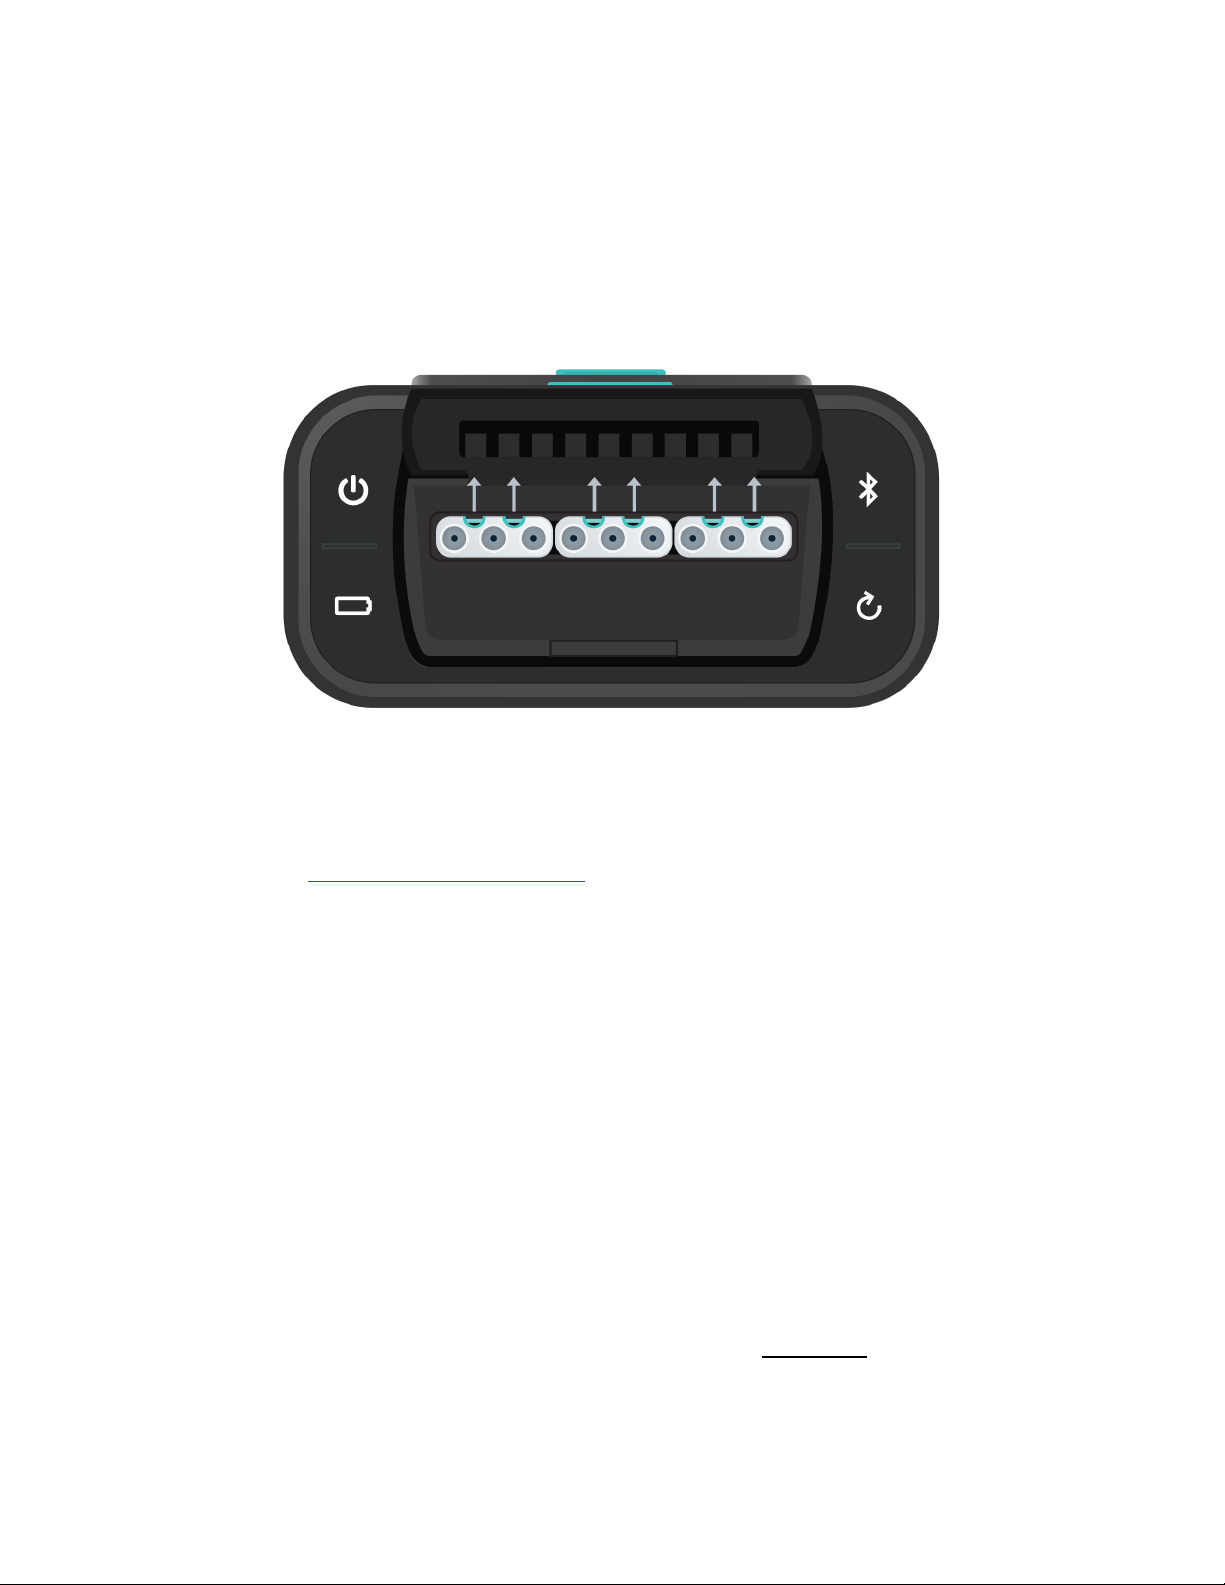
●Align the Go-Strip and void filling cap so that the strip connections are visible
through the cap cutouts as shown in the illustration below.
Placing into Franklin™ Thermocycler
●Open the lid of your thermocycler by pressing the latch on top of the unit.
●Place your Go-Strip, with the void filling cap inserted, into a 3-well slot. Don’t
worry if the void filling cap feels slightly loose. When the lid of the
thermocycler is closed, it will secure the caps into place, sealing the PCR
reaction.
Franklin™ PCR Thermocycler and Biomeme Go
User Manual
© Biomeme, Inc. 2020
Version 1.0
10
●It’s important to make sure your Go-Strip is oriented correctly when placing
it into your thermocycler. Make sure the strip connections that are visible
through the void filling cap cutouts are facing the back of your thermocycler
as shown in the illustration below, then close the lid.
●Navigate to the Biomeme Go mobile application on your smartphone to
begin your testing protocol. For further instructional information, please
contact [email protected].
Note:
Transport your Franklin™ thermocycler in its carrying case. Additionally, moving your thermocycler while
thermocycling could result in errors. We highly recommend not moving or opening the device while thermocycling to
avoid losing your PCR run. After your run has completed, be careful when removing your Go-Strips and void filling caps
to avoid liquid splatter.
How To Start Your First Run
1. Grab your smartphone and log into the Biomeme Go app if you haven’t
done so already (see “Logging In and Out”).
2. From the main dashboard of Biomeme Go, tap Start Run.
Franklin™ PCR Thermocycler and Biomeme Go
User Manual
© Biomeme, Inc. 2020
Version 1.0

11
3. If your test kit pouch has a QR code printed on it, you may use your
smartphone camera to capture it. Simply point the camera at the QR code
to be scanned.
Note:
The first time you scan a QR code, you may be asked to give your QR scanner permission to access the
camera on your device. You will only have to grant permission once.
4.
If a QR code is unavailable, tap Select Test to choose from a list of available
tests. If your test is unavailable in the list, then you’ll need to create a new
protocol (see “How to Create a New Protocol”).
5. Select the quantity of 3-well Go-Strips to run simultaneously in your
thermocycler by adjusting the (add) and (subtract) icons, then tap
Confirm. The maximum number of Go-Strips per test run is 3.
6. Biomeme’s Go-Strips are highly adaptable to meet your individual needs,
so choose the run layout that fits your test best.
7. Choose to Scan or Generate your Sample IDs. You can change these on the
next screen if you’d like. You’re able to scan barcodes and QR codes from
directly within the app.
8. Review your Sample IDs and tap Continue once you’re ready to proceed.
9. Select which folder you would like to save your run into. If you haven’t yet
created a folder, click Add Folder located towards the top right corner to
create one.
10. Once you have selected the folder to save your run into, you can optionally
change your Run Name, update your GPS Coordinates, and/or add
Location tags.
11. If you wish, you can add a note to the run file by selecting the Note icon
in the upper right corner.
Franklin™ PCR Thermocycler and Biomeme Go
User Manual
© Biomeme, Inc. 2020
Version 1.0

12
12. Tap Confirm to proceed to Run Setup.
13. If you haven’t already, power on your thermocycler by pressing the Power
button on top of your device and tap Continue back in the Biomeme Go
app.
14. If your smartphone is not already connected to your thermocycler via
Bluetooth (BLE) or serial, the app will prompt you to connect.
Enable Bluetooth on your thermocycler by pressing the Bluetooth
button on top of the device.
15. Tap Scan in the app and wait a few seconds for your device to be found.
16. Once the thermocycler is found, select it in order to pair your devices.
Note:
The first time you to try scan for devices, you’ll be asked to give the Biomeme Go app permission to
turn on Bluetooth. Please make sure that the “Location” service is enabled in your phone settings. The latest
version of Bluetooth requires that location discovery is enabled to properly pair devices.
17. You are almost ready to start your run. If you would like to, select View Load
Strips Tutorial located below the Confirm button to learn more about
properly loading your Go-Strips into your thermocycler. If not, tap Confirm
to proceed.
18. Ensure your Go-Strips are loaded and the lid is closed on your thermocycler
before starting your run.
19. Tap the Start Run button!
Franklin™ PCR Thermocycler and Biomeme Go
User Manual
© Biomeme, Inc. 2020
Version 1.0

13
During the Run
1. The Biomeme Go app will remain in live view while the test runs. The app
will display how many minutes remain in your run, the thermocycler
battery percentage, and the cycle number.
2. By swiping to the left, you will be able to view real-time data as the test
proceeds. You can toggle between Go-Strips by touching the wells you wish
to view using the tabs at the top of the screen. You can always swipe to the
right to return to the previous screen.
3. You can manually stop the run at any time by tapping the Stop button in
the upper right corner. Do note that this will end the run and you will not be
able to restart the test. The run data up to that point will then be available
in the Data Management section of the app. Runs intentionally stopped by
the user are not considered incomplete runs.
Note:
You do not need to worry about your smartphone screen turning off or going to sleep. The experiment
will continue to run. If the app freezes or crashes, the experiment will also continue to run and your data can
be found in the Incomplete Runs section of the app once you’ve reloaded the Biomeme Go app and
reconnected to the thermocycler. For more information on Incomplete Runs, please refer to the “
Recovering
& Reattaching Test Data
” section.
How To Create a New Project Folder
1. Log into the Biomeme Go app if you haven’t done so already (see “Logging
In and Out”).
2. Select Data Management from the main dashboard of Biomeme Go.
3. Tap Add Folder.
4. Enter a name for your new folder.
Franklin™ PCR Thermocycler and Biomeme Go
User Manual
© Biomeme, Inc. 2020
Version 1.0

14
5. Tap the Add Folder button to create and save.
How To Create a New Protocol
1. Log into the Biomeme Go app if you haven’t done so already (see “Logging
In and Out”).
2. Select Protocol Management from the main dashboard of Biomeme Go.
3. Tap Add.
4. Enter a name for your new protocol (e.g. Northern Pike).
5. If you wish, give your target(s) names.
6. Edit your thermocycling parameters as needed by clicking on each text
field that you would like to change.
7. Enable or disable Reverse Transcription and Extension steps by adjusting
the toggle accordingly.
8. Tap Confirm to save your new protocol.
How To Delete a Protocol
1. Log into the Biomeme Go app if you haven’t done so already (see “Logging
In and Out”).
2. Select Protocol Management from the main dashboard of Biomeme Go.
3. Swipe left on the name of the protocol you wish to delete.
Franklin™ PCR Thermocycler and Biomeme Go
User Manual
© Biomeme, Inc. 2020
Version 1.0

15
4. Tap the red Delete button that appears. Once a protocol is deleted, you
cannot recover it.
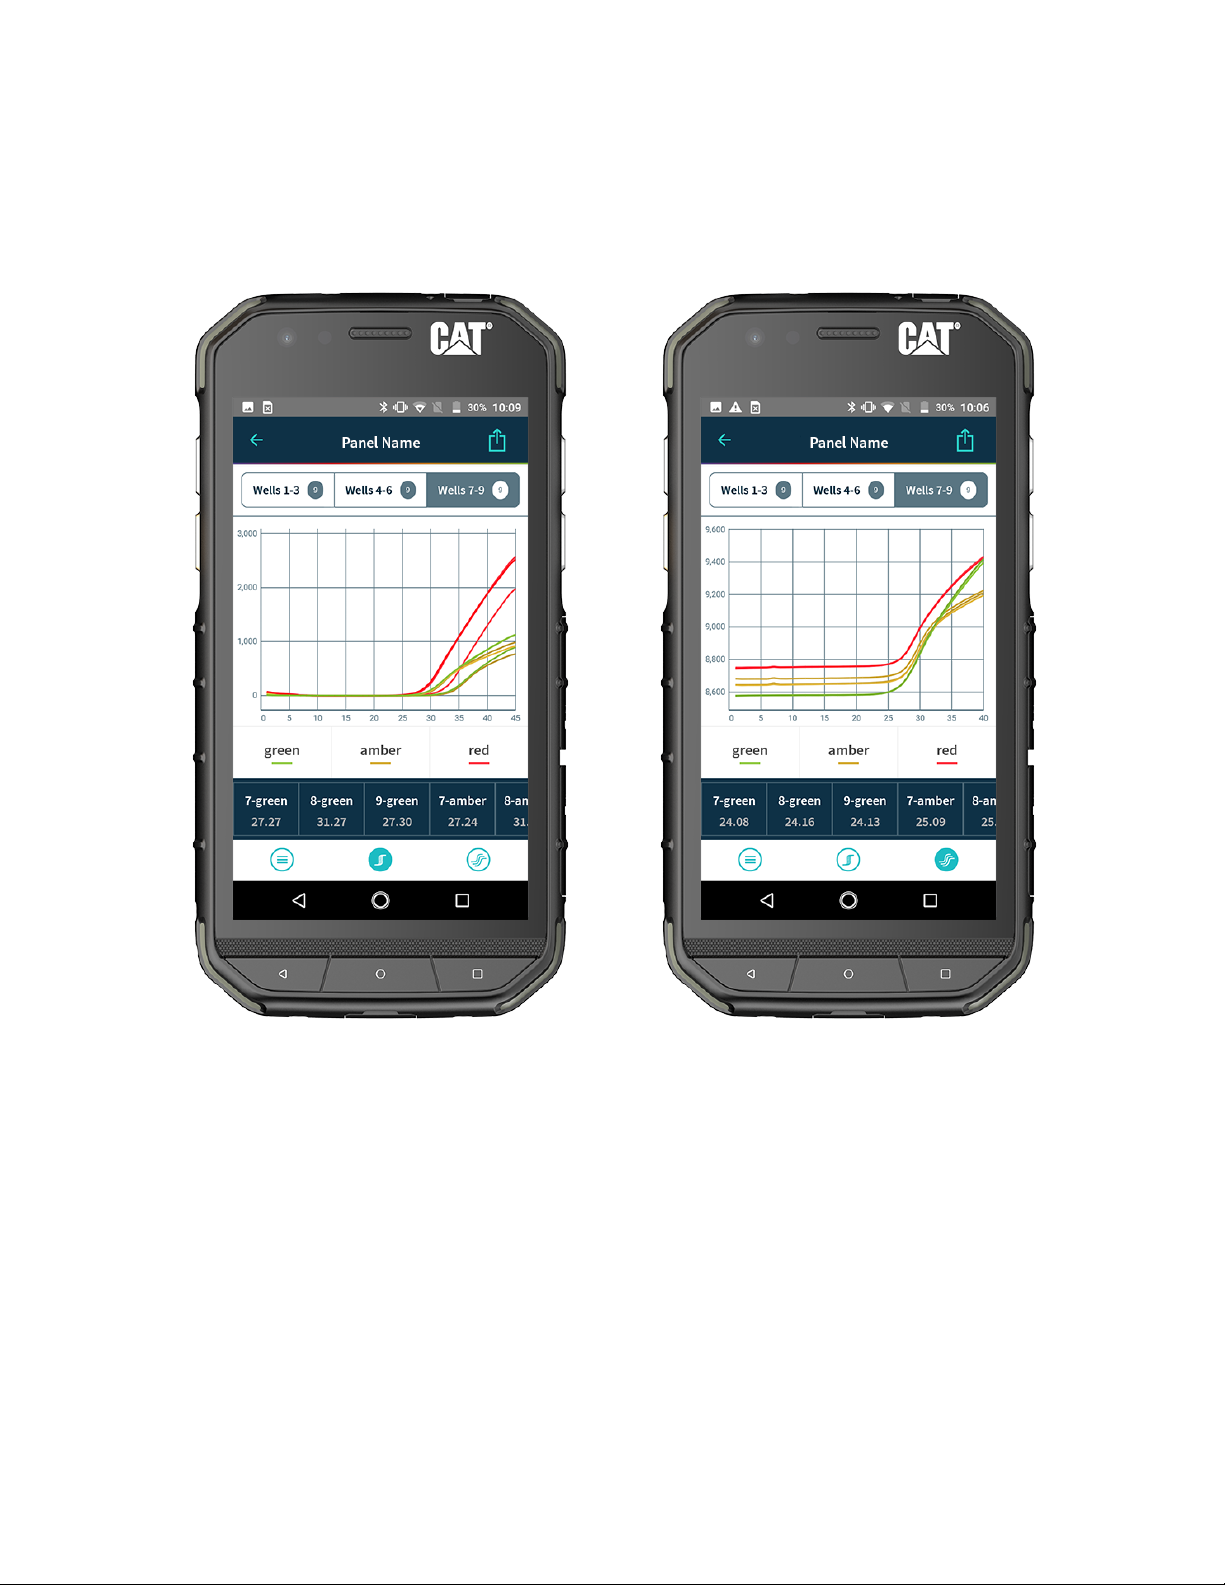
Interpreting Results
Depending on your protocol, quantitative and/or qualitative results will be
available for your review within 45 minutes to an hour. Below are a few examples of
each as well as amplification plots for baselined and raw data.
Note:
The colors, statements, and Cq values used in the screenshots below are only examples and your results interface
may vary. Please consult your Team Admin for details regarding the Cq ranges for your team’s protocol(s).
Franklin™ PCR Thermocycler and Biomeme Go
User Manual
© Biomeme, Inc. 2020
Version 1.0
16
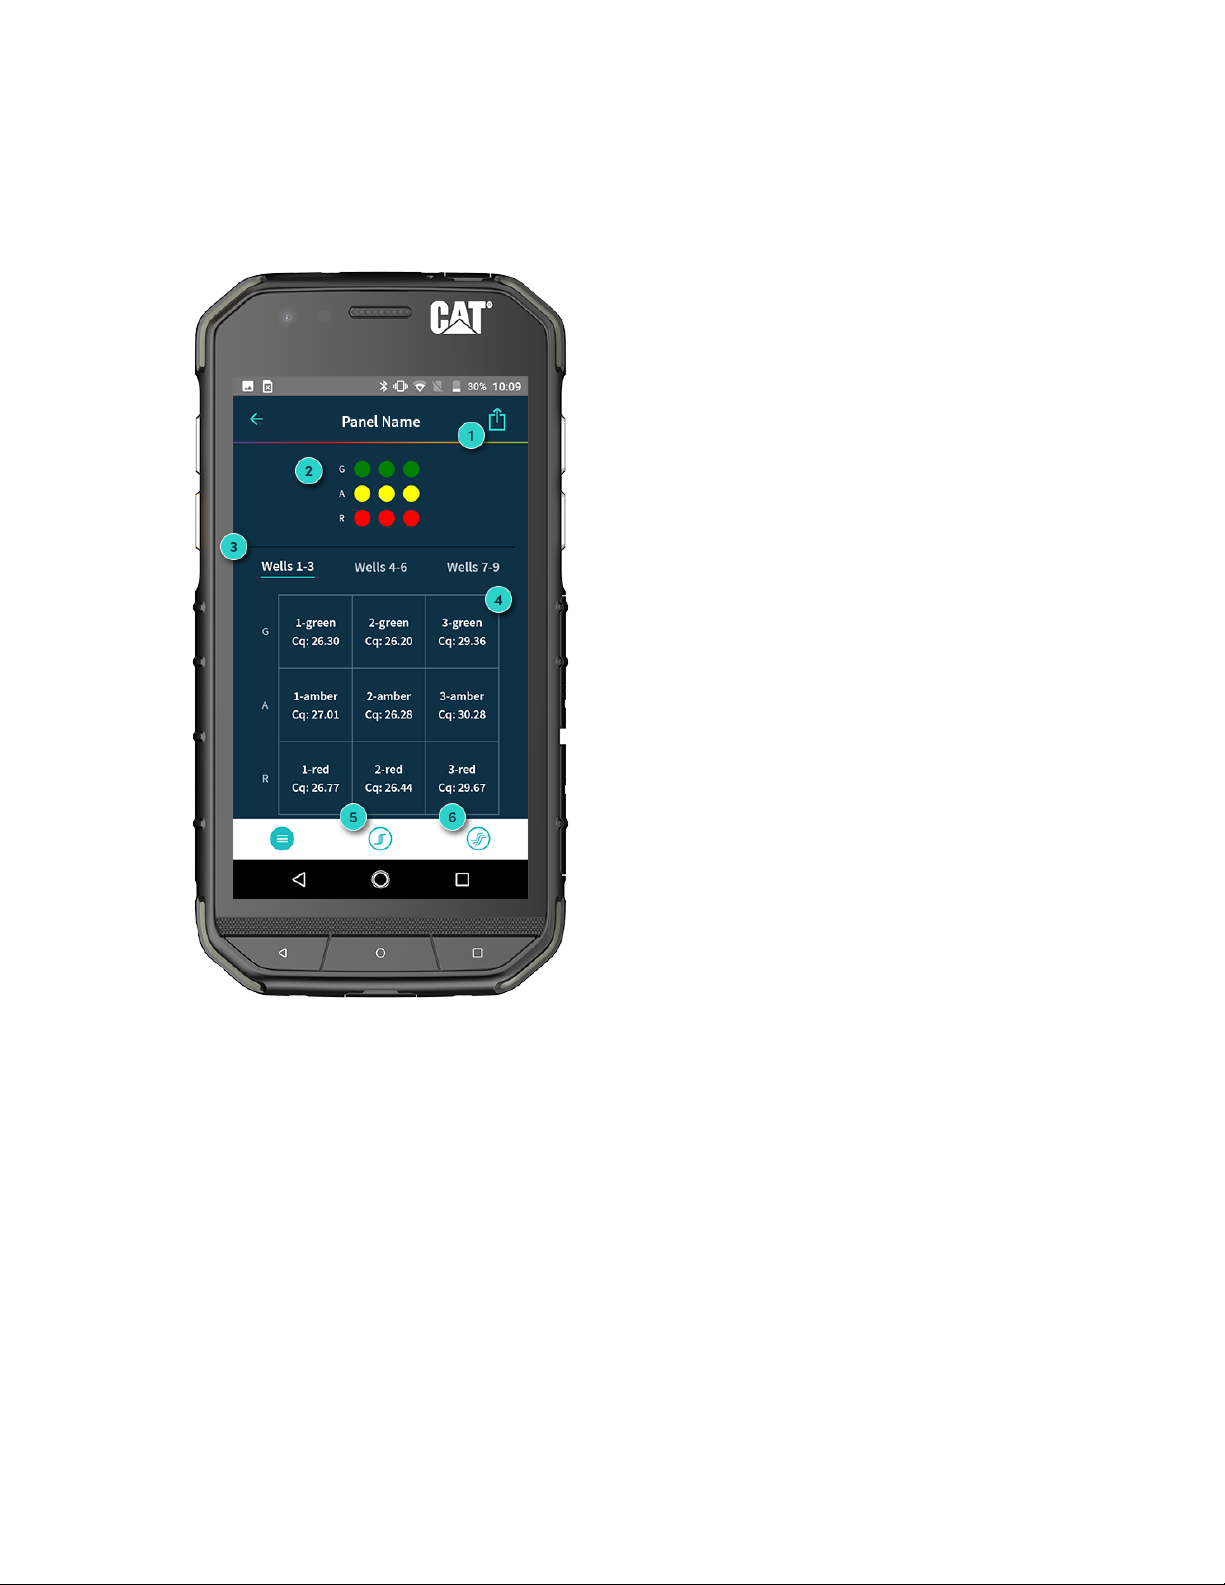
Quantitative Interpretation
1. Export Your Results
Share your results via email or
download to a shared drive (e.g.
Google Drive).
2. Fluorescent Channels
See which fluorescent channels were
used and amplified during your run
(e.g. Green, Amber, Red).
3. Well Selection
Toggle tabs to see your results per
Go-Strip, per channel (e.g. Wells 1 - 3,
4 - 6, 7 - 9).
4. Quantitative Results (Cq)
View Cq values for each of your
targets.
5. Baselined Data
View amplification plots for your
baselined data.
6. Raw Data
View amplification plots for your raw
data.
Franklin™ PCR Thermocycler and Biomeme Go
User Manual
© Biomeme, Inc. 2020
Version 1.0
17
Baselined Data Example
Raw Data Example
Franklin™ PCR Thermocycler and Biomeme Go
User Manual
© Biomeme, Inc. 2020
Version 1.0

18
Qualitative Interpretation
Target Drilldown View
1. Major Summary Statement
Your summary result message
refined by Cq ranges (e.g. 1 - 300 =
low, 301 - 3,000 = medium, > 3,000 =
high).
2. Background Color
Background color based on your test
result (e.g. green, yellow, red).
3. Minor Summary Statement
Your instructions for what to do next
based on the result (e.g. send to lab
for further analysis).
4. Qualitative Results
Your results per target refined by Cq
ranges (e.g. 1 bar = Low, 2 bars =
Medium, 3 bars = High).
Franklin™ PCR Thermocycler and Biomeme Go
User Manual
© Biomeme, Inc. 2020
Version 1.0

19
Viewing Completed Run Data
Run data for completed and intentionally stopped runs is available in the Data
Management section of Biomeme Go.
1. Log into the Biomeme Go app if you haven’t done so already (see “Logging
In and Out”).
2. Select Data Management from the main dashboard of Biomeme Go.
3. Choose the folder in which your run data is saved.
4. Tap the name of the run you wish to view.
Viewing Incomplete Runs
Incomplete Runs can occur for a variety of reasons (see “Common Scenarios” for
examples). If this happens, you can still view the incomplete run data:
1. Log into the Biomeme Go app if you haven’t done so already (see “Logging
In and Out”).
2. Select Incomplete Runs from the main dashboard of Biomeme Go to view a
list of all runs classified as incomplete.
Note:
After selecting your incomplete run, please wait roughly 30 seconds before your run data begins to populate. Be
sure to connect to your thermocycler via wire or Bluetooth so your app can automatically transfer data off the
thermocycler once available. Runs that are intentionally stopped by the user are not considered incomplete runs and
the run data will not be available in this section of the Biomeme Go app.
Franklin™ PCR Thermocycler and Biomeme Go
User Manual
© Biomeme, Inc. 2020
Version 1.0

20
Thermocycler LED Status Indicators
Vertical LED on the front of your thermocycler.
Franklin™ has 5 LEDs on the front of the unit. The LEDs are used to convey various
states of the thermocycler as outlined in the table below.
COLOR
INTERPRETATION
5 solid indicates your thermocycler is on
5 blinking indicates Bluetooth (BLE) is pairing
2 solid indicates remaining battery is between 21 and 40%
3 solid indicates remaining battery is between 41 and 60%
4 solid indicates remaining battery is between 61 and 80%
5 solid indicates remaining battery is between 81 and 100%
1 blinking indicates charging
1 solid indicates run start to 9% complete
2 solid indicates run is between 10 and 31% complete
3 solid indicates run is between 32 and 53% complete
4 solid indicates run is between 54 and 75% complete
5 solid indicates run is between 76 and 99% complete
1 solid indicates remaining battery is between 0 and 20%
5 blinking indicates thermocycler lid is open or an error
Note:
If the battery is in the red, you shouldn’t start your run until you plug your
thermocycler into power.
5 blinking indicates your test is complete and data is ready to
be synced to your smartphone
Franklin™ PCR Thermocycler and Biomeme Go
User Manual
© Biomeme, Inc. 2020
Version 1.0
Other manuals for Franklin
4
Table of contents
Other Biomeme Laboratory Equipment manuals


Popular Laboratory Equipment manuals by other brands


conoptics
conoptics 200 manual

Hanna Instruments
Hanna Instruments HI 208 instruction manual

Inscape Data
Inscape Data LinkPower PIS6095 user manual

Klein Tools
Klein Tools TI250 instruction manual

CHEFOOK
CHEFOOK 16WSTERILIZER INSTRUCTIONS FOR THE INSTALLATION, USE AND MAINTENANCE

Elektro-Automatik
Elektro-Automatik PS 8000 E 3U Series operating guide