manuals.online logo
Brands
  1. Home
  2. •
  3. Brands
  4. •
  5. Birlea
  6. •
  7. Indoor Furnishing
  8. •
  9. Birlea NEXUS TRIPLE SLEEPER User manual

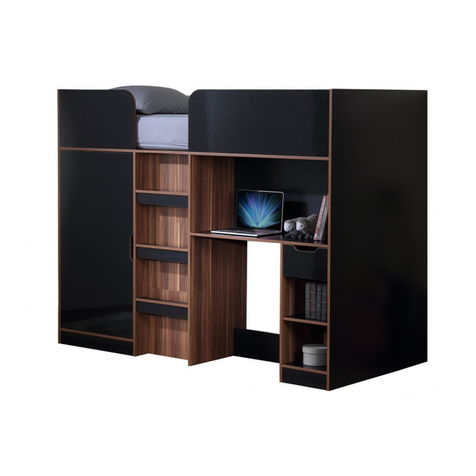
Birlea NEXUS TRIPLE SLEEPER User manual

ASSEMBLY INSTRUCTIONS
NEXUS TRIPLE SLEEPER
IMPORTANT : READ THIS INSTRUCTIONS CAREFULLY BEFORE ASSEMBLING OR USING YOUR
NEXUS TRIPLE SLEEPER.
PLEASE KEEP THESE INSTRUCTIONS FOR FUTURE REFERENCE.
HEALTH & SAFETY
DO NOT jump on this bed frame.
WARNING : DO NOT use the bunk bed / high bed if any structural part is broken or missing.
DO NOT use this bed frame unless all fixings are secured.
Please keep small parts out of reach of children.
Always use on a level, even surface.
WARNING : High beds and the upper bed of bunk beds are not suitable for children under six years due to the risk of injury
from falls.
This bed frame complies to BS EN 747 1&2:2012 + A1:2015
Always follow the manufacturer's instructions.
WARNING : Bunk beds and high beds can present a serious risk of injury from strangulation if not used correctly.
Never attach or hang items to any part of the bunk bed that are not designed to be used with the bed, for example,
but not limited to ropes, strings, cords, hooks, belts and bags.
WARNING: Children can become trapped between the bed and the wall. To avoid risk of serious injuries the
distance between the top safety barrier and the adjoining structure shall not exceed 75mm or shall be more
than 230mm.
WARNING : If this bed is placed on a non-carpeted floor you must place some protection under all legs to
stop the bed from moving. If this is not adhered to there is no guarantee if the bed frame collapses.
CARE & MAINTENANCE
Assemble in the room of use.
Periodically check all screws & fixings to ensure they are secure.
DO NOT push the bed frame as this will damage the legs.
Always lift the bed with two people to reposition.
Keep any sharp objects away from the frame.
Recommended size of mattress for top bunk is 3ft x 6ft 3inch.
Sticker marking the mattress maximum thickness can be found on the headboard post and mattress being
used do not exceed the arrow on the sticker.
Recommended maximum mattress height for top bunk is 200mm.
Ventilation of the room is necessary in order to keep the humidity low and to prevent mold in and around the bed.
Recommended size of mattress for bottom bunk is 4ft 6in x 6ft 3inch.
www.birlea.com Page 1 of 4
Vendor: S000053
Birlea
Suppliers of Inspiration
Page 2 of 4
Vendor: S000053
1
29
4
3
5
6
7
8
10
1
1
1
1
2
15
3 14
PART LIST
Part Description Box Qty
HARDWARE LIST (FOUND IN BOX 2)
Part Description Qty
1
2
3
4
5
6
7
8
9
10
11
12
13
14
15
Right Post A (Sticker 1)
Right Post B (Sticker 1)
Left Post A
Left Post B
Headend Frame
Ladder
Back Rail
Bottom Base
Ladder Connector
Front Rail
Ladder Step
Frame Support
Center Support
Base Leg
Top Base
1
1
1
1
1
1
1
1
2
2
2
2
2
2
2
A
B
C
D
E
F
G
H
I
J
1
1
1
1
1
1
1
1
2
2
2
2
2
1
4
M6 x 16mm JCBC Screw
M6 x 80mm JCBC Screw
M6 x 60mm JCBC Screw
M6 Nut
19mm M6 Flat Round Washer
M6 x 35mm JCBC Screw
M8 Metal Square Nut
M8 x 95mm JCBC Screw
50mm Round Cap
Black Round Stud
18
13
8
4
8
8
4
6
6
4
**M4 Allen Key & M5 Allen Key provided
STEP 1: Fix the Headend Frame (5) to the Right Post A (1) and Right Post B (3) using hardware part (A), then attach the Frame
Support (7) using hardware part (B). Repeat for the left side.
DO NOT use any power tools as this may damage the frame and will invalidate any claim.
Sticker '1'Sticker '1'
RIGHT LEFT
Small Allen Key Small Allen Key
Sticker Mattress
Small
Allen Key
Small
Allen Key
A A
A AA A
A A
B B
55
12
3 4
B B
7 7
IMPORTANT : Please ensure all the screw are being tighten up
Page 3 of 4
Vendor: S000053
STEP 2: Join together the Bottom Base Panels (6) with the Center Support (11) using hardware parts (C) and (D), then attach
the Base Legs (8) using hardware parts (D), (E) and (F).
DO NOT use any power tools as this may damage the frame and will invalidate any claim.
IMPORTANT :
Please ensure the
Base Leg is well tighten
Do not tighten these
screws until the base
leg is assembled DD
Small
Allen
Key
D
D
C
C
6
11
6
Base Leg
D D
EE
FF
Small
Allen
Key
6
6
8
6
8
6
11
11
STEP 3: Attach the Top Base (12) and Bottom Base (6) using hardware parts (G) and (H) but do not fully tighten yet.
DO NOT use any power tools as this may damage the frame and will invalidate any claim.
Do not fully tighten the screws
before assembling the side rails
Big
Allen Key
Big
Allen Key
12
5
2
4
6
7
6
11
8
3
12
6
H
H
G
G
B1
2
3
Small
Allen
Key
Small Allen Key
5
B
BB
B
B
B
STEP 4: Secure the Back Rail (13) and Front Rail (14) in position using hardware part (B).
DO NOT use any power tools as this may damage the frame and will invalidate any claim.
Small
Allen Key
Small Allen Key
1
1
2
4
5
2
13
14
Page 4 of 4
Vendor: S000053
STEP 5: Fix the Ladder Connectors (10) to the Bottom Base (6) using hardware part (F), then slot the Ladder (9) into the
Ladder Connectors (10)
DO NOT use any power tools as this may damage the frame and will invalidate any claim.
10
F
Small Allen Key
6
F
9
6
10
STEP 6: Secure the Ladder (9) to the Top Base (12) using hardware parts (A), then attach the Ladder Steps (15) to
the Ladder (9) and Ladder Connector (10) using hardware part (A).
DO NOT use any power tools as this may damage the frame and will invalidate any claim.
14
1
9
2
A
A
Small Allen Key
Small Allen Key
15
9
A
A
I
6
10
9
15
A
A
STEP 7: Insert hardware part (I) to the bed posts.
DO NOT use any power tools as this may damage the frame and will invalidate any claim.
NOTE: PLEASE INSERT THOSE BLACK ROUND STUD (J) INTO THE EXTRA 10MM HOLES.
ADDITIONAL INFORMATION :
For complete product information, images and dimension diagrams please visit the website www.birlea.com.
If you have any issues with your item please contact the retailer directly you purchased it from who will be able
to resolve any issues with Birlea.
Why don't you send us photos of your assembled furniture to [email protected] to be shared in our #birleahome
feature on instagram.
Birlea
Suppliers of Inspiration

Other Birlea Indoor Furnishing manuals
Birlea FRANKLIN User manual

Birlea

Birlea FRANKLIN User manual

Birlea Chloe CHL7DTMWHT User manual

Birlea

Birlea Chloe CHL7DTMWHT User manual

Birlea DENVER 4’6 BED PINE User manual

Birlea

Birlea DENVER 4’6 BED PINE User manual

Birlea MARQUIS FABRIC User manual

Birlea

Birlea MARQUIS FABRIC User manual

Birlea corona User manual

Birlea

Birlea corona User manual

Birlea CHABBWHTV2 User manual

Birlea

Birlea CHABBWHTV2 User manual
Birlea CORFU User manual

Birlea

Birlea CORFU User manual

Birlea SANTIAGO 3 User manual

Birlea

Birlea SANTIAGO 3 User manual

Birlea Toronto Bed User manual

Birlea

Birlea Toronto Bed User manual

Birlea ATLAS 4' User manual

Birlea

Birlea ATLAS 4' User manual

Birlea LYON S000053 User manual

Birlea

Birlea LYON S000053 User manual

Birlea Highgate HIGCTCRO User manual

Birlea

Birlea Highgate HIGCTCRO User manual

Birlea LYNX 2 DOOR SLIDING ROBE WITH MIRRIOR User manual

Birlea

Birlea LYNX 2 DOOR SLIDING ROBE WITH MIRRIOR User manual

Birlea ELYSEE 5 DRAWER DRESSING TABLE User manual

Birlea

Birlea ELYSEE 5 DRAWER DRESSING TABLE User manual

Birlea OXFORD User manual

Birlea

Birlea OXFORD User manual

Birlea CORONA 2 DOOR 5 DRW SIDEBOARD Installation guide

Birlea

Birlea CORONA 2 DOOR 5 DRW SIDEBOARD Installation guide

Birlea EMILY 3’ BED User manual

Birlea

Birlea EMILY 3’ BED User manual

Birlea WINCHESTER NEST OF TABLES User manual

Birlea

Birlea WINCHESTER NEST OF TABLES User manual

Birlea Corona series User manual

Birlea

Birlea Corona series User manual

Birlea Highgate HIGSTVCRO User manual

Birlea

Birlea Highgate HIGSTVCRO User manual

Birlea BERLIN OTTOMAN 4’6 User manual

Birlea

Birlea BERLIN OTTOMAN 4’6 User manual

Birlea KINGSTON User manual

Birlea

Birlea KINGSTON User manual

Birlea PEMBROKE 4 DRAWER NARROW CHEST PINE User manual

Birlea

Birlea PEMBROKE 4 DRAWER NARROW CHEST PINE User manual

Birlea Aurora User manual

Birlea

Birlea Aurora User manual

Popular Indoor Furnishing manuals by other brands

Furniture of America Heidelberg CM3498PT Assembly instructions

Furniture of America

Furniture of America Heidelberg CM3498PT Assembly instructions

Baumax Romero R14P manual

Baumax

Baumax Romero R14P manual

Giorgetti CLAUDIANO Assembling instructions

Giorgetti

Giorgetti CLAUDIANO Assembling instructions

OVE ALONSO 60 installation manual

OVE

OVE ALONSO 60 installation manual

Worlds Apart ReadyBed 340/0229 quick guide

Worlds Apart

Worlds Apart ReadyBed 340/0229 quick guide

RTA Techni Mobili RTA-3806 Assembly instruction

RTA

RTA Techni Mobili RTA-3806 Assembly instruction

RADEX MAYA quick start guide

RADEX

RADEX MAYA quick start guide

IKEA BEKVAM KITCHEN CART 23 5/8X19 5/8" instructions

IKEA

IKEA BEKVAM KITCHEN CART 23 5/8X19 5/8" instructions

Spectrum Industries 37317 Assembly instructions

Spectrum Industries

Spectrum Industries 37317 Assembly instructions

convenience concepts 111288 Assembly instructions

convenience concepts

convenience concepts 111288 Assembly instructions

Home affaire Anna 31199355 Assembly instructions

Home affaire

Home affaire Anna 31199355 Assembly instructions

Takara Belmont W SWING YUME operating instructions

Takara Belmont

Takara Belmont W SWING YUME operating instructions

Costway KC54473 user manual

Costway

Costway KC54473 user manual

Next LOUIS 917174 Assembly instructions

Next

Next LOUIS 917174 Assembly instructions

Schildmeyer 682370 Assembly instructions

Schildmeyer

Schildmeyer 682370 Assembly instructions

Teknion Interpret WWSSB Installation guides

Teknion

Teknion Interpret WWSSB Installation guides

Manis-h 15020-2 manual

Manis-h

Manis-h 15020-2 manual

Glideware Not-So-Lazy Susan installation instructions

Glideware

Glideware Not-So-Lazy Susan installation instructions

manuals.online logo
manuals.online logoBrands
  • About & Mission
  • Contact us
  • Privacy Policy
  • Terms and Conditions

Copyright 2025 Manuals.Online. All Rights Reserved.